- How to Identify which Windows Process is Locking a File or Folder
- Symptoms
- How to Solve the Issue
- Identify what program is using a file
- Identify which handle or DLL is using a file
- Release the lock on the file or folder
- Fix problems in Windows Search
- Check for updates
- Run the Search and Indexing troubleshooter
- Restart Windows Search or your device
- Reset Windows Search
- Windows 10, version 1809 and earlier
- Windows 10, version 1903 and later
- Help us improve Search in Windows 10
- Windows search locking files
- Вопрос
- How do exclude folders from windows search
- Replies (11)
How to Identify which Windows Process is Locking a File or Folder
While attempting to delete, move, or rename a file or folder you get a Windows warning message; the Operating System refuses to complete the operation.
This article helps identifying the process that currently has a handle on the file or folder you are attempting a maintenance operation on.
Symptoms
When trying to delete, move, or rename a file you get a Windows system warning message:
- «Cannot delete file: Access is denied».
- «There has been a sharing violation».
- «The source or destination file may be in use».
- «The file is in use by another program or user».
- «Make sure the disk is not full or write-protected and that the file is not currently in use».
How to Solve the Issue
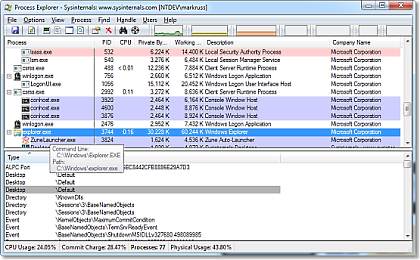
One of the easiest ways to handle locked files or folders is to use Microsoft Sysinternals Process Explorer.
Identify what program is using a file
Using Process Explorer there is a simple way to find the program:
- Open Process Explorer
- Running as administrator.
- On the toolbar, find the gunsight icon on the right.

- Drag the icon and drop it on the open file or folder that is locked.
- The executable that is using the file will be highlighted in the Process Explorer main display list.

Identify which handle or DLL is using a file
- Open Process Explorer
- Running as administrator.
- Enter the keyboard shortcut Ctrl+F.
- Alternatively, click the “Find” menu and select “Find a Handle or DLL”.
- A search dialog box will open.
- Type in the name of the locked file or other file of interest.
- Partial names are usually sufficient.
- Click the button “Search”.
- A list will be generated.
- There may be a number of entries.
Release the lock on the file or folder
To release the lock on the file you are attempting the maintenance operation on, you will need to kill the appropriate process. An individual program or handle in the list provided by Process Explorer can be killed by:
- Selecting the process/handle/program entry.
- Pressing the delete key.
Proceed with care when deleting handles as this may generate erratic behavior and instabilities may occur.
Fix problems in Windows Search
If Windows Search is unresponsive or the search results don’t appear as expected, try any of the following solutions in this article.
If you’re running Windows 10 May 2019 Update (version 1903) or later versions and Windows can detect a problem, we’ll run the Search troubleshooter automatically. This troubleshooter will reset Windows Search back to the default experience. View your troubleshooter history under Settings > Update & Security > Troubleshoot > View History. Follow the steps below if your issue is still not resolved.
Original product version: В Windows 10 — all editions
Original KB number: В 4520146
Check for updates
Windows 10 lets you choose when and how to get the latest updates to keep your device running smoothly and securely. To manage your options and see any available updates, select the Start button, and then go to Settings > Update & Security > Windows Update > Check for updates. Install any available updates, and then restart your computer if the updates require it.
For more information, see Update Windows 10.
Run the Search and Indexing troubleshooter
Your PC automatically indexes content to deliver faster search results. Learn more about Search indexing in Windows 10.
Use the Windows Search and Indexing troubleshooter to try to fix any problems that may arise. To use the troubleshooter, follow these steps:
- Select Start, then select Settings.
- In Windows Settings, select Update & Security >Troubleshoot. Under Find and fix other problems, select Search and Indexing.
- Run the troubleshooter, and select any problems that apply. Windows will try to detect and solve them.
You can also use a command prompt to open the troubleshooter. Press Windows logo key+R, enter cmd in the Open box, and then select OK. At the command prompt, run the following command:
Restart Windows Search or your device
End the SearchUI process to restart Windows Search by following these steps:
- Press Ctrl+Alt+Delete, and select Task Manager.
- In the Task Manager window, select the Details tab.
- In the Name column, right-click SearchUI.exe, and then select End task.
- When you’re prompted to end SearchUI.exe, select End process.
The Windows Search process will automatically restart the next time that you search.
If this solution doesn’t fix your problem, try restarting your device. Restarting will also install any pending updates.
You may want to bookmark this page before you restart.
Reset Windows Search
Try resetting Windows Search by using the method that’s appropriate for your version of Windows.
To determine which version of Windows your device is running, follow these steps:
Select Start > Settings > System > About.
Under Windows specifications, check which version of Windows your device is running.
Resetting Windows Search does not affect your files. However, it may temporarily affect the relevance of search results.
Windows 10, version 1809 and earlier
If the Windows 10 October 2018 Update or an earlier update is installed, reset Cortana to reset Windows Search by following these steps:
- Select Start, right-click Cortana, select More, and then select App settings.
- In the Cortana settings, select Reset.
Windows 10, version 1903 and later
If the Windows 10 May 2019 Update or a later update is installed, use Windows PowerShell to reset Windows Search by following these steps:
You must have administrator permissions to run this script.
Download the ResetWindowsSearchBox.ps1 script from the Reset Windows Search PowerShell script, and save the file to a local folder.
Right-click the file that you saved, and select Run with PowerShell.
If you’re asked the following question, select Yes.
Do you want to allow this app to make changes to your device?
The PowerShell script resets the Windows Search feature. When the word Done appears, close the PowerShell window.
If you receive the following error message:
Cannot be loaded because running scripts is disabled on this system
enter the following command on the command line of the PowerShell window, and then press Enter:
The current policy appears in the window. For example, you might see Restricted. We recommend that you note this value because you’ll have to use it later.
Enter the following command on the command line of the PowerShell window, and then press Enter:
You’ll receive a warning message that explains the security risks of an execution policy change. Press Y, and then press Enter to accept the change.
To learn more about PowerShell execution policies, see About Execution Policies.
After the policy change is completed, close the window, and then repeat steps 2-4. However, when the Done message appears this time, DON’T close the PowerShell window. Instead, press any key to continue.
Revert to your previous PowerShell execution policy setting. Enter the following command on the command line of the PowerShell window, press the Spacebar, enter the policy value that you noted in step 5, and then press Enter:
For example, if the policy that you noted in step 5 was Restricted, the command would resemble the following one:
You’ll receive a warning message that explains the security risks of an execution policy change. Press Y, and then press Enter to accept the change and revert to your previous policy setting.
Close the PowerShell window.
If your organization has disabled the ability to run scripts, contact your administrator for help.
Help us improve Search in Windows 10
If the previous suggestions don’t fix the problem, let us know by sending feedback in the Feedback Hub. Provide details, such as a description of the problem, screenshots, log files, and any other information that might be helpful. In the Feedback Hub, select the appropriate category and subcategory. In this case, submit your feedback in the Cortana and Search category.
Windows search locking files
![]()
Вопрос
![]()
![]()
I have a single employee in our organization that is constantly getting the following error: «Cannot display folder. ‘Windows Search’ exited without properly closing your Outlook data file ‘..com.ost’. ‘Microsoft Outlook’ must be restarted.» It occurs anywhere from 5 times in a day to every 5-10 minutes. The only thing we’ve noticed is that it occurs when Outlook is not focused such as when he is browsing the internet. I checked the logs and it does show Search crashing before the error occurs in Outlook. It produces event ID 10023 nearly every time: «The protocol host process 21516 did not respond and is being forcibly terminated
We use Outlook 2016 and have an on-premise Exchange 2013 server. I have reinstalled Office 2016, rebuilt the Windows Search index, rebuilt his OST, ran SFC, installed all Windows/Office updates, and checked for errors in his Exchange mailbox. I even setup his profile on another laptop and the error appeared there as well.
Short of disabling indexing of his OST file, any help would be greatly appreciated!
How do exclude folders from windows search
Replies (11)
* Please try a lower page number.
* Please enter only numbers.
* Please try a lower page number.
* Please enter only numbers.
To exclude a specific folder’s contents, along with subfolders and their contents, the path to that folder can be specified with a minus sign as in this example syntax:
If you know that the folder has a unique name within the full area that you are searching, then you can leave off most of the path, as in:
If you instead want to permit searching inside of subfolders of such a folder, while still excluding files that are immediately inside of that folder, then use:
You can use multiple instances of the syntax to exclude more than one folder.
A related task that is worth mentioning here:
If Folder Options is set for searching to include subfolders, then to limit the search results to items within a currently windowed folder named wert and not the subfolders of wert, enter folder:»\wert» with other desired search parameters into the search box of the wert window. The quotation marks and backslash are required to have the desired effect. If a minus sign or NOT preceeds folder:»\wert», then the results are limited to items within the subfolders of wert and not immediately in wert itself. Be aware however, that if a subfolder of wert happens to also be named wert, then that subfolder will also be involved. The remedy is to use the complete path and the symbol for «match exactly», as in folder:=»C:\this\that\wert», and that will avoid involving the folder at C:\this\that\wert\others\wert.
72 people found this reply helpful
Was this reply helpful?
Sorry this didn’t help.
Great! Thanks for your feedback.
How satisfied are you with this reply?
Thanks for your feedback, it helps us improve the site.
How satisfied are you with this reply?
Thanks for your feedback.
Just to make sure I understand correctly, I would have to use these commands every time I search. If so, that would not work.
Basically what I have set up is a (very large and structured) group of documents that has a sort of manual version history. (Once a file has been replaced it is moved to a «old versions» folder. When I use the widows search to find the current version, it also searches «old versions» folder. I would like to prevent it from searching the «old versions» folders.
Also, is it possible to have windows automatically use the «-foldername:(oldversions)» every time I search? That would probably work.
6 people found this reply helpful
Was this reply helpful?
Sorry this didn’t help.
Great! Thanks for your feedback.
How satisfied are you with this reply?
Thanks for your feedback, it helps us improve the site.
How satisfied are you with this reply?
Thanks for your feedback.
That’s right, if you are searching a wide area including non-indexed folders, then you would have to use those commands. Alternatively you’d place your old versions folders outside of the area that you search, assuming that you are not searching your entire hard drive necessarily. (You’d be navigating to a folder on your hard drive that would contain everything that you might search, and use that folder’s search box in the upper right corner, instead of using the Start menu search box.)
Otherwise, you could have the indexing settings be set for which areas to index and which to not index, and only search within indexed areas or the Start menu search box, but then you would be limiting yourself to indexed areas. (See Indexing Options, which you can find with the Start menu search box.) Indexing is not usually done to entire hard drives, with all of those system files and whatnot.
As for automatically searching as with «-foldername:(oldversions)» regardless of indexing settings, if that can be done at all it would be by some method more complicated than I know about.
5 people found this reply helpful
Was this reply helpful?
Sorry this didn’t help.
Great! Thanks for your feedback.
How satisfied are you with this reply?
Thanks for your feedback, it helps us improve the site.
How satisfied are you with this reply?
Thanks for your feedback.
As for automatically searching as with «-foldername:(oldversions)» regardless of indexing settings, if that can be done at all it would be by some method more complicated than I know about.
I think this would be the optimal solution. Hopefully someone can help on this.
4 people found this reply helpful
Was this reply helpful?
Sorry this didn’t help.
Great! Thanks for your feedback.
How satisfied are you with this reply?
Thanks for your feedback, it helps us improve the site.
How satisfied are you with this reply?
Thanks for your feedback.
To exclude a specific folder’s contents, along with subfolders and their contents, the path to that folder can be specified with a minus sign as in this example syntax:
If you know that the folder has a unique name within the full area that you are searching, then you can leave off most of the path, as in:
If you instead want to permit searching inside of subfolders of such a folder, while still excluding files that are immediately inside of that folder, then use:
You can use multiple instances of the syntax to exclude more than one folder.
A related task that is worth mentioning here:
If Folder Options is set for searching to include subfolders, then to limit the search results to items within a currently windowed folder named wert and not the subfolders of wert, enter folder:»\wert» with other desired search parameters into the search box of the wert window. The quotation marks and backslash are required to have the desired effect. If a minus sign or NOT preceeds folder:»\wert», then the results are limited to items within the subfolders of wert and not immediately in wert itself.
Thanks for sharing such important info, a problem though, i couldn’t make it work. For instance, i am trying to find a .psd file that i happen to not know the name, as i have a stupidly large collection of images i am pretty sure the file is there, but my collection is organized in folders, and i want to exclude the folder SSs
so what i am typing is this: «.psd» -folder:(SSs)
i have also tried the inverse: -folder:(SSs) «.psd»
but then i get instant zero results. am i doing it wrong orrr?


