- How to Search the Contents of Any File Type Using Windows Search
- Which Plain-Text Files are “Content Indexed” by Default?
- Enable Searching File Contents of Any File Type
- Example: Enable Searching File Contents of PowerShell Scripts (.PS1)
- Exclude Files in Specific Folders to Prevent the Contents Indexed
- Search file names only, not contents (even with content indexing enabled)
- Refine your searches using Search tab Ribbon commands
- Search file contents even in non-indexed locations
- How to Search Through File Contents on Windows 10
- Turn on Option To Search Through File Contents
- Search Through File Contents in File Explorer
- 32 Comments
How to Search the Contents of Any File Type Using Windows Search
Windows Search and its Advanced Query Syntax (AQS) is a freaking awesome feature in Windows. It lets you quickly find a particular file or group of files with a specific name or metadata, in a folder and sub-folders.
Along with indexing file properties or metadata, most known plain-text files are also content indexed by default. When a file type is content indexed, Windows Search lists out the files that contain the word or phrase in the file contents when you type a search phrase in the Search box.
Which Plain-Text Files are “Content Indexed” by Default?
By default, known plain-text file types such as .BAT , .CMD , .CPP , .VBS . Here is the full list of file types that are, by default, content indexed on a Windows 10 computer:
Enable Searching File Contents of Any File Type
If you have a custom file type that is of plain-text format, and want to fully index (except the stop words) the contents, you can add the file extension manually in indexing options. Type Indexing Options in the Start/Cortana search box and click on the search result.
To add custom or unknown plain-text files like, .AHK or .PHP , in the Indexing Options dialog, click Advanced, and click File Types.
Type the file extension PHP , select Index Properties and File Contents radio-button, and click OK. After you press OK, the prompt “Rebuilding the index might take a long time to complete. Some views and search results might be incomplete until rebuilding is finished.” appears.
Click OK, and give the indexer considerable time (maybe even hours) to do its job.
Example: Enable Searching File Contents of PowerShell Scripts (.PS1)
PowerShell script file type .PS1 , although it’s a known plain-text file, is not content indexed by default. To demonstrate this, I have two files with different file extensions, but containing exactly the same PowerShell code.
As you can see, the file contains a word named Defender .
However, when I typed defender in the Search text box, it listed only the text ( .txt ) file. Although the .PS1 file has got the same contents, the file wasn’t listed in the search results.
To search file contents of .PS1 using Windows Search, enable content indexing for the file extension. In Indexing Options, click Advanced, and select the File Types tab. Select .PS1 from the list and enable Index Properties and File Contents radio-button.
Click OK, and give ample time for Windows Search to index the chosen file type. Rebuilding may take anywhere from minutes to hours depending upon the system configuration, number of files waiting to be indexed, and the user activity level in the system. Don’t expect Windows to content index your additional file types immediately.
After some time, Windows Search indexed the contents of all .PS1 files duly, and here are the search results:
Exclude Files in Specific Folders to Prevent the Contents Indexed
Content indexing additional file types mean additional database file size and additional resources consumed by the Search Indexer. To keep the database size down, enable the option only for the files you need. For the rest of the file types, you can choose to index only the file properties and metadata.
Besides configuring content indexing on a per-file type basis, you can exclude certain folders (or files) as well. Right-click on a file or folder, click Properties, and click Advanced.
Note: You can do this on a per-file or per-folder basis.
Uncheck Allow files in this folder to have contents indexed in addition to file properties, and click OK. For folders, Windows asks you whether to apply the settings for files from the current folder only, or for sub-folders as well. Choose the appropriate option and click OK.
From now on, Windows Search will not index the contents of the files present in that particular folder, regardless of your per-file type setting in the File Types dialog in Indexing Options. This helps lower the burden of Windows Search, and keeps the database size smaller.
Search file names only, not contents (even with content indexing enabled)
Sometimes, you may want to prevent Windows search from indexing the contents of documents and archives (without turning off the file content indexing feature), restricting the results to filenames only.
To make Windows Search search only for the file name (not contents), use the search operator filename:
For example, the advanced search query filename:*audit* lists out files that contain the word audit in the file name, regardless of file contents. For accurate searches, always use advanced search operators.
Refine your searches using Search tab Ribbon commands
Don’t like manually typing or memorizing the advanced query syntax? No problem! use the advanced search ribbon buttons in File Explorer Search tab to refine your searches. It fills up the search operators automatically in the search text box.
For demonstration, I added a 0-byte file named defender.txt along with sample.txt and sample.ps1.
The files sample.txt and sample.ps1 contain the word defender inside the file. In this case, typing defender in the search box lists all three files:
That’s because, for freestyle keyword searches, Windows Search looks for the filename, as well as searches the contents (of included file types) for the keyword used. If I used the Advanced Query Syntax (AQS) syntax filename: or name: it searches for the file name only, as seen in the following screenshot.
The filename: operator is always preferred to name: because the name: operator will only search from the beginning of the file name, as opposed to anywhere in the file name.
Similarly, there are many such advanced search operators that you’d like to be familiar with. For example, using the AQS, you can search for Files created between two dates. You can mix and match multiple search operators to refine your searches. With Windows Search’s AQS, the opportunities are endless.
Search file contents even in non-indexed locations
Thus far, everything written in this article applies to indexed locations. For non-indexed paths, Windows has to scour through each file or folder in the file system and fetch the results. This will be accurate, but very slow and drains the system resources more.
By default, in non-indexed locations, Windows Search doesn’t search file contents. If you wish to search file contents in non-indexed locations, there is a setting you can enable.
- Open File Explorer, click the File menu, and select “Change folder and search options”.
- Click the Search tab and enable the option named Always search file names and contents (this might take several minutes)
- Click OK.
It’s worth reiterating that the above setting when enabled, will cause the searches to slow down very much, and the system performance certainly takes a hit with constant churning of the hard drive. Please use the above setting judiciously — enable it only when it’s absolutely necessary.
How to Search Through File Contents on Windows 10
Windows comes with a robust search engine that allows you to find apps, search the Windows Store and the web, and find files on your PC. The search engine in Windows 7 used to find content not just in file names, but also in the contents of files. You could even search the contents of .zip files in Windows 7.
Most people are unaware that this functionality still exists in Windows 10. It’s just not obvious how to enable it. Today we’ll show you how to enable searching through file contents in Windows 10.
Turn on Option To Search Through File Contents
Click the Cortana or Search button or box on the Taskbar and type “indexing options.” Then, click on Indexing Options under Best match.
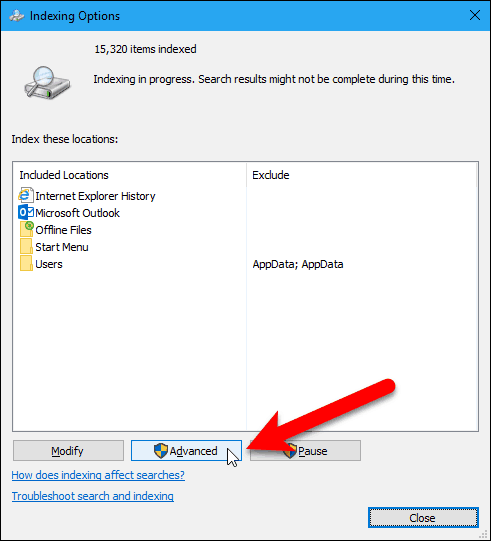
On the Indexing Options dialog box, click Advanced.
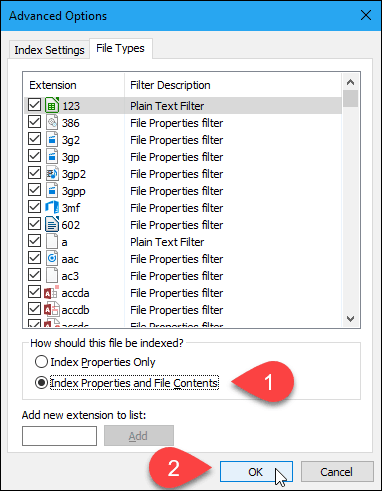
Click the File Types tab on the Advanced Options dialog box. By default, all the extensions are selected, and that’s what we want. This will allow Windows to search through all the types of files on your hard drive.
Select the Index Properties and File Contents option in the How should this file be indexed section. Then, click OK.
A Rebuild Index dialog box displays, warning you that rebuilding the index might take a long time. That means that all the contents of your hard drive might not be searched until the indexing process is finished. Click OK.
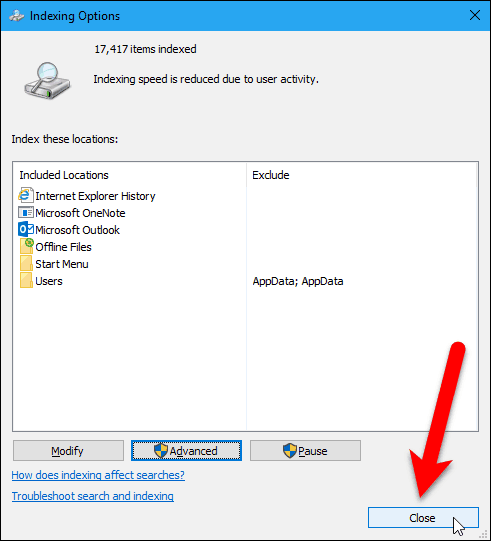
Click Close on the Indexing Options dialog box.
Search Through File Contents in File Explorer
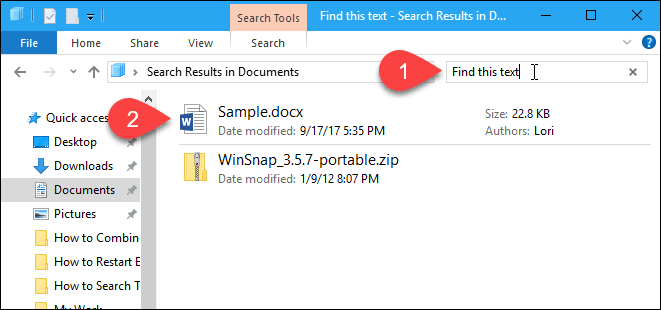
Now, when you search for text in File Explorer, Windows will search the contents of files for the text in addition to searching the file names.
Remember, if you don’t get results for your search right away, you may have to wait for the folders and files to be indexed.
What methods do you use to search the contents of files in Windows? Do you use any third-party apps to search the contents of files? Let us know your thoughts and experiences in the comments.
32 Comments
Well THANK YOU Lori Kaufman!! Not being able to search contents has been a pain.
I agree – this page was very helpful!
I just need to search a project folder without having to enable indexing on all system. Is Microsoft incapable to just add something simple as a grep command ? The Find in files option in previous versions of Windows was good enough for the job. But as usual when something is good for the users MS kills it. No brain- No Pain – Big Gain for MS.
Thanks. Turn this way down to just a few boxes back when was having h/w issues in Windows 8 & then into 10. Now with more powerful & stable gear it’s time to click these back on. Will help with the video files as well as within .docx & photo, art files.
Microsoft never really promoted the search function well enough, it is fundamental to the way the O/S’s since Windows 7 are geared towards using the search function rather than go trawling through the file explorer tree, I am fairly confident they are visionary in this approach as in the future computers will not rely so heavily on computing, but will have all possible answers pre-loaded in the quantum field and the user would simply feed in the quest and the computer would then search for the single correct answer.
Quite the opposite in fact. Simply having answers pre-loaded does not mean anything for computing speed. The very action of searching, or to be more precise sorting the information in more feasible manner, still requires both computing and time. This has not changed, even with the advent of Quantum Computing. Google operates in the same manner and is a clear example of what is at the forefront, they have machines already performing the search beforehand. Yet what the user inputs is really the search engine sorting out the information in a way that seems the most relevant to the user.
Working in this field of search/sort algorithms, I do not think that we will see any new innovations on this subject in decades to come, sadly enough.
This is honestly the first time that I see this feature on Windows. Good job.
Thank you! Is there a way to print the contents of a folder (a list of all the files in a file)? I used to do this on my Atari computer and it was quite handy at times.
I have got File – Home – Share – View but not Search on the toolbar.
What am I doing wrong.
Me also. I don’t have the Search tab. Only File – Home – Share – View
Hi Bill and Dolly,
Not to worry! As soon as you enter anything in the search boxes located below the toolbar, the Search tab magically appears!
For an example, look at the last picture above and you will see the search boxes labeled 1 and 2. Type anything in the #2 box on your computer and you will see the search tab show up.
Hope that helps.
How do I force Windows File Explorer to display OpenOffice files on searching a term? I can search “.odt” and get results, but when I search a directory that contains such OpenOffice files, I get no results, other than old doc, docx, adobe and so on.
I tried to search the way you describe above and got .odt results no matter how I searched. I used phrases from .odt documents and I tried searching just .odt and had no problem.
So, I am wondering if you followed the steps laid out in this post to open search to titles and contents of documents? If not, then I would do that first.
If you have already done that, I would suggest going to the page shown above named Advanced Options and on the File Types tab, scroll down the list and make sure the odt file type is checked. If not, check the box, wait for indexing (takes a while) is complete, then try your search again.
Hope this helps you!
Thanks, I had discovered that. Now I am annoyed that details | content shows a tiny thumbnail, not the nice full preview I get with pdf files.
The indexing does not seem to work at all for file content even in indexed locations.
The disk I am searching has around 55GB data. Where Google desktop would have given a result as I typed, Win10 search either does not find at all or takes several hours.
Win 10 search takes as input only a word or phrase, not several key words.
But, I do not know of any tool that will do so either. Any help will be appreciated
Use Windows Commander rather than W’10’s search engine. It is convenience and fast with great configuration.
I used to use the free word perfect editor. It worked just like word perfect but worked at a text file level. I could quickly search thru Windows MSWord files for context content. Mainly speaches so I could do a quick analysis of a proposed speech for the main concepts of the proposed speech and advise on what the official line had been on key words.
It was called WEd.exe
see it at
https://sites.google.com/site/texteditors/Home/files/wp_ed.zip?attredirects=0
wp_ed.zip
I would run it in a command window. F3 gives you the menu, you set the folder you want to search and specify the content key words you want to find and it would list all the files then you would just do f2 to search thru for the key words. I could do this faster than any two people in my office. Now I would just use findstr in a batch file.
So, if your IT department has any brains at all, you don’t have Administrator Rights on your own PC (preventing you from installing unapproved software – software that might be free for home use but licensing requirements if used for business, software that might have a virus, software that might interfere with the software provided by the company, etc.). You need Admin rights to click on “Advanced” in “Indexing Options”. Is there any other way to search through file contents, i.e. something you don’t need Admin rights for?
Third party software like ultra search
I had been so disappointed all these years with Windows 10 that I couldn’t do a phrase search. I finally decided to look it up…I’m SOoo glad I found you to clear this up!
I have file with dashes and numbers in the name. No searches appear after a begin typing the dash and first 2 digits:
During the last 3-4 months there has been a drastic (and unwelcome) change to the search feature. I often searched for content inside many types of files with no problems. Now I have nothing but problems. I found the procedure you outline above on my own and hoped things would change, but no joy. I experience many false positives and false negatives. (I.e., files reported by search do NOW contain the search term, and failure to find files I KNOW are there. Additionally, the search is returned in some kind of virtual screen that has no apparent connection to the rest of File Explorer, i.e., I cannot get back to the folder I was searching. Back buttons don’t work, ESC doesn’t work, deleting the search term (my former default) doesn’t work. I can only conclude that someone at MS has royally screwed up this feature. I will have to find a utility to search inside files like I used to use years ago.
Search Note is an impressive way to search content inside your shared documents.
Why don’t you give it a try? Search note is available on github.
https://github.com/scorpionit01/SearchNote
03 Aug 2020: Followed all steps successfully…EXCEPT A WORKING SEARCH OF CONTENTS. Added the php extension, allowed it to complete indexing, did a cold boot, used the indexing troubleshooter (which said Windows Search wasn’t working, then said it fixed the problem). Still finds two (pdf) files which do not have the string and none that do, same as before.
This information is quite helpful to me. I was finding hard time searching and locating file names. The only results I was getting ended with folder names. Thank you.
24 August 2020. I followed these steps long ago, and have never been able to search file content in W-10. Tried it again today. A search that should have turned up about 200 or so documents in a particular client’s folder showed 83.
No, it’s not an ordinary word.
I also noted that three Word documents which were done this morning (and obviously have not yet been indexed), which had the word in the body, showed up on the list. The other 80 had the word in the file name. But I know for a fact those 200+ documents exist. And if the search had functioned properly I would have been able to figure out which of those 200 was the one I need to find.
All of which says to me that once my system has indexed something, despite the “index file name/contents” being clicked, a search of the content isn’t possible.
Make sure that windows search service enabled.
This is a very good hint. I usually resort to Bash tools on command line but this is much more convenient. Thanks.
I just compared the (right-click on filename)Properties for SEARCH.TXT and SEARCH_SUB.TXT. I clicked on “Advanced” in the Properties window under the General tab, There is a box that says “Allow this file to have contents indexed in addition to other file properties”. SEARCH.TXT had it checked, while it was unchecked for SEARCH_SUB.TXT. This kind of garbage is why MS can drive users crazy. Was it an oversight or did some exec realize that if a User had a big tree of large files under Documents, that searching would bog down. Now the question: how do I batch set this attribute for my many 1000”s of TXT, DOC, PDF, XLS, etc files? And dare I do it? Maybe it will make File Explorer searches into monsters.
Important actions preceded my previous post, so read this first. I created a new TXT file I called SEARCH.TXT in my Documents folder and added the text “bbbb”. After typing bbbb in File Explorer’s search window, Explorer found the SEARCH.TXT file. I tried the same procedure creating a SEARCH_SUB.TXT file in a subfolder I’ll call Documents\Subfold. But now the a search for bbbb failed and only came up with SEARCH.TXT, but not SEARCH_SUB.TXT (both files were identical except for where they resided). I moved SEARCH.TXT into Documents\Sobfold. The search for bbbb still found SEARCH.TXT in Documents\Subfold. I created an identical SEARCH.TXT in the special, MS pre-loaded folders in my User file like Music, Downloads, Pictures and Videos. The search for bbbb worked in these subfolders! I moved SEARCH_SUB.TXT from its subfolder into the Documents folder and opened and resaved it. Still not discoverable.
Turns out there’s a “Contents Searchability” Attribute that is set when files are created in these special pre-loaded folders (Documents, Music,…), but is not set when created in a subfolder (at least not on my Windows 10 version).
One nice free tool I forgot to mention is called “Agent Ransack”; yeah, it’s legit, free for the free version. There is a pro version that honestly, I never felt the need for.
I installed and on the desktop shortcut, I added a hot-key combo “ctrl-alt-shift-f” and off it goes.
But I must say that when I’m already looking stuff in Explorer, I rather use the built-in and search from there.


