- Sign in to your Microsoft account with Windows Hello or a security key
- What is Windows Hello?
- What is a security key?
- How to sign in with Windows Hello
- How to sign in with a security key
- Manage your keys
- Set up a security key as your verification method
- Security verification versus password reset authentication
- What is a security key?
- Before you begin
- Register your security key
- Delete a security key from your security info
- Manage your security key settings from Windows Settings
- Reset your security key
- To reset your security key
- Create a new security key PIN
- To create a new security key PIN
- Additional security info methods
- Next steps
- How to disable the Windows Key in Windows 10 [FULL GUIDE]
- How can I disable the Windows Key while gaming?
- 1. Modify your registry
- 2. Use Disable Windows key reg
- 3. Use AutoHotkey
- 4. Use SharpKeys
- 5. Use Gaming mode on your keyboard
- 6. Use your keyboard software
Sign in to your Microsoft account with Windows Hello or a security key
If you’re tired of having to remember or reset your password, try using Windows Hello or a FIDO 2–compliant security key to sign in to your Microsoft account instead. All you’ll need is a device running Windows 10 Version 1809 or later and the Microsoft Edge browser. (This functionality is not available yet on Xbox or phones.)
What is Windows Hello?
Windows Hello is a more personal way to sign in, using your face, fingerprint, or a PIN. You can use Windows Hello to sign in to your device on the lock screen and sign in to your account on the web.
What is a security key?
A security key is a physical device that you can use instead of your user name and password to sign in. It may be a USB key that you could keep on your keychain, or an NFC device like a smartphone or access card. Since it’s used in addition to a fingerprint or PIN, even if someone has your security key, they won’t be able to sign in without your PIN or fingerprint.
Security keys are usually available for purchase from retailers that sell computer accessories.
How to sign in with Windows Hello
Follow these steps to set up Windows Hello and then sign in to your Microsoft account in Microsoft Edge:
Go to the Start menu and select Settings .
Go to Accounts > Sign-in options.
Under Manage how you sign in to your device, select a Windows Hello item to add.
To add Windows Hello as a sign in method for your Microsoft account:
Go to the Microsoft account page and sign in as you normally would.
Select Security > More security options
Select Add a new way to sign in for verify
Select Use your Windows PC
Follow the dialogs to set up Windows Hello as a method for signing in.
How to sign in with a security key
There are different types of security keys that you can use, like a USB key that you plug in to your device or an NFC key that you tap on an NFC reader. Make sure to familiarize yourself with the type of security key you have by reading the instruction manual from the manufacturer.
Go to the Microsoft account page and sign in as you normally would.
Select Security > More security options
Select Add a new way to sign in or verify
Identify what type of key you have (USB or NFC) and select Next.
You will be redirected to the setup experience where you will insert or tap your key.
Create a PIN (or enter an existing PIN if you have already created one).
Take the follow-up action by touching either the button or gold disk if your key has one (or read the instruction manual to figure out what else it might be).
Name your security key so that you can distinguish it from other keys.
Sign out and open Microsoft Edge, select Use Windows Hello or security key instead, and sign in by inserting or tapping your key.
Note: Your security key manufacturer might provide software that can help you manage your key, such as by changing the PIN or creating a fingerprint.
Manage your keys
Follow these steps to delete keys that you have set up for your account:
Go to the Microsoft account page and sign in as you normally would.
Select Security > More security options and under Windows Hello and security keys, select Manage your sign-in methods.
Set up a security key as your verification method
You can use security keys as a passwordless sign-in method within your organization. A security key is a physical device that’s used with a unique PIN to sign-in to your work or school account. Because security keys require you to have the physical device and something only you know, it’s considered a stronger verification method than a username and password.
Using a security key as a passwordless authentication method is currently in public preview. If what you’re seeing on your screen doesn’t match what’s being covered in this article, it means that your administrator hasn’t turned on this feature yet. Until this feature is turned on, you must choose another authentication method from the Security Info page. For more information about previews, see Supplemental Terms of Use for Microsoft Azure Previews.
If you don’t see the security key option, it’s possible that your organization doesn’t allow you to use this option for verification. In this case, you’ll need to choose another method or contact your organization’s help desk for more assistance.
Security verification versus password reset authentication
Security info methods are used for both two-factor security verification and for password reset. However, not all methods can be used for both.
| Method | Used for |
|---|---|
| Authenticator app | Two-factor verification and password reset authentication. |
| Text messages | Two-factor verification and password reset authentication. |
| Phone calls | Two-factor verification and password reset authentication. |
| Security key | Two-factor verification and password reset authentication. |
| Email account | Password reset authentication only. You’ll need to choose another method for two-factor verification. |
| Security questions | Password reset authentication only. You’ll need to choose another method for two-factor verification. |
What is a security key?
We currently support several designs and providers of security keys using the Fast Identity Online (FIDO) (FIDO2) passwordless authentication protocols. These keys allow you to sign in to your work or school account to access your organization’s cloud-based resources when on a supported device and web browser.
Your administrator or your organization will provide you with a security key if they require it for your work or school account. There are different types of security keys you can use, for example a USB key that you plug in to your device or an NFC key that you tap on an NFC reader. You can find out more information about your security key, including what type it is, from the manufacturer’s documentation.
If you’re unable to use a FIDO2 security key, there are other passwordless verification methods you can use such as the Microsoft Authenticator app or Windows Hello. For more information about the Microsoft Authenticator app, see What is the Microsoft Authenticator app?. For more information about Windows Hello, see Windows Hello overview.
Before you begin
Before you are able to register your security key, the following must be true:
Your administrator has turned on this feature for use within your organization.
You’re on a device running the Windows 10 May 2019 Update and using a supported browser.
You have a physical security key approved by your administrator or your organization. Your security key must be both FIDO2 and Microsoft-compliant. If you have any questions about your security key and whether it’s compatible, contact your organization’s help desk.
Register your security key
You must create your security key and give it a unique PIN before you can sign in to your work or school account using the key. You may have up to 10 keys registered with your account.
Go to the My Profile page at https://myaccount.microsoft.com and sign in if you haven’t already done so.
Select Security Info, select Add method, and then select Security key from the Add a method drop-down list.

Select Add, and then select the type of security key you have, either USB device or NFC device.

If you aren’t sure which type of security key you have, refer to the manufacturer’s documentation. If you aren’t sure about the manufacturer, contact your organization’s help desk for assistance.
Have your security key physically available and then in the Security key box, select Next.

A new box appears to help walk you through setting up your new sign-in method.
In the Setting up your new sign-in method box, select Next, and then:
If your security key is a USB device, insert your security key into the USB port of your device.
If your security key is an NFC device, tap your security key to your reader.
Type your unique security key PIN into the Windows security box, and then select OK.
You’ll return to the Setting up your new sign-in method box.
Select Next.
Return to the Security info page, type a name you’ll recognize later for your new security key, and then select Next.

Your security key is registered and ready for you to use for sign in to your work or school account.
Select Done to close the Security key box.
The Security info page is updated with your security key information.

Delete a security key from your security info
If you misplace or no longer want to use a security key, you can delete the key from your security info. While this stops the security key from being used with your work or school account, the security key continues to store your data and credential information. To delete your data and credential information from the security key itself, you must follow the instructions in the Reset a Microsoft-compatible security key section of this article.
Select the Delete link from the security key to remove.
Select Ok from the Delete security key box.
Your security key is deleted and you’ll no longer be able to use it to sign in to your work or school account.
If you delete a security key by mistake, you can register it again using the instructions in the How to register your security key section of this article.
Manage your security key settings from Windows Settings
You can manage your security key settings from the Windows Settings app, including resetting your security key and creating a new security key PIN.
Reset your security key
If you want to delete all the account information stored on your physical security key, you must return the key back to its factory defaults. Resetting your security key deletes everything from the key, allowing you to start over.
Resetting your security key deletes everything from the key, resetting it to factory defaults.
All data and credentials will be cleared.
To reset your security key
Open the Windows Settings app, select Accounts, select Sign-in options, select Security Key, and then select Manage.
Insert your security key into the USB port or tap your NFC reader to verify your identity.
Follow the on-screen instructions, based on your specific security key manufacturer. If your key manufacturer isn’t listed in the on-screen instructions, refer to the manufacturer’s site for more information.
Select Close to close the Manage screen.
Create a new security key PIN
You can create a new security key PIN for your security key.
To create a new security key PIN
Open the Windows Settings app, select Accounts, select Sign-in options, select Security Key, and then select Manage.
Insert your security key into the USB port or tap your NFC reader to verify your identity.
Select Add from the Security Key PIN area, type and confirm your new security key PIN, and then select OK.
The security key is updated with the new security key PIN for use with your work or school account. If you decide to change your PIN again, you can select the Change button.
Select Close to close the Manage screen.
Additional security info methods
In order to register a security key, you must have at least one additional security verification method registered. See the Overview section for more information.
Next steps
Reset your password if you’ve lost or forgotten it, from the Password reset portal or follow the steps in the Reset your work or school password article.
Get troubleshooting tips and help for sign-in problems in the Can’t sign in to your Microsoft account article.
How to disable the Windows Key in Windows 10 [FULL GUIDE]

- Have you wondered how to disable the Windows key? Modifying the registry is one solution.
- Instead of modifying the registry, you can download a .reg file and use it to disable the Windows key.
- Usually, gaming keyboards have dedicated software so you can check the key settings there.
- Using a dedicated third-party tool is another solution of how to disable the Windows key button.

- Download Restoro PC Repair Tool that comes with Patented Technologies (patent available here).
- Click Start Scan to find Windows issues that could be causing PC problems.
- Click Repair All to fix issues affecting your computer’s security and performance
- Restoro has been downloaded by 0 readers this month.
The Windows Key is rather useful and it’s a part of many shortcuts on Windows 10. Even though many users use it frequently, some users want to disable it.
Every advanced Windows user knows how useful Windows Key button is. Despite its usefulness, the key can sometimes be a problem, especially during intense gaming sessions.
By default, pressing the Windows Key will open the Start Menu and that can be a problem during gaming. By accidentally pressing the Windows button you’ll lose focus on your game and that can be a big problem.
In order to avoid these kinds of problems, many gamers disable their Windows Key during the gaming sessions.
In this guide, we’re going to show how to disable the Windows button. There are a couple of methods you can use from where you can choose the best for you.
How can I disable the Windows Key while gaming?
1. Modify your registry
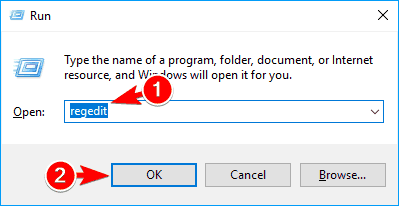
- Press Windows Key + R and enter regedit.
- Click on OK or press Enter.

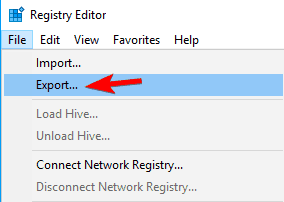
- Optional: Before you make any changes to your registry it’s always a good idea to create a backup. To do that, just click on File > Export.
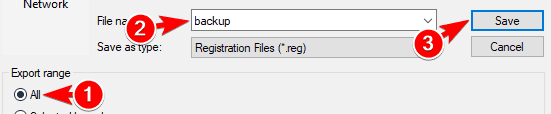
- Select All as Export range, choose a safe location, enter the desired file name and click on Save.
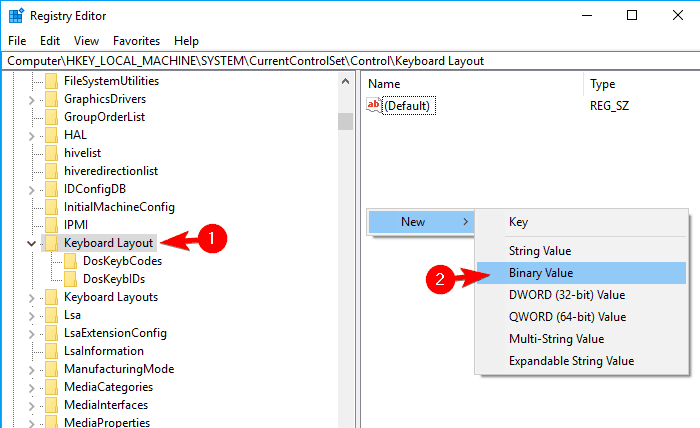
- In the left panel, navigate to: Computer\HKEY_LOCAL_MACHINE\SYSTEM\CurrentControlSet\Control\Keyboard Layout
- In the right pane, right-click the empty space and choose New >Binary Value from the menu.
- Enter Scancode Map as the name of the new value.
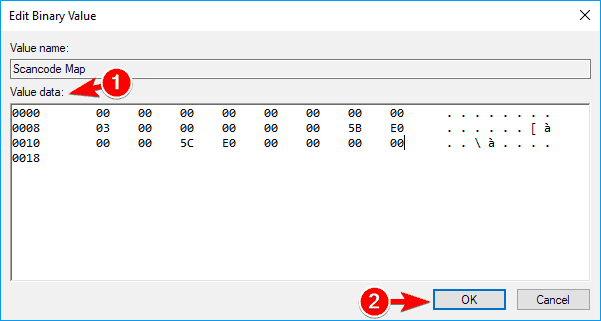
- Double click Scancode Map value and enter 00000000000000000300000000005BE000005CE000000000 in the Data field.
- Be extra cautious and double-check if the entered value is correct. Now click OK.
- After doing that, close Registry Editor and restart your PC.
Note: Keep in mind that your registry has sensitive information in it, so if you want to edit it, use extra caution. If you encounter any problems with your PC after modifying the registry, restore the backup created at steps 3-4.
After your PC restarts, the Windows Key should be completely disabled. To enable the Windows Key, you need to go back to Registry Editor and delete the Scancode Map that you created.
2. Use Disable Windows key reg

If you don’t want to modify your registry manually, there’s a .reg file available that you can use to modify it. Simply download Disable Windows key.reg and run it.
When the warning message appears, click on Yes. If you want to enable Windows Key again, download and run Enable Caps Lock and Windows keys.reg.
This method is a lot faster and simpler, so if you’re not comfortable with modifying the registry manually, be sure to try using the .reg file.
This method is great if you want to disable Windows Key and prevent other users from enabling it. Modifying the registry manually might not be the simplest method, but you can always use the .reg file to modify it automatically.
3. Use AutoHotkey

If you want to disable your Windows Key, you might want to try using AutoHotkey. This is an open-source and powerful automation scripting language.
The application allows you to assign certain commands to your keys, but it also allows you to disable keys. AutoHotkey isn’t the simplest application , so you might want to learn how it works before you can use it correctly.
Basically, you need to create a script that will block Windows Keys and add that script to AutoHotkey. Simply click AutoHotkey icon in your Taskbar and choose Edit this Script. Now you need to paste the following script at the bottom:
Save your script, right-click AutoHotkey and choose to Reload This Script from the menu. After doing that, both Windows Keys will be disabled.
Keep in mind that this solution won’t disable shortcuts that involve Windows Key, instead, it will just disable the keys themselves.
It’s worth mentioning that some online games might recognize AutoHotkey as a cheating application, so keep that in mind.
Before you use this solution it’s always a good idea to do some research and check if the game developers allow you to use AutoHotkey with their game.
⇒ Download Autohotkey
4. Use SharpKeys
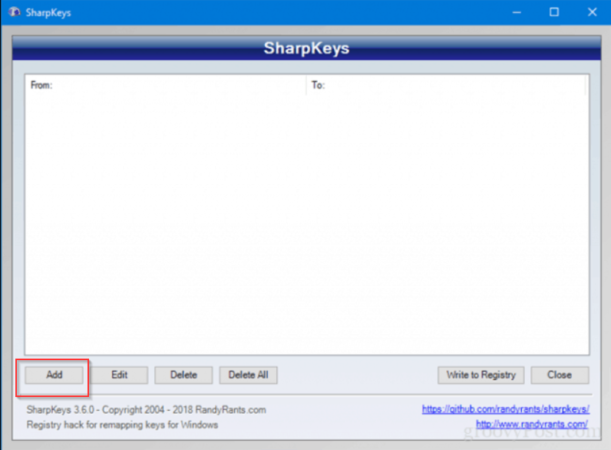
- Download and start SharpKeys.
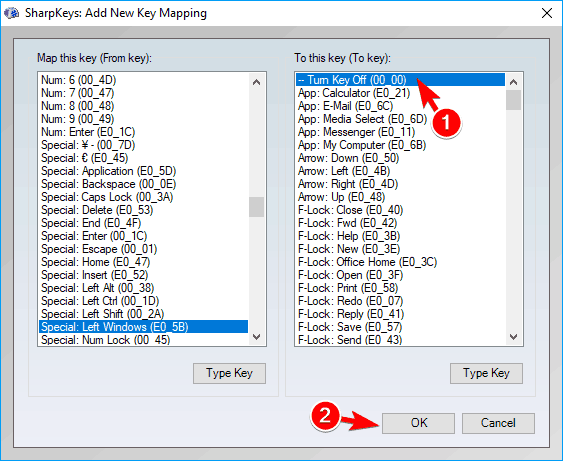
- Once the application starts, click on Add.
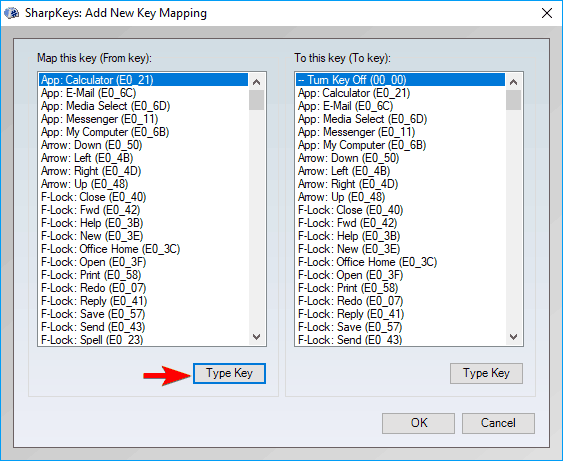
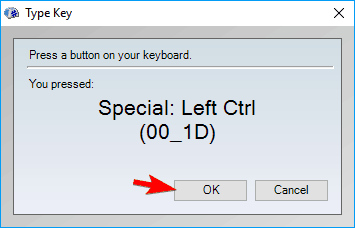
- Now you’ll see two columns. Click on Type Key in the left pane and press the Windows Key.
- Now click on OK to select the pressed key.
- Select Turn Key Off in the right pane and click on OK to save changes.
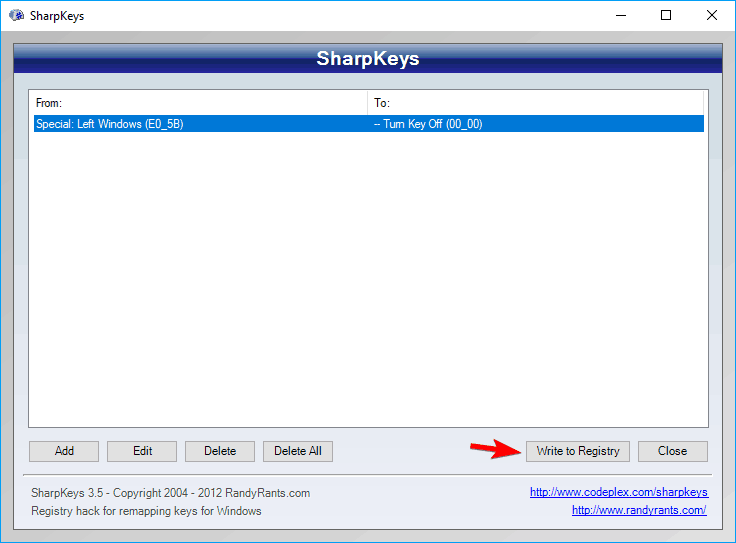
- Now click on Write to Registry button.
- Now you just have to restart your PC or log out and log back in to apply the changes.
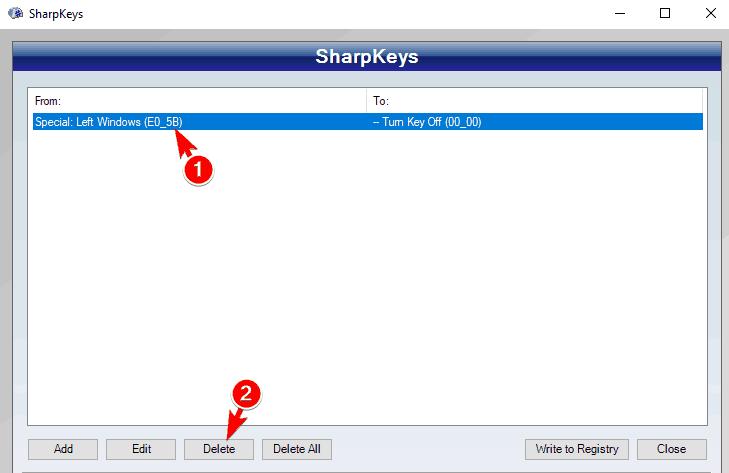
- To enable Windows Key again, start Sharpkeys, s elect the desired key from the menu, and click on Delete.
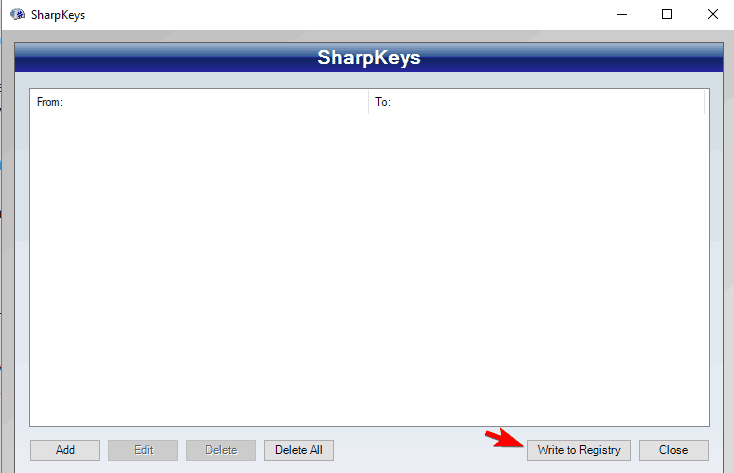
- After deleting the key, click on Write to Registry button.
- Now restart your PC or log off and back on to apply the changes.
Note: This is a free and portable tool that allows you to remap your keys, but it also has the ability to disable keys or to assign them to certain functions. Keep in mind that this is a powerful application, so you’re using it at your own risk.
5. Use Gaming mode on your keyboard
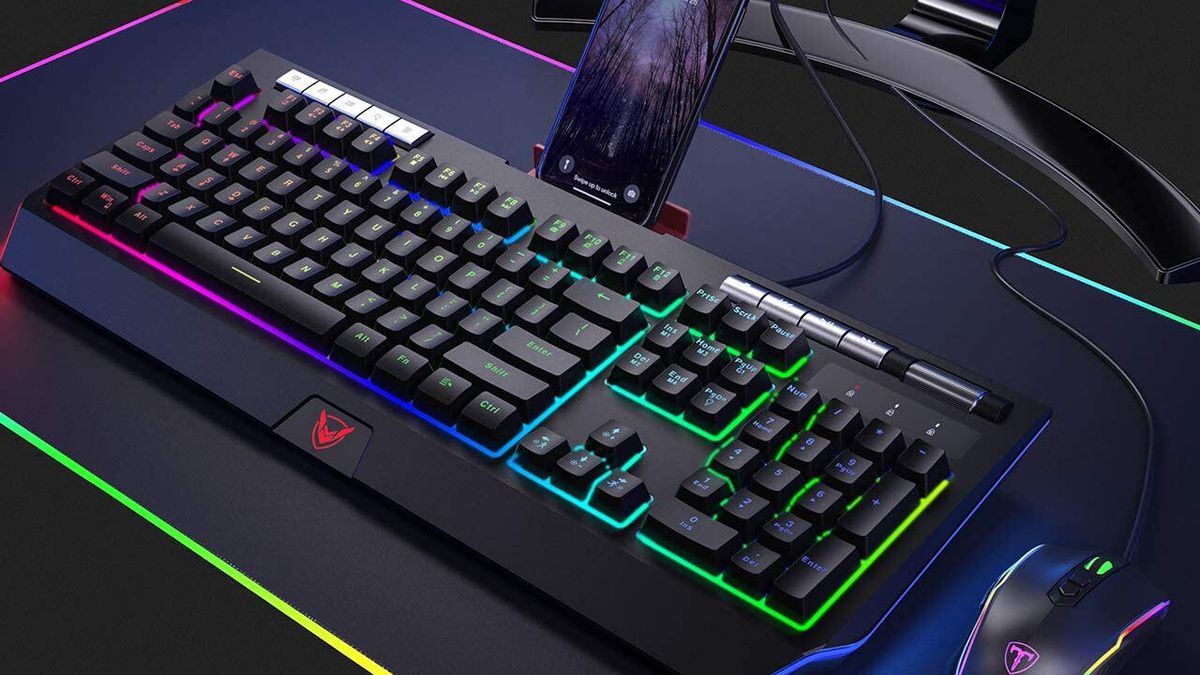
Many gaming keyboards have a Gaming mode feature that allows you to block Windows Key with ease. To activate Gaming mode you usually have to press a certain keyboard shortcut.
Some keyboards even have a controller icon on one of its keys so you can easily find the shortcut key for Gaming mode. If you can’t find the shortcut on your own, we advise you to check your keyboard manual for detailed instructions on how to activate Gaming mode.
Keep in mind that not all keyboards support this feature, so before you can use it you need to check if your keyboard supports it. Activating the Gaming mode is the simplest and fastest way to disable Windows Key, but unfortunately, not all keyboards support this feature.
6. Use your keyboard software
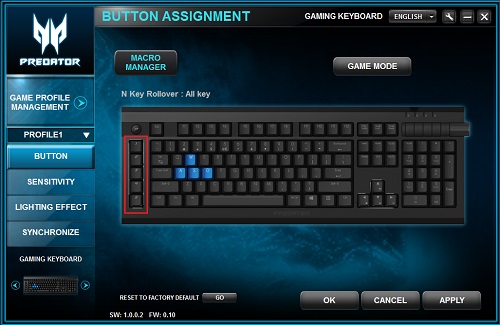
As we previously mentioned, many gaming keyboards support Gaming mode. These keyboards usually have dedicated software that you can use to configure various settings such as macros and lighting.


