- Device protection in Windows Security
- Core isolation
- Memory integrity
- Security processor
- Security processor details
- Secure boot
- Hardware security capability
- Your device meets the requirements for standard hardware security
- Your device meets the requirements for enhanced hardware security
- Your device exceeds the requirements for enhanced hardware security ( Note: In Windows 20H2 this message will say «Your device has all Secured-core PC features enabled»)
- Standard hardware security not supported
- Stay protected with Windows Security
- Important security info
- Understand and customize Windows Security features
- Status icons indicate your level of safety:
- Run a malware scan manually
- Run a quick scan in Windows Security
- Run an advanced scan in Windows Security
- Schedule your own scan
- Schedule a scan
- Turn Microsoft Defender Antivirus real-time protection on or off
- Turn real-time protection off temporarily
- Administer security policy settings
- What’s changed in how settings are administered
- Using the Local Security Policy snap-in
- Using the secedit command-line tool
- Using the Security Compliance Manager
- Using the Security Configuration Wizard
- Working with the Security Configuration Manager
- Security Configuration and Analysis
- Security analysis
- Security configuration
- Security templates
- Security settings extension to Group Policy
- Local Security Policy
- Using the Security Configuration Manager
- Applying security settings
- Importing and exporting security templates
- Analyzing security and viewing results
- Resolving security discrepancies
- Automating security configuration tasks
- Working with Group Policy tools
Device protection in Windows Security
Windows Security provides the following built-in security options to help protect your device from malicious software attacks.
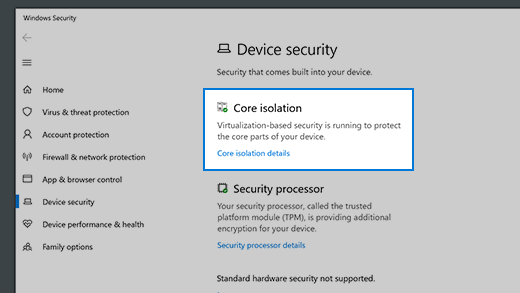
To access the features described below, in the search box on the taskbar, type windows security, select it from the results, and then select Device security.
Notes: What you actually see on the Device security page may vary depending upon what your hardware supports.
For more info about Windows Security, see Stay protected with Windows Security.
For more info about Microsoft Defender Firewall, see Turn Microsoft Defender Firewall on or off.
Core isolation
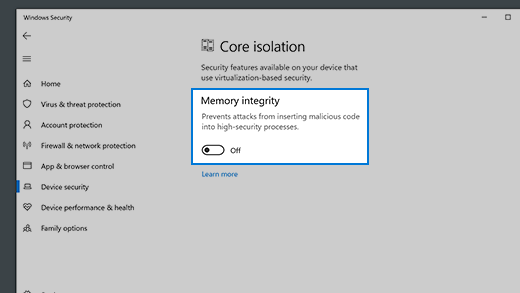
Core isolation provides added protection against malware and other attacks by isolating computer processes from your operating system and device. Select Core isolation details to enable, disable, and change the settings for core isolation features.
Memory integrity
Memory integrity is a feature of core isolation. By turning on the Memory integrity setting, you can help prevent malicious code from accessing high-security processes in the event of an attack.
Security processor
Your security processor provides additional encryption for your device.
Security processor details

This is where you’ll find info about the security processor manufacturer and version numbers, as well as about the security processor’s status. Select Security processor details for additional info and options.
Note: If you don’t see a Security processor entry on this screen then it’s likely that your device doesn’t have the TPM (Trusted Platform Module) hardware necessary for this feature.
If your security processor isn’t working properly you’ll see a link on the Security processor details page that says Security processor troubleshooting. Select it to see any error messages and advanced options. For more information see: Security Processor troubleshooting.
Secure boot
Secure boot prevents a sophisticated and dangerous type of malware—a rootkit—from loading when you start your device. Rootkits use the same permissions as the operating system and start before it, which means they can completely hide themselves. Rootkits are often part of an entire suite of malware that can bypass local logins, record passwords and keystrokes, transfer private files, and capture cryptographic data.
You may have to disable secure boot to run some PC graphics cards, hardware, or operating systems such as Linux or earlier versions of Windows. For more info, see How to disable and re-enable secure boot.
Hardware security capability
At the bottom of the Device security screen, one of the following messages appears, indicating the security capability of your device.
Your device meets the requirements for standard hardware security
This means your device supports memory integrity and core isolation and also has:
TPM 2.0 (also referred to as your security processor)
Secure boot enabled
Your device meets the requirements for enhanced hardware security
This means that in addition to meeting all the requirements of standard hardware security, your device also has memory integrity turned on.
Your device exceeds the requirements for enhanced hardware security ( Note: In Windows 20H2 this message will say «Your device has all Secured-core PC features enabled»)
This means that in addition to meeting all the requirements of enhanced hardware security, your device also has System Management Mode (SMM) protection turned on.
Standard hardware security not supported
This means that your device does not meet at least one of the requirements of standard hardware security.
Improving hardware security
If the security capability of your device isn’t what you’d like it to be, you might need to turn on certain hardware features (such as secure boot, if supported) or change the settings in your system’s BIOS. Contact your hardware manufacturer to see what features are supported by your hardware and how to activate them.
Stay protected with Windows Security
Windows 10 includes Windows Security, which provides the latest antivirus protection. Your device will be actively protected from the moment you start Windows 10. Windows Security continually scans for malware (malicious software), viruses, and security threats. In addition to this real-time protection, updates are downloaded automatically to help keep your device safe and protect it from threats.
Windows 10 in S mode
Some features will be a little different if you’re running Windows 10 in S mode. Because this mode is streamlined for tighter security, the Virus & threat protection area has fewer options. But don’t worry—the built-in security of this mode automatically prevents viruses and other threats from running on your device, and you’ll receive security updates automatically. For more info, see Windows 10 in S mode FAQ.
Important security info
Windows Security is built-in to Windows 10 and includes an antirvirus program called Microsoft Defender Antivirus. (In previous versions of Windows 10, Windows Security is called Windows Defender Security Center).
If you have another antivirus app installed and turned on, Microsoft Defender Antivirus will turn off automatically. If you uninstall the other app, Microsoft Defender Antivirus will turn back on automatically.
If you’re having problems receiving Windows Security updates, see Fix Windows Update errors and the Windows Update FAQ.
For info on how to uninstall an app, see Repair or remove an app in Windows 10.
To change your user account to an admin account, see Create a local user or administrator account in Windows 10.
Understand and customize Windows Security features
Windows Security is your home to manage the tools that protect your device and your data:
Virus & threat protection. Monitor threats to your device, run scans, and get updates to help detect the latest threats. (Some of these options are unavailable if you’re running Windows 10 in S mode.)
Account protection. Access sign-in options and account settings, including Windows Hello and dynamic lock.
Firewall & network protection. Manage firewall settings and monitor what’s happening with your networks and internet connections.
App & browser control. Update settings for Microsoft Defender SmartScreen to help protect your device against potentially dangerous apps, files, sites, and downloads. You’ll have exploit protection and you can customize protection settings for your devices.
Device security. Review built-in security options to help protect your device from attacks by malicious software.
Device performance & health. View status info about your device’s performance health, and keep your device clean and up to date with the latest version of Windows 10.
Family options. Keep track of your kids’ online activity and the devices in your household.
You can customize how your device is protected with these Windows Security features. To access them, select Start > Settings > Update & Security > Windows Security . Then select the feature you want to explore.
Open Windows Security settings
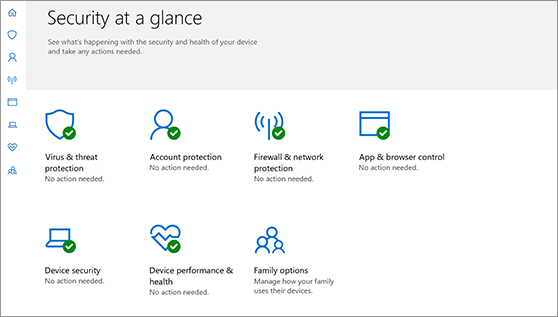
Status icons indicate your level of safety:
Green means your device is sufficiently protected and there aren’t any recommended actions.
Yellow means there is a safety recommendation for you.
Red is a warning that something needs your immediate attention.
Run a malware scan manually
When you’re concerned about risks to a specific file or folder, you can right-click the file or folder in File Explorer, then select Scan with Microsoft Defender.
If you suspect there’s malware or a virus on your device, you should immediately run a quick scan. This is much faster than running a full scan on all your files and folders.
Run a quick scan in Windows Security
Select Start > Settings > Update & Security > Windows Security and then Virus & threat protection.
Open Windows Security settings
Under Current threats, select Quick scan (or in previous versions of Windows 10, under Threat history, select Scan now).
If the scan doesn’t find any issues, but you’re still concerned, you may want to check your device more thoroughly.
Run an advanced scan in Windows Security
Select Start > Settings > Update & Security > Windows Security and then Virus & threat protection.
Under Current threats, select Scan options (or in previous versions of Windows 10, under Threat history, select Run a new advanced scan).
Select one of the scan options:
Full scan (check files and programs currently running on your device)
Custom scan (scan specific files or folders)
Microsoft Defender Offline scan (run this scan if your device has been, or could potentially be, infected by a virus or malware). Learn more about Microsoft Defender Offline
Select Scan now.
Note: Because of streamlined security, this process isn’t available if you’re running Windows 10 in S mode.
Schedule your own scan
Even though Windows Security is regularly scanning your device to keep it safe, you can also set when and how often the scans occur.
Schedule a scan
Select the Start button, type schedule tasks in the Search box, and in the list of results, select Task Scheduler.
In the left pane, select the arrow (>) next to Task Scheduler Library to expand it, do the same with Microsoft > Windows, and then scroll down and select the Windows Defender folder.
In the top-center pane, select Windows Defender Scheduled Scan. (Point to the choices to see the full names.)
In the Actions pane on the right, scroll down and then select Properties.
In the window that opens, select the Triggers tab, and then select New.
Set your preferred time and frequency, and then select OK.
Review the schedule and select OK.
Note: Because of streamlined security, this process isn’t available if you’re running Windows 10 in S mode.
Turn Microsoft Defender Antivirus real-time protection on or off
Sometimes you may need to briefly stop running real-time protection. While real-time protection is off, files you open or download won’t be scanned for threats. However, real-time protection will soon turn on automatically again to protect your device.
Turn real-time protection off temporarily
Select Start > Settings > Update & Security > Windows Security and then Virus & threat protection > Manage settings. (In previous versions of Windows 10, select Virus & threat protection > Virus & threat protection settings.)
Open Windows Security settings
Switch the Real-time protection setting to Off and choose Yes to verify.
Note: Because of streamlined security, this process isn’t available if you’re running Windows 10 in S mode.
Administer security policy settings
Applies to
This article discusses different methods to administer security policy settings on a local device or throughout a small- or medium-sized organization.
Security policy settings should be used as part of your overall security implementation to help secure domain controllers, servers, client devices, and other resources in your organization.
Security settings policies are rules that you can configure on a device, or multiple devices, for the purpose of protecting resources on a device or network. The Security Settings extension of the Local Group Policy Editor snap-in (Gpedit.msc) allows you to define security configurations as part of a Group Policy Object (GPO). The GPOs are linked to Active Directory containers such as sites, domains, and organizational units, and they enable administrators to manage security settings for multiple computers from any device joined to the domain.
Security settings can control:
- User authentication to a network or device.
- The resources that users are permitted to access.
- Whether to record a user’s or group’s actions in the event log.
- Membership in a group.
For info about each setting, including descriptions, default settings, and management and security considerations, see Security policy settings reference.
To manage security configurations for multiple computers, you can use one of the following options:
- Edit specific security settings in a GPO.
- Use the Security Templates snap-in to create a security template that contains the security policies you want to apply, and then import the security template into a Group Policy Object. A security template is a file that represents a security configuration, and it can be imported to a GPO, or applied to a local device, or it can be used to analyze security.
What’s changed in how settings are administered
Over time, new ways to manage security policy settings have been introduced, which include new operating system features and the addition of new settings. The following table lists different means by which security policy settings can be administered.
| Tool or feature | Description and use |
|---|---|
| Security Policy snap-in | Secpol.msc MMC snap-in designed to manage only security policy settings. |
| Security editor command line tool | Secedit.exe Configures and analyzes system security by comparing your current configuration to specified security templates. |
| Security Compliance Manager | Tool download A Solution Accelerator that helps you plan, deploy, operate, and manage your security baselines for Windows client and server operating systems, and Microsoft applications. |
| Security Configuration Wizard | Scw.exe SCW is a role-based tool available on servers only: You can use it to create a policy that enables services, firewall rules, and settings that are required for a selected server to perform specific roles. |
| Security Configuration Manager tool | This tool set allows you to create, apply, and edit the security for your local device, organizational unit, or domain. |
| Group Policy | Gpmc.msc and Gpedit.msc The Group Policy Management Console uses the Group Policy Object editor to expose the local Security options, which can then be incorporated into Group Policy Objects for distribution throughout the domain. The Local Group Policy Editor performs similar functions on the local device. |
| Software Restriction Policies See Administer Software Restriction Policies | Gpedit.msc Software Restriction Policies (SRP) is a Group Policy-based feature that identifies software programs running on computers in a domain, and it controls the ability of those programs to run. |
| Administer AppLocker See Administer AppLocker | Gpedit.msc Prevents malicious software (malware) and unsupported applications from affecting computers in your environment, and it prevents users in your organization from installing and using unauthorized applications. |
Using the Local Security Policy snap-in
The Local Security Policy snap-in (Secpol.msc) restricts the view of local policy objects to the following policies and features:
- Account Policies
- Local Policies
- Windows Firewall with Advanced Security
- Network List Manager Policies
- Public Key Policies
- Software Restriction Policies
- Application Control Policies
- IP Security Policies on Local Computer
- Advanced Audit Policy Configuration
Policies set locally might be overwritten if the computer is joined to the domain.
The Local Security Policy snap-in is part of the Security Configuration Manager tool set. For info about other tools in this tool set, see Working with the Security Configuration Manager in this topic.
Using the secedit command-line tool
The secedit command-line tool works with security templates and provides six primary functions:
- The Configure parameter helps you resolve security discrepancies between devices by applying the correct security template to the errant server.
- The Analyze parameter compares the server’s security configuration with the selected template.
- The Import parameter allows you to create a database from an existing template. The Security Configuration and Analysis tool does this also.
- The Export parameter allows you to export the settings from a database into a security settings template.
- The Validate parameter allows you to validate the syntax of each or any lines of text that you created or added to a security template. This ensures that if the template fails to apply syntax, the template will not be the issue.
- The Generate Rollback parameter saves the server’s current security settings into a security template so it can be used to restore most of the server’s security settings to a known state. The exceptions are that, when applied, the rollback template will not change access control list entries on files or registry entries that were changed by the most recently applied template.
Using the Security Compliance Manager
The Security Compliance Manager is a downloadable tool that helps you plan, deploy, operate, and manage your security baselines for Windows client and server operating systems, and for Microsoft applications. It contains a complete database of recommended security settings, methods to customize your baselines, and the option to implement those settings in multiple formats—including XLS, GPOs, Desired Configuration Management (DCM) packs, or Security Content Automation Protocol (SCAP). The Security Compliance Manager is used to export the baselines to your environment to automate the security baseline deployment and compliance verification process.
To administer security policies by using the Security Compliance Manager
- Download the most recent version. You can find out more info on the Microsoft Security Guidance blog.
- Read the relevant security baseline documentation that is included in this tool.
- Download and import the relevant security baselines. The installation process steps you through baseline selection.
- Open the Help and follow instructions how to customize, compare, or merge your security baselines before deploying those baselines.
Using the Security Configuration Wizard
The Security Configuration Wizard (SCW) guides you through the process of creating, editing, applying, or rolling back a security policy. A security policy that you create with SCW is an .xml file that, when applied, configures services, network security, specific registry values, and audit policy. SCW is a role-based tool: You can use it to create a policy that enables services, firewall rules, and settings that are required for a selected server to perform specific roles. For example, a server might be a file server, a print server, or a domain controller.
The following are considerations for using SCW:
- SCW disables unnecessary services and provides Windows Firewall with Advanced Security support.
- Security policies that are created with SCW are not the same as security templates, which are files with an .inf extension. Security templates contain more security settings than those that can be set with SCW. However, it is possible to include a security template in an SCW security policy file.
- You can deploy security policies that you create with SCW by using Group Policy.
- SCW does not install or uninstall the features necessary for the server to perform a role. You can install server role-specific features through Server Manager.
- SCW detects server role dependencies. If you select a server role, it automatically selects dependent server roles.
- All apps that use the IP protocol and ports must be running on the server when you run SCW.
- In some cases, you must be connected to the Internet to use the links in the SCW help.
The SCW is available only on Windows Server and only applicable to server installations.
The SCW can be accessed through Server Manager or by running scw.exe. The wizard steps you through server security configuration to:
- Create a security policy that can be applied to any server on your network.
- Edit an existing security policy.
- Apply an existing security policy.
- Roll back the last applied security policy.
The Security Policy Wizard configures services and network security based on the server’s role, as well as configures auditing and registry settings.
For more information about SCW, including procedures, see Security Configuration Wizard.
Working with the Security Configuration Manager
The Security Configuration Manager tool set allows you to create, apply, and edit the security for your local device, organizational unit, or domain.
For procedures on how to use the Security Configuration Manager, see Security Configuration Manager.
The following table lists the features of the Security Configuration Manager.
| Security Configuration Manager tools | Description |
|---|---|
| Security Configuration and Analysis | Defines a security policy in a template. These templates can be applied to Group Policy or to your local computer. |
| Security templates | Defines a security policy in a template. These templates can be applied to Group Policy or to your local computer. |
| Security Settings extension to Group Policy | Edits individual security settings on a domain, site, or organizational unit. |
| Local Security Policy | Edits individual security settings on your local computer. |
| Secedit | Automates security configuration tasks at a command prompt. |
Security Configuration and Analysis
Security Configuration and Analysis is an MMC snap-in for analyzing and configuring local system security.
Security analysis
The state of the operating system and apps on a device is dynamic. For example, you may need to temporarily change security levels so that you can immediately resolve an administration or network issue. However, this change can often go unreversed. This means that a computer may no longer meet the requirements for enterprise security.
Regular analysis enables you to track and ensure an adequate level of security on each computer as part of an enterprise risk management program. You can tune the security levels and, most importantly, detect any security flaws that may occur in the system over time.
Security Configuration and Analysis enables you to quickly review security analysis results. It presents recommendations alongside of current system settings and uses visual flags or remarks to highlight any areas where the current settings do not match the proposed level of security. Security Configuration and Analysis also offers the ability to resolve any discrepancies that analysis reveals.
Security configuration
Security Configuration and Analysis can also be used to directly configure local system security. Through its use of personal databases, you can import security templates that have been created with Security Templates and apply these templates to the local computer. This immediately configures the system security with the levels specified in the template.
Security templates
With the Security Templates snap-in for Microsoft Management Console, you can create a security policy for your device or for your network. It is a single point of entry where the full range of system security can be taken into account. The Security Templates snap-in does not introduce new security parameters, it simply organizes all existing security attributes into one place to ease security administration.
Importing a security template to a Group Policy Object eases domain administration by configuring security for a domain or organizational unit at once.
To apply a security template to your local device, you can use Security Configuration and Analysis or the secedit command-line tool.
Security templates can be used to define:
- Account Policies
- Password Policy
- Account Lockout Policy
- Kerberos Policy
- Local Policies
- Audit Policy
- User Rights Assignment
- Security Options
- Event Log: Application, system, and security Event Log settings
- Restricted Groups: Membership of security-sensitive groups
- System Services: Startup and permissions for system services
- Registry: Permissions for registry keys
- File System: Permissions for folders and files
Each template is saved as a text-based .inf file. This enables you to copy, paste, import, or export some or all of the template attributes. With the exceptions of Internet Protocol security and public key policies, all security attributes can be contained in a security template.
Security settings extension to Group Policy
Organizational units, domains, and sites are linked to Group Policy Objects. The security settings tool allows you change the security configuration of the Group Policy Object, in turn, affecting multiple computers. With security settings, you can modify the security settings of many devices, depending on the Group Policy Object you modify, from just one device joined to a domain.
Security settings or security policies are rules that are configured on a device or multiple device for protecting resources on a device or network. Security settings can control:
- How users are authenticated to a network or device
- What resources users are authorized to use.
- Whether or not a user’s or group’s actions are recorded in the event log.
- Group membership.
You can change the security configuration on multiple computers in two ways:
- Create a security policy by using a security template with Security Templates, and then import the template through security settings to a Group Policy Object.
- Change a few select settings with security settings.
Local Security Policy
A security policy is a combination of security settings that affect the security on a device. You can use your local security policy to edit account policies and local policies on your local device
With the local security policy, you can control:
- Who accesses your device.
- What resources users are authorized to use on your device.
- Whether or not a user’s or group’s actions are recorded in the event log.
If your local device is joined to a domain, you are subject to obtaining a security policy from the domain’s policy or from the policy of any organizational unit that you are a member of. If you are getting a policy from more than one source, conflicts are resolved in the following order of precedence.
- Organizational unit policy
- Domain policy
- Site policy
- Local computer policy
If you modify the security settings on your local device by using the local security policy, then you are directly modifying the settings on your device. Therefore, the settings take effect immediately, but this may only be temporary. The settings will actually remain in effect on your local device until the next refresh of Group Policy security settings, when the security settings that are received from Group Policy will override your local settings wherever there are conflicts.
Using the Security Configuration Manager
For procedures on how to use the Security Configuration Manager, see Security Configuration Manager How To. This section contains information in this topic about:
Applying security settings
Once you have edited the security settings, the settings are refreshed on the computers in the organizational unit linked to your Group Policy Object:
- When a device is restarted, the settings on that device will be refreshed.
- To force a device to refresh its security settings as well as all Group Policy settings, use gpupdate.exe.
Precedence of a policy when more than one policy is applied to a computer
For security settings that are defined by more than one policy, the following order of precedence is observed:
- Organizational Unit Policy
- Domain Policy
- Site Policy
- Local computer Policy
For example, a workstation that is joined to a domain will have its local security settings overridden by the domain policy wherever there is a conflict. Likewise, if the same workstation is a member of an Organizational Unit, the settings applied from the Organizational Unit’s policy will override both the domain and local settings. If the workstation is a member of more than one Organizational Unit, then the Organizational Unit that immediately contains the workstation has the highest order of precedence.
Use gpresult.exe to find out what policies are applied to a device and in what order.
For domain accounts, there can be only one account policy that includes password policies, account lockout policies, and Kerberos policies.
Persistence in security settings
Security settings may still persist even if a setting is no longer defined in the policy that originally applied it.
Persistence in security settings occurs when:
- The setting has not been previously defined for the device.
- The setting is for a registry object.
- The setting is for a file system object.
All settings applied through local policy or a Group Policy Object are stored in a local database on your device. Whenever a security setting is modified, the computer saves the security setting value to the local database, which retains a history of all the settings that have been applied to the device. If a policy first defines a security setting and then no longer defines that setting, then the setting takes on the previous value in the database. If a previous value does not exist in the database, then the setting does not revert to anything and remains defined as is. This behavior is sometimes called «tattooing.»
Registry and file settings will maintain the values applied through policy until that setting is set to other values.
Filtering security settings based on group membership
You can also decide what users or groups will or will not have a Group Policy Object applied to them regardless of what computer they have logged onto by denying them either the Apply Group Policy or Read permission on that Group Policy Object. Both of these permissions are needed to apply Group Policy.
Importing and exporting security templates
Security Configuration and Analysis provides the ability to import and export security templates into or from a database.
If you have made any changes to the analysis database, you can save those settings by exporting them into a template. The export feature provides the ability to save the analysis database settings as a new template file. This template file can then be used to analyze or configure a system, or it can be imported to a Group Policy Object.
Analyzing security and viewing results
Security Configuration and Analysis performs security analysis by comparing the current state of system security against an analysis database. During creation, the analysis database uses at least one security template. If you choose to import more than one security template, the database will merge the various templates and create one composite template. It resolves conflicts in order of import; the last template that is imported takes precedence.
Security Configuration and Analysis displays the analysis results by security area, using visual flags to indicate problems. It displays the current system and base configuration settings for each security attribute in the security areas. To change the analysis database settings, right-click the entry, and then click Properties.
| Visual flag | Meaning |
|---|---|
| Red X | The entry is defined in the analysis database and on the system, but the security setting values do not match. |
| Green check mark | The entry is defined in the analysis database and on the system and the setting values match. |
| Question mark | The entry is not defined in the analysis database and, therefore, was not analyzed. If an entry is not analyzed, it may be that it was not defined in the analysis database or that the user who is running the analysis may not have sufficient permission to perform analysis on a specific object or area. |
| Exclamation point | This item is defined in the analysis database, but does not exist on the actual system. For example, there may be a restricted group that is defined in the analysis database but does not actually exist on the analyzed system. |
| No highlight | The item is not defined in the analysis database or on the system. |
If you choose to accept the current settings, the corresponding value in the base configuration is modified to match them. If you change the system setting to match the base configuration, the change will be reflected when you configure the system with Security Configuration and Analysis.
To avoid continued flagging of settings that you have investigated and determined to be reasonable, you can modify the base configuration. The changes are made to a copy of the template.
Resolving security discrepancies
You can resolve discrepancies between analysis database and system settings by:
- Accepting or changing some or all of the values that are flagged or not included in the configuration, if you determine that the local system security levels are valid due to the context (or role) of that computer. These attribute values are then updated in the database and applied to the system when you click Configure Computer Now.
- Configuring the system to the analysis database values, if you determine the system is not in compliance with valid security levels.
- Importing a more appropriate template for the role of that computer into the database as the new base configuration and applying it to the system.
Changes to the analysis database are made to the stored template in the database, not to the security template file. The security template file will only be modified if you either return to Security Templates and edit that template or export the stored configuration to the same template file.
You should use Configure Computer Now only to modify security areas not affected by Group Policy settings, such as security on local files and folders, registry keys, and system services. Otherwise, when the Group Policy settings are applied, it will take precedence over local settings—such as account policies.
In general, do not use Configure Computer Now when you are analyzing security for domain-based clients, since you will have to configure each client individually. In this case, you should return to Security Templates, modify the template, and reapply it to the appropriate Group Policy Object.
Automating security configuration tasks
By calling the secedit.exe tool at a command prompt from a batch file or automatic task scheduler, you can use it to automatically create and apply templates, and analyze system security. You can also run it dynamically from a command prompt. Secedit.exe is useful when you have multiple devices on which security must be analyzed or configured, and you need to perform these tasks during off-hours.
Working with Group Policy tools
Group Policy is an infrastructure that allows you to specify managed configurations for users and computers through Group Policy settings and Group Policy Preferences. For Group Policy settings that affect only a local device or user, you can use the Local Group Policy Editor. You can manage Group Policy settings and Group Policy Preferences in an Active Directory Domain Services (ADВ DS) environment through the Group Policy Management Console (GPMC). Group Policy management tools also are included in the Remote Server Administration Tools pack to provide a way for you to administer Group Policy settings from your desktop.


