- How to Disable “Open File Security Warnings” in Windows 10, 8 and 7
- Disabling the warning window when running an app downloaded from the Internet
- Security warning when running apps from the network share
- How to disable the security warning for specific file types using GPO
- How to Disable “Open File – Security Warning” in Windows 7
- Method 1: Registry Editor
- Method 2: Local Group Policy Editor
- Method 3: Internet Options’ Security Tab
- Отключаем предупреждение системы безопасности в Windows 10, 8 и 7
- Отключение окна предупреждения при запуске файла, скачанного из Интернета
- Предупреждение безопасности при запуске приложений из сетевого каталога
- Отключение предупреждение для определенных типов файлов через GPO
How to Disable “Open File Security Warnings” in Windows 10, 8 and 7
When you trying to run an exe, msi, bat, cmd and other executable types of files from a local drive or network folder in Windows, you can see this warning: “Open file — Security Warning”. In order to continue the program, user must manually confirm the launch of such a file by clicking Run button. This Windows security warning usually appears when you run an application file downloaded from the Internet or executable file that is located in a network shared folder.
Such Windows behavior is designed to protect your computer from running potentially dangerous executable files that was downloaded from the Internet or from others untrusted sources. This feature is present both in Windows 7 and Windows 10.
In some cases, when this software is being run or installed in the background using the scheduler task, Group Policies, SCCM scripts, etc., it can cause some issues since the warning window doesn’t appear in the user session. So, it becomes impossible to install / run such an application in a batch mode.
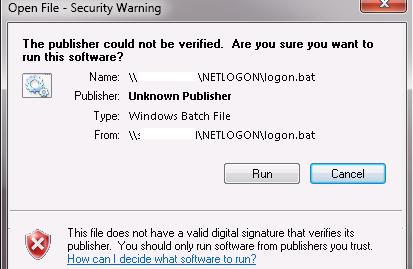
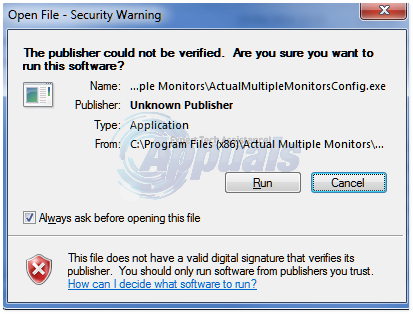
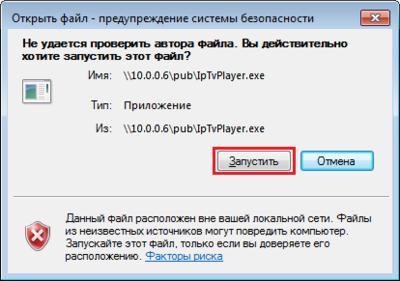
Let’s remind what the warning window looks like. For example, when you try to open a file from the network folder, the security warning alert looks as follows:
Open File — Security Warning
The Publisher could not be verified. Are you sure you want to run this software?
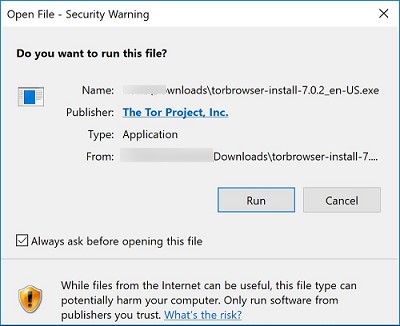
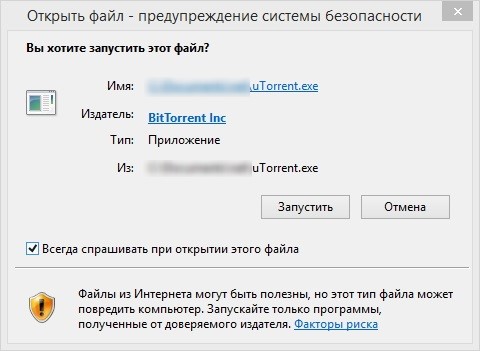
When running a file downloaded from the Internet from the local drive (or a network share mounted through net use), the text of the warning is a bit different:
Open File — Security Warning
Do you want to run this file?
While files from the Internet can be useful, this file type can potentially harm your computer. Only run software from publishers you trust.
Let’s try to find out how to remove security warnings when running executable or installation files in Windows 7 and Windows 10 (this guide is also suitable for all other Microsoft operating systems, starting from Windows XP).
We offer several options on how to disable this security warning window. Choose the suitable one depending on the necessary solution (in some cases you will have to combine the solutions).
Disabling the warning window when running an app downloaded from the Internet
The executable files downloaded from the Internet are automatically marked as potentially dangerous (downloaded from an untrusted source). This feature is implemented with the help of the alternative NTFS file streams technology (Alternate Data Streams – ADS). To make it simple, let’s consider it to be a special file mark, which is automatically assigned to the downloaded file (see an article How does Windows know if a file is downloaded from the Internet). To remove this marker, you need to unblock this file. To do it:
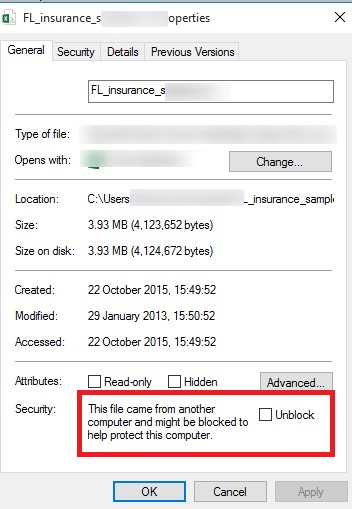
- Open the properties of the executable file;
- On the General tab click the button or mark the Unblock checkbox. If the file has been downloaded from the Internet, the following warning will be displayed next to the button (checkbox): This file came from another computer and might be blocked to help protect this computer.

- Save the changes by clicking OK button. After the file has been unblocked, it is run without the warning window (NTFS alternate data streams is removed).
The alternative NTFS stream mark Zone.Identifier can be reset using these two commands (a new file will be created):
move oldapp.exe > newapp
type newapp > oldapp.exe
Or with the help of the Sysinternal’s utility:
Also you can unblock file using PowerShell:
Unblock-File -Path C:\Downloads\somefile.exe
If you want to disable this warning only for files downloaded using the browser, then you can disable setting the Zone.Identifier attribute in the different browsers:
For Google Chrome and IE, you need to create such a registry key:
And for Mozilla Firefox, on the settings page about:config change the value of browser.download.saveZoneInformation to false.
Security warning when running apps from the network share
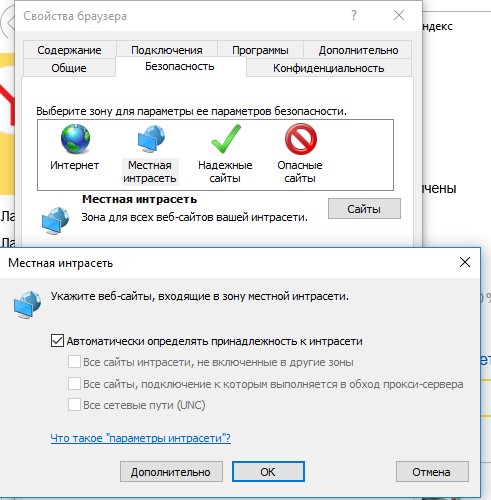
The warning window may appear when the program is launched from a shared network folder using the UNC path. This problem is usually applies to corporate users working in the organization’s network. In this case, it’s easiest to add the name and / or IP address of the server where the executable file is stored to the Local Intranet zone in the Internet Explorer settings. This will indicate that the resource is trusted. To do it:
- Go to Control Panel → Internet Option
- Security tab
- Open Local Intranet → Sites → Advanced

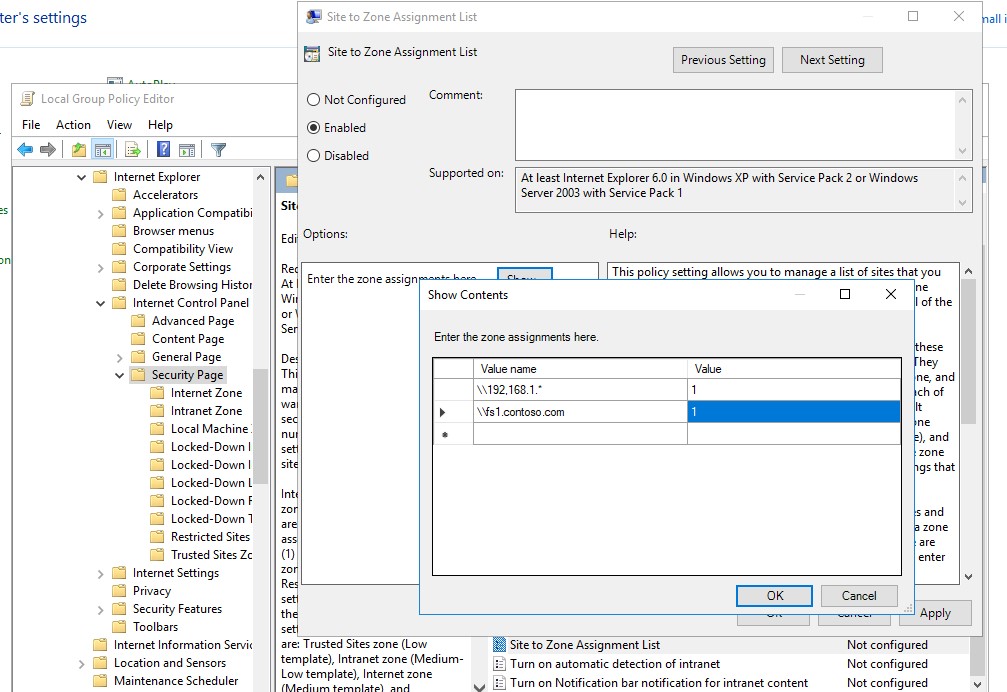
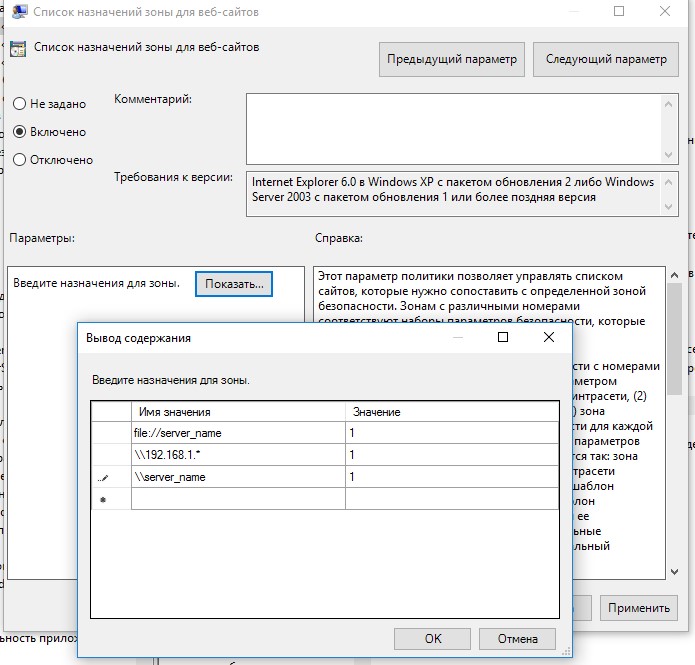
Also you can add the addresses of network folder and servers to the Local Intranet zone using GPO. Open the local (gpedit.msc) or the domain policy editor (gpmc.msc). Enable the policy Compute Configuration -> Administrative Templates ->Windows Components -> Internet Explorer -> Internet Control Panel -> Security Page -> Site to Zone Assignment List. In the policy settings, you must specify a list of trusted servers in the following format:
- Server name (e.g., file://server_name, \\server_name, server_name or IP)
- Zone number (1 for the Local Intranet Zone)
Save the policy changes and update it on the client (gpupdate / focre). Warning when opening executable files from the specified shared folders should cease to appear.
In addition, in Group Policies, you can enable the following settings in the section User Configuration -> Administrative Templates -> Windows Components -> Internet Explorer -> Internet Control Panel -> Security Page. This is the best option for domain users:
- Intranet Sites: Include all local (intranet) sites not listed in other zones
- Intranet Sites: Include all network paths (UNCs)
- Turn on automatic detection of intranet

How to disable the security warning for specific file types using GPO
In some cases, it is advisable to completely disable the appearance of the security warnings for certain types (extensions) of files through group policies. Although, of course, this is not very safe, because the user can accidentally run something malicious.
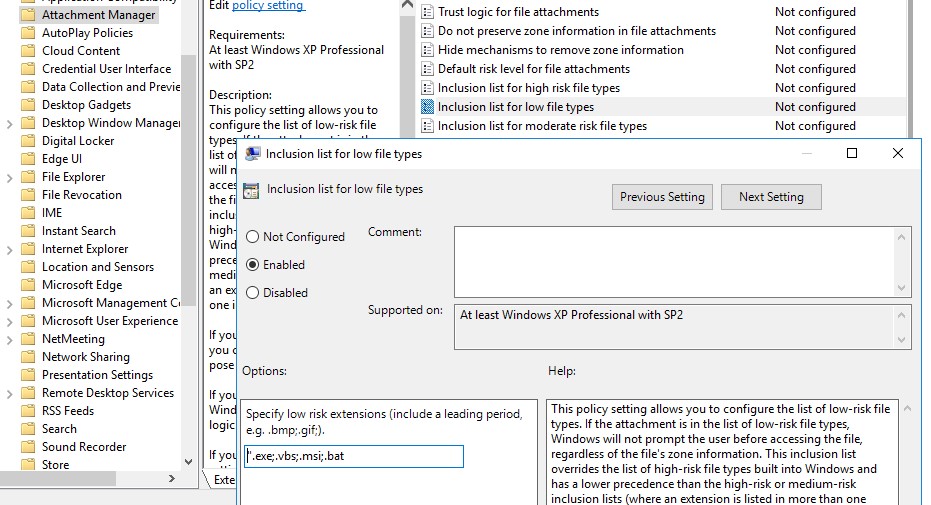
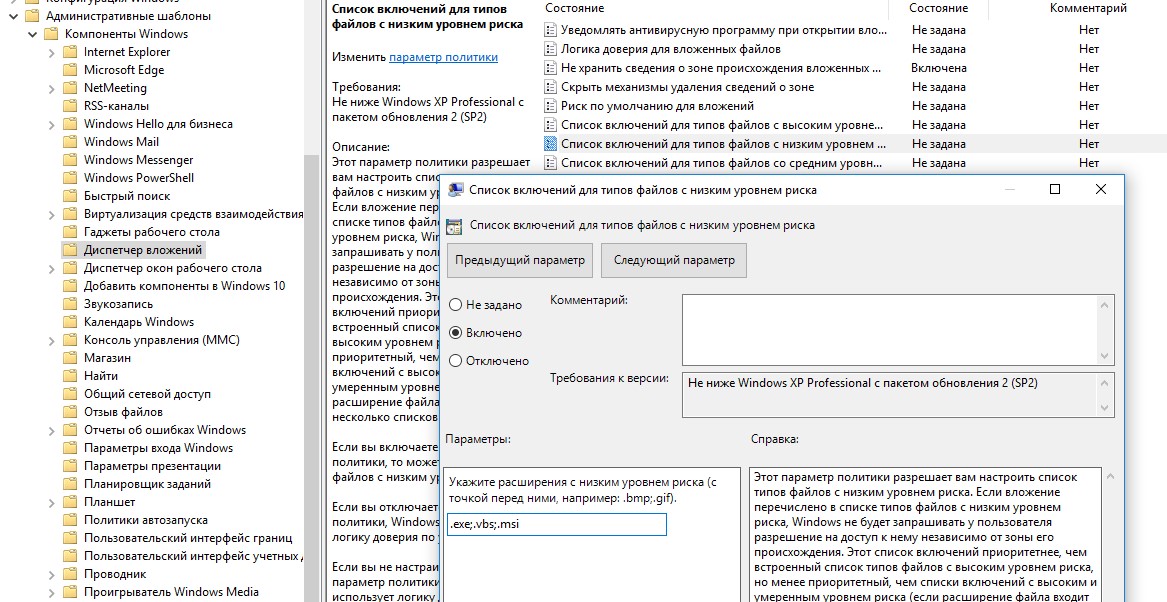
To do it, in the GPO Editor go to: User Configuration -> Administrative Templates -> Windows Components -> Attachment Manager.
- Enable the policy Do not preserve zone information in file attachments. All the downloaded files will be run without the warning on all computers.
- Enable the policy Inclusion list for low file types, and in its settings specify the list of file extensions you would like to run, e.g., .exe; .vbs; .msi. The system will ignore the markers on the files with these extensions and run them without the warning.
Save the policy, assign it to the target OU and apply it to clients by running on them gpupdate /force
How to Disable “Open File – Security Warning” in Windows 7
We all need security measures to be put in place to protect us while using computer systems. Windows 7, like any other platform, also has its fair share of security risks and threats. It is for this reason that Microsoft set out to put measures in place to warn you of potential attacks on your system. One such mechanism happens to be the security warning “Do you want to run this file?” Usually you will see the name, publisher, type and source of the “suspicious” file. This pulls the user’s attention to the file in question and they proceed only after closer scrutiny.
This feature takes into account that in the course of using computers, users sometimes download programs without much consideration. These programs pose the threat of infecting computers. However, if you have a good antivirus program in place, there is really no need to have these warnings popping up every now and then. Quite frankly the warning messages in Windows 7can get irritating. If you have had enough of the annoyance, there are some ways through which you can eradicate the irksome messages.
NOTE: Disabling the security warning is a security threat in itself. Do this if you have a strong updated antivirus program on your PC.
Method 1: Registry Editor
Hold the Windows Key and Press R.
Type regedit.exe in the run dialog and press ENTER or click OK. Make sure you take a backup of registry settings (click here)

In case a User Account Control warning appears after the above step, click “Yes” or press ENTER again.
The registry editor appears here. You will have the explorer window to the left and the components or elements to be edited on the right hand side of it.
Click on the element “HKEY_CURRENT_USER”. It will expand into sub folders. Under it, click on “Software” to yet again access more subfolders.
Continue to the sub folders Microsoft -> Windows -> CurrentVersion -> Policies, and then to In some rare cases you may not find the Association sub folder. If so, create it by yourself. Still under Policies, right click on an empty space and choose NEW -> Key -> Associations

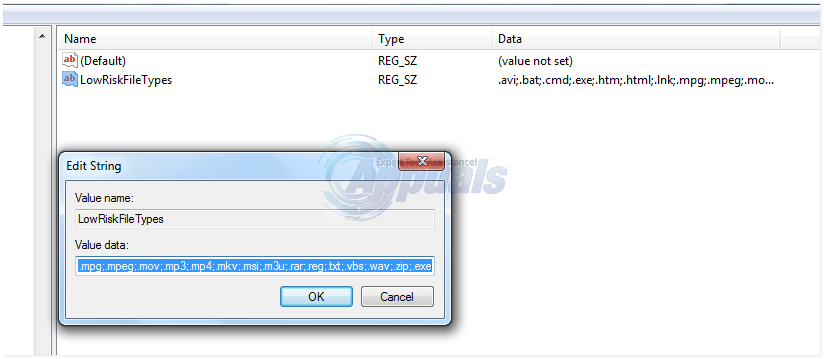
Click on the Associations folder, and then move to the right hand side of the window. Identify the LowRiskFileTypes Double click it. Just in case there is no such entry on your system, yet again create a new one with the name LowRiskFileTypes (Right Click in the Left Pane, choose New -> String Value).
Take note that the security warning applies to specific program extensions. You have to key them in by yourself. If you know the exact files prompting the warning go ahead and fill in the file extensions you want to be overlooked by the system. Otherwise, just paste the below entries into the resulting window under “value data”:
To add more values, just add ;.value-here to the end of the line.
These extensions are not limited whatsoever; you can key in any file extensions that you think trigger the security warning.
After you finish, press OK and close the registry window. Restart your PC. That’s it! The irksome warning is no more.
Method 2: Local Group Policy Editor
If you are not up to the task of fiddling around with registry keys, editing the Local Group Policy is your next best bet.However, the Group Policy feature is only built into Pro Versions.
Go to “Run” and type “gpedit.msc”; or access the policy editor by any other preferred means.
Go to User Configuration, and then click on Administrative Templates. Go to the Windows Components sub folder and then again to Attachment Manager.
On the list of entries, locate the item “Do note preserve zone information in file attachments” and open it. Change the value to Enabled then say OK. Close the window and save the changes. Do not go out of the Group Policy Editor just yet.
Open the “Inclusion list for low file types” item. Yet again, change the setting to “Enabled”, and in the options box also enter the file extensions written under Method 1. Click OK (settings will be saved after closing). You can now exit the policy editor and restart your computer.
Method 3: Internet Options’ Security Tab
There is yet another way of eliminating the security warning. This is through editing Internet Settings. Just follow the steps below.
Hold the Windows Key and Press R and type “inetcpl.cpl” in the run window that appears. Press ENTER or click OK.
The internet properties window appears. Click on the “Security” tab in the upper region of the Internet Properties window. You will see security levels for your current zone.
Click on the “Custom Level” button; another window appears right away. Locate the line that says “Launching applications and unsafe files (not secure)” and choose “Enable”.
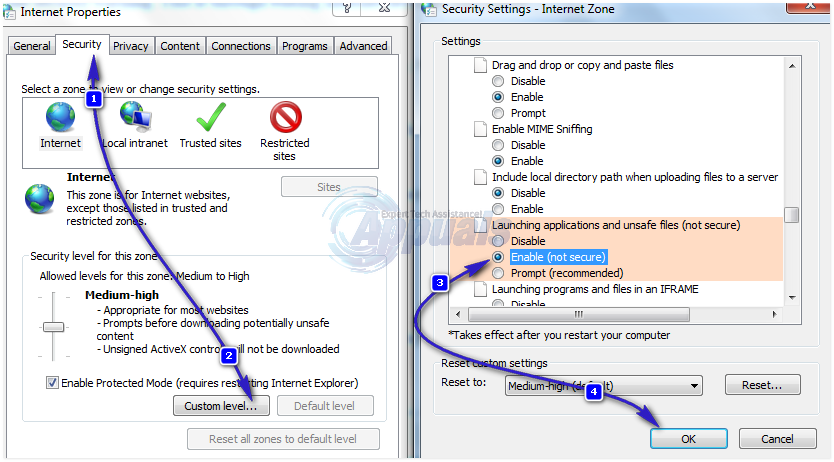
Click on OK. A warning appears; just click yes. Click OK again to exit the internet settings.
If necessary, restart your computer.
You have successfully disabled the “Open File – Security Warning” in Windows 10” warning.
Отключаем предупреждение системы безопасности в Windows 10, 8 и 7
В Windows при попытке открыть или запустить исполняемый файл типа exe, msi, bat, cmd (и других типов файлов) с локального диска или сетевой папки может появиться предупреждение “Открыть файл – предупреждение системы безопасности” (Open file — Security Warning). Для продолжения выполнения программы пользователь должен вручную подтвердить запуск такого файла, нажав кнопку “Запустить” (Run). Такое предупреждение безопасности Windows как правило, появляется при запуске скачанного из интернета установочного файла приложения или исполняемого файла, которые находится в общей сетевой папке на сервере.
Такая настройка Windows предназначена для обеспечения защиты вашего компьютера от запуска потенциально опасных исполняемых файлов, которые вы скачали из Интернета или других недоверенных источников и пытаетесь запустить. Эта особенность при запуске файлов присутствует как в Windows 7, так и в Windows 10.
В ряде случаев, когда запуск / установка подобного ПО осуществляется в фоновом режиме через скрипты планировщика, групповые политики, задания SCCM и т.д. это может вызвать проблемы, т.к. предупреждающее окно не отображается в сессии пользователя. Соответственно, установка или запуск такого приложения из скрипта становится невозможен.
Напомним, как выглядит окно с предупреждением. Например, при открытии файла из сетевого каталога окно предупреждения системы безопасности Windows выглядит так:
Открыть файл – предупреждение системы безопасности
Не удаётся проверить издателя. Вы действительно хотите запустить этот файл?
Open File — Security Warning
The Publisher could not be verified. Are you sure you want to run this software?
 При запуске скачанного их Интернета файла с локального диска (или сетевого каталога, смонтированного через net use) текст предупреждения немного другой:
Open File — Security Warning
Do you want tio run this file?
Открыть файл – предупреждение системы безопасности
Запустить этот файл?
Файлы из Интернета могут быть полезны, но этот тип файла может повредить компьютер. Запускайте только программы, полученные от доверенного издателя.
Попробуем разобраться, как убрать предупреждение системы безопасности при запуске исполняемых или установочных файлов в Windows 7 и Windows 10 (инструкция подходит и для всех других ОС Microsoft, начиная с Windows XP).
Мы предлагаем несколько вариантов отключения окна предупреждения системы безопасности. Выберите подходящий способ в зависимости от требуемого решения (в некоторых случаях предложенные решения приходится комбинировать).
Отключение окна предупреждения при запуске файла, скачанного из Интернета
Исполняемые файлы, скачанные из Интернета, автоматически помечаются как потенциально опасные (загруженные из небезопасного источника). Реализуется этот функционал через альтернативные NTFS потоки файлов. Для упрощения, будем считать что это специальная метка файла, которая автоматически назначается скачанному из сети файлу (Как Windows определяет, что файл скачан из Интернета). Чтобы удалить эту метку, нужно разблокировать это приложение. Для этого:
- Откройте свойства исполняемого файла
- И на вкладке Общие (General) нажмите кнопку или установите чекбокс Разблокировать (Unblock). У полученного из интернета файла будет рядом с кнопкой будет указано такое предупреждение
Осторожно: Этот файл получен с другого компьютера и, возможно, был заблокирован с целью защиты компьютера. (This file came from another computer and might be blocked to help protect this computer)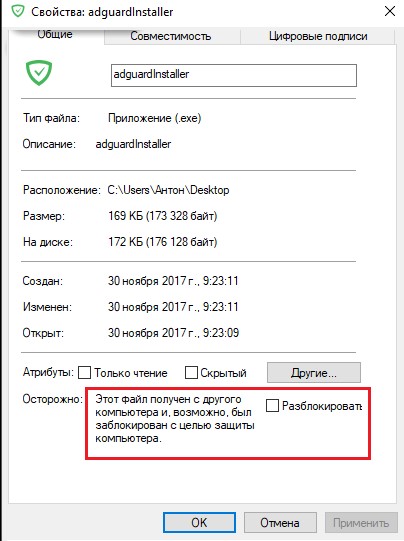
Сохраните изменение, нажав на кнопку Ok. После того, как файл был разблокирован, он будет запускаться без предупреждающего окна (NTFS метка будет снята).
Метку альтернативного NTFS потока Zone.Identifier можно сбросить с помощью таких двух команд (создастся новый файл):
move oldName.exe > newName
type newName > oldName.exe
Или утилиты
streams.exe
Если нужно отключить это предупреждение только для файлов, скачанных с помощью браузера, то отключить сохранение атрибута Zone.Identifier при скачивании файлов можно непосредственно в браузере:
Для Google Chrome и IE нужно создать такой ключ реестра
[HKEY_CURRENT_USER\Software\Microsoft\Windows\CurrentVersion\Policies\Attachments]
“SaveZoneInformation”=dword:00000001
А для Mozilla Firefox на странице настроек about:config изменить значение browser.download.saveZoneInformation на false.
Предупреждение безопасности при запуске приложений из сетевого каталога
Этот вариант, как правило, возникает у корпоративных пользователей, которые работают в сети организации. Окно предупреждения может появится при запуске программы из общего сетевого каталога (сетевой шары) через UNC путь. В этом случае проще всего в настройках обозревателя Internet Explorer добавить имя и/или ip адрес сервера, на котором хранится исполняемый файл в зону Местная интрасеть. Тем самым вы укажете, что данный ресурс является доверенным. Для этого:
- Перейдите в Панель управления -> Свойства обозревателя (Internet Option)
- Вкладка Безопасность (Security)
- Открыть Местная интрасеть (Local Intranet) ->Узлы (Sites) ->Дополнительно (Advanced)
Добавить адреса сетевых каталогов и серверов в зону Местная интрасеть можно с помощью групповых политик (GPO). Откройте редактор локальной (gpedit.msc) либо доменной (gpmc.msc) политики. Перейдите в раздел Compute Configuration -> Administrative Templates -> Windows Components -> Internet Explorer -> Internet Control Panel -> Security Page (Конфигурация компьютера -> Административные шаблоны -> Компоненты Windows -> Internet Explorer -> Панель управления браузером -> Вкладка безопасность). Включите политику Site to Zone Assignment List (Список назначений зоны безопасности для веб-сайтов). В настройках политики нужно указать список доверенных серверов в формате:
- Имя сервера (в виде file://server_name, \\server_name, server_name или IP)
- Номер зоны (1 – Для местной интрасети)
Сохраните изменения в политики и обновите ее на клиенте (gpupdate /focre). Предупреждение при открытии исполняемых файлов из указанных сетевых каталогов должно перестать появляться.
Кроме того, в групповых политиках можно включить следующие настройки в разделе User Configuration -> Administrative Templates -> Windows Components -> Internet Explorer -> Internet Control Panel -> Security Page (Конфигурация пользователя -> Административные шаблоны -> Компоненты Windows -> Internet Explorer -> Панель управления браузером -> Вкладка безопасность). Это оптимальный вариант для пользователей домена:
- Сайты Интрасети: все сайты, не перечисленные в других зонах Intranet Sites: Include all local (intranet) sites not listed in other zones
- Сайты Интрасети: все сетевые пути (UNC) Intranet Sites: Include all network paths (UNCs)
- Включить автоматическое определение интрасети

Отключение предупреждение для определенных типов файлов через GPO
В некоторых случаях целесообразно отключить появление предупреждения для определенных типов (расширений) файлов через групповые политики. Хотя, конечно, это не очень безопасно, т.к. пользователь не глядя может запустить что-то вредоносное.
Для этого в редакторе GPO перейдите в раздел User Configuration-> Administrative Templates-> Windows Components-> Attachment Manager (Конфигурация пользователя -> Административные шаблоны -> Компоненты Windows -> Диспетчер вложений).
- Включите политику Не хранить сведения о зоне происхождения вложений (Do not preserve zone information in file attachments). Все скачанные из интернета исполняемые файлы будут запускаться без подтверждения на всех компьютерах.
- Включите политику Список включений для типов файлов с низким риском (Inclusion list for low file types), укажите в ее настройках список расширений файлов, для которых нужно отключить появления окна с предупреждением системы безопасности Windows, например: .exe;.vbs;.msi. Система будет игнорировать метки на файлах с этим расширением, и запускать их без подтверждения.
Сохраните политику и примените ее на клиентах, выполнив на них команду gpupdate /force.
После этого должно перестать появляться предупреждение при открытии файлов с указанными расширениями с любой информацией в атрибуте Zone.Identifier.
Можно также в параметрах обозревателя для зоны Интернета (Безопасность — .Интернет -> Другой -> Разное -> Запуск программ и небезопасный файлов) разрешить запуск любых файлов из интернета, но это крайне рискованно.


