- Configure Windows 7 to Display File Extensions [How-To]
- How To Display File Extensions In Windows 7
- How to show File Extensions in Windows 10
- What are File Extensions & how are they useful
- Show File Extensions in Windows 10
- 1] Through Folder or File Explorer Options
- 2] Via Windows File Explorer
- 3] Using the Registry Editor
- How to configure Windows to show file extensions and hidden files
- How to Show File Extensions in Windows 10 [DETAILED GUIDE]
- How can I see file extensions in Windows 10?
- 1. Use Windows File Explorer
- 2. Show File Extension from Control Panel
- 3. Use the Registry Editor
- Show and hide file extensions in Windows 10
- Learn how to show and hide file extensions in Windows 10
- Show hidden file extensions in Microsoft Windows 10
- Related software and links:
Configure Windows 7 to Display File Extensions [How-To]

 In all versions of Windows including the latest Windows 7, the file extensions are hidden by default. Perhaps it’s because Microsoft did some case study in the past and found that people don’t like being able to see file extensions. Who knows. All I know is, with hidden file extensions, it’s not easy to (A – Find a file at times and (B – Rename files (specifically their extension.) This is why the below Step-by-Step to configure Windows to display file extensions is one of the first things I do on new systems.
How To Display File Extensions In Windows 7
1. Right-Click the Start Orb, and then Click Open Windows Explorer.

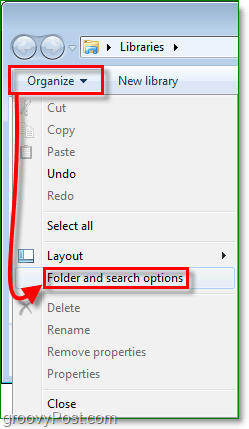
2. In Explorer, Click Organize. Then Click Folder and search options.
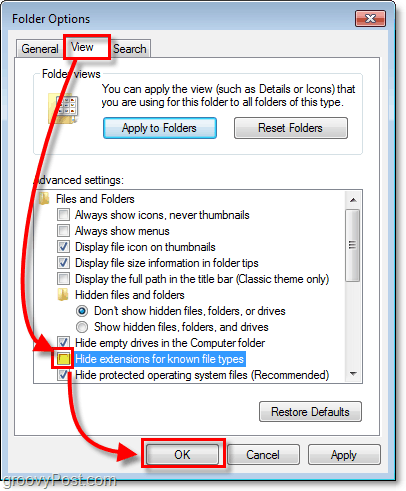
3. In the Folder Options window, Click the View tab. Next Click and Uncheck the Hide extensions for known file types check box. Click OK to finish.
All done!
Instantly your files will show their extensions at the end of their file name. Now you can even use the Right-Click > Rename feature to change file extensions manually as well (just make sure you know what you’re doing first.)
How to show File Extensions in Windows 10
File Extension is that which identifies the file type. If you are a regular Windows user, then it is not at all a problem to identify the file type. For it is very important to see file extension to identify the type of file you are trying to open from a security point of view. So in this post, we will see how to hide or show File Extensions in Windows 10/8/7 and why you should show them.
Since file names allow you to use multiple full stops, the real name of a malware file could be realword .docx.exe . But because you have not set Windows to show file extensions, you would see only realword .docx . Thinking its a Word document, you could well end up clicking on it and infecting your computer. If you had, on the other hand, set your PC to show file extensions, you would see its full name – realword .docx.exe , which would help you to identify that it was actually an executable file and in all probability a malware file.
What are File Extensions & how are they useful
Different file types have different extensions. Audio files have .mp3, .wav, .wma, and more based on the program used to open that file. File extensions also help the operating system to identify the corresponding program to open that particular file. So, you should be able to see file extensions to be at the safer side, and we will let you know how to enable options to see file extensions in Windows.
As mentioned earlier, by default Windows does not show file extensions and they are hidden. But, you can toggle the option to see them.
Show File Extensions in Windows 10
There are five ways how you can go about accessing this setting:
- Through the File Explorer Options
- Through Windows Explorer Ribbon
- Using the Registry
- Using Command Prompt
- Using Group Policy Editor.
1] Through Folder or File Explorer Options
Open Control Panel > Appearance and Personalization. Now, click on Folder Options or File Explorer Option, as it is now called > View tab.
In this tab, under Advanced Settings, you will see the option Hide extensions for known file types. Uncheck this option and click on Apply and OK.
Windows 10 users may also search for File Explorer Options in Start search box and open this box.
Now, you can see file extensions for all files anywhere on your Windows system.
In Windows 10/8.1 Explorer, you can access File Explorer Options via Explorer.
Click View > Options > Change folder and search options.
Once here, you can do the needful as explained above.
In Windows 7, open Explorer, press Alt on your keyboard to make the Classic bar appear. Next, click on Tools > Folder Options. Now follow the steps mentioned above.
These are very simple steps to follow, and you do not need any third-party software to view file extensions. Windows provides us with everything which can be easily achieved, and the point lies in knowing and implementing them. This is the first way to see file extensions in Windows 7.
2] Via Windows File Explorer
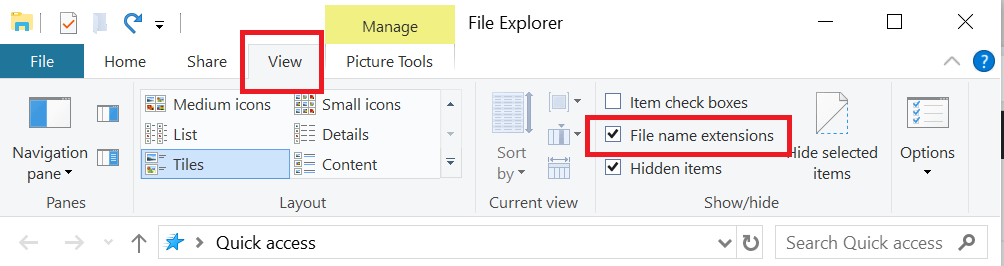
Open Explorer and click on the View tab. Simply select the File name extensions checkbox, and you are all set.
3] Using the Registry Editor
Hit the WINKEY + R button combination to launch the Run utility, type in regedit and hit Enter. Once Registry Editor opens, navigate to the following key-
Look up for a DWORD entry labeled as HideFileExt.
Double click on the mentioned DWORD entry and set its value as 0. This will show up the hidden file extensions.
A value of 0 will hide the file extensions.
Exit the Registry Editor and then reboot your computer for the changes to take effect.
4] Use Windows Command Prompt
This fix can be used in both the scenarios mentioned above. Insert a bootable drive of Windows 10 installer.
Start by hitting the WINKEY + X combinations and select Command Prompt (Admin) to launch Command Prompt with Administrator Privileges.
Navigate to the root location of that bootable device inside the Command Prompt command line. Once you get there, type in the following to show the file extensions-
And then hit Enter.
You can also enter the following command to hide the file extensions,
5] Using Group Policy Editor
You can also use the Group Policy Editor and change the setting here:
User Configuration > Preferences > Control Panel Settings > Folder Options.
Set “Show hidden files and folders” and uncheck “Hide extensions for known file types”.
Thus, you can set your Windows to show file extensions in Windows 10/8. If you have anything to add, please do share it with us through comments.
Date: March 22, 2020 Tags: Explorer, Features
How to configure Windows to show file extensions and hidden files
In order to avoid confusion regarding your saved files, you may want to configure Windows to show all common file extensions, such as .zip. This will help differentiate between different archives (and other files). You may also want to configure Windows to show you hidden files and folders. Both involve using the same Control Panel applet. Here are the steps:
Windows 10:
- Open File Explorer; if you do not have an icon for this in the task bar; click Start, click Windows System, and then File Explorer.

- Click the View tab in File Explorer
- Click the box next to File name extensions to see file extensions
- Click the box next to Hidden items to see hidden files
- Close File Explorer if you wish


Windows 8:
- On the Start menu screen start typing «Control»
- When you see Control Panel under Apps, click it
- If you are in the Category view, click the drop down menu and choose either Large icons or Small icons
- Open Folder Options
- Click on the View tab at the top of the dialog box
- To see file extensions, uncheck Hide file extensions for known file types
- To see hidden files and folders, select Show hidden files, folders, and drives
- Click OK


Windows 7
- Click Start and open the Control Panel
- If you are in the Category view, click the drop down menu and choose either Large icons or Small icons
- Open Folder Options
- Click on the View tab at the top of the dialog box
- To see file extensions, uncheck Hide file extensions for known file types
- To see hidden files and folders, select Show hidden files, folders, and drives
- Click OK
If you have any questions about this information, please submit a Technical Support ticket.
How to Show File Extensions in Windows 10 [DETAILED GUIDE]


Windows 10 by default hides the file extension from the user view in the File Explorer to keep the directory clean. However, at times you may need it to show file extensions in Windows 10. It also helps you in finding the right program to open a file in case Windows is unable to recognize the right program to run the file.
In this article, we have put together multiple methods to show file extension in Windows 10.
How can I see file extensions in Windows 10?
1. Use Windows File Explorer
- Open the File Explorer. Click the Folder icon in the taskbar or search for it using the Search bar.
- Make sure the Ribbon (top) is maximized, and you can see “File, Home, Share and View” tab.
- Click on the View tab.
- Check “File name Extensions” box under “Show/Hide” section.
- Now if you open any folder, you should be able to view the file name followed by the extension for all the files.
2. Show File Extension from Control Panel
- Press Windows Key + R.
- Type control and press OK.
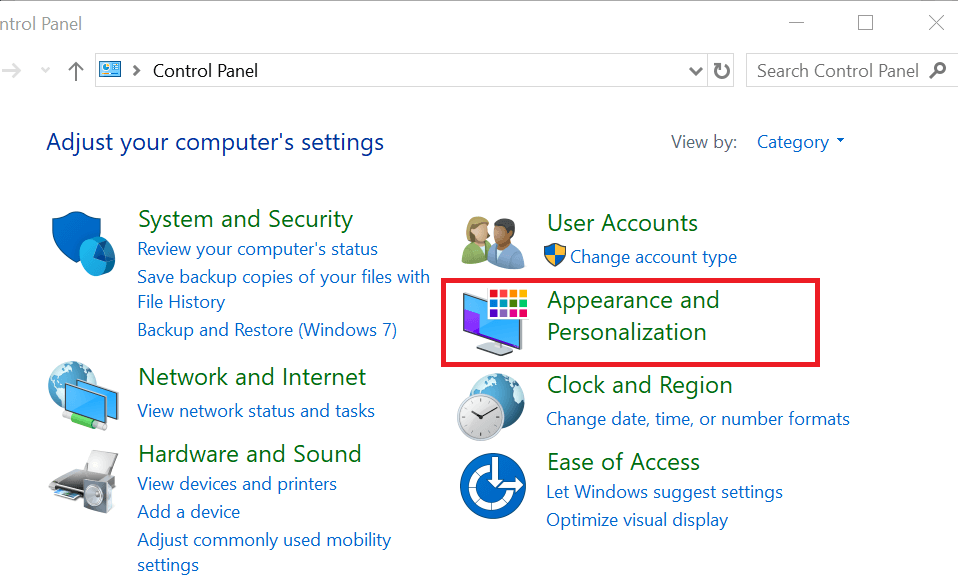
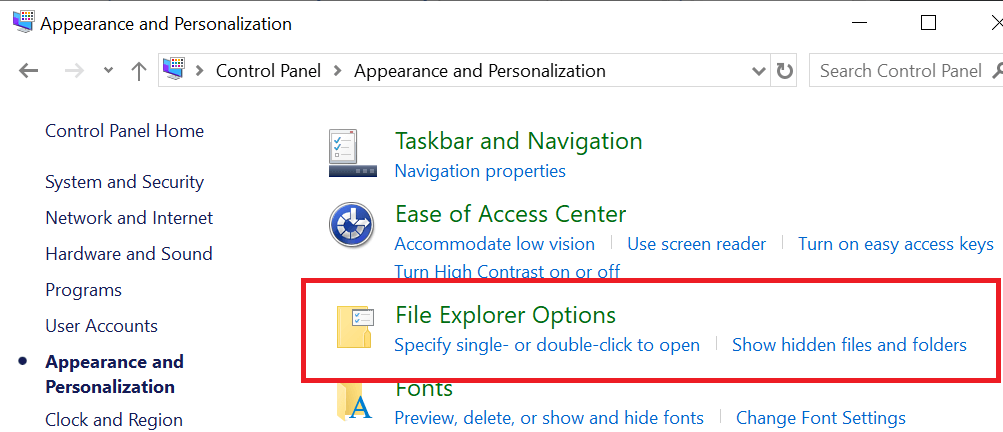
- Click on the Appearance and Personalization tab.
- Click on File Explorer Options.
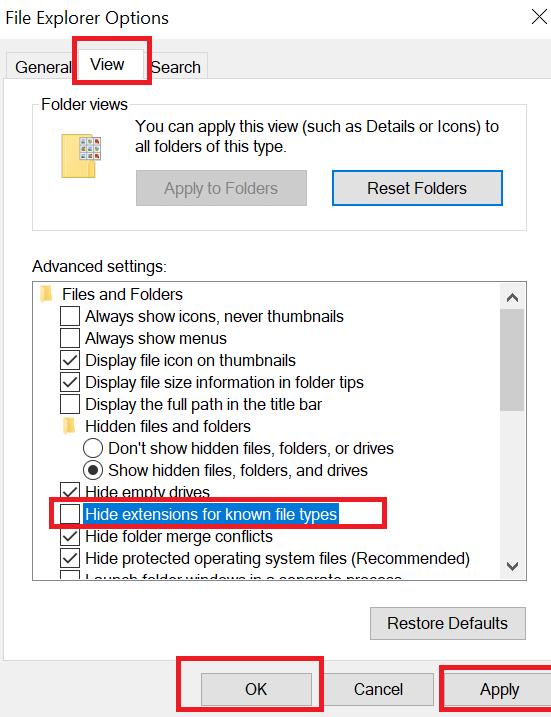
- In the “File Explorer Options” window, click on the View tab.
- Under Advanced Settings, scroll down and uncheck the box “Hide extensions for known file types“.
- Click Apply and click OK to save the changes. Windows 10 should show file extensions in File Explorer now.
3. Use the Registry Editor
- Press Windows Key + R to open Run.
- Type regedit and click OK.
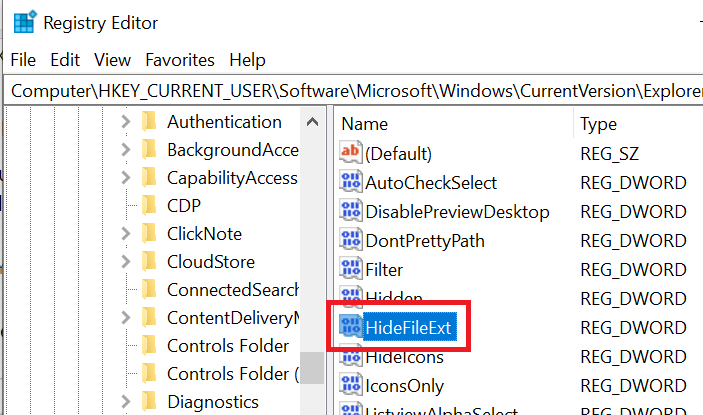
- In the Registry Editor, navigate to the following path:
Computer\HKEY_CURRENT_USER\Software. - And then navigate to Microsoft\Windows\CurrentVersion\Explorer\Advanced.
- In the right pane look for the “HideFileExt” DWORD value.
- Right-click on “HideFileExt” DWORD and select “Modify”.
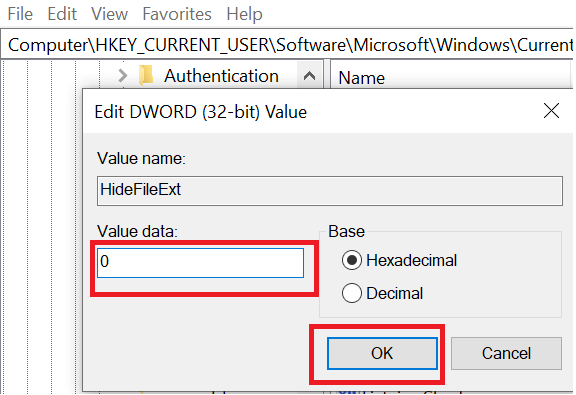
- In the value data, type 0 and click OK.
- Close the registry editor and check if the Windows 10 shows file extensions.
RELATED STORIES YOU MAY LIKE:
Show and hide file extensions in Windows 10
Show and hide file extensions in Windows 10
Learn how to show and hide file extensions in Windows 10
Even in the latest version of Windows operating system — Windows 10, the file extensions of known file types that are associated with some software installed in your computer, are still hidden by default.
This is due to Microsoft’s policy which makes it somewhat easier for common users, but at the same time may also be potentially dangerous due security reasons.
Microsoft prefers simplicity over security, which unfortunately means that dangerous and harmful files can be hidden under wrong file type and users does not have fully under control what they opens.
More advanced users of Windows 10 who want to keep their files and data under control can turn off «Hide extensions for known file types» File Explorer feature.
Show hidden file extensions in Microsoft Windows 10
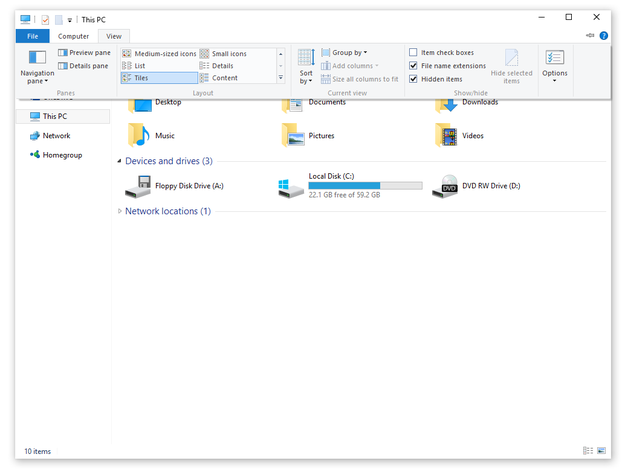
Open File Explorer (This PC) → Click on View option in upper menu to view Ribbon menu → Check the box next the File name extensions option.
If you also want to view hidden files and folders → Check the box next the Hidden items option.
Hide and show file extensions in Windows 10
Another way how to view file extensions in Microsoft Windows 10, but little more complex is:
Open Desktop Control Panel, for example by click by right mouse button on Start button in the left down corner → Select Control Panel option.
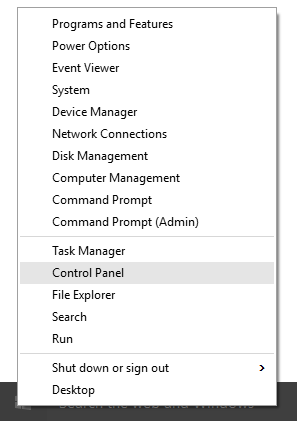
Control Panel option in Windows 10
Click on Appearance and Personalization option.
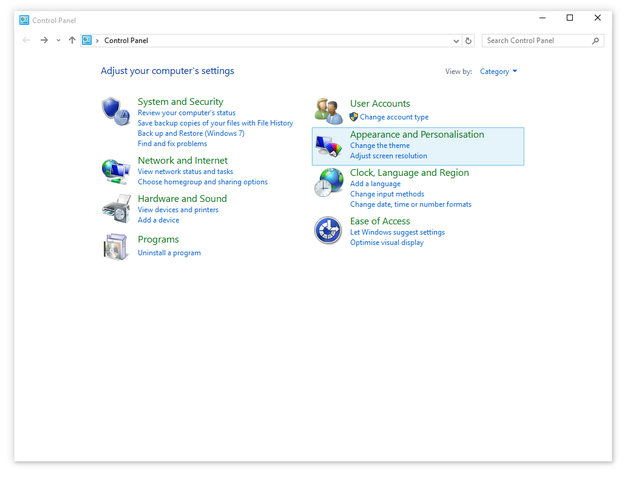
Control Panel in Microsoft Windows 10
Click on Show hidden files and folders option in File Explorer Options group.
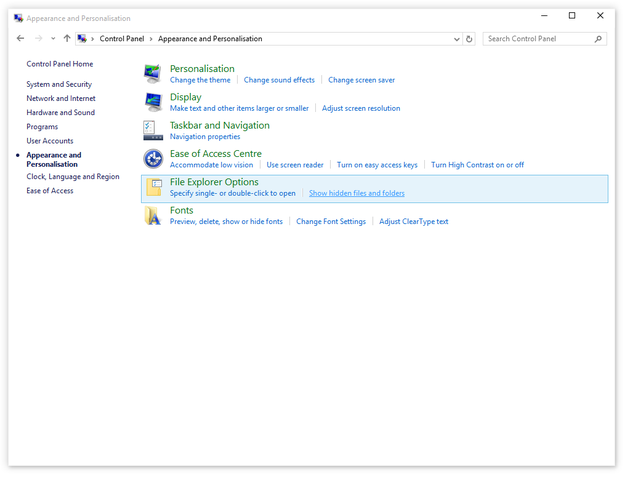
Show Hidden files and folders option in Windows 10 Control Panel
Select Show hidden files, folders and drives options and uncheck Hide extensions for known file types box → Apply and OK

File Explorer Options in Windows 10
After the changes are saved, you will be able to see the all file extensions in your Microsoft Windows 10 operating system.


