- Установка Exchange 2013 на Windows 2012 R2
- Моральная подготовка
- Подготовка AD сервера
- Установка Exchange
- Exchange 2013 prerequisites
- What do you need to know before you begin?
- Active Directory preparation
- Windows Server 2012 R2 and Windows Server 2012 prerequisites
- Mailbox or Client Access server roles
- Edge Transport server role
- Windows Server 2008 R2 SP1 prerequisites
- Mailbox or Client Access server roles
- Edge Transport server role
- Windows 7 prerequisites (admin tools only)
- Установка Exchange 2013 on Windows Server 2012 R2
Установка Exchange 2013 на Windows 2012 R2
Привет, сегодня мы будем ставить Exchange 2013 на Windows Server 2012 R2! Берем машинку помощнее и диска по больше, правда в моем случае я ограничился 12 GB RAM/60 SSD.
Моральная подготовка
- Не отключай IPv6, Exchange не любит этого
- Добавь себя в «Администраторы схемы» и «Администраторы предприятия», будь владыкой!
- Помни, минимальный уровень леса 2003, а схема должна располагаться на 2003 SP1 (не ниже)
- Заранее скачай Exchange 2013
- Распакуй образ (в примере будет использоваться путь к инсталяхе C:\Exchange\)
Подготовка AD сервера
Скорее всего у вас, в качестве ОС для AD используется 2008 R2 как и у меня, потому первые 2 шага будут относится только к этой ОС.
- Устанавливаем .NET Framework 4.0 (или .NET Framework 4.5 если ОС — Windows 2008 R2 SP2 и выше)
- Устанавливаем Windows Management Framework 3.0
- Выполняем команду Add-WindowsFeature RSAT-ADDS (Или Install-WindowsFeature RSAT-ADDS если у вас Windows 2012)
Установка Exchange
Перемещаемся на Exchange сервер который уже подготовлен, у него адекватное название, выставлен часовой пояс и введен в домен (советую пока не устанавливать обновления, так как я столкнулся с конфликтом при выполнении следующего шага и обновлений (решение после первого шага).
- Устанавливаем всякую мелочь необходимую для корректной установки и работы Exchange сервера. Вставляем все это в окно PowerShell запущенное с административными привелегиями.
При установке у меня появилась проблема, не могло найти компонент Desktop-Experience. Помогло выполнение команды sfc /scannow и установка этого компонента через Server Manager.
- Microsoft .NET Framework 4.5 RC
- Windows Management Framework 3.0
- Microsoft Unified Communications Managed API 4.0, Core Runtime 64-bit
- Microsoft Office 2010 Filter Pack 64 bit
- Microsoft Office 2010 Filter Pack SP1 64 bit
- Microsoft Knowledge Base article KB974405 (Windows Identity Foundation)
- Knowledge Base article KB2619234 (Enable the Association Cookie/GUID that is used by RPC over HTTP to also be used at the RPC layer in Windows 7 and in Windows Server 2008 R2)
- Knowledge Base article KB2533623 (Insecure library loading could allow remote code execution)
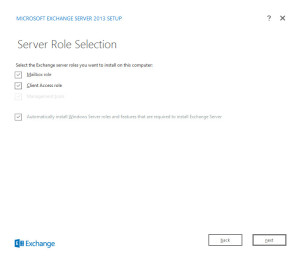
Mailbox Role — по сути самая важная роль в Exchange. Без нее — не будет ничего. Работает только в пределах одной организации.
Client Access role — У Mailbox роли есть один существенный «недостаток» он делает все, только не принимает подключения от клиентов. Вот здесь то и пригодился Mailbox Access. Данная роль служить очень прозрачным прокси, принимающим подключения от различных клиентов, будь то WEB доступ, Outlook или мобильные устройства, авторизирует клиентов через AD DS.
Последнюю галочку ставим обязательно дабы Exchange установился в полной мере, со всеми ему необходимыми компонентами.
Кратко говоря — если этот сервер единственный, ставьте чекбоксы так, как показано на скриншоте, то есть все возможные компоненты.
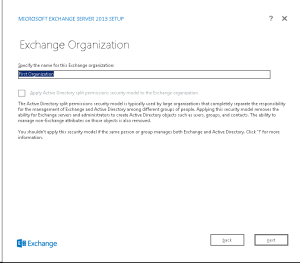
Название организации указываем произвольное.
Пункт Active Directory split permissions отвечает за разделение прав доступа на управление Active Directory и Exchange сервер. Данная настройка необходима только для больших организаций с двумя десятками айтишников и строжайшим разделением прав доступа в AD и Exchange. В подавляющем большинстве случаев данную галку — не трогаем.
Больше заковыристых пунктов не будет. Завершаем установку, которая длится обычно около 20 минут, перезагружаемся и можно пробовать зайти по адресу https://localhost/owa (если в конце установки не попросили перенаправить вас на эту страницу по окончанию инсталляции.
На этом установка завершена. Настраивать будем в последующих статьях.
Exchange 2013 prerequisites
Applies to: Exchange Server 2013
This topic provides the steps for installing the necessary Windows Server 2012 R2, Windows Server 2012 and Windows Server 2008В R2 with Service Pack 1 (SP1) operating system prerequisites for the Microsoft Exchange 2013 Mailbox, Client Access, and Edge Transport server roles. It also provides the prerequisites required to install the Exchange 2013 management tools on Windows 8, Windows 8.1, and WindowsВ 7 client computers.
What do you need to know before you begin?
The information in this topic is applicable to Service Pack 1 and later versions of Exchange 2013.
The Edge Transport server role is available starting with Exchange 2013 SP1.
Make sure that the functional level of your forest is at least Windows Server 2003, and that the schema master is running Windows Server 2003 with Service Pack 2 or later. For more information about the Windows functional level, see Managing Domains and Forests.
The full installation option of Windows Server 2012 R2, Windows Server 2012 and Windows Server 2008В R2 SP1 must be used for all servers running Exchange 2013 server roles or management tools.
You must first join the computer to the appropriate internal Active Directory forest and domain.
Some prerequisites require you to reboot the server to complete installation.
Install the latest Windows updates on your computer. For more information, see Deployment security checklist.
If you’re installing the Mailbox server role and you intend for the server to be a member of a database availability group (DAG), you must be running Windows Server 2012 R2 Standard or Datacenter Edition, Windows Server 2012 Standard or Datacenter Edition, or Windows Server 2008 R2 SP1 Enterprise Edition. Windows Server 2008 R2 SP 1 Standard Edition doesn’t support the features needed for DAGs.
You can’t upgrade Windows when Exchange is installed on the server.
To upgrade to Microsoft Unified Communications Managed API (UCMA) 4.0, you must first uninstall any previous versions of UCMA that are installed by using Add/Remove programs .
Having problems? Ask for help in the Exchange forums. Visit the forums at Exchange Server.
Active Directory preparation
The computer you want to use to prepare Active Directory for Exchange 2013 has specific prerequisites that must be met.
Install the following software, in the order shown, on the computer that will be used to prepare Active Directory:
Windows Management Framework 4.0 (included with Windows Server 2012 R2)
After you’ve installed the software listed above, complete the following steps to install the Remote Tools Administration Pack. After you’ve installed the Remote Tools Administration Pack you’ll be able to use the computer to prepare Active Directory. For more information about preparing Active Directory, see Prepare Active Directory and domains.
Open Windows PowerShell.
Install the Remote Tools Administration Pack.
On a Windows Server 2012 R2 or Windows Server 2012 computer, run the following command.
On a Windows Server 2008 R2 SP1 computer, run the following command.
Windows Server 2012 R2 and Windows Server 2012 prerequisites
The prerequisites that are needed to install Exchange 2013 on a Windows Server 2012 R2 or Windows Server 2012 computer depends on which Exchange roles you want to install. Read the section below that matches the roles you want to install.
Mailbox or Client Access server roles
Follow the instructions in this section to install the prerequisites on Windows Server 2012 R2 or Windows Server 2012 computers where you want to do one of the following:
Install only the Mailbox server role on a computer.
Install only the Client Access server role on a computer.
Install both the Mailbox and Client Access server roles on the same computer.
Do the following to install the required Windows roles and features:
Open Windows PowerShell.
Run the following command to install the required Windows components.
After you’ve installed the operating system roles and features, install the following software in the order shown:
Exchange 2013 CU23 requires .NET Framework 4.7.2. Upgrade your servers to .NET Framework 4.7.2 before you install Exchange 2013 CU23 or you’ll receive an error. If you’re running .NET Framework 4.7.1, upgrade to Exchange 2013 CU22 before you install .NET Framework 4.7.2. If you’re running .NET Framework 4.6.2, upgrade to Exchange 2013 CU20 before you install .NET Framework 4.7.1.
Windows Management Framework 4.0 (included with Windows Server 2012 R2)
Here you’ll find an overview of the latest supported Visual C++ Redistributable versions
Edge Transport server role
Follow the instructions in this section to install the prerequisites on Windows Server 2012 R2 or Windows Server 2012 computers where you want to install the Edge Transport server role on a computer.
Do the following to install the required Windows roles and features:
Open Windows PowerShell.
Run the following command to install the required Windows components.
Install the version of Microsoft .NET Framework that corresponds to the version of Exchange 2013 you’re installing:
Exchange 2013 CU23 requires .NET Framework 4.7.2. Upgrade your servers to .NET Framework 4.7.2 before you install Exchange 2013 CU23 or you’ll receive an error. If you’re running .NET Framework 4.7.1, upgrade to Exchange 2013 CU22 before you install .NET Framework 4.7.2. If you’re running .NET Framework 4.6.2, upgrade to Exchange 2013 CU20 before you install .NET Framework 4.7.1.
Windows Management Framework 4.0 (included with Windows Server 2012 R2)
Here you’ll find an overview of the latest supported Visual C++ Redistributable versions
Windows Server 2008 R2 SP1 prerequisites
The prerequisites that are needed to install Exchange 2013 on a Windows Server 2008 R2 SP1 computer depends on which Exchange roles you want to install. Read the section below that matches the roles you want to install.
Mailbox or Client Access server roles
Follow the instructions in this section to install the prerequisites on Windows Server 2008 R2 SP1 computers where you want to do one of the following:
Install only the Mailbox server role on a computer.
Install only the Client Access server role on a computer.
Install both the Mailbox and Client Access server roles on the same computer.
Do the following to install the required Windows roles and features:
Open Windows PowerShell.
Run the following command to load the Server Manager module.
Run the following command to install the required Windows components.
After you’ve installed the operating system roles and features, install the following software in the order shown:
Exchange 2013 CU23 requires .NET Framework 4.7.2. Upgrade your servers to .NET Framework 4.7.2 before you install Exchange 2013 CU23 or you’ll receive an error. If you’re running .NET Framework 4.7.1, upgrade to Exchange 2013 CU22 before you install .NET Framework 4.7.2. If you’re running .NET Framework 4.6.2, upgrade to Exchange 2013 CU20 before you install .NET Framework 4.7.1.
Here you’ll find an overview of the latest supported Visual C++ Redistributable versions
This hotfix may already be installed if you’ve configured Windows Update to install security updates on your computer.
Edge Transport server role
Follow the instructions in this section to install the prerequisites on Windows Server 2008 R2 SP1 computers where you want to install the Edge Transport server role on a computer.
Do the following to install the required Windows roles and features:
Open Windows PowerShell.
Run the following command to load the Server Manager module.
Run the following command to install the required Windows components.
After you’ve installed the operating system roles and features, install the following software in the order shown:
Exchange 2013 CU23 requires .NET Framework 4.7.2. Upgrade your servers to .NET Framework 4.7.2 before you install Exchange 2013 CU23 or you’ll receive an error. If you’re running .NET Framework 4.7.1, upgrade to Exchange 2013 CU22 before you install .NET Framework 4.7.2. If you’re running .NET Framework 4.6.2, upgrade to Exchange 2013 CU20 before you install .NET Framework 4.7.1.
Here you’ll find an overview of the latest supported Visual C++ Redistributable versions
Windows 7 prerequisites (admin tools only)
Follow the instructions in this section to install the prerequisites on domain-joined WindowsВ 7 64-bit computers where you want to install the Exchange management tools.
Open Control Panel, and then select Programs.
Click Turn Windows features on or off.
Navigate to Internet Information Services > Web Management Tools > IIS 6 Management Compatibility.
Select the check box for IIS 6 Management Console, and then click OK.
After you’ve installed the operating system features, install the following software in the order shown:
Установка Exchange 2013 on Windows Server 2012 R2
В Очередной раз мне пригодилось что я в свободное время изучал на своем тестовом полигоне. На это раз это шаги которые нужно проделать дабы развернуть почтовый сервер Exchange 2013 в домене под управлением Windows Server 2012 R2 Standard.
Всегда прежде чем что-то разворачивать для продуктива, так и для теста следует ознакомиться с системными требованиями, вот к примеру для установки Exchange 2013 ниже представлены следующие рекомендации:
- Почтовый ящик — минимум 8 ГБ
- Клиентский доступ — минимум 4 ГБ
- Сочетание почтовых ящиков и клиентского доступа — минимум 8 ГБ
- Пограничный транспорт — минимум 4 ГБ
Но это лишь начало. В моем случае т. к. я хочу хоть немного попробовать поработать, то мои требования будут много более занижены и все роли я буду устанавливать на одну систему.
Т.к. развернуть весь стенд под Virtualbox нужно обладать уж очень хорошей основной системой.
[stextbox заметку: В рамках этой заметки почтовый сервер будет развернут на одной системе сочетающей в себя роли: DC (DNS+DHCP) + Exchange 2013[/stextbox]
- Установлена система Windows Server 2012 R2 Standard (CPU =2,RAM = 4,HDD=70)
- Развернут контроллер домена на базе Windows Server 2012 R2 Standard = polygon.local
Также нужно настроить DNS прописать mx запись :
Win + C – control panel – Administrative Tools – DNS — Forward Lookup Zones — polygon.local:
mx:srv-dc:srv-dc.polygon.local:10
Из своего опыта Рекомендую всегда использовать англоязычные издания Exchange Server. Как показывает практика, оригинальные (английские) версии Exchange работают стабильнее, к тому же вам будет проще общаться на одном языке с профессионалами в случае возникновения проблем или при желании обменяться опытом.
Заходим на сайт http://technet.microsoft.com/en-us/evalcenter/hh973395.aspx ( Microsoft Exchange Server ) и нажимаем кнопку « Get Started Now ».
На 20.01.2017 перехожу по ссылке: https://www.microsoft.com/en-us/evalcenter/ после в строке поиска указываю Exchange 2013 и скачиваю указав произвольные данные для идентификации, а точнее наполнения статистики кто скачивает.
Для загрузки Exchange Server 2013, на следующем этапе потребуется установить Akamai NetSession Interface.
В открывшемся окне выбираем «Download the installer».
Далее автоматически откроется окно, где необходимо выбрать куда будет сохранен дистрибутив Exchange Server 2013, я на логическом диске C: создал каталог Exchange2013 и туда сохранил скачанный дистрибутив: Exchange-x64.exe
После того, как загрузка дистрибутива будет завершена запускаем инсталляционный файл: C:\Exchange2013\Exchange-x64.exe
Запускаем «Exchange-x64.exe” через правый клик выбрав запуск от имени Администратора (Run as administrator)
Далее мастер установки попросит указать путь до директории куда следует распаковать файлы (Choose Directory For Extracted Files), оставляю как есть: C:\Exchange2013
После того, как распаковка будет завершена, нужно будет подготовить схему Active Directory.
[stextbox ниже команды необходимо выполнять на контроллере домена с ролью «Shema Master», а так же обладать соответствующими правами в домене.[/stextbox]
Запускаем командную строку с правами администратора:
сочетание клавиш: Win + X, после выбираем в списке Command Prompt (Admin) – командная строка должна быть вида: «Administrator: Command Prompt»
Переходим в директорию: C:\Exchange2013:
C:\Windows\system32>cd /d c:\Exchange2013
c:\Exchange2013>setup /prepareschema /IAcceptExchangeServerLicenseTerms
Welcome to Microsoft Exchange Server 2013 Unattended Setup
File copy complete. Setup will now collect additional information needed for
Performing Microsoft Exchange Server Prerequisite Check
Prerequisite Analysis COMPLETED
Configuring Microsoft Exchange Server
Extending Active Directory schema COMPLETED
The Exchange Server setup operation completed successfully.
Процесс подготовки схемы Active Directory завершен.
Теперь необходимо подготовить Active Directory и создать организацию Exchange (после «OrganizationName» необходимо указать название (Я указываю polygon, у Вас это должно быть отличным) вашей организации на английском языке)
c:\Exchange2013>setup /PrepareAD /OrganizationName: «POLYGON» /IAcceptExchangeServerLicenseTerms
Welcome to Microsoft Exchange Server 2013 Unattended Setup
File copy complete. Setup will now collect additional information needed for
Performing Microsoft Exchange Server Prerequisite Check
Prerequisite Analysis COMPLETED
Setup will prepare the organization for Exchange 2013 by using ‘Setup /PrepareA
D’. No Exchange 2010 server roles have been detected in this topology. After thi
s operation, you will not be able to install any Exchange 2010 servers. For more information, visit: http://technet.microsoft.com/library(EXCHG.150)/ms.exch.setupreadiness.NoE14ServerWarning.aspx
Configuring Microsoft Exchange Server
Organization Preparation COMPLETED
The Exchange Server setup operation completed successfully.
Процесс подготовки Active Directory и создания организации Exchange завершен:
c:\Exchange2013>exit
Далее запускаем Windows PowerShell с правами Администратора и устанавливаем необходимые компоненты:
На рабочем столе из левого нижнего узла на иконке PowerShell через правый клик на элементе вызываем список свойств, находим строку Run as administrator и запускаем, консоль примет вид: «Administrator: Windows PowerShell»
Далее устанавливаем необходимые компоненты:
PS C:\Users\Administrator> install-windowsfeature as-http-activation,desktop-experience,net-framework-45-features,rpc-over-http-proxy,rsat-clustering,rsat-clustering-cmdinterface,web-mgmt-console,was-process-model,web-asp-net45,web-basic-auth,web-client-auth,web-digest-auth,web-dir-browsing,web-dyn-compression,web-http-errors,web-http-logging,web-http-redirect,web-http-tracing,web-isapi-ext,web-isapi-filter,web-lgcy-mgmt-console,web-metabase,web-mgmt-console,web-mgmt-service,web-net-ext45,web-request-monitor,web-server,web-stat-compression,web-static-content,web-windows-auth,web-wmi,windows-identity-foundation
Через некоторое время установка необходимых компонентов будет завершена и нужно будет перезагрузить сервер:
Success Restart Needed Exit Code Feature Result
WARNING: You must restart this server to finish the installation process.
WARNING: Windows automatic updating is not enabled. To ensure that your newly-installed role or feature is
automatically updated, turn on Windows Update.
PS C:\Users\Administrator> shutdown /r /t 3
- Теперь необходимо установить Microsoft Unified Communications Managed API 4.0.
Заходим на сайт http://www.microsoft.com/en-us/download/details.aspx?id=34992 (Microsoft Unified Communications Managed API 4.0) и нажимаем кнопку «Download».
- Теперь необходимо установить Microsoft Office 2010 Filter Pack. (FiterPack64bit.exe)
Заходим на сайт http://www.microsoft.com/en-us/download/details.aspx?id=17062 (Microsoft Office 2010 Filter Pack) и нажимаем кнопку «Download».
- Теперь необходимо установить Microsoft Office 2010 Filter Pack SP1.
Заходим на сайт http://www.microsoft.com/en-us/download/details.aspx?id=26604 (Microsoft Office 2010 Filter Pack SP1) и нажимаем кнопку «Download».
После установки необходимых компонентов выше снова перезагружаем систему:
Win + X → Command Prompt(Admin) → shutdown /r /t 3
Теперь можно приступить к установке Exchange Server 2013, для этого переходим в каталога куда распаковывали Exchange 2013 и запускаем setup.exe
C:\Exchange2013\setup.exe – мастер установки предложить проверить наличие обновлений для Exchange Server 2013 так и отказаться, я выбираю Don’t check for updates right now (обновления можно поставить и позже) и Нажимаем кнопку «Next».
Далее начнется копирование файлов необходимых для установки Exchange. Далее «Мастер установки Exchange Server» предлагает ознакомиться с информацией касательно Exchange Server 2013.
Нажимаем кнопку «Next».
Теперь необходимо принять условия лицензии.
Нажимаем кнопку «Next».
Выбираем «Dont use recommended settings», чтобы сервер Exchange автоматически не отправлял в Microsoft отчеты об ошибках и о том как вы используете Exchange.
Нажимаем «Next».
Теперь необходимо выбрать какие роли будут установлены на ваш сервер.
В данном руководстве рассматривается установка Exchange Server 2013 без реализации отказоустойчивости. Таким образом, роли Excahange Server будут установлены на один сервер.
Выбираем «Mailbox role», «Client Access role», затем выбираем «Automatically install Windows Server roles and features that are required to install Exchange Server» и нажимаем кнопку «Next».
Оставляем настройки без изменений и нажимаем «Next».
Каталог установки Exchange Server: C:\Program Files\Microsoft\Exchange Server\V15
Теперь можно настроить параметры защиты от вредоносных программ.
В пункте «Disable malware scanning» выбираем «No» и нажимаем кнопку «Next».
Далее начнется процесс проверки готовности к установке, после того как процесс будет завершен, можно запускать процесс установки Exchange Server 2013.
Нажимаем кнопку «Install».
Начался процесс установки Exchange Server 2013. Процесс относительно не долог, у меня он занял 30-40 минут.

Выбираем «Launch Exchange Administration Center after finishing Exchange setup» и нажимаем кнопку «Finish».
Для администрирования сервера Exchange используется «Exchange Administration Center», запускаем браузер Internet Explorer: клавиша Win и далее кликаем на вызов браузера Internet Explorer, после чего в сроке адреса вводим URL https://srv-dc/ecp, где srv-dc — имя моего сервера Exchange
Для корректного отображения «Exchange Administration Center» необходимо добавить сервер Exchange в надежные узлы в Internet Explorer.
Нажимаем Add…
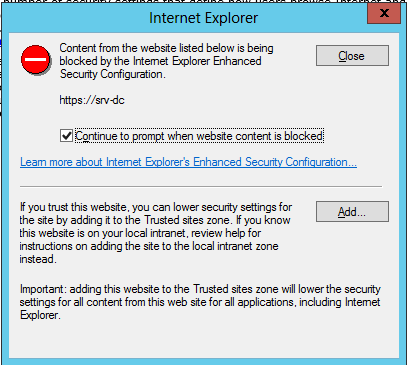
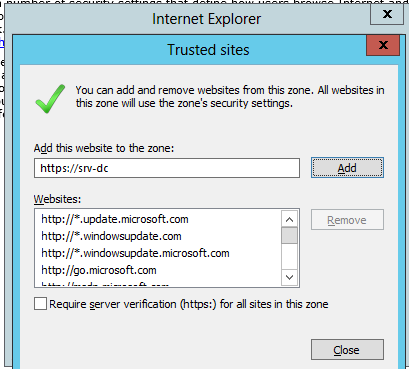
Чтобы это дело поправить, просто отключим безопасность IE
сочетание клавиш Win + C → control panel – Administrative Tools – Server Manager – Local Server → IE Enhanced Security Configuration – выставляем в положением Off
- Administrators: Off
- Users: Off
После чего обновляем страницу в браузере и она принимает вид:
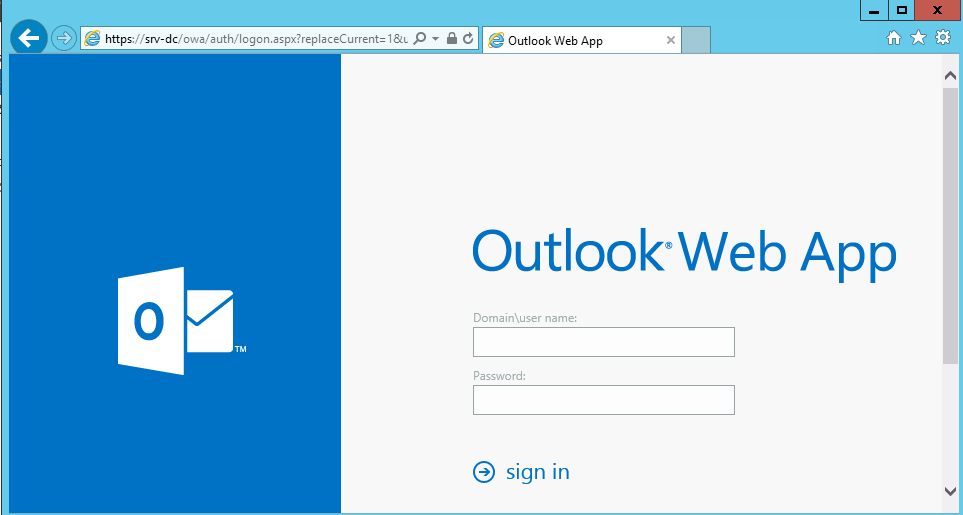
- https://srv-dc/owa
- Domain\user name: polygon.local\Administrator
- Password: 712mbddr@
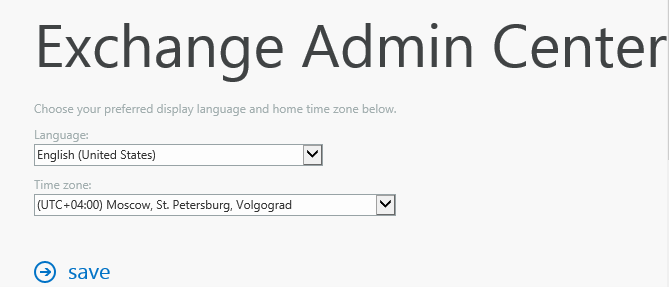
Далее изменяем настройки языка и часового пояса и нажимаем Save:
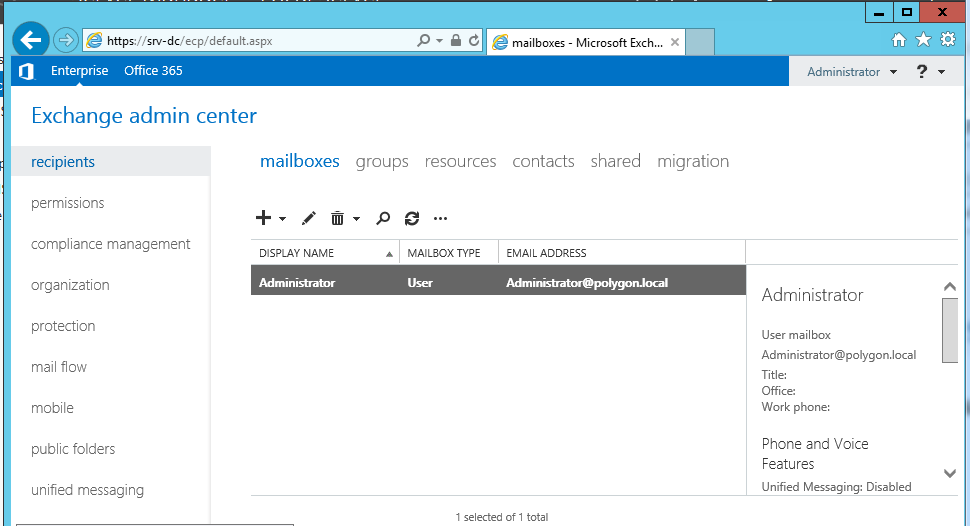


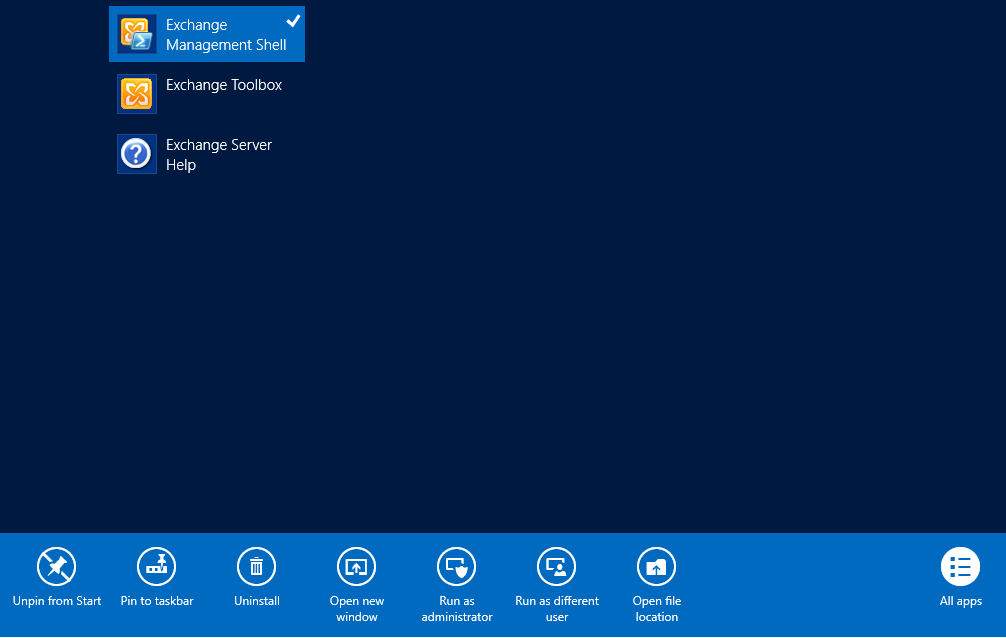
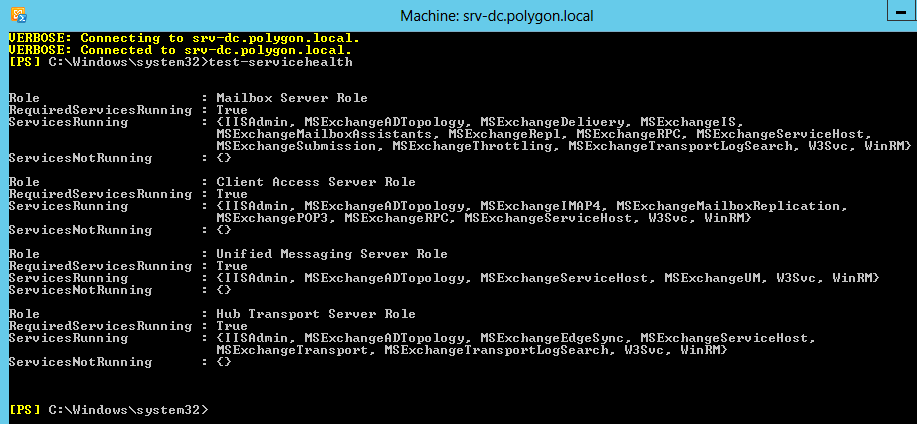
Проверка служб завершена успешно.
Значение «True» в «RequireServiceRunning» свидетельствует о том, что служба запущена.
Используйте прокси ((заблокировано роскомнадзором, используйте vpn или proxy)) при использовании Telegram клиента:
Поблагодари автора и новые статьи
будут появляться чаще 🙂
Карта МКБ: 4432-7300-2472-8059
Yandex-деньги: 41001520055047
Большое спасибо тем кто благодарит автора за практические заметки небольшими пожертвованиями. С уважением, Олло Александр aka ekzorchik.


