- Bcdedit
- Syntax
- Parameters
- General BCDEdit Command-Line Option
- Parameters that Operate on a Store
- Parameters that Operate on Entries in a Store
- Parameters that Operate on Entry Options
- Parameters that Control Output
- Parameters that Control the Boot Manager
- Parameters that Control Emergency Management Services
- Parameters that Control Debugging
- How to Fix Windows Server 2012 Boot BCD Error Easily?
- Windows Server 2012 boot BCD error
- Content navigate
- About boot BCD
- Why you get BCD error in Windows Server 2012?
- How to fix boot BCD error in Server 2012 in simple steps?
- Fix BCD error with Windows installation disc
- Repair BCD error by fixing corrupted MBR
- Summary
- BCDEdit /set
- Alternatives to BCDEdit
- Settings startup options
- Startup Settings
- System Configuration Utility
- Syntax
- Parameters
- Use the command line help to view options
- Boot Settings
- Display Settings
- Hardware Abstraction Layer (HAL) & KERNEL
- Verification Settings
- Processor Settings
- Memory Related Settings
- Additional Settings
- Debugger Settings
- Hypervisor Debugger Settings
- Hypervisor Settings
- Emergency Management Services
- Event Logging
- Comments
- DTrace
- Requirements
Bcdedit
Applies To: Windows Vista, Windows Server 2008, Windows Server 2012, Windows 8
Boot Configuration Data (BCD) files provide a store that is used to describe boot applications and boot application settings. The objects and elements in the store effectively replace Boot.ini.
BCDEdit is a command-line tool for managing BCD stores. It can be used for a variety of purposes, including creating new stores, modifying existing stores, adding boot menu parameters, and so on. BCDEdit serves essentially the same purpose as Bootcfg.exe on earlier versions of Windows, but with two major improvements:
Exposes a wider range of boot parameters than Bootcfg.exe.
Has improved scripting support.
Administrative privileges are required to use BCDEdit to modify BCD.
BCDEdit is the primary tool for editing the boot configuration of WindowsВ Vista and later versions of Windows. It is included with the WindowsВ Vista distribution in the %WINDIR%\System32 folder.
BCDEdit is limited to the standard data types and is designed primarily to perform single common changes to BCD. For more complex operations or nonstandard data types, consider using the BCD Windows Management Instrumentation (WMI) application programming interface (API) to create more powerful and flexible custom tools.
Syntax
Parameters
General BCDEdit Command-Line Option
Displays a list of BCDEdit commands. Running this command without an argument displays a summary of the available commands. To display detailed help for a particular command, run bcdedit /? , where is the name of the command you are searching for more information about. For example, bcdedit /? createstore displays detailed help for the Createstore command.
Parameters that Operate on a Store
Creates a new empty boot configuration data store. The created store is not a system store.
Exports the contents of the system store into a file. This file can be used later to restore the state of the system store. This command is valid only for the system store.
Restores the state of the system store by using a backup data file previously generated by using the /export option. This command deletes any existing entries in the system store before the import takes place. This command is valid only for the system store.
This option can be used with most BCDedit commands to specify the store to be used. If this option is not specified, then BCDEdit operates on the system store. Running the bcdedit /store command by itself is equivalent to running the bcdedit /enum active command.
Parameters that Operate on Entries in a Store
Makes a copy of a specified boot entry in the same system store.
Creates a new entry in the boot configuration data store. If a well-known identifier is specified, then the /application, /inherit, and /device parameters cannot be specified. If an identifier is not specified or not well known, an /application, /inherit, or /device option must be specified.
Deletes an element from a specified entry.
Parameters that Operate on Entry Options
Deletes a specified element from a boot entry.
Sets an entry option value.
Parameters that Control Output
Lists entries in a store. The /enum option is the default value for BCEdit, so running the bcdedit command without parameters is equivalent to running the bcdedit /enum active command.
Verbose mode. Usually, any well-known entry identifiers are represented by their friendly shorthand form. Specifying /v as a command-line option displays all identifiers in full. Running the bcdedit /v command by itself is equivalent to running the bcdedit /enum active /v command.
Parameters that Control the Boot Manager
Specifies a one-time display order to be used for the next boot. This command is similar to the /displayorder option, except that it is used only the next time the computer starts. Afterwards, the computer reverts to the original display order.
Specifies the default entry that the boot manager selects when the timeout expires.
Specifies the display order that the boot manager uses when displaying boot parameters to a user.
Specifies the time to wait, in seconds, before the boot manager selects the default entry.
Specifies the display order for the boot manager to use when displaying the Tools menu.
Parameters that Control Emergency Management Services
Enables or disables Emergency Management Services (EMS) for the specified entry.
Enables or disables EMS for the specified operating system boot entry.
Sets the global EMS settings for the computer. /emssettings does not enable or disable EMS for any particular boot entry.
Parameters that Control Debugging
Enables or disables the boot debugger for a specified boot entry. Although this command works for any boot entry, it is effective only for boot applications.
Specifies or displays the global debugger settings for the system. This command does not enable or disable the kernel debugger; use the /debug option for that purpose. To set an individual global debugger setting, use the bcdedit /set command.
Enables or disables the kernel debugger for a specified boot entry.
How to Fix Windows Server 2012 Boot BCD Error Easily?
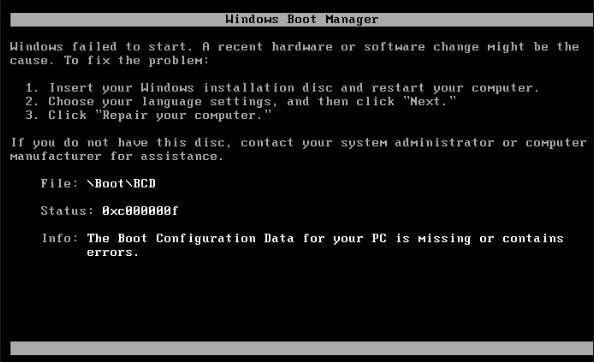
Windows failed to start and you get Boot BCD error in Windows Server 2012 or 2008? Learn how to fix “The Boot Configuration Data for your PC is Missing” in simple steps.
![]()
By Teresa  / Last Updated August 3, 2020
Windows Server 2012 boot BCD error
How to fix boot BCD error?
When I boot up the machine, just got following message saying Windows failed to start. It gives the information: The boot configuration data for your PC is missing or contains errors. What should I do to make this machine work normally?»
— Question from microsoft.com
The boot BCD error is actually a common error that also happens in Windows Server 2008 (R2). Except for Server operating systems, you can also find the help post on how to fix Dell laptop boot BCD error, HP, Lenovo or Gateway boot BCD error. Then, what a boot BCD is and why you get the error.
Content navigate
About boot BCD
According to Wikipedia, the Boot Configuration Data (BCD) is a firmware-independent database for boot-time configuration data. It is used as new Windows Boot Manager.
In different boot mode, the BCD store locates differently. For traditional BIOS boot, the BCD file is at /boot/BCD on the active partition, usually the system partition. For UEFI boot, the file is located at /EFI/Microsoft/Boot/BCD on the EFI System Partition. Therefore, some users also receive UEFI boot error BCD or EFI/Microsoft/Boot/BCD error in Windows Server 2012.
Why you get BCD error in Windows Server 2012?
Generally, you may get this error in the first restart that is triggered by extending system partition. Inappropriate operations may damage the Boot\BCD file.
In addition, the error occurs after adding some applications or programs. Boot Configuration Data is set for third-party integration, so anyone can implement tools like diagnostics or recovery options. As a result, the BCD store may be damaged by malicious third-party software.
What’s more, you may get boot BCD error when boot from USB drive that contains corrupted MBR or BCD store. Besides, error installing Server will cause the error as well.
In the type of BCD error in Server 2012, these errors are also likely to happen during PXE boot or in SCCM: “Recovery. Your PC needs to be repaired”, “The Windows Boot Configuration Data file does not contain a valid OS entry”, “An error occurred while attempting to read the boot configuration data”, and “After multiple tries, the operating system on your PC failed to start, so it needs to be repaired”.
Then, what should you do to get the boot BCD error fixed in Windows Server 2012 as well as Server 2008?
How to fix boot BCD error in Server 2012 in simple steps?
You need different solutions on different conditions. If you’re lucky enough with a Windows installation disc or repair disc around, refer to the steps in the first part. If not, see what you’ve got in the next part.
Fix BCD error with Windows installation disc
Insert the Windows installation disc to your machine and start it. Follow these steps to rebuild BCD for your Server.
1. At the installation interface, choose language, time and keyboard input, and then click Next.
2. Click on Repair you computer in the lower left corner.
3. Go Troubleshoot > Command Prompt to start CMD. Then, type bootre /rebuildbcd and hit Enter. Wait for the process completes.
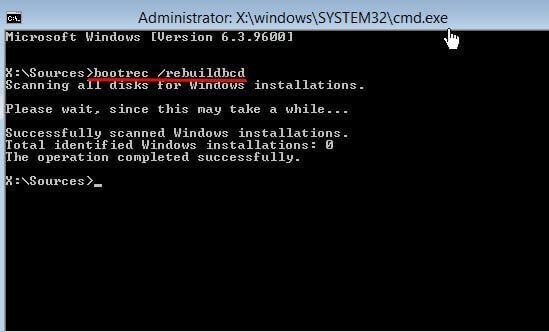
4. Close the command prompt and back to the Choose an option interface. Click on Continue. It will prompt to press any key to start. Press any key to restart your Server. The BCD file should be rebuilt and the Server can start properly.
Tips: if that does not work, type following commands first and then rebuild the BCD file.
в—Џ bootrec /fixmbr
в—Џ bootrec fixboot
в—Џ bootrec /scanos
It is quite easy to fix BCD error with the help of Windows installation disc. Nevertheless, what if there is no such disc to assist? If you have created regular system backup or disk backup for the Windows Server 2012, you can revert the Server back to a state when everything functional. In that case, you just need to make a bootable media to start the Server 2012.
Absolutely, you can fix boot BCD error without disc in Server 2012 with the assistance of professional tool.
Repair BCD error by fixing corrupted MBR
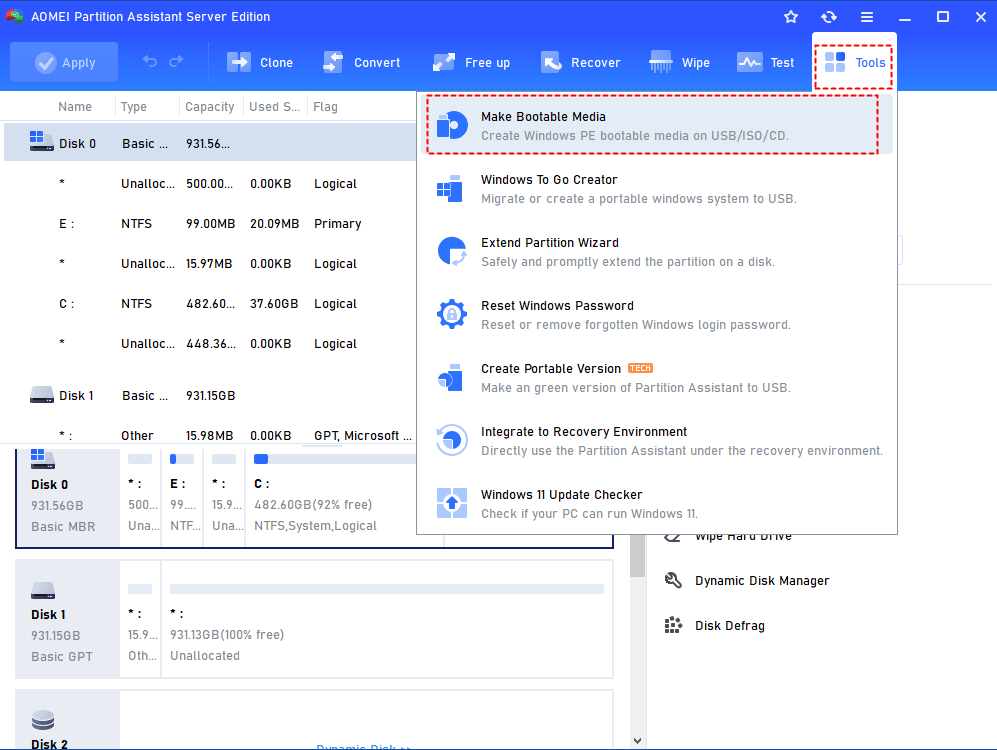
If the BCD error has been caused by damaged or corrupted MBR, you need to fix MBR for Windows Server 2012. AOMEI Partition Assistant Server is all-around disk partition manager that will assist you rebuild MBR for Server 2012, 2019, 2016, 2012 as well as Server 2008. It provides both CUI and GUI that for both computer beginners and IT experts. It supports all Windows Server editions. Let’s get to know how to fix the error with this software.
Preparations:
в—Џ A functional PC: since the Server 2012 is unbootable, you need to prepare a functional Windows-based PC to install AOMEI Partition Assistant Server.
в—Џ A USB flash drive or CD/DVD disc: after installing AOMEI Partition Assistant on that PC, you need to make a bootable media with the software on that PC so that you can boot the Server 2012.
1. Connect a USB drive to the healthy PC. Install and launch AOMEI Partition Assistant Server on that PC as well. At the main interface, click on Make Bootable Media in the left pane and follow the steps to complete creating. Burn to CD/DVD and Export ISO File are available, too. You can also add certain drivers for the Server 2012 before creating.
2. Insert the bootable media to the Server 2012 and boot off the machine. If it falls back to the local disk, you need to change the boot priority to the bootable media in BIOS.
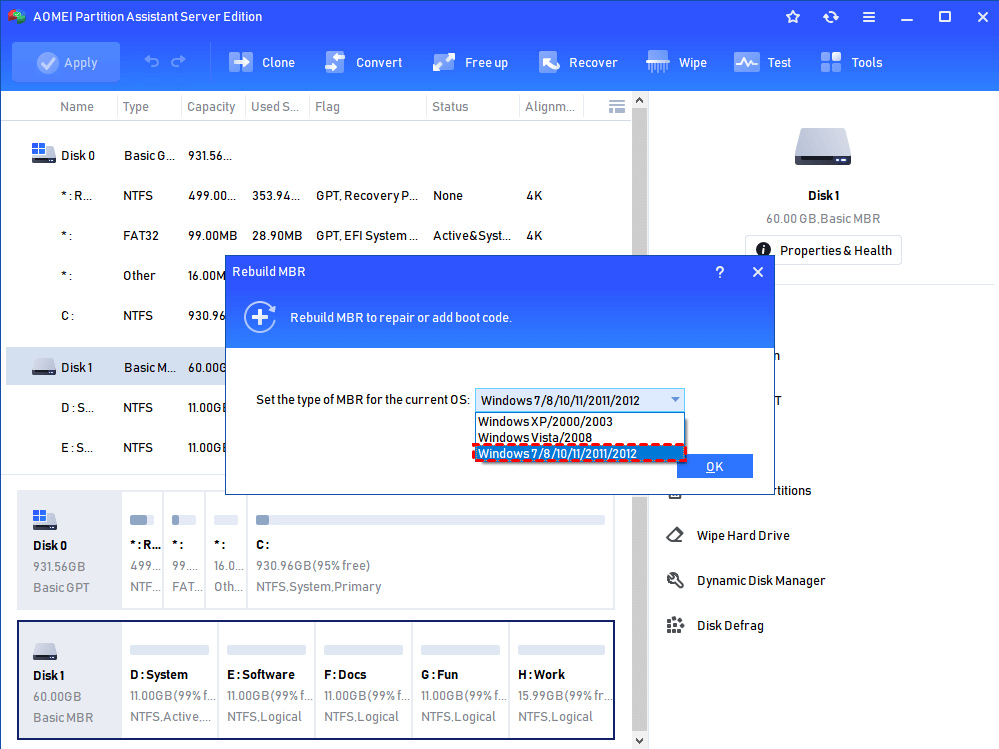
3. Once you login AOMEI Partition Assistant Server will start automatically. Right click the disk you want to fix (usually the system disk in this case) and select Rebuild MBR.
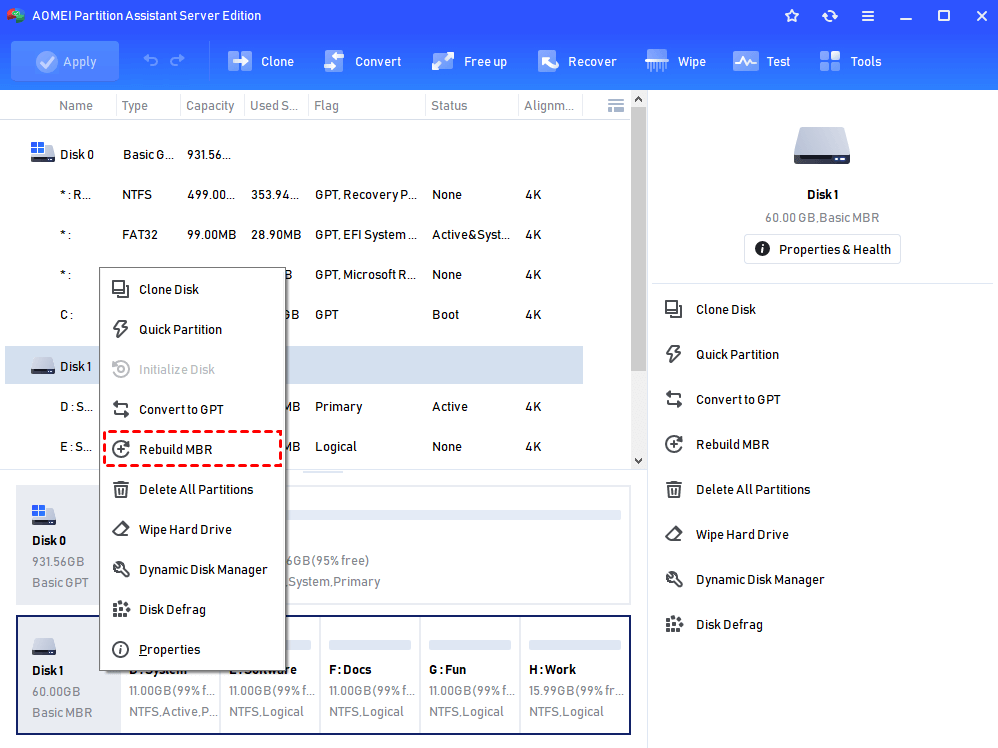
4. In the popping up window, select the type of MBR for Windows Server 2012, i.e. Windows 7/8/10/2011/2012 option, and click OK.
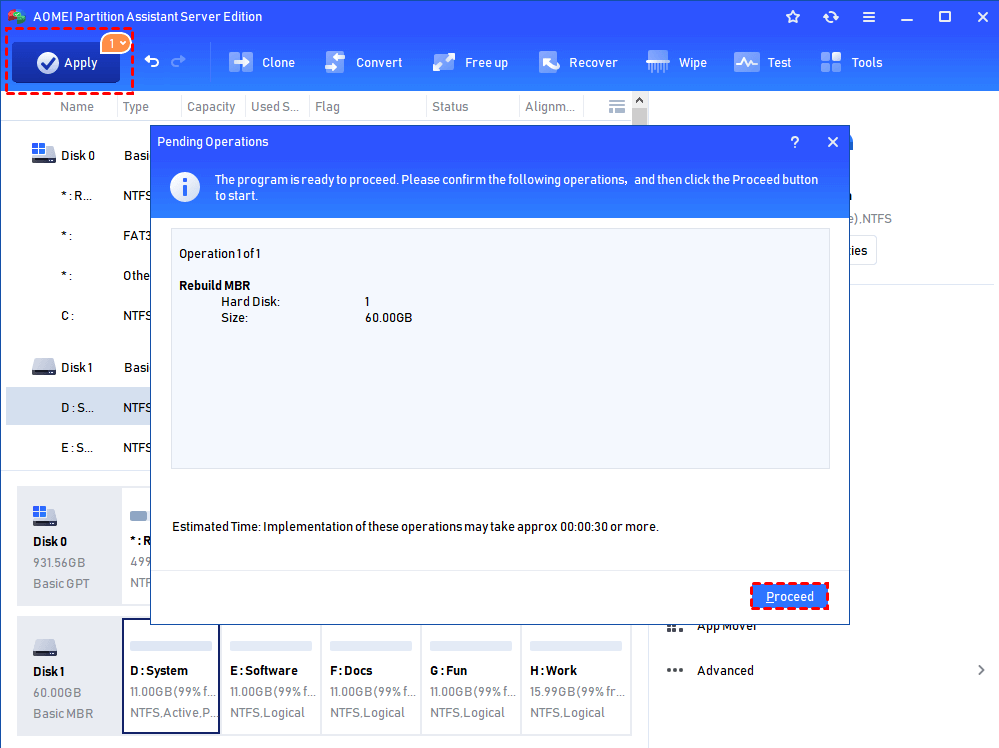
5. Click Apply and then Proceed to execute the pending operations. Then, restart your Server for repairing.
Tips:
After successfully booting Windows Server 2012, you can run CHKDSK to see if any other errors existing.
To fix boot BCD error in Windows Server 2008, you need to choose Windows Vista/2008 option in Step 4.
Summary
When you come across Windows Server 2012 boot BCD error, you can easily fix it by using Windows installation disc. If the error was caused by corrupted MBR, then you need to fix MBR accordingly.
AOMEI Partition Assistant Server is comprehensive software that can solve many practical issues for Windows Server 2003, 2008 (R2), 2012 (R2), 2016 and 2019. For instance, you can convert MBR to GPT in Server 2012 without losing data.
BCDEdit /set
The BCDEdit /set command sets a boot entry option value in the Windows boot configuration data store (BCD). Use the BCDEdit /set command to configure specific boot entry elements, such as kernel debugger settings, memory options, or options that enable test-signed kernel-mode code or load alternate hardware abstraction layer (HAL) and kernel files. To remove a boot entry option, use the BCDEdit /deletevalue command.
Administrative privileges are required to use BCDEdit to modify BCD. Changing some boot entry options using the BCDEdit /set command could render your computer inoperable. As an alternative, use the System Configuration utility (MSConfig.exe) to change boot settings.
В Before setting BCDEdit options you might need to disable or suspend BitLocker and Secure Boot on the computer.
Alternatives to BCDEdit
Settings startup options
В To avoid the risk associated with using BCDEdit, consider using an alternative method to perform boot configuration discussed in this section.
Startup Settings
Some common boot options such as enabling debugging mode are available in the start up options. In Windows 10, the settings can be accessed in Settings, Update and Security, select Recovery. Under Advanced startup, select Restart Now. When the PC reboots, select Startup options. Then select Troubleshoot > Advanced options > Startup Settings , then select Restart button. When the PC restarts, you will be able to set the available startup options.
System Configuration Utility
Use the System Configuration Utility (MSConfig.exe) instead of BCDEdit when possible. For more information, see How to open MSConfig in Windows 10.
Syntax
Parameters
[ ]
The is the GUID that is associated with the boot entry. If you do not specify an , the command modifies the current operating system boot entry. If a boot entry is specified, the GUID associated with the boot entry must be enclosed in braces . To view the GUID identifiers for all of the active boot entries, use the bcdedit /enum command. The identifier for the current boot entry is . For more information about this option, use the following command: bcdedit /? ID
If you are using Windows PowerShell, you must use quotes around the boot entry identifier, for example: «<49916baf-0e08-11db-9af4-000bdbd316a0>« or «
Use the command line help to view options
Use the command line help for BCDEdit to display information available for a specific version of Windows.
The following sections describe some common datatypes and their associated values.
Boot Settings
bootlog [ yes | no ]
Enables the system initialization log. This log is stored in the Ntbtlog.txt file in the %WINDIR% directory. It includes a list of loaded and unloaded drivers in text format.
bootmenupolicy [ Legacy | Standard ]
Defines the type of boot menu the system will use. ForWindowsВ 10, WindowsВ 8.1, WindowsВ 8 and WindowsВ RT the default is Standard. For Windows ServerВ 2012В R2, Windows ServerВ 2012, the default is Legacy. When Legacy is selected, the Advanced options menu (F8) is available. When Standard is selected, the boot menu appears but only under certain conditions: for example, if there is a startup failure, if you are booting up from a repair disk or installation media, if you have configured multiple boot entries, or if you manually configured the computer to use Advanced startup. When Standard is selected, the F8 key is ignored during boot. WindowsВ 8 PCs start up quickly so there isn’t enough time to press F8. For more information, see Windows Startup Settings (including safe mode).
The option is available starting with WindowsВ 8 and Windows ServerВ 2012. You can also use the onetimeadvancedoptions to use the Advanced options (F8) menu (Legacy) one time on the next boot.
bootstatuspolicy policy
Controls the boot status policy. The boot status policy can be one of the following:
| Boot Status Policy | Description |
|---|---|
| DisplayAllFailures | Displays all errors if there is a failed boot, failed shutdown, or failed checkpoint. The computer will fail over to the Windows recovery environment on reboot. |
| IgnoreAllFailures | Ignore errors if there is a failed boot, failed shutdown, or failed checkpoint. The computer will attempt to boot normally after an error occurs. |
| IgnoreShutdownFailures | Only ignore errors if there is a failed shutdown. If there is a failed shutdown, the computer does not automatically fail over to the Windows recovery environment on reboot. This is the default setting for WindowsВ 8. |
| IgnoreBootFailures | Only ignore errors if there is a failed boot. If there is a failed boot, the computer does not automatically fail over to the Windows recovery environment on reboot. |
| IgnoreCheckpointFailures | Only ignore errors if there is a failed checkpoint. If there is a failed checkpoint, the computer does not automatically fail over to the Windows recovery environment on reboot. The option is available starting with WindowsВ 8 and Windows ServerВ 2012. |
| DisplayShutdownFailures | Displays errors if there is a failed shutdown. If there is a failed shutdown, the computer will fail over to the Windows recovery environment on reboot. Ignores boot failures and failed checkpoints. The option is available starting with WindowsВ 8 and Windows ServerВ 2012. |
| DisplayBootFailures | Displays errors if there is a failed boot. If there is a failed boot, the computer will fail over to the Windows recovery environment on reboot. Ignores shutdown failures and failed checkpoints. The option is available starting with WindowsВ 8 and Windows ServerВ 2012. |
| DisplayCheckpointFailures | Displays errors if there is a failed checkpoint. If there is a failed checkpoint, the computer will fail over to the Windows recovery environment on reboot. Ignores boot and shutdown failures. The option is available starting with WindowsВ 8 and Windows ServerВ 2012. |
quietboot [ on | off ]
Controls the display of a high-resolution bitmap in place of the Windows boot screen display and animation.
Do not use the quietboot option in WindowsВ 8 as it will prevent the display of bug check data in addition to all boot graphics.
sos [ on | off ]
Controls the display of the names of the drivers as they load during the boot process. Use sos on to display the names. Use sos off to suppress the display.
lastknowngood [ on | off ]
Enables boot to last known good configuration.
nocrashautoreboot [ on | off ]
Disables automatic restart on crash.
resumeobject (id)
Defines the identifier of the resume object that is associated with this operating system object.
safebootalternateshell [ on | off ]
Uses the alternate shell when booted into Safe mode.
winpe [ on | off ]
Enables the computer to boot to Windows PE.
onetimeadvancedoptions [ on | off ]
Controls whether the system boots to the legacy menu (F8 menu) on the next boot.
Display Settings
bootuxdisabled [ on | off ]
Disables boot graphics.
graphicsmodedisabled [ on | off ]
Indicates whether graphics mode is disabled and boot applications must use text mode display.
graphicsresolution
Defines the graphics resolution, 1024×768, 800×600,1024×600, etc.
highestmode [ on | off ]
Enables boot applications to use the highest graphical mode exposed by the firmware.
novga [ on | off ]
Disables the use of VGA modes entirely.
vga [ on | off ]
Forces the use of the VGA display driver.
Hardware Abstraction Layer (HAL) & KERNEL
hal file
Directs the operating system loader to load an alternate HAL file. The specified file must be located in the %SystemRoot%\system32 directory.
kernel file
Directs the operating system loader to load an alternate kernel. The specified file must be located in the %SystemRoot%\system32 directory.
Verification Settings
testsigning [ on | off ]
Controls whether WindowsВ 10, WindowsВ 8.1, WindowsВ 8, Windows 7, Windows Server 2008, or Windows Vista will load any type of test-signed kernel-mode code. This option is not set by default, which means test-signed kernel-mode drivers on 64-bit versions of WindowsВ 10, WindowsВ 8.1, WindowsВ 8, Windows 7, Windows Server 2008, and Windows Vista will not load by default. After you run the BCDEdit command, restart the computer so that the change takes effect. For more information, see Introduction to Test-Signing
nointegritychecks [ on | off ] Disables integrity checks. Cannot be set when secure boot is enabled. This value is ignored by Windows 7 and WindowsВ 8.
disableelamdrivers [ yes | no ]
Controls the loading of Early Launch Antimalware (ELAM) drivers. The OS loader removes this entry for security reasons. This option can only be triggered by using the F8 menu. Someone must be physically present (at the computer) to trigger this option.
This option should only be used for debugging.
nx [Optin |OptOut | AlwaysOn |AlwaysOff]
Enables, disables, and configures Data Execution Prevention (DEP), a set of hardware and software technologies designed to prevent harmful code from running in protected memory locations. For information about DEP settings, see Data Execution Prevention.
| DEP Option | Description |
|---|---|
| Optin | Enables DEP only for operating system components, including the Windows kernel and drivers. Administrators can enable DEP on selected executable files by using the Application Compatibility Toolkit (ACT). |
| Optout | Enables DEP for the operating system and all processes, including the Windows kernel and drivers. However, administrators can disable DEP on selected executable files by using System in Control Panel. |
| AlwaysOn | Enables DEP for the operating system and all processes, including the Windows kernel and drivers. All attempts to disable DEP are ignored. |
| AlwaysOff | Disables DEP. Attempts to enable DEP selectively are ignored. On Windows Vista, this parameter also disables Physical Address Extension (PAE). This parameter does not disable PAE on Windows Server 2008. |
Processor Settings
groupsize maxsize
Sets the maximum number of logical processors in a single processor group, where maxsize is any power of 2 between 1 and 64 inclusive. By default, processor groups have a maximum size of 64 logical processors. You can use this boot configuration setting to override the size and makeup of a computer’s processor groups for testing purposes. Processor groups provide support for computers with greater than 64 logical processors. This boot option is available on 64-bit versions of Windows 7 and Windows Server 2008 R2 and later versions. This boot option has no effect on the 32-bit versions of Windows 7.
Use the groupsize option if you want to force multiple groups and the computer has 64 or fewer active logical processors. For more information about using this option, see Boot Parameters to Test Drivers for Multiple Processor Group Support.
groupaware [ on | off ]
Forces drivers to be aware of multiple groups in a multiple processor group environment. Use this option to help expose cross-group incompatibilities in drivers and components. Processor groups provide support for computers with greater than 64 logical processors. This boot option is available on 64-bit versions of Windows 7 and Windows Server 2008 R2 and later versions. This boot option has no effect on the 32-bit versions of Windows 7. You can use the groupaware option and the groupsize option to test driver compatibility to function with multiple groups when computer has 64 or fewer active logical processors.
The groupaware on setting ensures that processes are started in a group other than group 0. This increases the chances of cross-group interaction between drivers and components. The option also modifies the behavior of the legacy functions, KeSetTargetProcessorDpc, KeSetSystemAffinityThreadEx, and KeRevertToUserAffinityThreadEx, so that they always operate on the highest numbered group that contains active logical processors. Drivers that call any of these legacy functions should be changed to call their group-aware counterparts (KeSetTargetProcessorDpcEx, KeSetSystemGroupAffinityThread, and KeRevertToUserGroupAffinityThread).
maxgroup [ on | off ]
Maximizes the number of groups created in a processor group configuration. The maxgroup on setting assigns NUMA nodes to groups in a manner that maximizes the number of groups for a particular computer. The number of groups created is either the number of NUMA nodes the computer has, or the maximum number of groups supported by this version of Windows, whichever is smaller. The default behavior (maxgroup off) is to pack the NUMA nodes tightly into as few groups as possible.
Use the maxgroup option if you want to use multiple groups, the computer has 64 or fewer active logical processors, and the computer already has multiple NUMA nodes. This option can also be used to alter the default group configuration of a computer that has more than 64 logical processors.
Processor groups provide support for computers with greater than 64 logical processors. This option is available on 64-bit versions of Windows 7 and Windows Server 2008 R2 and later versions. This boot option has no effect on the 32-bit versions of Windows 7.
onecpu [ on | off ]
Forces only the boot CPU to be used in a computer that has more than one logical processor. For example, the following command configures the current operating system loader to use one processor.
Memory Related Settings
increaseuserva Megabytes
Specifies the amount of memory, in megabytes, for user-mode virtual address space.
On 32-bit editions of Windows, applications have 4 gigabyte (GB) of virtual address space available. The virtual address space is divided so that 2 GB is available to the application and the other 2 GB is available only to the system.
The 4-gigabyte tuning feature, enabled with the increaseuserva option, allows you to increase the virtual address space that is available to the application up to 3 GB, which reduces the amount available to the system to between 1 and 2 GB. The BCEdit /set increaseuserva Megabytes command can specify any value between 2048 (2 GB) and 3072 (3 GB) megabytes in decimal notation. Windows uses the remaining address space (4 GB minus the specified amount) as its kernel-mode address space.
See 4-Gigabyte Tuning (Windows) for additional information about this feature.
nolowmem [ on | off ] Controls the use of low memory. When nolowmem on is specified, this option loads the operating system, device drivers, and all applications into addresses above the 4 GB boundary, and directs Windows to allocate all memory pools at addresses above the 4 GB boundary. Note that the nolowmem option is ignored in WindowsВ 8, Windows ServerВ 2012, and later versions of Windows.
pae [ Default | ForceEnable | ForceDisable ]
Enables or disables Physical Address Extension (PAE). When PAE is enabled, the system loads the PAE version of the Windows kernel.
The pae parameter is valid only on boot entries for 32-bit versions of Windows that run on computers with x86-based and x64-based processors. On 32-bit versions of Windows (prior to WindowsВ 8) , PAE is disabled by default. However, Windows automatically enables PAE when the computer is configured for hot-add memory devices in memory ranges beyond the 4 GB region, as defined by the Static Resource Affinity Table (SRAT). Hot-add memory supports memory devices that you can add without rebooting or turning off the computer. In this case, because PAE must be enabled when the system starts, it is enabled automatically so that the system can immediately address extended memory that is added between restarts. Hot-add memory is supported only on Windows Server 2008, Datacenter Edition; Windows Server 2008 for Itanium-Based Systems; and on the datacenter and enterprise editions of all later versions of Windows Server. Moreover, for versions of Windows prior to Windows Server 2008, hot-add memory is supported only on computers with an ACPI BIOS, an x86 processor, and specialized hardware. For Windows Server 2008 and later versions of Windows Server, it is supported for all processor architectures.
On a computer that supports hardware-enabled Data Execution Prevention (DEP) and is running a 32-bit version of the Windows operating system that supports DEP, PAE is automatically enabled when DEP is enabled and, on all 32-bit versions of the Windows operating system, except Windows Server 2003 with SP1, PAE is disabled when you disable DEP. To enable PAE when DEP is disabled, you must enable PAE explicitly, by using /set nx AlwaysOff and /set pae ForceEnable. For more information about DEP, see Boot Parameters to Configure DEP and PAE.
For more information about using the pae parameter and the other parameters that affect PAE configuration, see Boot Parameters to Configure DEP and PAE.
removememory Megabytes
Removes memory from the total available memory that the operating system can use.
For example, the following command removes 256 MB of memory from the total available to the operating system associated with the specified boot entry.
truncatememory address Limits the amount of physical memory available to Windows. When you use this option, Windows ignores all memory at or above the specified physical address. Specify the address in bytes.
For example, the following command sets the physical address limit at 1 GB. You can specify the address in decimal (1073741824) or hexadecimal (0x40000000).
Additional Settings
disabledynamictick [ yes | no ]
Enables and disables dynamic timer tick feature.
This option should only be used for debugging.
forcelegacyplatform [ yes | no ]
Forces the OS to assume the presence of legacy PC devices like CMOS and keyboard controllers.
This option should only be used for debugging.
pciexpress [ default | forcedisable]
Enables or disables PCI Express functionality. If the computer platform supports the PCI Express features and the ACPI _OSC method grants control of the features to the operating system, Windows enables the advanced features through the PCI Express Native Control feature (this is the default). Use the forcedisable option to override the advanced PCI Express features and use legacy PCI Express behavior. For more information, see Enabling PCI Express Native Control in Windows.
tpmbootentropy [ default | ForceEnable | ForceDisable]
Determines whether entropy is gathered from the trusted platform module (TPM) to help seed the random number generator in the operating system.
tscsyncpolicy [ Default | Legacy | Enhanced ]
Controls the times stamp counter synchronization policy. This option should only be used for debugging.
usefirmwarepcisettings [ yes | no ]
Enables or disables the use of BIOS-configured peripheral component interconnect (PCI) resources.
useplatformclock [ yes | no ]
Forces the use of the platform clock as the system’s performance counter.
This option should only be used for debugging.
uselegacyapicmode [ yes | no ]
Used to force legacy APIC mode, even if the processors and chipset support extended APIC mode.
useplatformtick [ yes | no ]
Forces the clock to be backed by a platform source, no synthetic timers are allowed. The option is available starting in WindowsВ 8 and Windows ServerВ 2012.
This option should only be used for debugging.
xsavedisable [ 0 | 1 ]
When set to a value other than zero (0), disables XSAVE processor functionality in the kernel.
x2apicpolicy [ enable | disable ]
Enables or disables the use of extended APIC mode, if supported. The system defaults to using extended APIC mode if it is available.
Debugger Settings
To work with the debugger settings, use the following commands.
| Command | Description |
|---|---|
| BCDEdit /bootdebug | The /bootdebug boot option enables or disables boot debugging of the current or specified Windows operating system boot entry. |
| BCDEdit /dbgsettings | The /dbgsettings option sets or displays the current global debugger settings for the computer. To enable or disable the kernel debugger, use the BCDEdit /debug option. |
| BCDEdit /debug | The /debug boot option enables or disables kernel debugging of the Windows operating system associated with the specified boot entry or the current boot entry. |
Hypervisor Debugger Settings
Use the BCDEdit / hypervisorsettings option to set or display the hypervisor debugger settings for the system. For more information, see BCDEdit /hypervisorsettings.
hypervisordebug [ On | Off ]
Controls whether the hypervisor debugger is enabled.
Hypervisor Settings
hypervisoriommupolicy [ default | enable | disable]
Controls whether the hypervisor uses an Input Output Memory Management Unit (IOMMU).
hypervisorlaunchtype [ Off | Auto ]
Controls the hypervisor launch options. If you are setting up a debugger to debug Hyper-V on a target computer, set this option to Auto on the target computer. For more information, see Create a Virtual Machine with Hyper-V.
hypervisorloadoptions NOFORCESNOOP [ Yes | No ]
Specifies whether the hypervisor should enforce snoop control on system IOMMUs.
hypervisornumproc number
Specifies the total number of logical processors that can be started in the hypervisor.
hypervisorrootproc number
Specifies the maximum number of virtual processors in the root partition and limits the number of post-split Non-Uniform Memory Architecture (NUMA) nodes which can have logical processors started in the hypervisor.
hypervisorrootprocpernode number
Specifies the total number of virtual processors in the root partition that can be started within a pre-split Non-Uniform Memory Architecture (NUMA) node.
hypervisoruselargevtlb [ yes | no]
Increases virtual Translation Lookaside Buffer (TLB) size.
Emergency Management Services
The BCDEdit /ems option enables or disables Emergency Management Services (EMS) for the specified operating system boot entry. For more information, see BCDEdit /ems.
The BCDEdit /emssettings option sets the global Emergency Management Services (EMS) settings for the computer. For more information, see For more information, see BCDEdit /emssettings.
Event Logging
The BCDEdit /event command enables or disables the remote event logging for the specified boot entry. For more information, see BCDEdit /event.
Comments
For more information about specific BCD elements and boot options, you can use the commands BCDEdit /? OSLOADER and BCDEdit /? TYPES OSLOADER.
To view the current boot entries and their settings, use the bcdedit /enum command. This command displays the active boot entries and their associated globally unique identifiers (GUID). Use the identifiers with the /set command to configure options for a specific boot entry.
To delete a boot option value that you have set, use the /deletevalue option. The syntax for the command is as follows:
bcdedit /deletevalue [ ] datatatype
For example, if you change the processor group option, groupsize, to a new value for testing purposes, you can revert to the default value of 64 by typing the following command and then restarting the computer.
Any change to a boot option requires a restart to take effect. For information about commonly used BCDEdit commands, see Boot Configuration Data Editor Frequently Asked Questions.
DTrace
DTrace (DTrace.exe) is a command-line tool that displays system information and events. There is a bcedit option to enable dtrace. For information about the DTrace BCDEdit options available, see the installing section of DTrace on Windows.
Requirements
Minimum supported client: WindowsВ Vista
Minimum supported server: Windows ServerВ 2008


