- Базовые команды для настройки и управления Windows Server Core
- Настройка Windows Server Core с помощью SCONFIG
- Основные команды PowerShell для настройки Server Core
- Настройка параметров сети
- Настройка времени/даты
- Задать имя компьютера, добавить в домен, активация
- Разрешить удаленный доступ
- Настройка Windows Firewall
- Установка обновлений в Server Core
- Управление ролями, службами и процессами Windows
- Часто используемые команды в Server Core
- Command-Line Reference
- Prerequisites
- Feature description
- New and deprecated functionality
- Command shell overview
- Customize the Command Prompt window
- To configure the Command Prompt window
- Command-line reference A-Z
Базовые команды для настройки и управления Windows Server Core
В этой статье я постарался собрать в одном месте основные команды cmd и PowerShell, которые полезны при настройке и управлении Windows Server Core. Думаю, этот гайд будет полезен как новичкам, так и опытным системным администраторам, как справочник по базовым командам Server Core.
Преимущества Windows Serve Core:
- Меньшие требования к ресурсам;
- Повышенная стабильность, безопасность, требует установки меньшего количества обновлений (за счет меньшего количества кода и используемых компонентов);
- Идеально подходит для использования в качестве сервера для инфраструктурных ролей (контроллер домена Active Directory, DHCP сервер, Hyper-V сервер, файловый сервер и т.д.).
Server Core лицензируется как обычный физический или виртуальный экземпляр Windows Server (в отличии от Hyper-V Server, который полностью бесплатен).
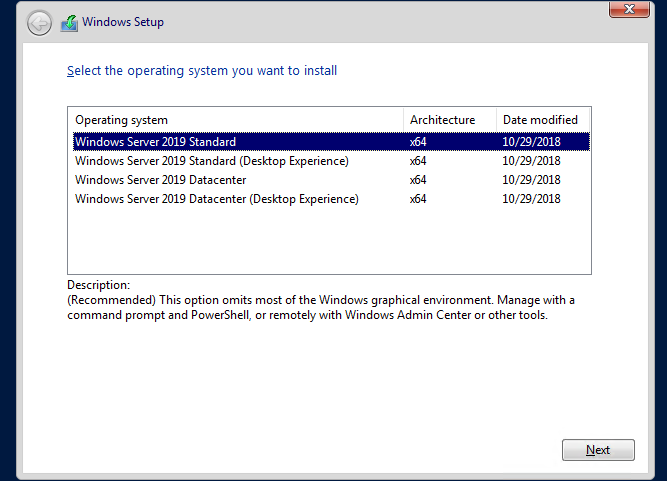
Для установки Windows Server 2016/2019 в режиме Core нужно выбрать обычную установку. Если вы выберите Windows Server (Desktop Experience), будет установлен GUI версия операционной системы (в предыдущих версиях Windows Server она называлась Server with a GUI).
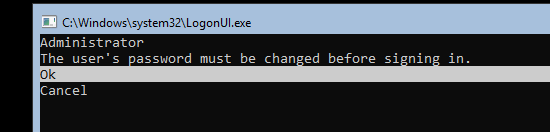
После установки Windows Server Core перед вами появляется командная строка, где нужно задать пароль локального администратора.
При входе на Server Core открывается командная строка (cmd.exe). Чтобы вместо командной строки у вас всегда открывалась консоль PowerShell.exe, нужно внести изменения в реестр. Выполните команды:
Powershell.exe
Set-ItemProperty -Path ‘HKLM:\Software\Microsoft\Windows NT\CurrentVersion\WinLogon’ -Name Shell -Value ‘PowerShell.exe’
И перезагрузите сервер:

Настройка Windows Server Core с помощью SCONFIG
Для базовой настройки Server Core можно использовать встроенный скрипт sconfig. Просто выполните команду sconfig в консоли. Перед вами появиться меню с несколькими пунктами:
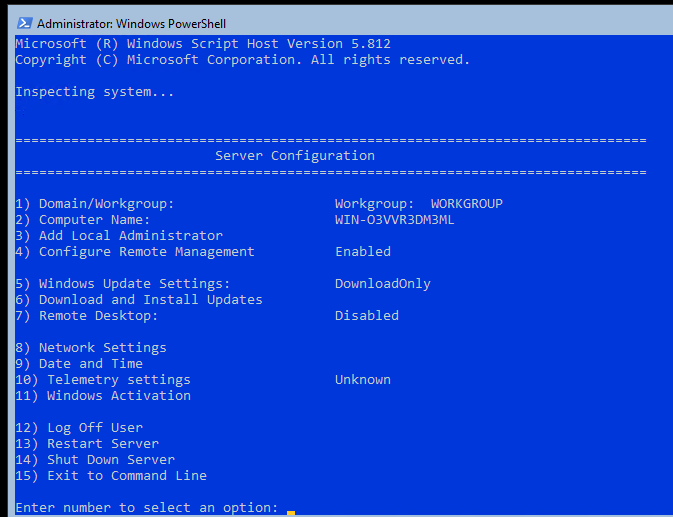
С помощью меню Server Configuration можно настроить:
- Добавить компьютер в домен или рабочую группу;
- Изменить имя компьютера (hostname);
- Добавить локального администратора;
- Разрешить/запретить удаленное управления и ответы на icmp;
- Настроить параметры обновления через Windows Update;
- Установить обновления Windows;
- Включить/отключить RDP;
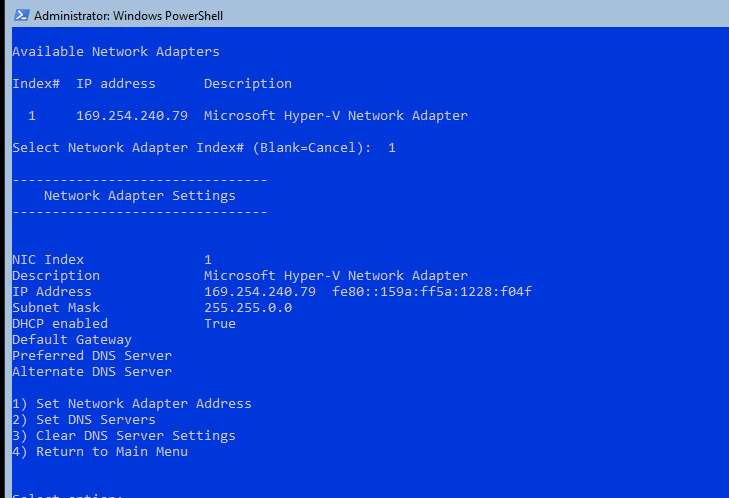
- Настроить параметры сетевых адаптеров (IP адрес, шлюз, DNS сервера);
- Настроить дату и время;
- Изменить параметры телеметрии;
- Выполнить logoff, перезагрузить или выключить сервер.
Все пункт в меню sconfig пронумерованы. Чтобы перейти в определенное меню наберите его номер и Enter.
В некоторых пунктах меню настройки sconfig есть вложенные пункты. Там также, чтобы перейти к определенной настройке, нужно сделать выбор цифры пункта меню.
Не будем подробно рассматривать все пункты настройки sconfig, т.к. там все достаточно просто и очевидно. Однако в большинстве случаев администраторы предпочитают использовать для настройки новых хостов с Server Core различные PowerShell скрипты. Это намного проще и быстрее, особенно при массовых развёртываниях.
Основные команды PowerShell для настройки Server Core
Рассмотрим основные команды PowerShell, которые можно использовать для настройки Server Core.
Узнать информацию о версии Windows Server и версии PowerShell:
Get-ComputerInfo | select WindowsProductName, WindowsVersion, OsHardwareAbstractionLayer
$PSVersionTable

Для перезагрузки Server Core нужно выполнить команду PowerShell :
Чтобы выполнить выход из консоли Server Core, наберите:
Настройка параметров сети
Теперь нужно из PowerShell нужно настроить параметры сети (по умолчанию Windows настроена на получение адреса от DHCP). Выведите список сетевых подключений:
Теперь укажите индекс интерфейса сетевого адаптера (InterfaceIndex), который нужно изменить и задайте новый IP адрес:
New-NetIPaddress -InterfaceIndex 4 -IPAddress 192.168.13.100 -PrefixLength 24 -DefaultGateway 192.168.13.1
Set-DNSClientServerAddress –InterfaceIndex 4 -ServerAddresses 192.168.13.11,192.168.13. 111
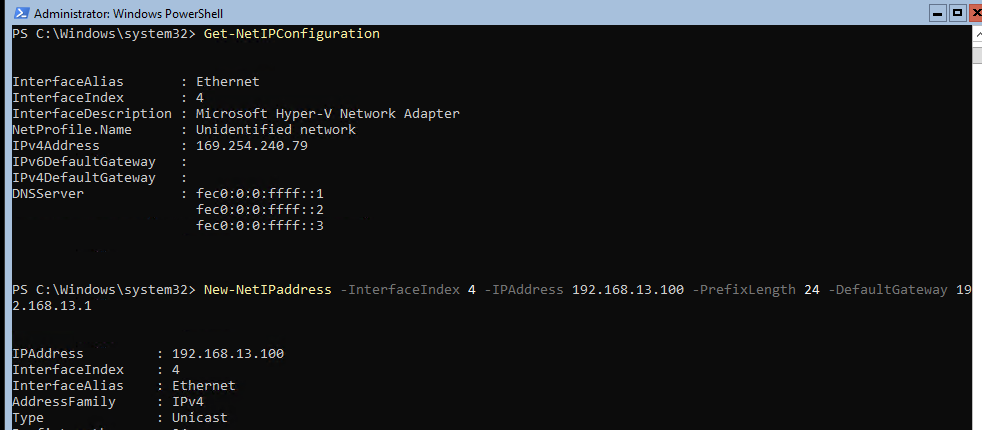
Проверьте текущие настройки:
Set-DnsClientServerAddress –InterfaceIndex 4 –ResetServerAddresses
Set-NetIPInterface –InterfaceIndex 4 -Dhcp Enabled
Включить/отключить сетевой адаптер:
Disable-NetAdapter -Name “Ethernet0”
Enable-NetAdapter -Name “Ethernet 0”
Включить, отключить, проверить статус поддержки IPv6 для сетевого адаптера:
Disable-NetAdapterBinding -Name «Ethernet0» -ComponentID ms_tcpip6
Enable-NetAdapterBinding -Name «Ethernet0» -ComponentID ms_tcpip6
Get-NetAdapterBinding -ComponentID ms_tcpip6
netsh Winhttp set proxy :
Настройка времени/даты
Вы можете настроить дату, время, часовой пояс с помощью графической утилиты intl.cpl или с помощью PowerShell:
Set-Date -Date «09/03/2022 09:00»
Set-TimeZone «Russia Time Zone 3
Задать имя компьютера, добавить в домен, активация
Чтобы изменить имя компьютера:
Rename-Computer -NewName win-srv01 -PassThru

Добавить сервер в домен Active Directory:
Add-Computer -DomainName «corp.winitpro.ru » -Restart
Если нужно добавить дополнительных пользователей в администраторы, можно настроить групповую политику или добавить вручную:
Add-LocalGroupMember -Group «Administrators» -Member «corp\anovikov»
Для активации Windows Server нужно указать ваш ключ:
Или можно активировать хост на KMS сервере (например, для Windows Server 2019):
slmgr /ipk N69G4-B89J2-4G8F4-WWYCC-J464C
slmgr /skms kms-server.winitpro.ru:1688
slmgr /ato
Разрешить удаленный доступ
Разрешить удаленный доступ к Server Core через RDP:
cscript C:\Windows\System32\Scregedit.wsf /ar 0
Разрешить удаленное управление:
Configure-SMRemoting.exe –Enable
Enable-NetFirewallRule -DisplayGroup “Windows Remote Management”
Настройка Windows Firewall
Информация о настройке Windows Firewall есть в статье по ссылке. Здесь оставлю несколько базовых команд.
Включить Windows Defender Firewall для всех профилей:
Set-NetFirewallProfile -Profile Domain,Public,Private -Enabled True
Изменить тип сети с Public на Private:
Get-NetConnectionProfile | Set-NetConnectionProfile -NetworkCategory Private
Полностью отключить Windows Firewall (не рекомендуется):
Get-NetFirewallProfile | Set-NetFirewallProfile -enabled false
Разрешить подключение через инструменты удаленного управления:
Enable-NetFireWallRule -DisplayName “Windows Management Instrumentation (DCOM-In)”
Enable-NetFireWallRule -DisplayGroup “Remote Event Log Management”
Enable-NetFireWallRule -DisplayGroup “Remote Service Management”
Enable-NetFireWallRule -DisplayGroup “Remote Volume Management”
Enable-NetFireWallRule -DisplayGroup “Remote Scheduled Tasks Management”
Enable-NetFireWallRule -DisplayGroup “Windows Firewall Remote Management”
Enable-NetFirewallRule -DisplayGroup «Remote Administration»
Установка обновлений в Server Core
Для управления параметрами обновлений предпочтительно использовать групповые политики Windows Update, но можно задать параметры и вручную.
Отключить автоматическое обновление:
Set-ItemProperty -Path HKLM:\Software\Policies\Microsoft\Windows\WindowsUpdate\AU -Name AUOptions -Value 1
Автоматически скачивать доступные обновления:
Set-ItemProperty -Path HKLM:\Software\Policies\Microsoft\Windows\WindowsUpdate\AU -Name AUOptions -Value 3
Получить список установленных обновлений:
Get-Hotfix
Или
wmic qfe list
Для ручной установки обновлений Windows можно использовать утилиту wusa:
Wusa update_name.msu /quiet
Также для установки и управления обновлениями из командной строки удобно использовать PowerShell модуль PSWindowsUpdate.
Управление ролями, службами и процессами Windows
Для получения списка всех доступных ролей в Windows Server Core выполните команду PowerShell:
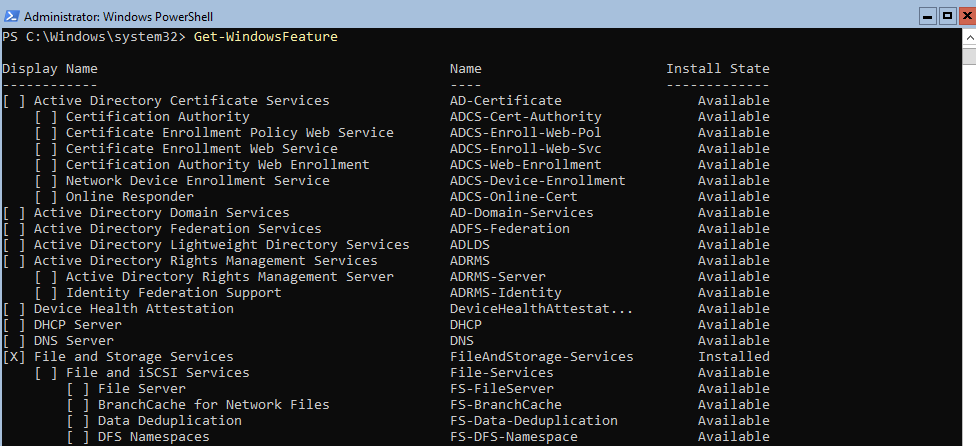
Получить список всех установленных ролей и компонентов в Windows Server(можно быстро понять, для чего используется сервер):
Get-WindowsFeature | Where-Object <$_. installstate -eq "installed">| ft Name,Installstate
Например, для установки службы DNS воспользуйтесь такой командой:
Install-WindowsFeature DNS -IncludeManagementTools
Список всех служб в Windows:
Список остановленных служб:
Restart-Service -Name spooler
Для управление процессами можно использовать стандартный диспетчер задач (taskmgr.exe) или PowerShell модуль Processes:
Get-Process cmd, proc1* | Select-Object ProcessName, StartTime, MainWindowTitle, Path, Company|ft
Часто используемые команды в Server Core
Ну и наконец, приведу список различных полезных мне команд, которые я периодически использую в Server Core.
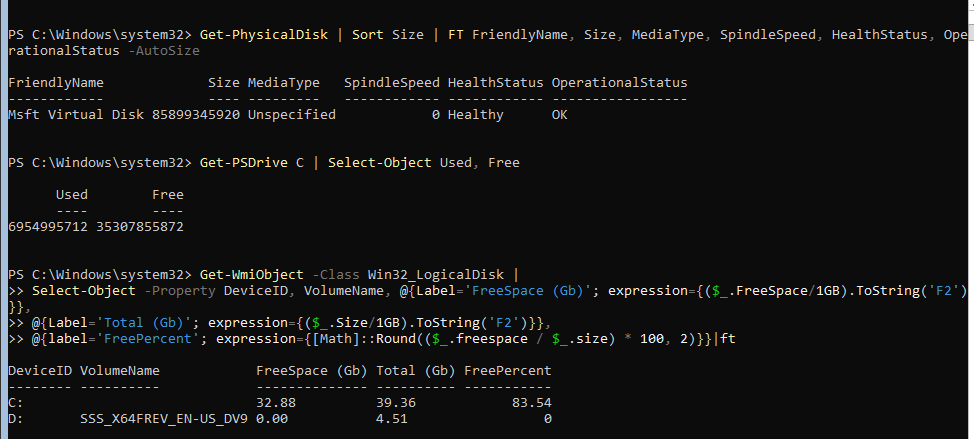
Информация о статусе и здоровье физических дисков (используется стандартный модуль управления дисками Storage):
Get-PhysicalDisk | Sort Size | FT FriendlyName, Size, MediaType, SpindleSpeed, HealthStatus, OperationalStatus -AutoSize
Информация о времени последних 10 перезагрузок сервера:
Get-EventLog system | where-object <$_.eventid -eq 6006>| select -last 10
Get-ItemProperty HKLM:\Software\Wow6432Node\Microsoft\Windows\CurrentVersion\Uninstall\* | Select-Object DisplayName, DisplayVersion, Publisher, InstallDate | Format-Table –AutoSize
Скачать и распаковать zip файл с внешнего сайта:
Invoke-WebRequest https://contoso/test.zip -outfile test.zip
Expand-Archive -path ‘.\test.zip’ -DestinationPath C:\Users\Administrator\Documents\
Чтобы скопировать все файлы из каталога на удаленный компьютер по сети можно использовать Copy-Item:
$session = New-PSSession -ComputerName remotsnode1
Copy-Item -Path «C:\Logs\*» -ToSession $session -Destination «C:\Logs\» -Recurse -Force
Для установки драйвера можно использовать стандартную утилиту:
Pnputil –i –a c:\distr\hpdp.inf
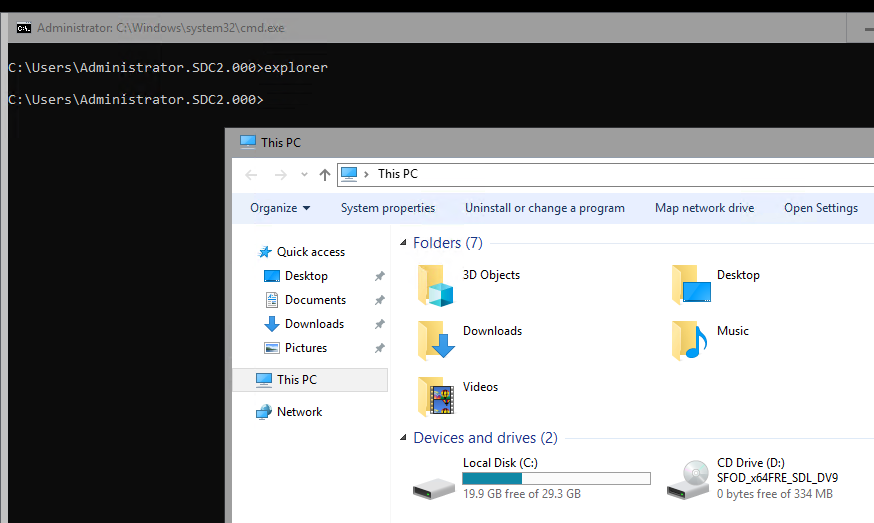
Также Microsoft предлагает специальный пакет Server Core App Compatibility Feature on Demand (FOD), который позволяет установить в Windows Server 2019 некоторые графические инструменты и консоли (MMC, Eventvwr, Hyper-V Manager, PerfMon, Resmon, Explorer.exe, Device Manager, Powershell ISE). Этот FOD доступен для загрузки в виде ISO при наличии активной подписки. Установка выполняется командой:
Add-WindowsCapability -Online -Name ServerCore.AppCompatibility
Установка Server Core App Compatibility Feature on Demand будет использовать дополнительно около 200 Мб оперативной памяти в Server Core.
В этой статье я постарался собрать самые нужные команды, которые нужно постоянно держать под рукой при работе с Windows Server Core. Время от времени я буду обновлять статью и добавлять новые команды, которые покажутся мне нужными для повседневной работы.
Command-Line Reference
Applies To: Windows Server 2003, Windows Vista, Windows XP, Windows Server 2008, Windows 7, Windows Server 2003 R2, Windows Server 2008 R2, Windows Server 2000, Windows Server 2012, Windows 8
Use this topic to find the documentation resources and other technical information that you need to learn about the command shell, and to automate command-line tasks by using scripts or scripting tools.
To read introductory information about the command shell and command-line tools, see Feature description. To see a listing of new and deprecated command-line tools see New and deprecated functionality.
To find information about a specific command, in the following A-Z menu, click the letter that the command starts with, and then click the command name.
Prerequisites
The information that is contained in this overview applies to:
Windows Server 2012
WindowsВ ServerВ 2008В R2
WindowsВ ServerВ 2008
WindowsВ ServerВ 2003В R2
WindowsВ ServerВ 2003
Feature description
New and deprecated functionality
New or Deprecated?
Create a new cluster or configure an existing cluster.
Configure DFS folders and folder targets in a DFS namespace.
Creates and manages File Server Resource Manager quotas.
Create and manage file groups, file screens, file screen exceptions, and file screen templates that are used to configure general administrative options for screening files.
Enable optional features in Windows by downloading required files from WindowsВ Update or a source that Group Policy specifies.
Read, write, run, debug, and test Windows PowerShell scripts and modules in a friendly, graphic-assisted environment.
Install or remove roles, role services, and features.
Monitor an RD Session Host session.
Create and manage storage reports and storage report tasks, and configure general administrative options for File Server Resource Manager.
Command shell overview
The command shell is a software program that provides direct communication between the user and the operating system. The non-graphical, command shell user interface provides the environment in which you run character-based applications and utilities. The command shell executes programs and displays their output on the screen by using individual characters similar to the MS-DOS command interpreter, Command.com. The command shell in the Windows Server operating system uses the command interpreter, Cmd.exe. Cmd.exe loads applications, directs the flow of information between applications, and translates user input into a form that the operating system understands.
You can use the command shell to create and edit scripts to automate routine tasks. For example, you can create simple scripts in batch (.bat) files to automate the management of user accounts or nightly backups. You can also use the command-line version of Windows Script Host to run more sophisticated scripts in the command shell. For more information, see Cscript or Wscript. You can perform operations more efficiently by using scripts than you can by using the user interface. Scripts accept all commands that are available at the command line.
Customize the Command Prompt window
You can change the properties for the Command Prompt window.
To configure the Command Prompt window
Open a Command Prompt window, click the upper-left corner of the Command Prompt window, and then click Properties. (Or to open Command Prompt Properties from the keyboard, press ALT+SPACEBAR+P.)
Click the Options tab.
In Command History, type or select 999 in Buffer Size, and then type or select 5 in Number of Buffers. By increasing the screen buffer size to 999, you enable scrolling through the Command Prompt window. By increasing the number of buffers to five, you increase the number of lines in the Command Prompt window to 5000.
In Edit Options, select the Quick Edit Mode and Insert Mode check boxes.
Click the Layout tab.
In Screen Buffer Size, type or select 2500 in Height.
To further customize your Command Prompt window settings, perform any of the following optional tasks:
In Screen Buffer Size, increase Width.
In Window Size, increase Height.
In Window Size, increase Width.
Clear the Let system position window check box, and then, in Window Position, change the values in Left and Top.
In the Apply Properties dialog box, click Save properties for future windows with same title.
To enable or disable file and directory name completion on a computer or user logon session, run Regedit.exe and set the following REG_DWORD value : HKEY_LOCAL_MACHINE\Software\Microsoft\Command Processor\CompletionChar\REG_DWORD To set the REG_DWORD value, use the hexadecimal value of a control character for a particular function (for example, 0Г—9 is Tab and 0Г—08 is Backspace). User-specified settings take precedence over computer settings, and command-line options take precedence over registry settings.
Incorrectly editing the registry may severely damage your system. Before making changes to the registry, you should back up any valued data on the computer.
Command-line reference A-Z
To find information about a specific command, in the following A-Z menu, click the letter that the command starts with, and then click the command name.
Each command-line tool topic displays the version of Windows that is supported by the command-line tool.


