- Настройка веб-сервера IIS
- План работ:
- 1. Включение компонент веб-сервера
- 1.1. Windows 10
- 1.2 Windows Server 2012 R2, 2016 и 2019
- 2. Выпуск самоподписанного сертификата
- 3. Привязка сертификата
- 4. Проверка публикации
- Adding ISAPI/CGI Restrictions Overview Compatibility Setup The collection is available only after you install the CGI or ISAPI Extensions modules on your IIS 7 and later server. You cannot install it independent of those features. Windows Server 2012 or Windows Server 2012 R2 On the taskbar, click Server Manager. In Server Manager, click the Manage menu, and then click Add Roles and Features. In the Add Roles and Features wizard, click Next. Select the installation type and click Next. Select the destination server and click Next. On the Server Roles page, expand Web Server (IIS), expand Web Server, expand Application Deelopment, and then select CGI or ISAPI Extensions. Click Next. . On the Select features page, click Next. On the Confirm installation selections page, click Install. On the Results page, click Close. Windows 8 or Windows 8.1 On the Start screen, move the pointer all the way to the lower left corner, right-click the Start button, and then click Control Panel. In Control Panel, click Programs and Features, and then click Turn Windows features on or off. Expand Internet Information Services, expand World Wide Web Services, expand Application Development Features, and then select CGI or ISAPI Extensions. Click OK. Click Close. Windows Server 2008 or Windows Server 2008 R2 On the taskbar, click Start, point to Administrative Tools, and then click Server Manager. In the Server Manager hierarchy pane, expand Roles, and then click Web Server (IIS). In the Web Server (IIS) pane, scroll to the Role Services section, and then click Add Role Services. On the Select Role Services page of the Add Role Services Wizard, select CGI or ISAPI Extensions. If the Add role services dialog appears, click Add Required Role Services. (This page appears only if you have not already installed any prerequisite role services on your server.) On the Select Role Services page, click Next. On the Confirm Installation Selections page, click Install. On the Results page, click Close. Windows Vista or Windows 7 On the taskbar, click Start, and then click Control Panel. In Control Panel, click Programs and Features, and then click Turn Windows Features on or off. In the Windows Features dialog box, expand Internet Information Services, then World Wide Web Services, then Application Development Features. Select CGI or ISAPI Extensions, and then click OK. How To How to add an ISAPI or CGI restriction Open Internet Information Services (IIS) Manager: If you are using Windows Server 2012 or Windows Server 2012 R2: On the taskbar, click Server Manager, click Tools, and then click Internet Information Services (IIS) Manager. If you are using Windows 8 or Windows 8.1: Hold down the Windows key, press the letter X, and then click Control Panel. Click Administrative Tools, and then double-click Internet Information Services (IIS) Manager. If you are using Windows Server 2008 or Windows Server 2008 R2: On the taskbar, click Start, point to Administrative Tools, and then click Internet Information Services (IIS) Manager. If you are using Windows Vista or Windows 7: On the taskbar, click Start, and then click Control Panel. Double-click Administrative Tools, and then double-click Internet Information Services (IIS) Manager. In the Connections pane, click the server name. In the Home pane, double-click ISAPI and CGI Restrictions. In the Actions pane, click Add. In the Add ISAPI or CGI Restriction dialog box, type the path to the binary you want to add in the ISAPI or CGI path box, type the description of the binary in the Description box, select the Allow extension path option to execute check box to allow the binary to run on the server, and then click OK. Configuration The collection can only be configured at the server level in the ApplicationHost.config file. Attributes Attribute Description allowed Required Boolean attribute. Specifies whether the restriction allows or denies a CGI or ISAPI module to run on the server. See the Default Configuration section below for the complete list of default values. Description Optional string attribute. Specifies the friendly description of the group associated with this groupID. See the Default Configuration section below for the complete list of default values. groupId Optional string attribute. Specifies the groupID of the application that has a dependency on an extension restriction. See the Default Configuration section below for the complete list of default values. path Required string attribute. Specifies the path to the CGI or ISAPI module in the file system of the server.
- Overview
- Compatibility
- Setup
- Windows Server 2012 or Windows Server 2012 R2
- Windows 8 or Windows 8.1
- Windows Server 2008 or Windows Server 2008 R2
- Windows Vista or Windows 7
- How To
- How to add an ISAPI or CGI restriction
- Configuration
- Attributes
Настройка веб-сервера IIS
Большинство пользователей при работе в тонком или веб-клиенте используют в основном публикацию информационных баз на основании протокола HTTP. С одной стороны — это простой и быстрый способ дать доступ к информационной базе пользователю, у которого нет дистрибутива тонкого клиента, и он может работать только в веб-клиенте или у пользователя нет прямого доступа к серверу «1С:Предприятие». С другой стороны – информационные базы, опубликованным таким образом, категорически не рекомендуются публиковать в глобальной сети Интернет, так как в таком случае используется незащищенный канал, данные по которому могут быть перехвачены злоумышленниками. Например, распространенные виды атак это:
Решением этих проблем является использование расширения протокола HTTP и в данной статье рассмотрены публикации информационных баз с использование протокола с шифрованием (HTTPS) для веб-сервера IIS.
Внимание! В статье не рассматривается выпуск и получение сертификата проверенных поставщиков. Этот пункт должен быть выполнен самостоятельно на основании предпочтений выбора провайдера услуг. В статье предполагается что, пропуская шаг выпуска самоподписанных сертификатов, у пользователя или администратора он имеется в наличие и будет подставлен в настроечные файлы, вместо указанных в статье самоподписанных сертификатов.
План работ:
Включение компонент веб-сервера.
Windows Server 2012 R2, 2016 и 2019.
Выпуск самоподписанного сертификата (Необязательно).
1. Включение компонент веб-сервера
По умолчанию в операционной среде Windows компоненты веб-сервера не установлены. В зависимости от версии установка может несущественно различаться. Мы будем рассматривать два варианта – это распространенный дистрибутив Windows 10, если планируются использовать для пробного включения шифрования протокола и Windows Server 2016/2018, если уже планируется непосредственное разворачивание публикации в продуктивной зоне.
1.1. Windows 10
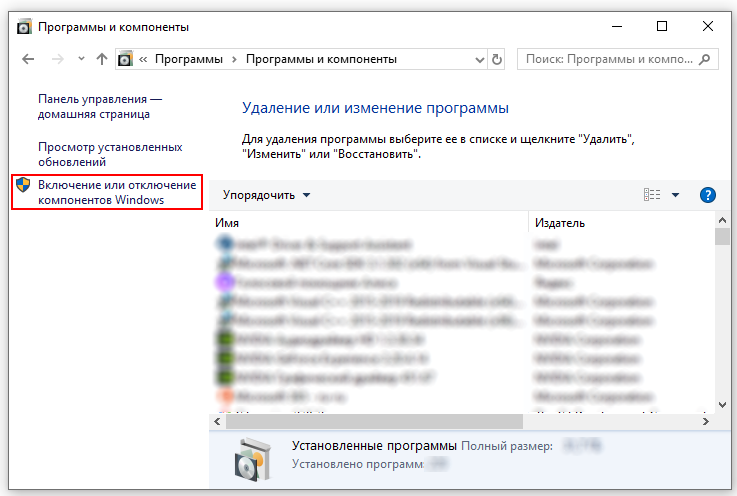
Включение компонентов веб-сервера IIS в операционной системе Windows 10 выполняется достаточно просто. Для начала нужно открыть раздел «Программы и компоненты» («Programs and Features») в панели управления (Control panel). Сделать можно это несколькими способами:
Нажать сочетание клавиш Win + R и в открывшемся окне ввести «appwiz.cpl» и нажать ОК.
Открыть панель управления (Control panel) и выбрать пункт меню Программы – Программы и компоненты (Programs – Programs and features).
В окне «Программы и компоненты» («Programs and Features») нажмите на кнопку «Включение и отключение компонентов Windows» («Turn Windows features on or off»).
Когда откроется окно «Компоненты Windows» («Windows features») в нем необходимо будет проставить флажки для следующих элементов:
Компоненты разработки приложений
Средства управления веб-сайтом
Консоль управления IIS

После этого нажимайте на кнопку «OK» и дождитесь завершения выполнения операции. После того как включение компонент будет выполнено, можно переходить к пункту «2. Публикация информационной базы».
1.2 Windows Server 2012 R2, 2016 и 2019
Настройка компонент для Windows Server 2012 R2, Windows Server 2016 и Windows Server 2019 одинаковая и все настройки производятся в диспетчере серверов (Server Manager).
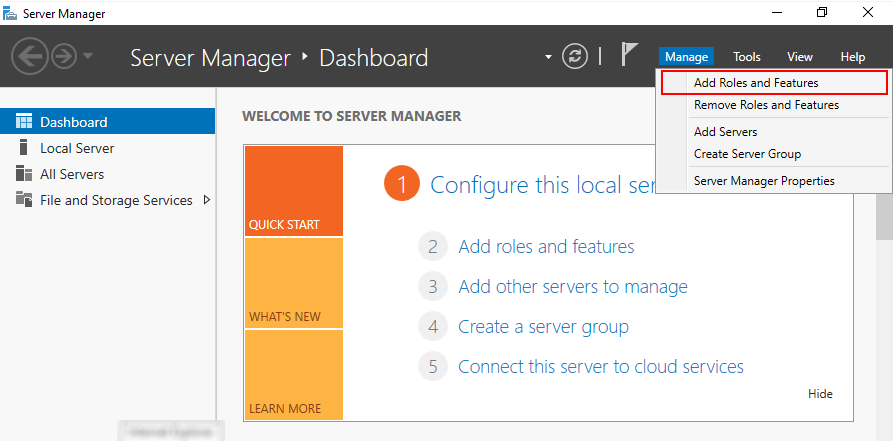
Откройте диспетчер серверов (Server Manager) и нажмите Управление – Добавить роли и компоненты (Manage – Add Roles and Features).
В ответ на нажатие откроется окно мастера добавления ролей и компонентов (Add Roles and Features).
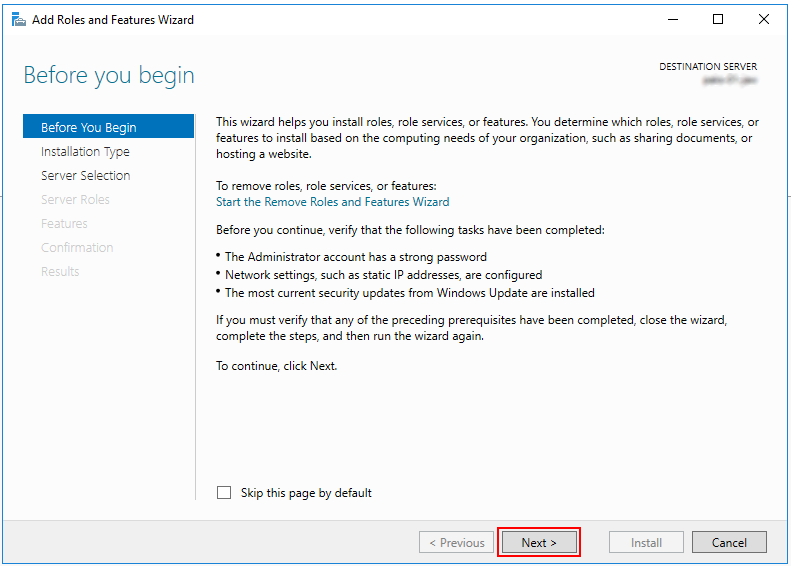
В этом окне нажмите два раза «Далее» («Next») пока мастер не переключится на страницу ролей сервера (Server Roles).

Во вкладке роли сервера (Server Roles) установите флажок «Web Server IIS». Так как эта роль зависит от другой роли ([Tools] IIS Management Console), то будет предложено установить ее дополнительно. Это можно сделать с помощью нажатия кнопки «Добавить компоненты» (Add Features) в открывшемся окне. После чего нажимаем кнопку «Далее» («Next») пока мастер не дойдет до вкладки «Роль веб-сервера IIS» («Web Server Role IIS»). На этой вкладке нажимайте кнопку «Далее» («Next») и попадете на вкладку «Службу ролей» («Role Services»). Во вкладке нужно найти пункт «Application Development» и выбрать в нем с помощью флажков пункты «ISAPI Extensions» и «ISAPI Filters». Как только закончите с установкой флажков нажимайте «Далее» («Next») и «Установить» («Install»).
На этом установка веб-сервера завершена. Можно переходить к настройкам сертификатов.
2. Выпуск самоподписанного сертификата
Выпуск самоподписанного сертификата для веб-сервера IIS максимально простой.
Для реальных систем не рекомендуем использовать самоподписанный сертификат.
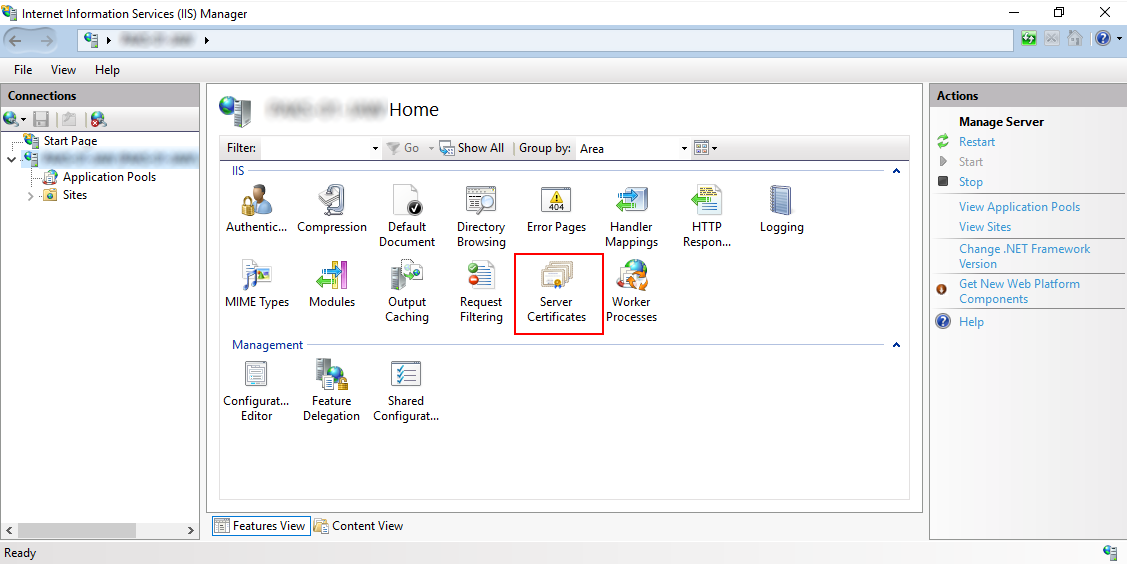
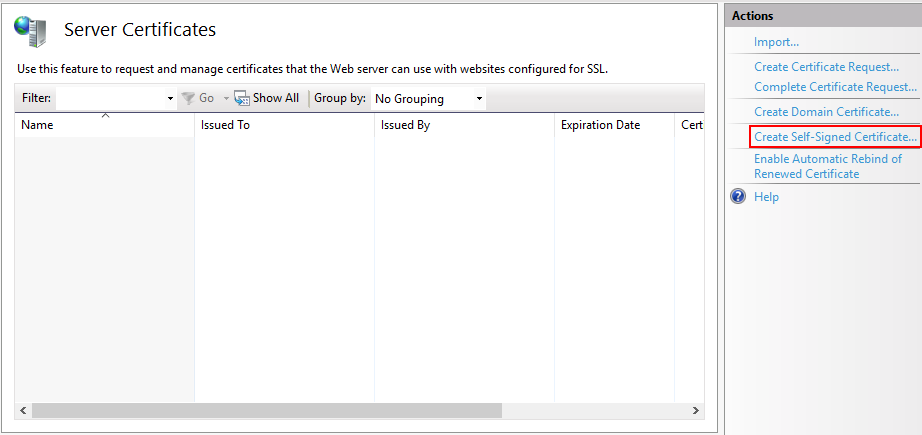
Для начала процедуры выпуска откройте окно Диспетчера служб IIS (Internet Information Services (IIS) Manager) и выделите сервер в списке Подключений (Connections) . После этого нажмите на ссылку «Сертификаты сервера» («Server Certificates») .
Откроется окно доступных сертификатов сервера (Server Certificates) в котором нужно нажать «Создать самозаверенный сертификат…» («Create Self-Signed Certificate…»).
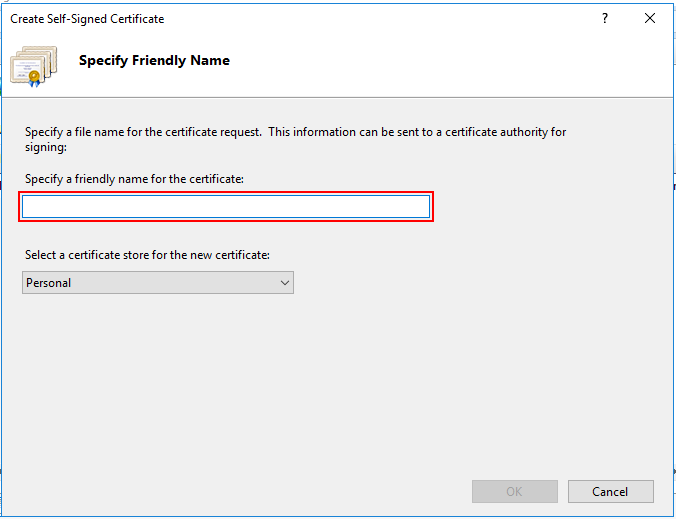
В окне мастера создания самоподписанного сертификата остается указать только произвольное название сертификата. В большинстве случаев, во избежание путаницы лучше явно указывать в качестве значения «Полное имя сертификата» («Specify a friendly name for the certificate») адрес сервера, на котором расположен сервер IIS. Как только имя сертификата будет задано нажимайте на кнопку OK и переходите к пункту привязки сертификата.
3. Привязка сертификата
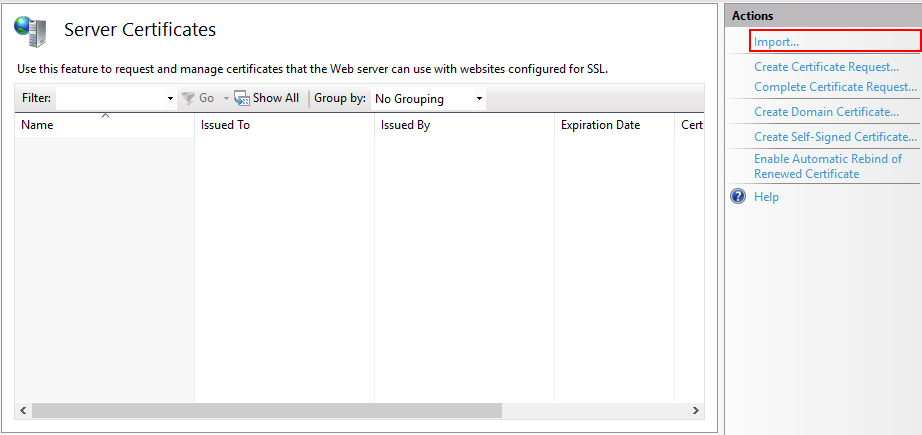
Предполагается, что сертификат получен и добавлен в список сертификатов сервера. Если сертификат получен с помощью распространенного сертифицирующего центра, то его нужно предварительно импортировать в окне «Сертификаты сервера» («Server Certificates»).

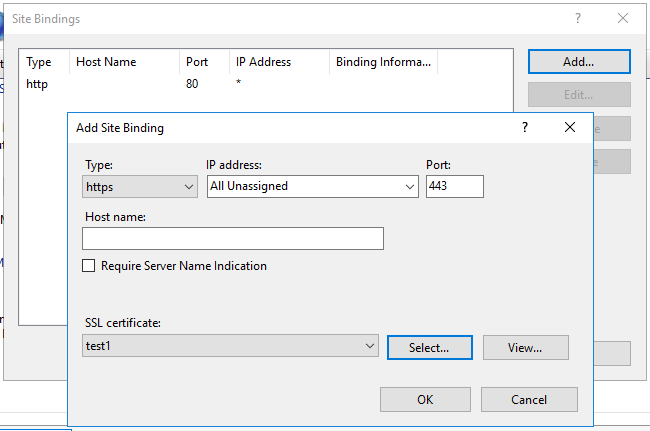
Как только сертификат появится в списке, переходим непосредственно к его привязки к публикации сайта. Для этого выделяем «Default Web Site» и в окне «Действия» («Actions») нажимаем на пункт «Привязки…» («Binding…»).
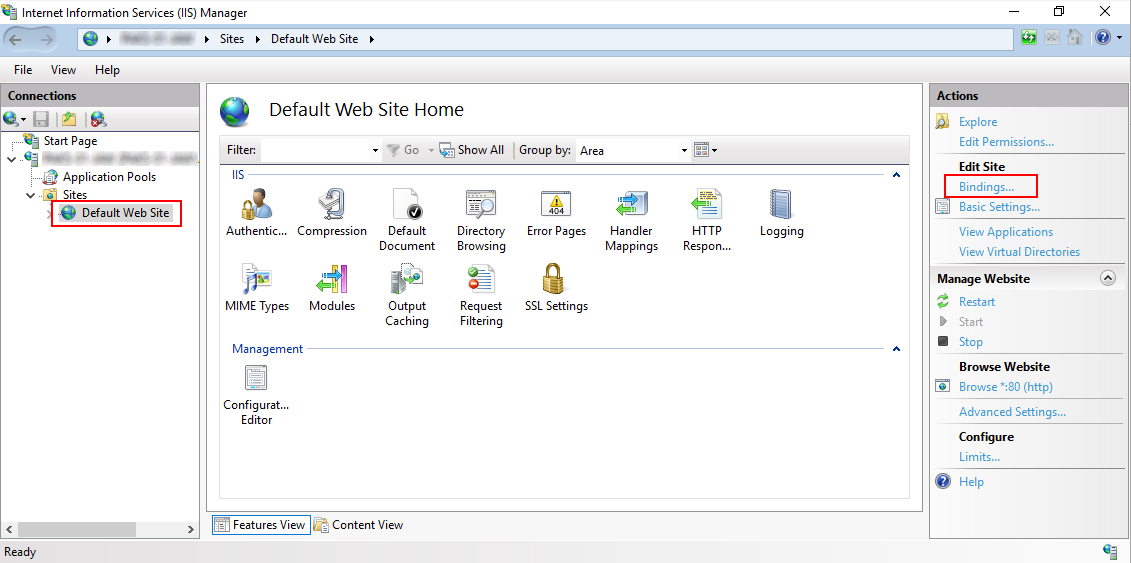
В этом окне можно увидеть, что публикация работает только на порту 80, который относится к незащищенному протоколу HTTP. Чтобы его расширить, нажмите кнопку Добавить… (Add…) слева от списка привязок сайта и в открывшемся окне выберите Тип (Type) в качестве значения «https». Завершением настройки будет выбор ранее импортированного сертификата в списке «SSL-сертификат» («SSL certificate»). Нажимаем кнопку OK и закрываем мастер привязок сайта.
Можно переходить к публикации информационной и проверки его работоспособности.
4. Проверка публикации
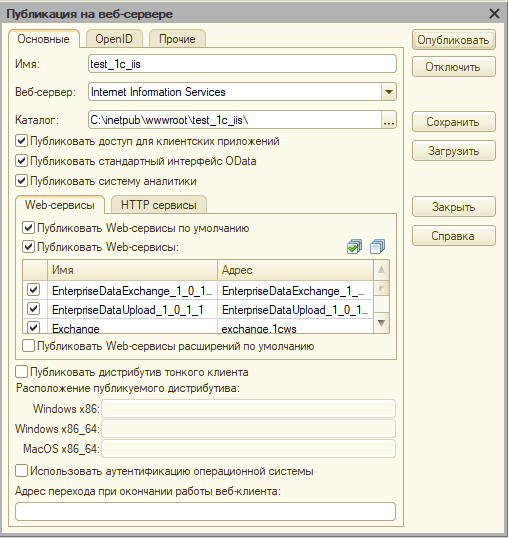
Для публикации информационной базы нужно открыть конфигуратор конкретной базы от имени администратора и перейти в пункт меню «Администрирование». После этого выбрать «Публикация информационной базы».
В окне публикации указать имя публикации и по желанию определить каталог, где будут находиться настройки публикации. Его также можно оставить по умолчанию.
После этого требуется нажать кнопку «Опубликовать» и дождаться окончания операции.
Для проверки корректной работы нужно открыть страницу в браузере и перейти по ссылке, которая состоит из двух частей:
- Имя вашего сервера (например, server1)
- Имя публикации базы (которое было указано в окне настройки публикации)
Для таких параметров ссылка будет иметь вид:
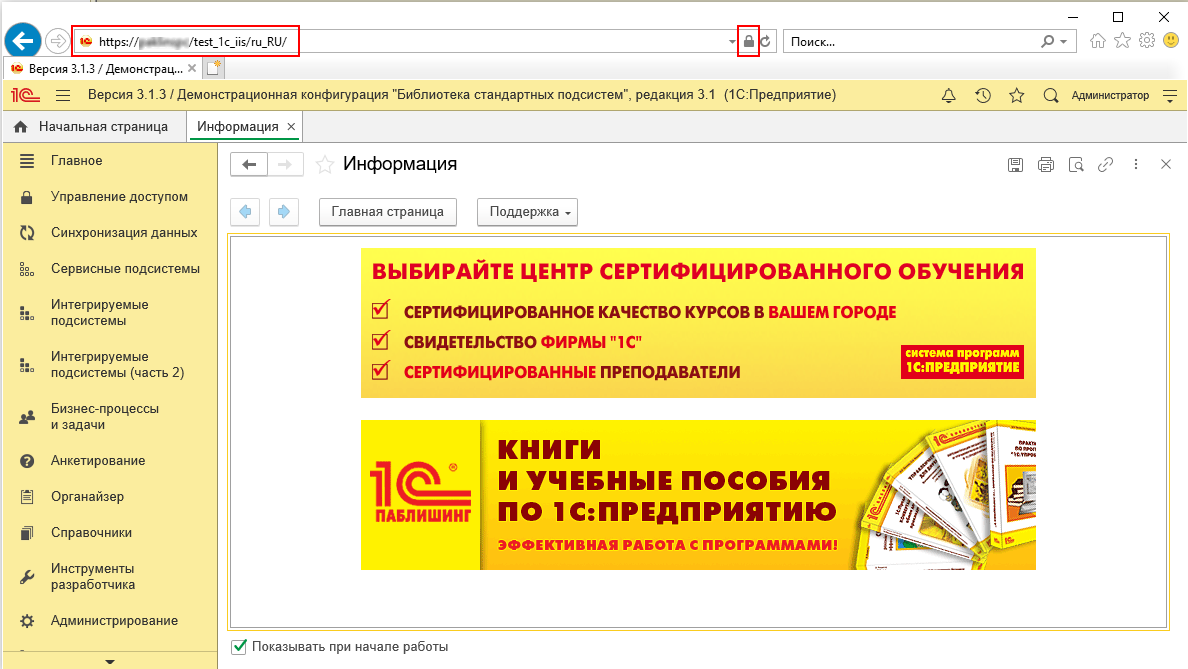
Если все хорошо, то откроется страница с вашей информационной базой.
Adding ISAPI/CGI Restrictions Overview
Compatibility
Setup
The collection is available only after you install the CGI or ISAPI Extensions modules on your IIS 7 and later server. You cannot install it independent of those features.
Windows Server 2012 or Windows Server 2012 R2
- On the taskbar, click Server Manager.
- In Server Manager, click the Manage menu, and then click Add Roles and Features.
- In the Add Roles and Features wizard, click Next. Select the installation type and click Next. Select the destination server and click Next.
- On the Server Roles page, expand Web Server (IIS), expand Web Server, expand Application Deelopment, and then select CGI or ISAPI Extensions. Click Next.
 .
. - On the Select features page, click Next.
- On the Confirm installation selections page, click Install.
- On the Results page, click Close.
 .
.Windows 8 or Windows 8.1
- On the Start screen, move the pointer all the way to the lower left corner, right-click the Start button, and then click Control Panel.
- In Control Panel, click Programs and Features, and then click Turn Windows features on or off.
- Expand Internet Information Services, expand World Wide Web Services, expand Application Development Features, and then select CGI or ISAPI Extensions.
- Click OK.
- Click Close.

Windows Server 2008 or Windows Server 2008 R2
- On the taskbar, click Start, point to Administrative Tools, and then click Server Manager.
- In the Server Manager hierarchy pane, expand Roles, and then click Web Server (IIS).
- In the Web Server (IIS) pane, scroll to the Role Services section, and then click Add Role Services.
- On the Select Role Services page of the Add Role Services Wizard, select CGI or ISAPI Extensions.
- If the Add role services dialog appears, click Add Required Role Services. (This page appears only if you have not already installed any prerequisite role services on your server.)
- On the Select Role Services page, click Next.
- On the Confirm Installation Selections page, click Install.
- On the Results page, click Close.

Windows Vista or Windows 7
- On the taskbar, click Start, and then click Control Panel.
- In Control Panel, click Programs and Features, and then click Turn Windows Features on or off.
- In the Windows Features dialog box, expand Internet Information Services, then World Wide Web Services, then Application Development Features.
- Select CGI or ISAPI Extensions, and then click OK.

How To
How to add an ISAPI or CGI restriction
Open Internet Information Services (IIS) Manager:
If you are using Windows Server 2012 or Windows Server 2012 R2:
- On the taskbar, click Server Manager, click Tools, and then click Internet Information Services (IIS) Manager.
If you are using Windows 8 or Windows 8.1:
- Hold down the Windows key, press the letter X, and then click Control Panel.
- Click Administrative Tools, and then double-click Internet Information Services (IIS) Manager.
If you are using Windows Server 2008 or Windows Server 2008 R2:
- On the taskbar, click Start, point to Administrative Tools, and then click Internet Information Services (IIS) Manager.
If you are using Windows Vista or Windows 7:
- On the taskbar, click Start, and then click Control Panel.
- Double-click Administrative Tools, and then double-click Internet Information Services (IIS) Manager.
In the Connections pane, click the server name.
In the Home pane, double-click ISAPI and CGI Restrictions. 
In the Actions pane, click Add.
In the Add ISAPI or CGI Restriction dialog box, type the path to the binary you want to add in the ISAPI or CGI path box, type the description of the binary in the Description box, select the Allow extension path option to execute check box to allow the binary to run on the server, and then click OK. 
Configuration
The collection can only be configured at the server level in the ApplicationHost.config file.
Attributes
| Attribute | Description |
|---|---|
| allowed | Required Boolean attribute. |
Specifies whether the restriction allows or denies a CGI or ISAPI module to run on the server.
See the Default Configuration section below for the complete list of default values.
Specifies the friendly description of the group associated with this groupID.
See the Default Configuration section below for the complete list of default values.
Specifies the groupID of the application that has a dependency on an extension restriction.
See the Default Configuration section below for the complete list of default values.
Specifies the path to the CGI or ISAPI module in the file system of the server.


