Windows Server 2012 R2 Inside Out: Networking with TCP/IP
- Navigating networking in Windows Server 2012 R2
- Using TCP/IP
- Understanding IPv4 addressing
- Special IPv4 addressing rules
- Using subnets and subnet masks
- Getting and using IPv4 addresses
- Understanding IPv6
- Understanding name resolution
TCP/IP is a protocol suite consisting of Transmission Control Protocol (TCP) and Internet Protocol (IP). TCP is a connection-oriented protocol designed for reliable end-to-end communications. IP is an internetworking protocol that is used to route packets of data called datagrams over a network. An IP datagram consists of an IP header and an IP payload. The IP header contains information about routing the datagram, including source and destination IP addresses. The IP payload contains the actual data being sent over the network.
TCP/IP is the backbone for Microsoft Windows networks. It is required for internetwork communications and for accessing the Internet. Before you can implement TCP/IP networking, you should understand IP addressing conventions, subnetting options, and name-resolution techniques—all of which are covered in this chapter.
Navigating networking in Windows Server 2012 R2
The networking features in Windows Server 2012 R2 are different from those in early releases of Windows. Windows Server 2012 R2 has a suite of networking tools, including the following:
- Network Explorer. Provides a central console for browsing computers and devices on the network
- Network And Sharing Center. Provides a central console for viewing and managing a computer’s networking and sharing configuration
- Windows Network Diagnostics. Provides automated diagnostics to help diagnose and resolve networking problems
Before discussing how these networking tools are used, we must first look at the features on which these tools rely:
- Network Discovery. Controls the ability to see other computers and devices
- Network Location Awareness. Reports changes in network connectivity and configuration
Network Location Awareness also enables a computer with multiple network interfaces to select the best route for a particular data transfer. As part of selecting the best route, Windows chooses the best interface (either wired or wireless) for the transfer. This mechanism improves the selection of wireless over wired networks when both interfaces are present.
The network discovery settings of the computer you are working with determine the computers and devices you can browse or view in networking tools. Discovery settings work in conjunction with a computer’s Windows Firewall to either block or allow the following:
- Discovery of network computers and devices
- Discovery of your computer by others
Network discovery settings are meant to provide the appropriate level of security for each of the various categories of networks to which a computer can connect. Three categories of networks are defined for servers:
- Domain Network. Intended as a designation for a network in which computers are connected to the corporate domain to which they are joined
- Private Network. Intended as a designation for a network in which computers are configured as members of a homegroup or workgroup and are not connected directly to the public Internet
- Public Network. Intended as a designation for a guest network in a public place, such as a coffee shop or airport, rather than for an internal network
In domains, you can enable discovery on domain controllers to view member computers. On member computers, you can enable discovery to see other member computers. With computers running nonserver versions of Windows, both homegroups and workgroups are available on private networks. Homegroups have special sharing settings that are not available in workgroups.
Correcting the network category
If Windows detects the wrong type of network, you should check the TCP/IP configuration settings for the related network adapter. If the public category is incorrectly assigned and the TCP/IP settings are correct, you can change the network category to private (or domain, if appropriate) using Network Explorer. Open Network Explorer, tap or click the warning message in the notification area, and then tap or click Turn On Network Discovery And File Sharing. In the dialog box provided, tap or click No, Make The Network That I Am Connected To A Private Network. This sets the network category as private while leaving network discovery disabled.
Another way to change the network category is to use Windows PowerShell. Enter Get-NetConnectionProfile to list information about the networks to which the computer is currently connected, including the name and interface alias for these networks. At an elevated Windows PowerShell prompt, use Set-NetConnectionProfile to change the category for a specific network adapter. The basic syntax is
where NetworkName is the network name and Category is Private for a private network or Public for a public network, such as
After you use Network Explorer or Set-NetConnectionProfile to change the network category to private, computers on domain networks should eventually be listed as such. If the network type doesn’t change automatically, you can disable and then enable the related network connection to force Windows to reevaluate the network category. One way to disable and then enable a network adapter is to use Disable-NetAdapter and Enable-NetAdapter. The basic syntax for each is
where NetworkName is the network name, such as
Because a computer saves settings separately for each category of network, you can use different block and allow settings for each network category. When you connect to a network for the first time, Windows automatically sets the network category based on the computer’s network settings. If the computer has multiple network adapters, the adapters can be connected to different networks and, therefore, can be assigned different network categories.
Based on the network category, Windows Server 2012 R2 automatically configures settings that turn discovery either on or off. You can manage these settings as well. Regardless of whether network discovery was managed automatically and configured manually, the On (Enabled) state means the following:
- The computer can discover other computers and devices on the network.
- Other computers on the network can discover the computer.
The Off (Disabled) state means the following:
- The computer can’t discover other computers and devices on the network.
- Other computers on the network can’t discover the computer.
Network Explorer, shown in Figure 2-1, displays a list of discovered computers and devices on the network. In any File Explorer view, you can access Network Explorer by tapping or clicking the leftmost option button in the address list and then tapping or clicking Network. The computers and devices listed in Network Explorer depend on the network discovery settings of the computer.
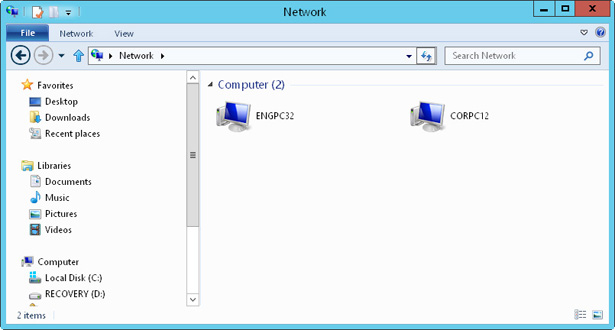
Figure 2-1 Use Network Explorer to browse network resources.
If discovery is blocked, you’ll see a note about this. When you tap or click the warning message, you can enable network discovery by selecting Turn On Network Discovery And File Sharing. This opens the appropriate Windows Firewall ports so that network discovery is allowed. If no other changes have been made with regard to network discovery, the computer will be in the discovery-only state. You need to manually configure the sharing of printers, files, and media, as discussed in Chapter 18, “Managing file sharing,” in Windows Server 2012 R2 Inside Out: Configuration, Storage, & Essentials (Microsoft Press, 2014).
When you attempt to enable network discovery for a network identified as public, you’ll see an additional prompt with options for making the network a private network or turning on network discovery and file sharing for all public networks. Generally, you don’t want to turn on network discovery and file sharing on public networks because this can open the computer to attack. Therefore, if the computer is actually connected to a public (open) network, click Cancel and do not turn on network discovery. Otherwise, if the computer is connected to an unidentified private network, select the option for making the network a private network.
Network And Sharing Center, shown in Figure 2-2, provides the current network status and an overview of the current network configuration. In Control Panel you can access Network And Sharing Center by tapping or clicking View Network Status And Tasks under the Network And Internet heading. In Network Explorer, tap or click Network on the toolbar and then tap or click Network And Sharing Center.
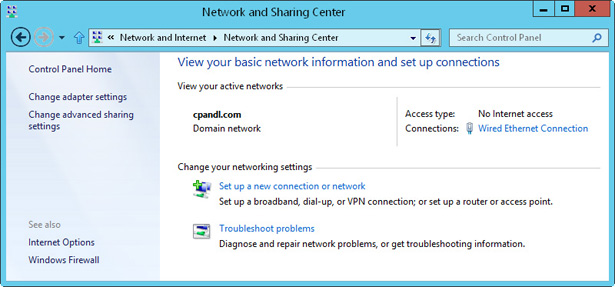
Figure 2-2 View and manage network settings with Network And Sharing Center.
Network And Sharing Center lists the current network by name and provides an overview of the network, including the category of the current network as Domain Network, Private Network, or Public Network. The Access Type field specifies whether and how the computer is connected to its current network as No Internet Access or Internet Access. The Connections field shows the name of the Local Area Connection being used to connect to the current network. If you tap or click the connection, you can view the connection status in the related Status dialog box.
Windows assigns the public category to any unidentified network, even on domain-joined computers. In Network And Sharing Center, the network adapter used to connect to the domain should identify the domain and show the network category as Domain Network. However, if a computer’s TCP/IP settings aren’t set correctly, Windows might misidentify a network as public or private rather than as a domain network. To resolve this, change the network adapter’s TCP/IP settings. When you enter the correct TCP/IP settings, Windows attempts to identify the network again and should set the network category correctly.
Windows might occasionally identify multiple networks on a computer with only one network adapter. Often the quickest solution for this mixed-state problem is to disable and then enable the network adapter. In Network And Sharing Center, tap or click Change Adapter Settings. Next, tap or click the network adapter and then tap or click Disable This Network Device. Finally, tap or click Enable This Network Device.
You also can use Windows PowerShell to work with network adapters. Use Get-NetAdapter to list details for network adapters, including the network name. Next, use Disable-NetAdapter to disable the network adapter and then use Enable-NetAdapter to reenable the network adapter.
If a computer has multiple network adapters connected to different networks, Windows Server might incorrectly identify the connected networks as either public or private instead of domain as well. Often the quickest solution for this mixed-state problem is to disable the network adapter that isn’t connected to the corporate network. For example, during development testing, I often run Windows Server on laptops with both wired and wireless connections. To get Windows Server to correctly identify the domain-connected adapter, I disable the wireless adapter.
Windows Server does allow multiple network adapters to be used. You can aggregate bandwidth using network adapter teaming. You can configure up to 32 network adapters to work together.
Настройка маршрутизатора на базе Windows Server 2012 R2
В этой статье посмотрим, как с помощью встроенных средств на базе сервера с Windows Server 2012 R2 организовать простой межсетевой маршрутизатор. И хотя на практике маршрутизаторы на базе компьютеров используются довольно редко (аппаратные маршрутизаторы, как правило, имеют более высокую производительность, надежность и несколько дешевле выделенного компьютера), в тестовых или виртуальных средах, когда нужно срочно настроить маршрутизацию между несколькими подсетями, маршрутизатор на базе Windows Server вполне себе приемлемое решение.
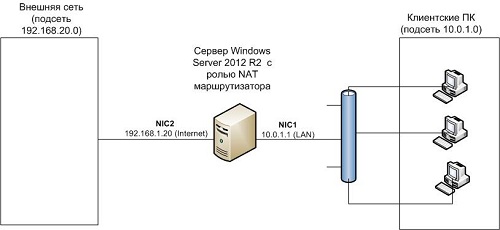
Итак, в роли маршрутизатора будет выступать сервер с ОС Windows Server 2012 R2. Сервер имеет 2 сетевых интерфейса: физических или виртуальных, если сервер запущен на гипервизоре. Каждому интерфейсу сервера назначен выделенный IP адрес из различных подсетей. Для удобства, мы переименовали названия сетевых интерфейсов в Панели управления сетями и общим доступом:
Сетевая карта 1 (сетевая карта подключена во внутреннюю LAN сеть):
Имя: LAN
IP: 10.0.1.1
Сетевая карта 2 (сетевая карта во внешней сети ):
Имя: Internet
IP: 192.168.1.20
Наша задача – организовать маршрутизацию пакетов из локальной подсети 10.0.1.0 во внешнюю подсеть 192.168.1.0 (как правило, такая сеть имеет выход в интернет) через NAT. Такую схему можно реализовать в случае необходимости организации доступа клиентов из внутренней сети в интернет.
Маршрутизация в Windows Server 2012 R2 реализуется на базе роли Remote Access (RRAS). Данная служба появилась еще в Windows Server 2003 и до текущей в версии Windows Server ее интерфейс и процесс настройки практически не изменился.
В первую очередь нужно установить роль Remote Access. Для этого откроем консоль Server Manager, выбираем Manage -> Add Roles and Features, находим и отмечаем роль Remote Access, в ее составе выбираем службу Routing, и, соглашаясь со всеми предложенными по умолчанию компонентами, запускаем ее установку (Install). 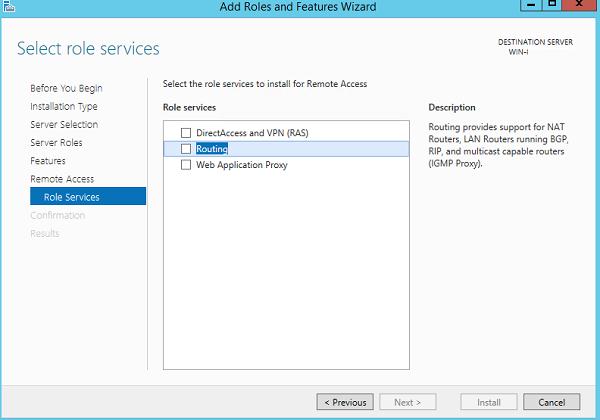
После окончания установки открываем консоль Routing and Remote Access (rrasmgmt.msc), щелкаем по имени сервера (с красной стрелкой) и выбираем Configure and Enable Routing and Remote Access. 
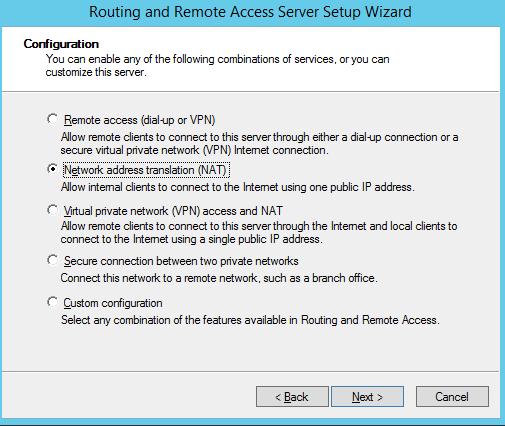
В открывшемся окне выбираем пункт Network Address Translation (NAT).
На следующей шаге (NAT Internet Connection) нужно выбрать сетевой интерфейс, подключённый ко внешней сети / Интернету (в нашем примере это интерфейс Internet с ip 192.168.1.20). Этот интерфейс будет «публичным интерфейсом» нашего NAT роутера. 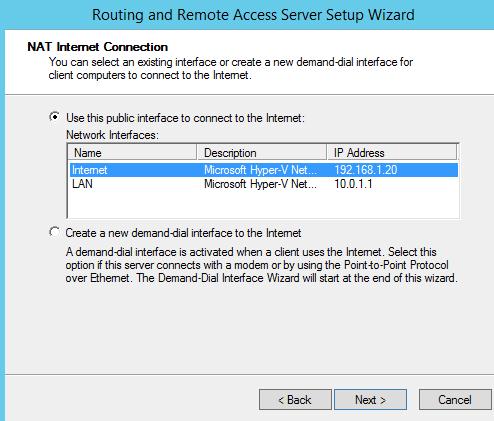
Далее будет предложено указать должен ли NAT роутер обеспечить клиентов внутренней сети сервисами DHCP и DNS. Как правило, этот функционал во внутренней сети уже имеется, поэтому в нем мы не нуждаемся. 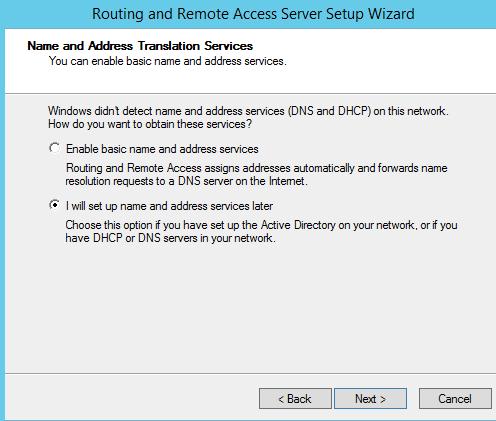
На этом базовая настройка маршрутизации на Windows Server 2012 R2 завершена. Сервер уже должен выполнять маршрутизацию пакетов между двумя подключенными сетями и выполнять трансляцию сетевых адресов (NAT).
Чтобы в этом убедиться, в консоли RRAS откройте свойства сервера. На вкладке General показано, что IPv4 маршрутизация включена (т.е. пакеты IPv4 будут пересылаться с одной сетевой карты на другую).
Проверить работу маршрутизации можно, указав на клиентском компьютере во внутренней сети (к которой подключен интерфейс сервера LAN) в качестве шлюза IP-адрес сервера (10.0.1.1), и выполнить ping или трассировку маршрута к ресурсу, расположенному во внешней сети или интернете. Эти попытки должны быть успешными. 
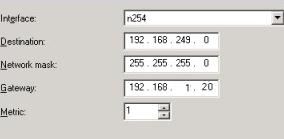
В нашем случае на сервере осуществялется статическая маршрутизация. Если нужно добавить новый маршрут, щелкните ПКМ по Static Routes, выберите пункт меню New static route и создайте новое статическое правило маршрутизации.