- Cannot access shared files or folders on a drive in Windows Server 2012 or Windows Server 2012 R2
- Symptoms
- Resolution
- Workaround
- Status
- More Information
- Windows Server 2012 — общий доступ к файлам
- Use Shared Folders in Windows Server Essentials
- Using the Windows Server Essentials Launchpad
- Copy or move shared files or folders using the Launchpad
- Using Remote Web Access
- Create, rename, move, delete, or copy files and folders in Remote Web Access
- Upload and download files in Remote Web Access
- Upload and download files in Remote Web Access
- Using My Server app for Windows Phone
- Using My Server app for Windows 8
- Настройка файлового сервера Windows Server 2012
- Файловый сервер настройка:
- Share a folder on network without passwords»
- 4 Answers 4
Cannot access shared files or folders on a drive in Windows Server 2012 or Windows Server 2012 R2
Symptoms
You may experience one of the following issues:
You can see the shared files but cannot open them.
When you open a shared file, the loading progress bar is displayed as zero percent.
When you open a shared file or a folder, Windows explorer freezes.
If you try to restart the Server service, the service freezes in the stopping state.
Microsoft Office Access databases (.mdb files) that are hosted on Windows Server 2012 shares may be corrupted.
A «file is locked by another user» or «is locked for editing» error occurs in Microsoft Excel.
SMB2 dialect negotiation receives only a TCP ACK response.
Resolution
To resolve this issue in Windows Server 2012 R2 or Windows Server 2012, install update 2955164 or 2955163. For more information about how to obtain update 2955164 or 2955163, click the following article numbers to view the articles in the Microsoft Knowledge Base:
2955164 Windows RT 8.1, Windows 8.1, and Windows Server 2012 R2 update rollup: May 2014
2955163 Windows RT, Windows 8, and Windows Server 2012 update rollup: May 2014
Workaround
To work around these issues, follow these steps:
Disable the leasing on the file server. To do this, run the following command:REG ADD HKEY_LOCAL_MACHINE\SYSTEM\CurrentControlSet\Services\lanmanserver\parameters /v DisableLeasing /t REG_DWORD /d 1 /f Note After you set this registry key, SMB2 leases are no longer granted, but oplocks are still available. This setting is primarily used for troubleshooting.
Restart the file server, or restart the server service. To restart the service, run the following commands:NET STOP SERVER
NET START SERVER
Status
Microsoft has confirmed that this is a problem in the Microsoft products that are listed in the «Applies to» section.
More Information
For more information about software update terminology, click the following article number to view the article in the Microsoft Knowledge Base:
824684 Description of the standard terminology that is used to describe Microsoft software updates For more information about SMB leasing, go to the following MSDN website:
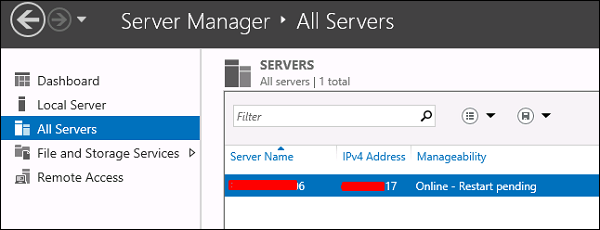
Windows Server 2012 — общий доступ к файлам
Другим важным сервисом для Windows Server является общий доступ к файлам, и для этого в Windows Server 2012 есть — File and Storage Services , который находится в Диспетчере серверов на левой панели, как показано на скриншоте ниже.
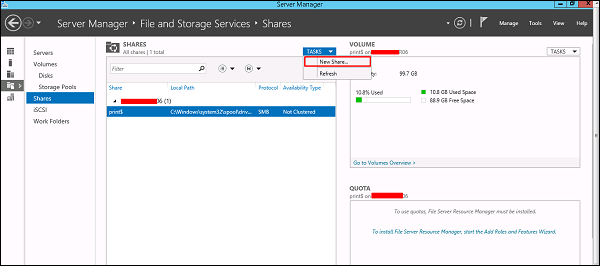
Теперь давайте посмотрим, как создать общий доступ в системе с соответствующими правами. Чтобы сделать это, мы должны следовать инструкциям ниже.
Шаг 1. Нажмите «Диспетчер серверов» → затем щелкните «Службы файлов и хранилищ» на боковой панели «Диспетчер серверов» → щелкните «Общие ресурсы» → щелкните раскрывающийся список «Общие ресурсы» → нажмите «Создать общий ресурс».
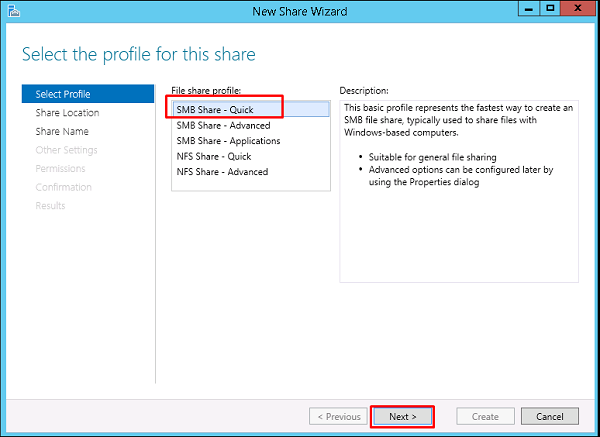
Шаг 2. Откроется мастер создания общего ресурса → Здесь выберите тип общего ресурса → Я создам очень простой общий ресурс SMB, поэтому нажмите « Общий ресурс SMB — Быстрый» . Позже мы можем настроить права пользователя этого ресурса.
Шаг 3 — Нажмите «Введите произвольный путь» → нажмите кнопку «Обзор».
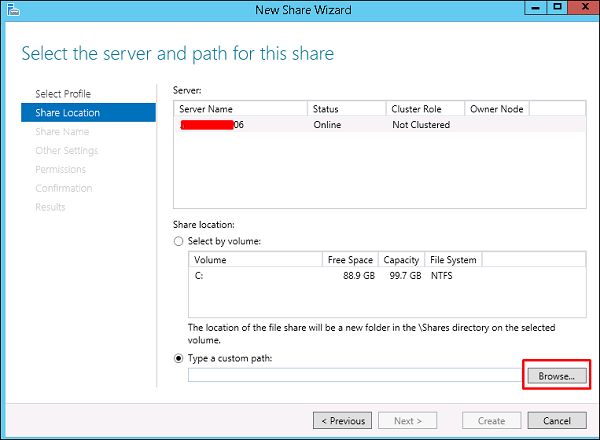
Шаг 4 — Выберите папку, к которой вы хотите предоставить общий доступ → Нажмите « Выбрать папку» .
Use Shared Folders in Windows Server Essentials
Applies To: Windows Server 2016 Essentials, Windows Server 2012 R2 Essentials, Windows Server 2012 Essentials
Windows Server Essentials provides a central location for all of your data and files through the shared folders that are located on your server.
There are several different ways that you can access your shared folders on Windows Server Essentials from a device that is connected to the server:
Using the Windows Server Essentials Launchpad
You can use the Launchpad from any computer that is connected to the server by using the Connect My Computer to the Server Wizard. For more information about connecting your computer to the server, see Connect computers to the server.
After you connect your computer to the server, a Launchpad shortcut is added to the notification area of your desktop. Double-click the Launchpad icon and enter your network credentials to access shared folders by using the Launchpad. Using the shared folders link on the Launchpad, you can upload or download files to any of the shared folders that are listed by dragging and dropping files between the local computer and the shared folders. Shared folders enable you to stream music and videos, play slideshows, or record TV programs on any computer that is connected to the server, or you can play a slide show to view pictures.
For more information about the Launchpad, see Launchpad Overview.
Copy or move shared files or folders using the Launchpad
When you want to copy or move shared files on Windows Server Essentials by using the Launchpad, click the Shared Folders tab in the Launchpad.
If you want to move a file or folder from one location to another in Shared Folders, you can use the drag-and-drop method in the same way as you would move files and folders on your computer. Open the folder that contains the file or folder that you want to move. Then open the folder where you want to move it to in a different window. Position the windows side-by-side on the desktop so that you can see the contents of both, and then drag the file or folder from the first folder to the second folder.
When using the drag-and-drop method, you might notice that sometimes the file or folder is copied, and at other times it is moved. If you are dragging an item between two folders that are stored on the same hard disk, the item is moved so that two copies of the same file or folder aren’t created in the same location. If you drag the item to a folder that is in a different location (such as another computer) or to removable media such as a USB flash drive, the item is copied.
If you want to copy files or folders from one location to another in Shared Folders, you can use the copy and paste method in the same way as you would copy files on your computer. Open the folder that contains the files that you want to copy. Right-click the files that you want to copy, and then click Copy. Right-click the folder where you want to paste the copied files, and then click Paste.
Using Remote Web Access
You can access shared files and folders from any remote computer by using the Remote Web Access website. From a computer within the server network, to access the Remote Web Access website, open the Internet browser and type https:// /remote. Using Remote Web Access, you can view and manage files on the shared folders. For step-by-step instructions, see Use Remote Web Access.
You can access shared files and folders from any remote computer by using the Remote Web Access website. From a computer within the server network, to access the Remote Web Access website, open the Internet browser and type https:// /remote. Using Remote Web Access, you can view and manage files on the shared folders. For step-by-step instructions, see Use Remote Web Access.
Remote Web Access on the server must be turned on in order to access the Remote Web Access website. For information about managing Remote Web Access, see Manage Remote Web Access.
Create, rename, move, delete, or copy files and folders in Remote Web Access
You can use Remote Web Access to create new folders in an existing shared folder, to rename files and folders, to move or copy files and folders, and to delete files and folders on your server. For more information, see the section Create, rename, move, delete, or copy files and folders in Remote Web Access? in the topic Use Remote Web Access.
Upload and download files in Remote Web Access
On the Remote Web Access Shared Folders tab, you can upload and download files. For more information, see the section Upload and download files in Remote Web Access? in the topic Use Remote Web Access.
Using My Server app for Windows Phone
You can access shared folders through your Windows Phone by using the My Server app for Windows Phone. You can download this app from the Marketplace for Windows Phone.
Using My Server app for Windows 8
You can access shared folders through Windows 8 by using the My Server app for Windows 8. You can download this app from the Windows 8 App store.
Настройка файлового сервера Windows Server 2012
Системные администраторы часто сталкиваются с проблемой размещения файлов пользователей а именно с созданием файлового сервера Windows Server 2012 в сети и как потом предоставить к ним доступ, причем только нужным пользователям!
Одним из главных понятий в этом вопросе является термин: общий ресурс, под которым подразумевается устройство или часть информации к которой можно предоставить доступ, и получить этот доступ с другого компьютера.
Важно понимать, что общим ресурсом может быть не только папка а еще: принтер, сканер, картинки, еще важно знать, что создатель файла может легко предоставить к нему доступ, без каких-либо специфических настроек.
Но в рамках данной статьи мы будем рассматривать как реализовать настройку файлового сервера Windows Server 2012.
Для этого заходим на наш сервер, после чего нам необходимо предоставить доступ к определенной папке.
Файловый сервер настройка:
Для этого создайте папку например с именем: «Обмен»
Важно: Для всех настроек вы должны обладать правами Администратора

Давайте теперь назначим на эту папку разрешения. Для того что бы это сделать мы кликаем по ней правой кнопкой мыши и выбираем пункт «Свойства»

В появившимся окне переходим на вкладку «Доступ» и назначаем определенные разрешения именно на эту сетевую папку путем перехода в пункт «Расширенная настройка»

Ставим галочку напротив надписи: открыть общий доступ к этой папке, после чего нам необходимо добавить пользователей которые будут иметь доступ к этой папке с определенными правами, для того что бы выбрать конкретных пользователей из Active Directory нажмите вкладку «Разрешения»

Мы попали в настройки разрешения общего доступа, что вы выбрать пользователя который будет иметь доступ, нажмите «Добавить»

В AD мы создавали тестового пользователя с именем «Тест» если вы не знаете, как добавить пользователя в оснастку Active Directory прочитайте эту статью.
Итак назначим учетной записи Тест полный доступ к этой папке, для этого введите имя «Тест» в поле выбираемых объектов после чего кликаем «Проверить имена«

Так же добавляем еще один параметр для общего доступа, для этого нажмите ПКМ по папке и перейдите по пунктам: «Общий доступ» – «Отдельные люди» В появившимся окне в поле для ввода имени вводим «Тест» и кликаем «Добавить» (желательно в данной папке выставить пользователям права на Чтение и запись)


Для того что бы проверить настройку и факт добавления сетевой папки у пользователя, войдем под учетной записью Тест!
Если вы откроете «Мой компьютер» то вы увидите подключенную сетевую папку «Обмен»

И как видим все прошло удачно. Если у вас возникли вопросы по теме, можете смело писать их в комментарии, я по возможности постараюсь ответить и не забываем подписываться на рассылку!
Share a folder on network without passwords»
We have one folder on a Windows Server 2012 R2 that we want to share without passwords» We need to provide the access of folder to another machine that is in same network but not in domain. We need to share it without password verification.
4 Answers 4
Make sure all computers are connected to same LAN
1.start —> Run —> fsmgmt.msc
2.shared folders dialogue will open in that right-click
shares—>new share—>browse through the folder you want to share
and then in permissions Add Guest and change the permissions to access all then click ok
3.enter ip(shared pc ip) in the LAN computer pc
it should be open
- In the computer that has the share, browse to Settings >> Network & Internet >> Status >> Sharing Options (or browse to Control Panel\Network and Internet\Network and Sharing Center\Advanced sharing settings)
- Advanced Sharing Options Window pops up
- Choose the «All Networks» section so it opens the options
- Scroll down to «Password Protected Sharing»
- Choose the Option to «Turn Off Password Protected Sharing»
- Click «Save Changes»
This method is only suggested if you aren’t running a domain controller. I use this method on a Windows 2016 Server which has shares I need to access from PC’s that are not part of any network domain. If you are running a domain controller, you want to handle everything through group policy as this method will allow anyone on your network to access the share.
If doing the above alone does not give you access then you will also need to edit the share permisions to and add the «Everyone» group object. The permission you give «Everyone» will determine whether users who access the share can read or write to the share.
- Open Computer Management.
- If the User Account Control dialog box appears, confirm that the action it displays is what you want, and then click Yes.
- In the console tree, click System Tools, click Shared Folders, and then click Shares.
- In the details pane, right-click the shared folder, and then click Properties.
- On the Share Permissions tab, set the permissions you want:
- To assign permissions to a shared folder to a user or group, click Add.
- In the Select Users, Computers, or Groups dialog box, type «Everyone», and then click OK.
- Verify the permissions for the «Everyone Group» you just added.
- Click Okay
- Test


