Installing WSUS on Windows Server 2012

April 15th, 2013
Summary : Honorary Scripting Guy, Boe Prox, talks about installing WSUS on Windows Server 2012 via Windows PowerShell.
Microsoft Scripting Guy, Ed Wilson, is here. Welcome back today to Honorary Scripting Guy, Boe Prox. Without further ado, here is Boe…
In a previous Hey, Scripting Guy! Blog post, Introduction to WSUS and PowerShell, I demonstrated how you can download the Windows Server Update Services (WSUS) installation file and use various parameters to customize a WSUS installation on a local or remote system. With Windows Server 2012, we get a new version of WSUS that can be installed through Server Manager and also by…you guessed it…Windows PowerShell!
We can do the installation by using the Install-WindowsFeature cmdlet and specifying the proper feature names that you would like to have installed. In the case of WSUS, we are looking only at the update services feature. I will also take a look at some of the new cmdlets that are available in the UpdateServices module, which is available in Windows Server 2012 to help configure the WSUS server.
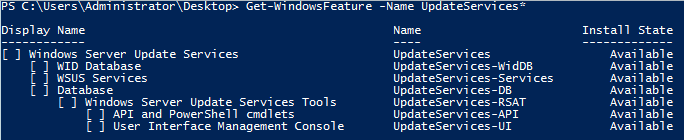
Let’s take a look at the possible subfeatures that are available by using the Get-WindowsFeature cmdlet and specifying UpdateServices* for the Name parameter.
Get-WindowsFeature –Name UpdateServices*
You could try to install everything, but that will end badly for you because there will be a conflict between using the Windows Internal Database (WID) and using another SQL Server database (local or remote) to store the SUSDB database on.

So which one should I choose? That depends on your environment and what your requirements are to support patching in your enterprise. Luckily for you, I will show examples of using the WID database or using another SQL Server database as part of the WSUS installation. After the installation, I will show one last thing you can do as a post installation that will allow you to specify a new location for the software update files and where the database is located.
Let’s start with the easiest, which is the WID database. I say easiest because it really comes down to just running a single line of code to get everything installed. Just to see what might be installed, I can use the WhatIf switch first.
Install-WindowsFeature -Name UpdateServices -IncludeManagementTools –WhatIf
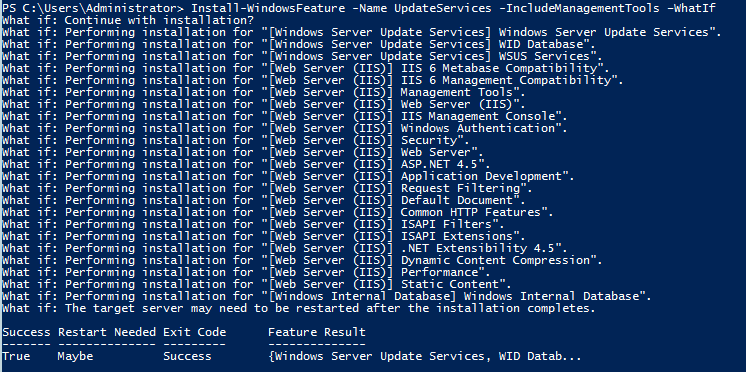
From the looks of it, not only will WSUS be installed, but we also will be installing the WID database and some IIS components that are used for client check-ins and other things. I am confident that this is what I need, so let’s remove WhatIf and let it run again.


And we are now finished with the installation. As you can see, we have a message stating some additional configuration may be required before our WSUS server can be up and running. In this case, we still need to configure a location for the update files to be stored.
This is where wsusutil.exe will come into play. This executable is located at C:\Program Files\Update Services\Tools. Besides the usual parameters that you can use with this utility, there is another set of parameters that become available when you use the PostInstall argument.

We have parameters for specifying where to store the content and for where to build the database, if needed. Note that this can be used to specify a database that is local or remote (you will see this used on a remote system later).
Before I say where I want the content, I had better create a folder to store it. I don’t want all of this on my system drive, so I will create the folder on my D: drive.
New-Item -Path D: -Name WSUS -ItemType Directory
Now I can run the following command to configure my content directory to download and save all of the update files to D:\WSUS.
.\wsusutil.exe postinstall CONTENT_DIR=D:\WSUS

And with that, we have now configured the content directory on another drive to save the update files. Very simple…and a big recommendation to do it regardless!
Specify an alternate SQL Server
What if I want to specify a different SQL Server for saving the data instead of relying on a WID instance locally? Fortunately for us (and as you saw previously), this is an available option by using WSUSUtil.exe PostInstall. Going back to the beginning, I will perform a different installation of WSUS, this time specifying that I want a different SQL Server database.
Install-WindowsFeature -Name UpdateServices-Services,UpdateServices-DB -IncludeManagementTools

Now we need to use WSUSUtil again to not only specify the Content directory, but also to specify the SQL Server database that I want to use for my WSUS server. The WSUS server must be on a domain for the remote SQL Server database build to work. If it isn’t, you will get a message that states the host is unknown.
.\wsusutil.exe postinstall SQL_INSTANCE_NAME=”DC1\SQL2008″ CONTENT_DIR=D:\WSUS

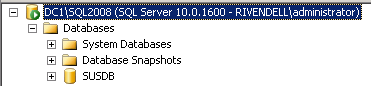
And after a few minutes, the configuration has completed with the Content directory on D:\WSUS and the SUSDB database configured on my remote SQL Server.
Inspect the WSUS Installation State
By using my current installation of WSUS and the remote SQL Server database, we can now check the Best Practices Analyzer to see if anything else is required before we configure the WSUS server and kick off synchronization get all of the update metadata.
Invoke-BpaModel -ModelId Microsoft/Windows/UpdateServices

Now let’s see the results of our scan…
Get-BpaResult -ModelId Microsoft/Windows/UpdateServices |
Select Title,Severity,Compliance | Format-List
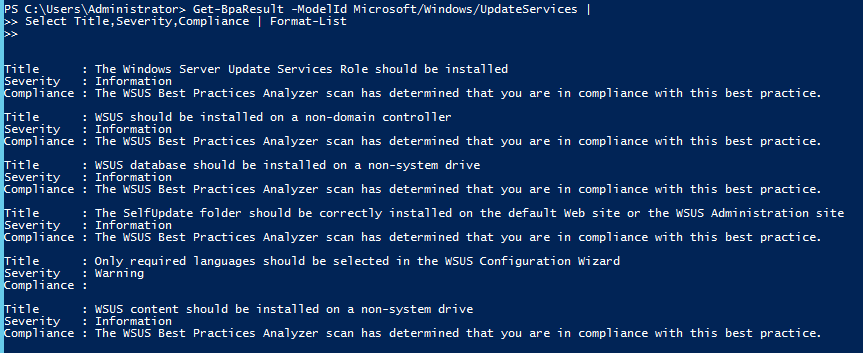
With the exception that I haven’t configured the WSUS server to use a required language pack (English in my case), everything else is compliant. Now it is time to finish configuring the WSUS server and get this synchronization kicked off.
First I’ll configure the languages and tell my server where I want to synchronize. In this case I want to sync up with Microsoft Updates. After I do that, I will perform an initial synchronization to pull down all of the available categories, classifications, and possible updates that can be approved.
Note For more information about some of the configuration properties that are set in the following code, see IUpdateServerConfiguration Properties on MSDN.
#Get WSUS Server Object
#Connect to WSUS server configuration
#Set to download updates from Microsoft Updates
#Set Update Languages to English and save configuration settings
#Get WSUS Subscription and perform initial synchronization to get latest categories
While ($subscription.GetSynchronizationStatus() -ne ‘NotProcessing’) <
Start-Sleep -Seconds 5
Write-Host “Sync is done.”
You may have noticed that I didn’t have to run Import-Module before using the UpdateServices module cmdlets. This is because Windows PowerShell 3.0 supports automatic loading of the modules when a specific cmdlet from a module is used.
Now that we have pulled down the classifications and platforms, it is time to filter the platforms for which I want updates and the classifications I want. Your preference for platforms and classifications will vary based on your environment and requirements.
When that is done, we will configure WSUS to synchronize once a day automatically at midnight, and kick off another synchronization to pull down the update metadata (not the actual update files) from the Microsoft Update server.
#Configure the Platforms that we want WSUS to receive updates
‘SQL Server 2008 R2’,
‘SQL Server 2005’,
‘SQL Server 2008’,
‘Exchange Server 2010’,
‘Windows Server 2003’,
‘Windows Server 2008’,
‘Windows Server 2008 R2’)
#Configure the Classifications
#Set synchronization scheduled for midnight each night
$subscription.SynchronizeAutomaticallyTimeOfDay= (New-TimeSpan -Hours 0)
#Kick off a synchronization
It may take a while to complete the synchronization. When it has completed, you can begin reviewing the available updates that your systems require. Whether you want to keep everything installed and configured on a single server or you want to keep your SUSDB database on a remote SQL Server, you will find that it is easily accomplished by using Windows PowerShell.
That is all for today’s blog about working with WSUS on Windows Server 2012. The next blog I have lined up will deal with using the UpdateServices module to configure the clients and approve or decline updates. In addition, we will dip our toes into WSUS API to set up Computer Groups for the clients and to remove clients from WSUS.
Thank you, Boe, for a great blog post. Join us tomorrow for a guest blog by Honorary Scripting Guy and Windows PowerShell MVP, Don Jones.
I invite you to follow me on Twitter and Facebook. If you have any questions, send email to me at scripter@microsoft.com, or post your questions on the Official Scripting Guys Forum. See you tomorrow. Until then, peace.
Ed Wilson, Microsoft Scripting Guy
Выполнение сценариев с обратной связью с помощью System Center 2012 Configuration Manager
 В предыдущей заметке был рассмотрен принцип простого выполнения сценариев, но что, если выполняемый скрипт должен возвращать некие значения, которые для нас важны? Попробуем немного усложнить задачу с выполнением скриптов через клиентов System Center 2012 Configuration Manager (SCCM).
Для примера будем использовать тот же скрипт для изменения RDP файлов, внеся в него некоторые изменения. В этом скрипте отличаются только выходные данные скрипта, которые будет ловить SCCM.
На этот раз мы не будет использовать какие-либо сетевые расположения для хранения скрипта, всё будет хранится непосредственно в SCCM.
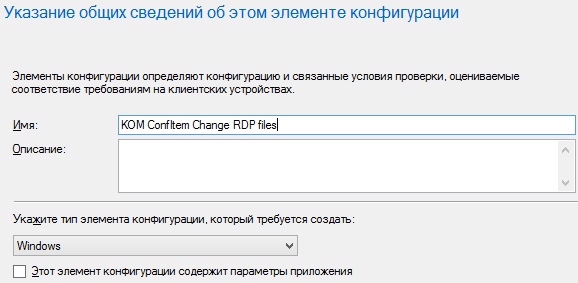
Открываем консоль SCCM и переходим на панель Активы и соответствие (Assets and Compliance) в раздел параметров соответствия (Compliance Settings) и вызовем создание нового элемента конфигурации (Configuration Items). Присвоим имя элементу конфигурации, тип элемента оставим по умолчанию, потому как исполнятся он должен на ОС Windows.
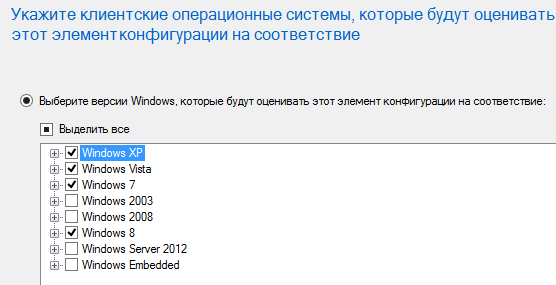
На следующем шаге укажем мастеру операционные системы к которым будет применяться элемент конфигурации.
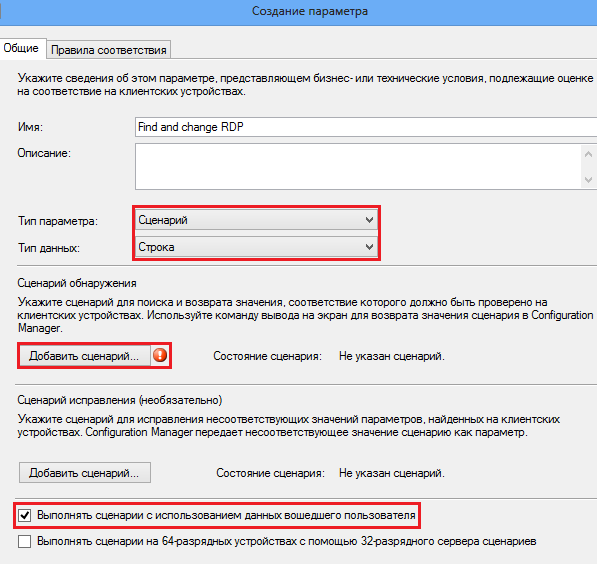
Далее переходим к шагу “параметры”, где нужно нажать кнопку создать, откроется новое окно в котором необходимо настроить создаваемый параметр. Присвоим имя параметру и выберем тип “Сценарий”, т.к. сценарий нам будет возвращать строковые данные выберем тип “Строка”. Эта задача так же исполнятся от имени вошедшего пользователя, поэтому нужно установить соответствующую галку.
Пришло время добавить наш сценарий в параметр, жмём на “Добавить сценарий”, перед нами вновь появляется новое окно, куда мы просто копируем скрипт.
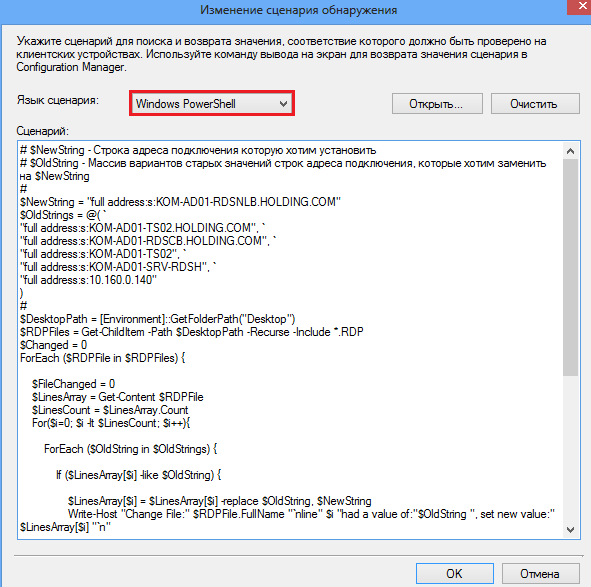
Язык сценария по умолчанию PowerShell, но так же доступны JScript и VBScript.
Как видно из скриншота, разработчики SCCM предлагают разделение скриптов, один — для обнаружения, второй — для исправления, но мы решили не мудрить и выполнить его в обнаружении. Возможно в каких-то других и более серьёзных задачах разделение скрипта будет полезным.
После того как скрипт добавлен, появляется возможность перейти на вкладку “Правила соответствия”. Присвоим правилу соответствия имя, выберем тип “Значение” и укажем параметр соответствия.
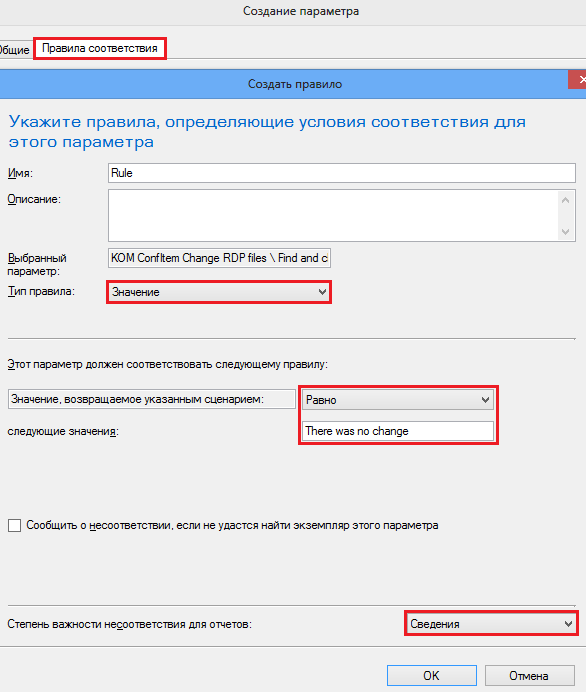
В правиле укажем следующий смысл – компьютер соответствует требованиям, если возвращаемая строка скриптом равна “ There was no change ”.
Степень важности несоответствия установим как “сведения”, потому как в нашем случае несоответствие не является ошибкой.
После проделанных действий параметр будет добавлен.
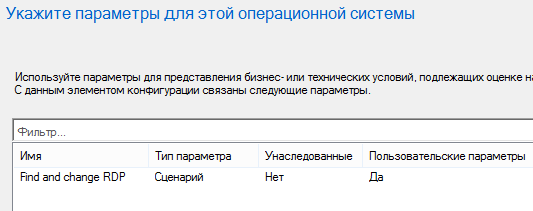
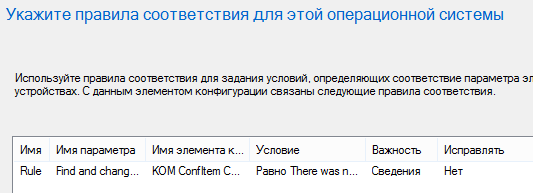
На следующем шаге, мы увидим уже добавленный ранее параметр соответствия, его можно добавлять и здесь, но мне удобнее с предыдущего мастера.
Осталось нажать несколько раз далее, чтобы завершить работу мастера создания элемента конфигурации.
Для развёртывания этого элемента нам потребуется создать шаблон базовой конфигурации (Configurations Baselines). В Мастере создания необходимо только присвоить имя и выбрать необходимый элемент конфигурации.
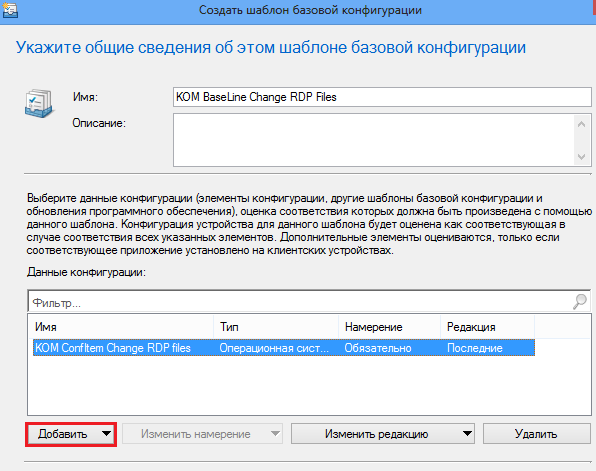
Вызовем контекстное меню на созданном шаблоне
Выберем пункт “Развернуть”, откроется мастер развёртывания шаблонов базовой конфигурации.
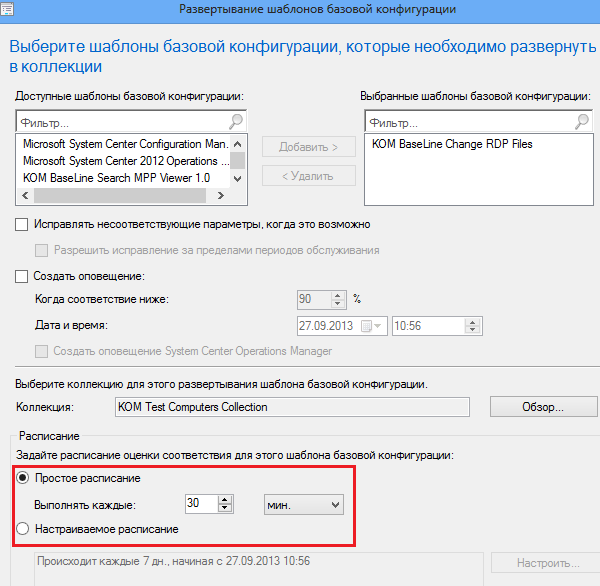
В настройках выберем коллекцию, на которую хотим выполнить развёртывание и укажем периоды выполнения. Для примера, я буду выполнять скрипт каждые 30 минут.
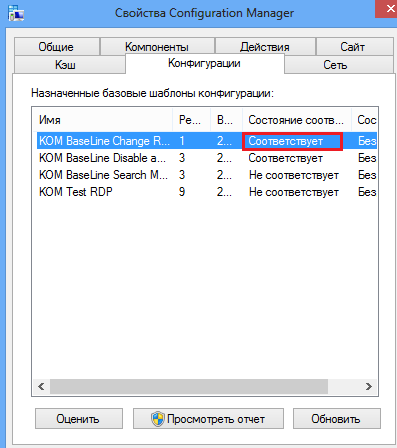
После получения SCCM клиентом развёртывания, возможно вы обнаружите, что состояние соответствия после выполнения имеет статус ошибки.
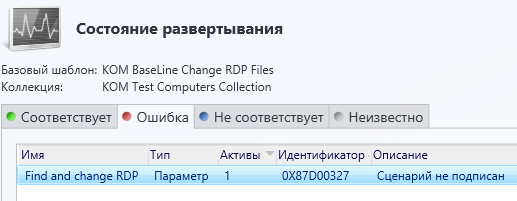
Такую же ошибку можно увидеть и на клиенте SCCM перейдя в вкладку “Конфигурации”.
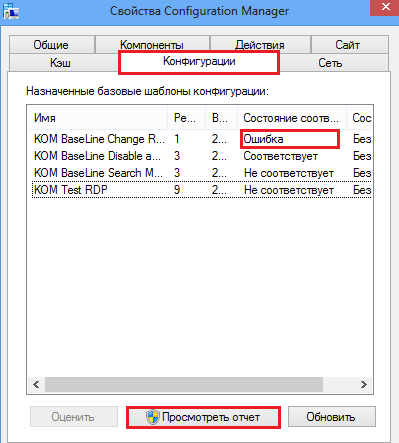
Можно вызвать отчёт и посмотреть более детально.
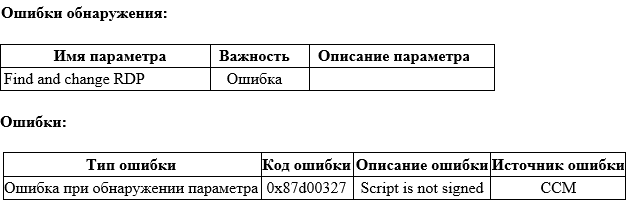
Для того чтобы избежать этой ошибки, необходимо на клиентских компьютерах разрешить выполнение PS-скриптов. Сделать это можно, например, через Групповые политики.
Параметр в редакторе групповых можно найти по расположению: Конфигурация компьютера –> Политики –> Административные шаблоны –> Компоненты Windows –> Windows PowerShell –> Включить выполнение сценариев.
Необходимо установить политику “Разрешать локальные сценарии и удалённые подписанные сценарии”.
Дождёмся автоматического выполнения сценария, либо выберем шаблон на клиенте SCCM и нажмём кнопку “Оценить”.
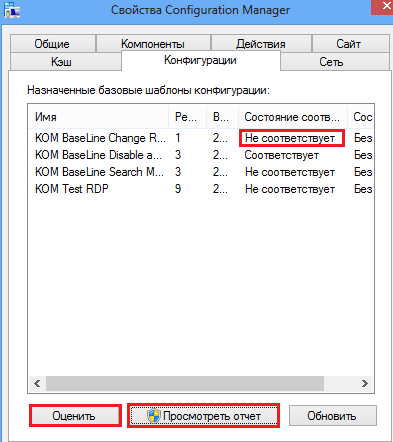
Увидим новый статус “ Не соответствует ”, посмотрим отчёт:
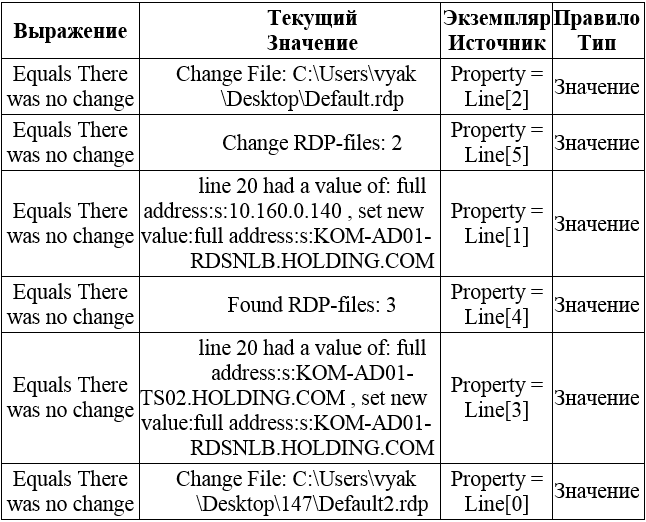
Сортировка в отчёте клиента отображает значения почему-то не по порядку, но в отчётах запускаемых с консоли такой проблемы нет:
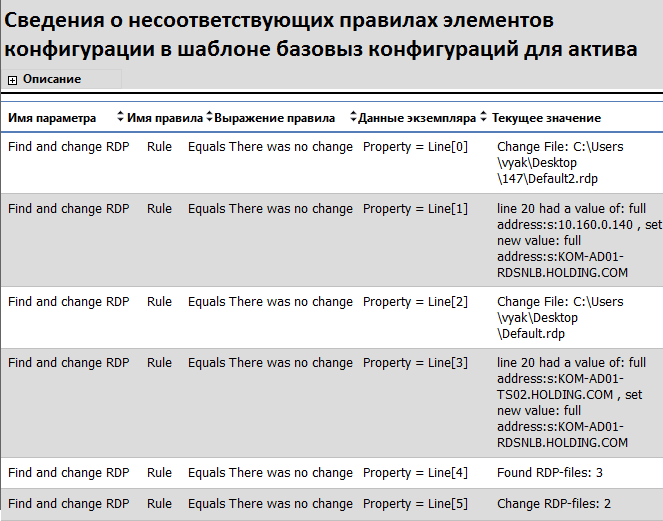
В любом из представленных отчётов можно увидеть, какие значения и файлы были заменены.
Если выполнить оценку ещё раз, то статус отображаемый на клиенте изменится на “ Соответствует ”, потому как скрипт возвратит строку соответствия – “ There was no change ”.
В отчёте на клиенте:

На мой взгляд, выполнять разворачивать скрипты PS/JS/VBS на рабочие станции пользователей более удобно используя шаблоны базовой конфигурации, так как у нас появляется возможность отслеживать статус выполняемых действий.


