- Установка Microsoft SQL Server 2012 Express Service Pack 3 (SP3) и Management Studio Express
- Редакция SQL Server 2012 Express
- Ограничения SQL Server 2012 Express
- Management Studio Express
- Что нового в SQL Server 2012 Express Service Pack 3?
- Системные требования для установки SQL Server 2012 Express Service Pack 3
- Где скачать SQL Server 2012 Express Service Pack 3?
- Установка Microsoft SQL Server 2012 Express Service Pack 3 на Windows 7
- Шаг 1
- Шаг 2
- Шаг 3
- Шаг 4
- Шаг 5
- Шаг 6
- Шаг 7
- Шаг 8
- Запуск Management Studio Express
- Install SQL Server 2012 Management Studio Express in Windows 7
- by Chris Evans on November 2nd, 2012 | Below are step by step instructions that will show you how to install SQL Server 2012 Management Studio Express on a Windows 7 PC client, and also create your very own local SQL Server on a Windows 7 PC. Update Windows Before we can get started, you need to make sure your Windows client is up to date with all recent important Windows updates. To do this, click on the lower left hand side “Start” windows button and search for Windows Update. Now that you have updated your Windows client, we can start the install of SQL Server 2012 Management Studio Express. Once you have updated your Windows client with all the important updates, you will be able to proceed with the SQL Server 2012 Management Studio Express install. Download the .exe File To start with the install you will need to download the .exe file which can be found on Microsoft.com or you can Google SQL Server 2012 Management Studio Express or click here. Note: You will need to select one of the two circled options based on your Windows client, whether your Windows client is 32 bit (x86) or 64 bit (x64). In addition, your PC will need to have the following requirements. System requirements Supported operating systems: Windows 7, Windows Server 2008 R2, Windows Server 2008 Service Pack 2, Windows Vista Service Pack 2 32-bit systems Computer with Intel or compatible 1GHz or faster processor (2 GHz or faster is recommended.) 64-bit systems 1.4 GHz or faster processor Minimum of 512 MB of RAM (2 GB or more is recommended.) 2.2 GB of available hard disk space Once you have decided on which install exe file is needed, you will need to click on the download button to download the .exe file to your PC. After you click the download button, you will then be asked to either to Run, Save, or Cancel the download. You will want to Save the SQLManagementStudio_xXX_ENU.exe file on your PC. Now that you downloaded SQLManagementStudio_xXX_ENU.exe file on your PC, you will want to click the Run button to run the exe file to start the install. While running the SQLManagementStudio_xXX_ENU.exe file, an extracting pop up will appear extracting all components to the install. After the extracting is complete, Windows will ask if SQL Server 2012 Management Studio Express can have access to proceed with the install, click Yes. A pop up will appear letting you know the setup and install is starting. You should now see the SQL Server Installation Center. SQL Server Installation Center Since this is for a new install, you will want to select the “New SQL Server stand-alone installation or add features to an existing installation” Now that the installation has started, SQL Server 2012 Management Studio Express will then validate all support rules have been applied. If you have any errors you will need to correct them. If you do not have any errors, you will be able to move on with the install. If no errors are found and all support rules have been applied, you will be asked to agree to the license terms. Please carefully read the license terms and select the two check boxes then click the Next button to proceed with the install. The install will now start. Enabling Features Once the setup files have completed, SQL Server 2012 Management Studio Express will then ask for what features you want to enable. All sboxes should be selected, then click the Next button. Unlock Your Potential with Application Modernization Application modernization is a growing area of focus for enterprises. If you’re considering this path to cloud adoption, this guide explores considerations for the best approach – cloud native or legacy migration – and more. Next, the error reporting option will appear. This is optional and if you want you can select the option to send error reports to Microsoft. Click the Next button to proceed with the install. Once the install has completed, all options should have the status as “Succeeded.” If it does not, you will need to fix the errors before completing the install. If all the options have a status as “Succeeded” then click the close button. You can now close the SQL Server 2012 Management Studio Express Installation Center. This will complete the SQL Server 2012 Management Studio Express install on your Windows 7 PC and a local SQL Server database. Confirm Success Now that the install is completed, lets validate that the local SQL Server database has created successfully. To do this you have to click on the lower left hand side “Start” windows button and search for cmd. To validate our local database install, let’s validate the local version of our SQL Server database. To do this, type in “SqlLocalDb Info” within the cmd window. You should have “v11.0” as your response. This lets you know the version of the database that has been installed. Now that you see you have your local database, you need to create the database instance. To create your database instance, you will need to type the following within the cmd window, SqlLocalDb create “DatabaseInstanceName” Within this example I will be calling the database instance PRFTInstance. After running the following create instance command you should receive the message, “LocalDB instance “DatabaseInstanceName” created with version 11.0” Now that you have your database instance created you will now need to start the database instance. To do this you will need to type the following within the cmd window, SqlLocalDb start “DatabaseInstanceName” You should now see your database instance started. Now that we have the database instance created and started, lets check on the status and other details about your database instance. To find this information you will need to type in the following within the cmd window, SqlLocalDb info “DatabaseInstanceName” You should now see details in regards to your database instance. Create a Database for the Instance Now that you have created your database instance and validated your instance lets now create a database for the instance. To create the database we will need to use sqlcmd. SQLCMD is a command line application that allows SQL queries to be written and executed from the command prompt[1] To use SQLCMD you must have SQL Server 2012 Management Studio Express installed, which you have already done. Before we can use SQLCMD we need to change the directory within the cmd window to C:\Program Files\Microsoft SQL Server0\Tools\Binn\ This will allow you to use SQLCMD which will allow you to create your database. Within the cmd window, type the following directory path, cd C:\Program Files\Microsoft SQL Server0\Tools\Binn\ Connect with SQLCMD This will change the directory to the new path. Now let’s connect to your created instance with SQLCMD. To connect using SQLCMD, you will need to type the following within the cmd window; sqlcmd -S (localdb)\DatabaseInstanceName 1> SELECT @@VERSION; The following will start the SQLCMD within your database instance and the @@VERSION will return the version, architecture, OS version and build date for current instance. Write the Query Once you have applied SQLCMD to your database instance, you can now go ahead and write the query to create a database. To create a database you will need to type in the following within the cmd window; 1> CREATE DATABASE DBNAME; For this example my database name will be PRFT_DB. Your database will now be created. Now let’s validate our install, database instance and database using have SQL Server 2012 Management Studio Express. Validate the Install To open SQL Server 2012 Management Studio Express click on the lower left hand side “Start” windows button then open folder Microsoft SQL Server 2012 then select SQL Server Management Studio. This will open up SQL Server 2012 Management Studio Express. Now that your SQL Server 2012 Management Studio Express has opened you will need to type the following within the Server Name, “(localdb)\DatabaseInstance” then click the connect button. This will log you into your local database instance you created. Now that you’re logged into your local database instance, lets validate the database you created. To do this, open up the database folder within the Object Explorer within SQL Server 2012 Management Studio. You should now find your local database in which you created. I hope this step by step instruction helped you install SQL Server 2012 Management Studio Express as well as help you create your local database instance and database on your Windows 7 PC.
- Update Windows
- Download the .exe File
- SQL Server Installation Center
- Enabling Features
- Confirm Success
- Create a Database for the Instance
- Connect with SQLCMD
- Write the Query
- Validate the Install
Установка Microsoft SQL Server 2012 Express Service Pack 3 (SP3) и Management Studio Express
Материал сегодня будет посвящен описанию процесса установки СУБД Microsoft SQL Server 2012 Express Service Pack 3 (SP3) и Management Studio Express, а также мы узнаем, где же скачать SQL Server 2012 Express Service Pack 3 и какие системные требования необходимо выполнить для его установки.
Напоминание! В связи с окончанием поддержки MS SQL Server 2005 всем тем, кто использует данную версию у себя в организации, рекомендуется перейти на более новую версию SQL сервера, подробности здесь.
Для начала давайте вспомним особенности Express версии SQL сервера, а также узнаем, что же нового появилось у нас в SQL Server 2012 Express Service Pack 3.
Редакция SQL Server 2012 Express
Express версия SQL сервера предназначена в основном для начинающих программистов и администраторов которые хотят освоить язык T-SQL и Microsoft SQL Server в целом. Также для тех, кто хочет просто попробовать в действие функционал SQL сервера от Microsoft (пусть и не полный).
Ограничения SQL Server 2012 Express
Так как данная версия является бесплатной, у нее есть ограничения, например:
- Она может использовать только 1 физический процессор или 4 ядра;
- Максимальный объем оперативной памяти, который может быть задействован это 1 ГБ;
- Максимальный размер базы данных 10 гигабайт;
- Нет агента SQL Server;
- Отсутствуют службы Analysis Services и Integration Services;
- Отсутствует функция группы доступности AlwaysOn;
- Нет возможности секционирование таблиц и индексов;
- Отсутствуют средства SQL Server Data Tools;
- Нет компонента Service Broker (можно использовать только как клиент);
- Также есть ограничения и в службах Reporting Services и в репликации.
Management Studio Express
Management Studio это наверное, основной инструмент программирования в SQL сервере, т.е. используя именно Management Studio можно писать SQL запросы, процедуры, функции, создавать таблицы и другие объекты (подробней об объектах в справочнике Transact-SQL), а также Management Studio используется и для администрирования SQL сервера.
Что нового в SQL Server 2012 Express Service Pack 3?
Совсем недавно (на момент написания статьи) вышел Service Pack 3 для SQL Server 2012. Он в основном включает в себя улучшения масштабируемости и производительности, например:
- Улучшения производительности для ядра хранения данных;
- Улучшенная производительность при открытии и чтения XEL файлов с помощью Linq XEvent;
- Улучшенная производительность для пространственных запросов;
- А также много других улучшений и обновлений.
Системные требования для установки SQL Server 2012 Express Service Pack 3
SQL Server 2012 Express поддерживает установку на следующие операционные системы:
- Windows 7;
- Windows 8;
- Windows 8.1;
- Windows Server 2008 R2;
- Windows Server 2012;
- Windows Server 2012 R2.
Для установки SQL Server 2012 Express минимум необходимо:
- Процессор с частотой не ниже 1 ГГц;
- Размер оперативной памяти не менее 512 МБ;
- Свободное место на жестком диске 4,2 ГБ.
Также для установки SQL Server 2012 Express требуется включить Microsoft .NET Framework 3.5 с пакетом обновления 1 (SP1), а также загрузить и установить Microsoft .NET Framework 4.0.
Где скачать SQL Server 2012 Express Service Pack 3?
Как видно из названия материала устанавливать мы будем не только сам SQL Server 2012 Express, но и Management Studio Express, поэтому давайте загрузим дистрибутив, в котором будет и SQL сервер Express и Management Studio Express. Для этого необходимо перейти в официальный центр загрузки Microsoft вот по этой ссылке. Рекомендую для скачивания любого программного продукта (не только Microsoft) использовать только официальные источники.
Затем нажимаем «Скачать». И так как в качестве примера я буду устанавливать SQL Server 2012 Express на 32 битную операционную систему Windows 7, то я выбираю, т.е. отмечаю пункт RUS\x86\SQLEXPRWT_x86_RUS.exe и жму «Next»
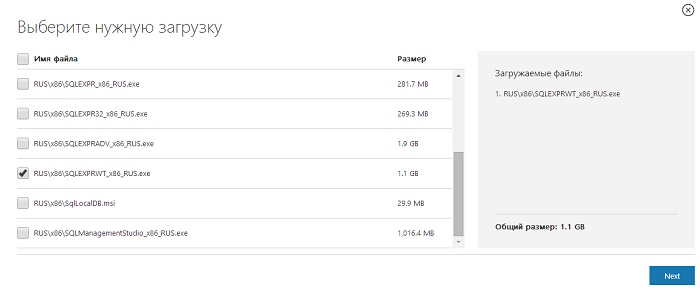
После чего начнется загрузка и в итоге загрузится файл SQLEXPRWT_x86_RUS.exe.
Установка Microsoft SQL Server 2012 Express Service Pack 3 на Windows 7
Итак, Вы загрузили дистрибутив, проверили, отвечает ли компьютер системным требованиям для установки SQL Server 2012 Express, и теперь можете переходить к самой установке.
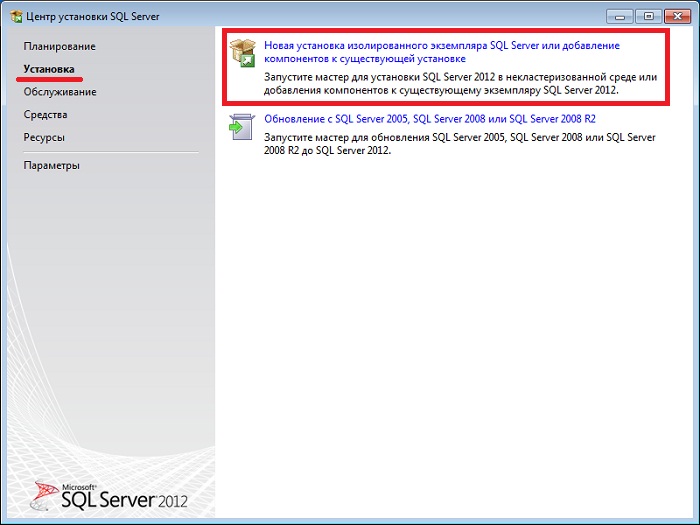
Шаг 1
Запускаем дистрибутив SQLEXPRWT_x86_RUS.exe и попадаем в «Центр установки SQL Server» где мы должны выбрать «Новая установка изолированного экземпляра SQL Server или добавление к существующей установке»
Затем программа установки проверит «Правила поддержки установки»
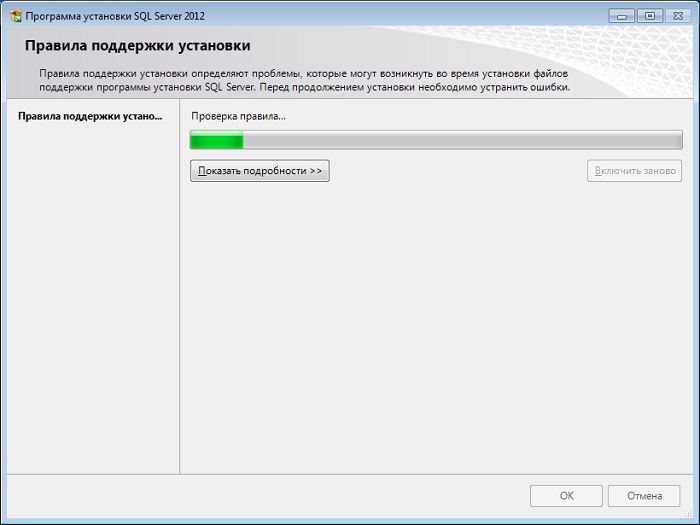
Если все хорошо, то автоматически запустится следующее окно, но если программа обнаружит какие-либо проблемы, то их необходимо устранить.
Шаг 2
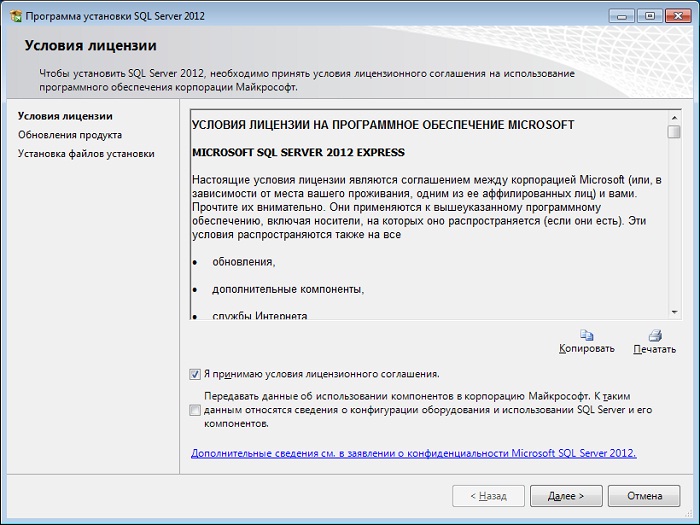
Далее нам необходимо прочитать и принять условия лицензионного соглашения, жмем «Далее»
После чего начнется установка «Файлов установки»
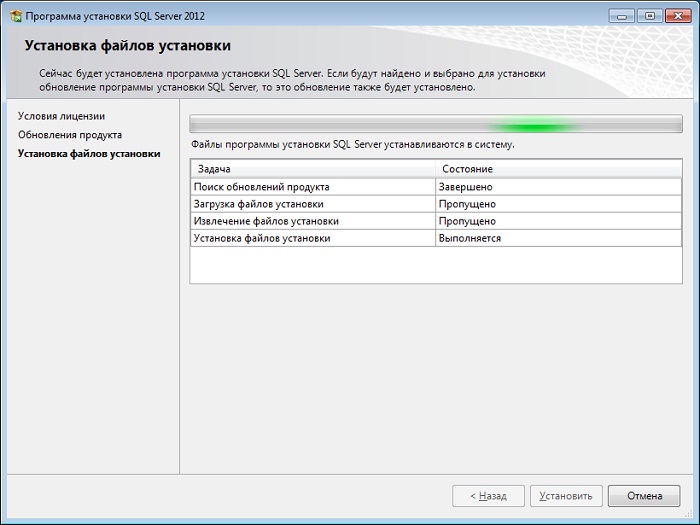
Затем будет еще одна проверка правил поддержки установки и если все хорошо, то автоматически откроется окно выбора компонентов.
Шаг 3
На этом шаге мы должны выбрать компоненты, которые хотим установить, предлагаю оставить все по умолчанию, т.е. давайте установим практически все, что есть в данном дистрибутиве. Жмем «Далее»
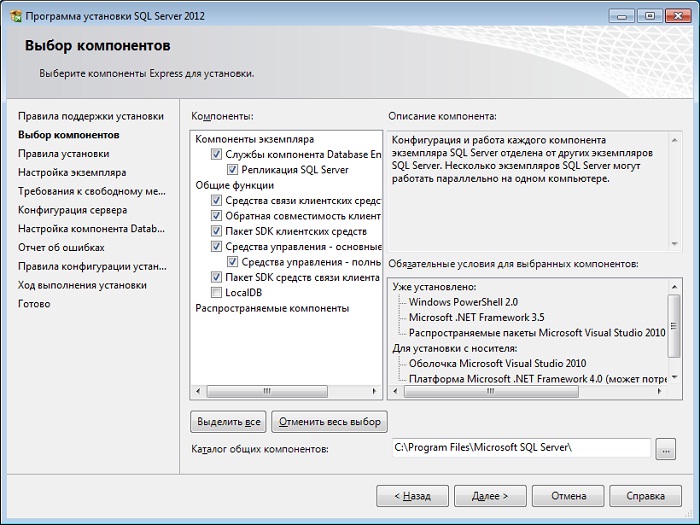
Далее программа установки проверит «Правила установки», для того чтобы определить будет ли заблокирован процесс установки и если все хорошо, то программа автоматически перейдет на следующий шаг.
Шаг 4
Здесь мы можем указать имя экземпляра SQL сервера, я оставлю как есть, т.е. «SQLEXPRESS», жмем «Далее»
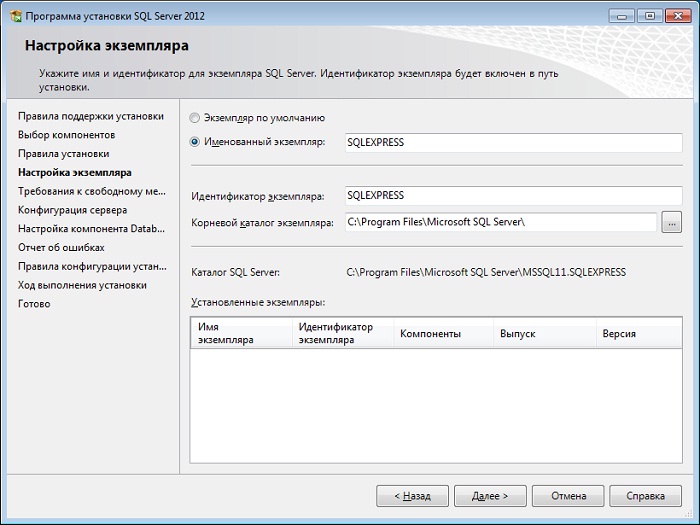
Программа установки проверит, хватит ли у Вас свободного места на диске, для того чтобы установить SQL Server 2012 Express и если места достаточно, то автоматически перейдет к следующему шагу
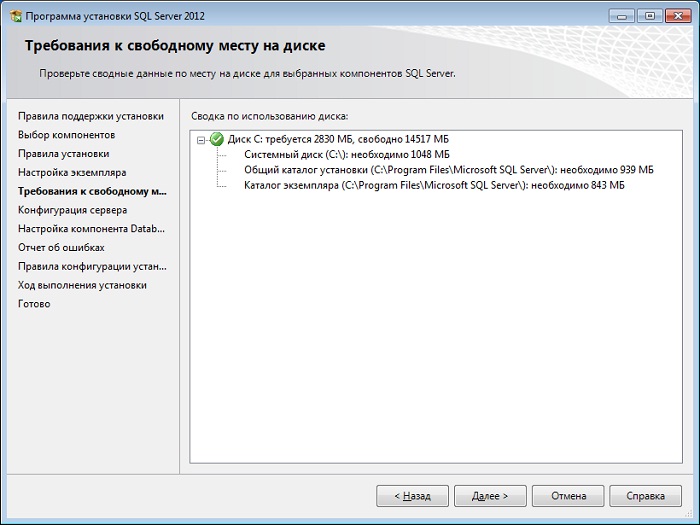
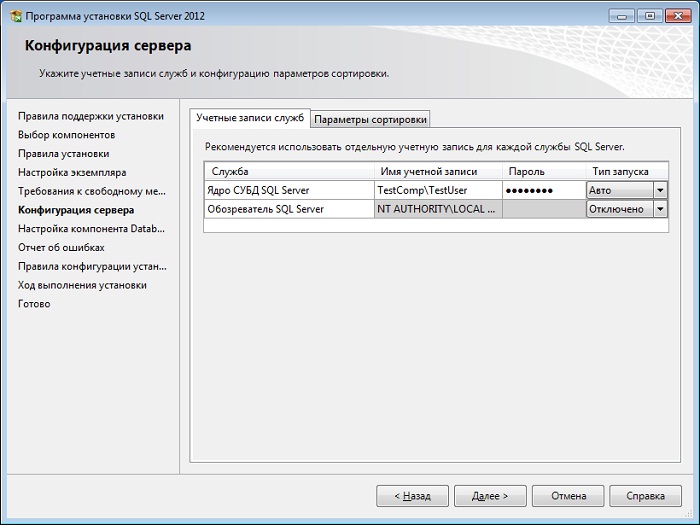
Шаг 5
Затем необходимо указать от имени какой учетной записи будет запускаться SQL Server 2012 Express, а также здесь можно изменить «Параметры сортировки», жмем «Далее»
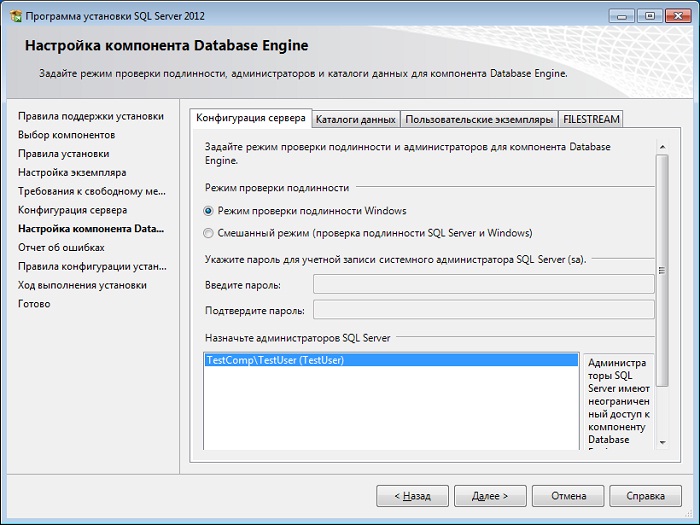
Шаг 6
На этом шаге мы можем задать режим проверки подлинности, назначить администраторов SQL сервера, а также изменить каталоги данных по умолчанию. Например, если Вы хотите чтобы файлы базы данных и журналов транзакций располагались на отдельном диске, то на вкладке «Каталоги данных» можно указать пути к нужным каталогам. Жмем «Далее»
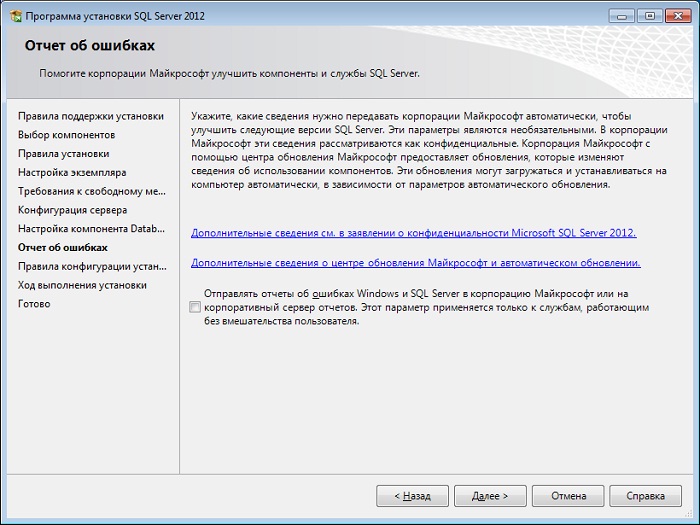
Шаг 7
Потом мы можем поставить галочку, чтобы отправлять отчеты об ошибках SQL сервера в компанию Microsoft, но это не обязательно, жмем «Далее»
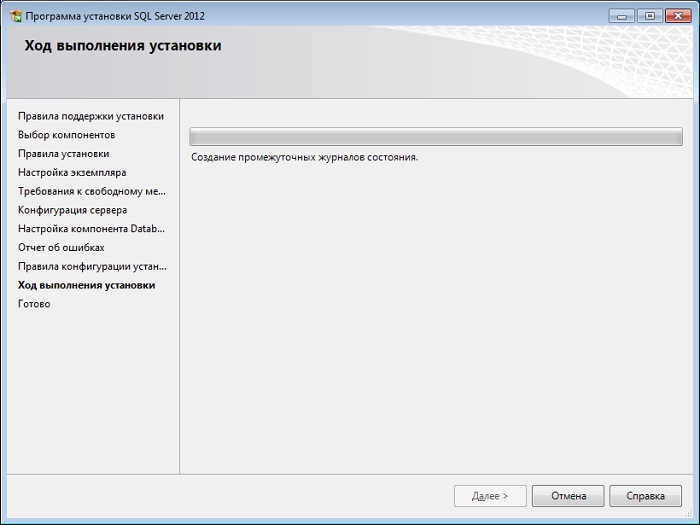
Если все хорошо, то автоматически начнется установка SQL Server 2012 Express.
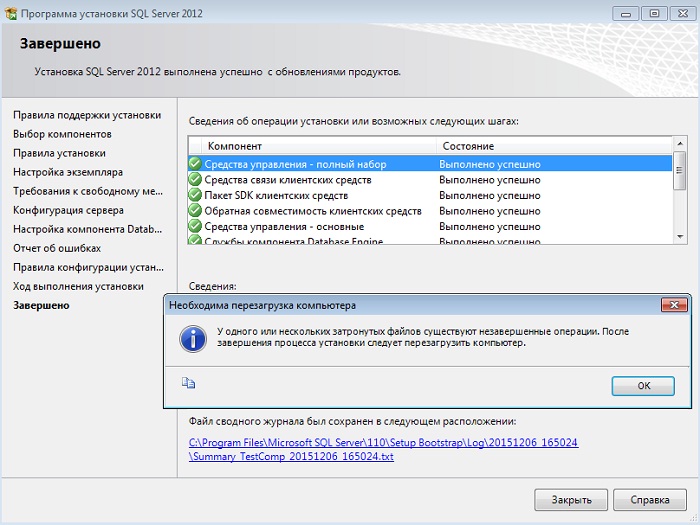
Шаг 8
Установка завершена. Жмем «ОК», закрываем «Программу установки» и перезагружаемся.
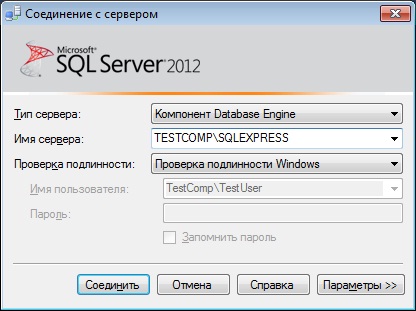
Запуск Management Studio Express
Для запуска Management Studio Express в меню «Пуск» нажимаем «Все программы ->Microsoft SQL Server 2012 -> SQL Server Management Studio». В окне «Соединение с сервером» жмем «Соединить», в случае необходимости можно указать настройки подключения.
В итоге запустится Management Studio, и для примера давайте с помощью SQL запроса узнаем, какая версия SQL сервера у нас установилась.

Мы видим, что все верно, у нас установлен Microsoft SQL Server 2012 Express Service Pack 3.
Install SQL Server 2012 Management Studio Express in Windows 7
by Chris Evans on November 2nd, 2012 |

Below are step by step instructions that will show you how to install SQL Server 2012 Management Studio Express on a Windows 7 PC client, and also create your very own local SQL Server on a Windows 7 PC.
Update Windows
Before we can get started, you need to make sure your Windows client is up to date with all recent important Windows updates.
To do this, click on the lower left hand side “Start” windows button and search for Windows Update.

Now that you have updated your Windows client, we can start the install of SQL Server 2012 Management Studio Express.
Once you have updated your Windows client with all the important updates, you will be able to proceed with the SQL Server 2012 Management Studio Express install.

Download the .exe File
To start with the install you will need to download the .exe file which can be found on Microsoft.com or you can Google SQL Server 2012 Management Studio Express or click here.

Note: You will need to select one of the two circled options based on your Windows client, whether your Windows client is 32 bit (x86) or 64 bit (x64). In addition, your PC will need to have the following requirements.
System requirements
Supported operating systems: Windows 7, Windows Server 2008 R2, Windows Server 2008 Service Pack 2, Windows Vista Service Pack 2
- 32-bit systems
- Computer with Intel or compatible 1GHz or faster processor (2 GHz or faster is recommended.)
- 64-bit systems
- 1.4 GHz or faster processor
- Minimum of 512 MB of RAM (2 GB or more is recommended.)
- 2.2 GB of available hard disk space
Once you have decided on which install exe file is needed, you will need to click on the download button to download the .exe file to your PC.

After you click the download button, you will then be asked to either to Run, Save, or Cancel the download.

You will want to Save the SQLManagementStudio_xXX_ENU.exe file on your PC.
Now that you downloaded SQLManagementStudio_xXX_ENU.exe file on your PC, you will want to click the Run button to run the exe file to start the install.

While running the SQLManagementStudio_xXX_ENU.exe file, an extracting pop up will appear extracting all components to the install.

After the extracting is complete, Windows will ask if SQL Server 2012 Management Studio Express can have access to proceed with the install, click Yes. A pop up will appear letting you know the setup and install is starting.

You should now see the SQL Server Installation Center.

SQL Server Installation Center
Since this is for a new install, you will want to select the “New SQL Server stand-alone installation or add features to an existing installation”
Now that the installation has started, SQL Server 2012 Management Studio Express will then validate all support rules have been applied.

If you have any errors you will need to correct them. If you do not have any errors, you will be able to move on with the install.
If no errors are found and all support rules have been applied, you will be asked to agree to the license terms. Please carefully read the license terms and select the two check boxes then click the Next button to proceed with the install.

The install will now start.

Enabling Features
Once the setup files have completed, SQL Server 2012 Management Studio Express will then ask for what features you want to enable. All sboxes should be selected, then click the Next button.


Unlock Your Potential with Application Modernization
Application modernization is a growing area of focus for enterprises. If you’re considering this path to cloud adoption, this guide explores considerations for the best approach – cloud native or legacy migration – and more.
Next, the error reporting option will appear. This is optional and if you want you can select the option to send error reports to Microsoft. Click the Next button to proceed with the install.

Once the install has completed, all options should have the status as “Succeeded.” If it does not, you will need to fix the errors before completing the install. If all the options have a status as “Succeeded” then click the close button.

You can now close the SQL Server 2012 Management Studio Express Installation Center. This will complete the SQL Server 2012 Management Studio Express install on your Windows 7 PC and a local SQL Server database.
Confirm Success
Now that the install is completed, lets validate that the local SQL Server database has created successfully. To do this you have to click on the lower left hand side “Start” windows button and search for cmd.


To validate our local database install, let’s validate the local version of our SQL Server database. To do this, type in “SqlLocalDb Info” within the cmd window.

You should have “v11.0” as your response. This lets you know the version of the database that has been installed.
Now that you see you have your local database, you need to create the database instance. To create your database instance, you will need to type the following within the cmd window, SqlLocalDb create “DatabaseInstanceName”
Within this example I will be calling the database instance PRFTInstance.

After running the following create instance command you should receive the message, “LocalDB instance “DatabaseInstanceName” created with version 11.0”
Now that you have your database instance created you will now need to start the database instance. To do this you will need to type the following within the cmd window, SqlLocalDb start “DatabaseInstanceName”

You should now see your database instance started.
Now that we have the database instance created and started, lets check on the status and other details about your database instance. To find this information you will need to type in the following within the cmd window, SqlLocalDb info “DatabaseInstanceName”

You should now see details in regards to your database instance.
Create a Database for the Instance
Now that you have created your database instance and validated your instance lets now create a database for the instance. To create the database we will need to use sqlcmd. SQLCMD is a command line application that allows SQL queries to be written and executed from the command prompt[1] To use SQLCMD you must have SQL Server 2012 Management Studio Express installed, which you have already done.
Before we can use SQLCMD we need to change the directory within the cmd window to C:\Program Files\Microsoft SQL Server\110\Tools\Binn\
This will allow you to use SQLCMD which will allow you to create your database. Within the cmd window, type the following directory path, cd C:\Program Files\Microsoft SQL Server\110\Tools\Binn\

Connect with SQLCMD
This will change the directory to the new path. Now let’s connect to your created instance with SQLCMD.
To connect using SQLCMD, you will need to type the following within the cmd window;
sqlcmd -S (localdb)\DatabaseInstanceName
1> SELECT @@VERSION;
The following will start the SQLCMD within your database instance and the @@VERSION will return the version, architecture, OS version and build date for current instance.

Write the Query
Once you have applied SQLCMD to your database instance, you can now go ahead and write the query to create a database.
To create a database you will need to type in the following within the cmd window;
1> CREATE DATABASE DBNAME;
For this example my database name will be PRFT_DB.

Your database will now be created. Now let’s validate our install, database instance and database using have SQL Server 2012 Management Studio Express.
Validate the Install
To open SQL Server 2012 Management Studio Express click on the lower left hand side “Start” windows button then open folder Microsoft SQL Server 2012 then select SQL Server Management Studio.

This will open up SQL Server 2012 Management Studio Express.
Now that your SQL Server 2012 Management Studio Express has opened you will need to type the following within the Server Name, “(localdb)\DatabaseInstance” then click the connect button.

This will log you into your local database instance you created.

Now that you’re logged into your local database instance, lets validate the database you created. To do this, open up the database folder within the Object Explorer within SQL Server 2012 Management Studio.

You should now find your local database in which you created.
I hope this step by step instruction helped you install SQL Server 2012 Management Studio Express as well as help you create your local database instance and database on your Windows 7 PC.


