- Setup an SSTP SSL VPN in Windows Server 2012 R2
- Install the SSL Certificate
- Step 1
- Step 2
- Install and configure the RRAS role
- Step 1
- Step 2
- Step 3
- Step 4
- Step 5
- Step 6
- Step 7
- Step 8
- Step 9
- Step 10
- Step 11
- Setup Network Policy Server (Optional)
- Step 1
- Step 2
- Step 3
- Step 4
- Step 5
- Step 6
- Step 7
- Step 8
- Step 9
- Step 10
- Step 11
- Step 12
- Setup a Client to Connect
- Step 1
- Step 2
- Step 3
- Step 4
- Step 5
- Step 6
- Step 7
- Step 8
- Step 9
- Some final notes
- Записки IT специалиста
- среда, 9 апреля 2014 г.
- VPN Сервер на Windows Server 2012 R2.
Setup an SSTP SSL VPN in Windows Server 2012 R2
So here’s what’s awesome about Secure Socket Tunneling Protocol SSL VPNs: they give your connecting client an IP and make it a full-on part of the network. And this is all done over port 443, a commonly used port which is often enabled on firewalls. SSTP SSL VPNs are not like some fake “SSL VPNs” that just give users a webpage and some sort of RDP.
It’s also relatively easy setup. While there are a lot of tutorials that show how to setup SSTP SSL VPNs using AD CA generated certificates, I strongly suggest you forego that, and just use a globally recognized certificate. This prevents outside users from having to install your CA’s root cert. It also prevents them from having to make a registry change if your CRL is not published and available online. All around, a $5.99 cert that can be obtained in 12 steps is well-worth the time and money invested.
This tutorial will cover how to easily setup an SSTP SSL VPN in Windows 2012 R2 using a legit cert. If you want to use your own domain’s cert, there are other websites that provide step-by-steps. advancedhomeserver.com is my preferred tutorial.
Overall, there are four major steps to this:
- Install the appropriate certificate
- Setup Routing and Remote Access
- Configure NPS (Optional)
- Setup your client.
Install the SSL Certificate
Step 1
Step 2
Import your PFX to the local machine’s Certificate store. To do this, certlm -> Personal -> Certificates -> Right-click, All Tasks -> Import -> Next -> Select your Cert -> Enter your password -> Next -> Finish.

Install and configure the RRAS role
Step 1
Add the Remote Access role. Server Manager -> Manage -> Add Roles and Features -> Remote Access.

Step 2
Click Next a couple times, then just click DirectAccess and VPN. DirectAccess seems cool, but it’s only intended for mobile domain-joined computers, which I’m not looking to support.

Step 3
Next a couple times. It will force you to install IIS, which is odd, because RRAS can work independently of IIS (you can even stop and disable IIS and RRAS will still work). I would think just the IIS Hostable Web Core would be enough, but whatever. It’s required. Go ahead and accept that it will be installed.

Step 4
Once the Role has been installed, click the flag thing at the top, and then Open the Getting Started Wizard.

Step 5
Select Deploy VPN Only.

Step 6
Once the new window pops up, right click your server name (mine is VPN (local)) then Configure and Enable Routing and Remote Access.

Step 7
We’re trying to keep our surface area as small as possible, so click on Custom Configuration.

Step 8
Next, only check VPN Access.

Step 9
The RRAS Sericve will configure itself, and start the service. You will then be returned to the RRAS config window. Right click your server name, then Properties.

Step 10
Check that your SSL Certificate binding is the newly installed certificate.

Step 11
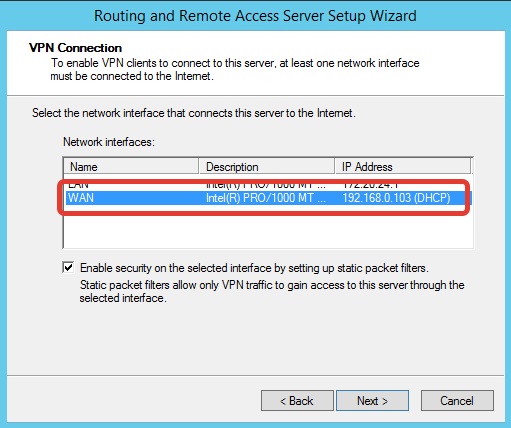
Next, click on IPv4. Here, you can either do a DHCP forwarding or just give RRAS a few IP addresses to hand out. Click Apply then Okay. You’ll be returned again to the RRAS window.

At this point, your RRAS server is setup! But I recommend a few more steps.
If you don’t want to add any additional security (IP restrictions, Group Access to VPN), then you can skip the next section and jump to setting up the client. I find it super interesting, though. I’d give it at least a glance.
Setup Network Policy Server (Optional)
Step 1
Once you’ve returned to the RRAS window, *left-click* Remote Access Logging and Policies. Then right-click and Launch NPS.

Step 2
A new Network Policy Server window will pop-up. Here, we can set which users can access the VPN, set the type of authentication encryption, and restrict network access.

Step 3
We’ll start by creating a new Network Policy. Right click Network Policy and click New.

Step 4
Name your Policy, and select Remote Access Server (VPN/Dial-up).

Step 5
Leave this window for a moment, go into AD, create a Group and name it VPN Access or whatever you wish, and add some users. Come back, and add that Windows Group by clicking Add -> Windows Group.

Step 6
Confirm and click Next

Step 7
Grant this group access.

Step 8
Here, you can choose your Authentication Encryption. I disabled all the weaker ones, and only enabled the stronger Microsoft: Secured Password (EAP-MSCHAP v2).

Step 9
Here you can set some restrictions if you like. Click Next.

Step 10
Click on IP Filter.

Step 11
Specify a Filter. I set mine to only allow access to my lab’s subnet.

Step 12
Click OK, next, and you’re done setting up NPS!
There’s more, but I’ll likely cover that later. You can also configure the Network Policy Server which can lock down your network so that only clients with Firewalls enabled and AVs installed will be allowed to connect.

Setup a Client to Connect
Step 1
Log into a Windows machine. SSTP was introduced in Windows Vista, so the OS must be Vista or Greater (or Server 2008 and greater). Go to Network and Sharing Center. Click Setup New Connection or Network.
Step 2
Click Connect to a workplace.

Step 3
Click Use Internet Connection (VPN).

Step 4
Fill in your info, and click Don’t connect now; just setup so I can connect later.

Step 5
Enter your user information. Don’t forget that if you didn’t setup a Group to access the VPN using NAP, you’ll need to enable Dial-In access within Active Directory Users and Computers for that user.

Step 6
We still need to configure a couple more things. Click on your connection -> Properties.

Step 7
Click the Security Tab -> Change type of VPN to SSTP. By default, it detects the type of VPN automatically, but slightly slows down the process.
Also change your authentication as seen below. That’s all you need. Note that, by default, Windows VPNS will use the remote gateway. If you want to modify that, go to Properties -> Networking -> IPv4 -> Advanced -> Uncheck Use Default Gateway on Remote Network.

Step 8

Step 9
Awesome. Poke around ipconfig if you’re interested in seeing your assigned IP, gateway and DNS servers.

Some final notes
Don’t forget that you have to expose your VPN’s port 443 at the router. To ensure that things are working, you can also try hitting your VPN server via a browser at https://yourvpn.server.ext. It should return a 404.
In addition, IIS is not necessary. You can actually stop it, disable the service, and you will still be able to connect to your VPN.

Chrissy is a Cloud and Datacenter Management & Data Platform MVP who has worked in IT for over 20 years. She is the creator of the popular SQL PowerShell module dbatools, holds a master’s degree in Systems Engineering and is coauthor of Learn dbatools in a Month of Lunches. Chrissy is certified in SQL Server, Linux, SharePoint and network security. You can follow her on Twitter at @cl.
Записки IT специалиста
Разговоры про IT и не только
среда, 9 апреля 2014 г.
VPN Сервер на Windows Server 2012 R2.
В данной статье представлена инструкция по развертыванию простейшего VPN-сервера на базе Windows Server 2012 R2. По моему личному мнению поднимать VPN на базе Windows можно в случае использования небольшой офисной сети с потребностью удаленного подключения для нескольких сотрудников. В случае же организации VPN между филиалами компании с достаточно обширной инфраструктурой, следует использовать технологию DirectAccess либо VPN на базе аппаратных решений (например Cisco).
Перейдем к установке и настройке:
- Открываем Server Manager — Dashboard, нажимаем «Add roles and features» (Рис.1):

2. Выбираем «Role-based or feature-based installation» и нажимаем Next (Рис.2):

3. Далее попадаем на страницу выбора сервера (в моем случае он один), выбираем сервер и нажимаем Next (Рис.3):

4. Далее выбираем роль «Remote Access» и нажимаем Next (Рис.4):

5. На последующий страницах мастера нажимаем два раза Next. В окне выбора служб ролей (Select role services) выбираем «DirectAcces and VPN (RAS)». Откроется окно «Add features», нажимаем кнопку «Add Features» (Рис.5 и 6):


6. Затем откроется окно «Web Server Role», нажимаем Next (Рис.7):

7. В окне «Select role services» нажимаем Next (Рис.8):

8. В окне подтверждения нажимаем Install (Рис.9):

9. После окончания установки нажимаем «Open the Getting Started Wizzard» (Рис.10):

10. Откроется окно «Configure Remote Access», нажимаем «Deploy VPN only» (Рис.11):

11. Откроется консоль «Routing and Remote Access». Нажимаем правой кнопкой мыши на нашем сервер и выбираем «Configure and Enable Routing and Remote Access» (Рис.12):

12. Откроется мастер настройки, нажимаем Next (Рис.13):

13. В окне Configuration выбираем «Remote Access (dial-up orVPN)» и нажимаем Next (Рис.14):

14. На следующей странице выбираем VPN и нажимаем Next (Рис.15):

15. Далее выбираем сетевой адаптер, имеющий доступ в Интернет и нажимаем Next (Рис.16):
16. В следующем окне можно выбрать, каким образом будут выдаваться IP-адреса vpn-клиентам: с помощью DHCP или из специального пула, выбираем второй вариант и нажимаем Next (Рис.17):

18. В окне «Address Range Assignment» нажимаем кнопку New (Рис.18):

19. Задаем начальный и конечный адреса диапазона и нажимаем Ок (возвращаемся на предыдущую страницу и нажимаем Next (Рис.19):

20. Далее выбираем метод аутентификации клиентов: с помощью RRAS или RADIUS. Выбираем первый вариант и нажимаем Next (Рис.20):

21. После успешной настройки нажимаем Finish (Рис.21):

22. Если нам нужен VPN PPTP, то настройки на этом завершены. Если нам нужен VPN L2TP, в консоли «Routing and Remote Access» открываем свойства нашего сервера (Рис.22):

23. На вкладке Securuty задаем «Preshared Key» (ставим галку «Allow custom IPsec policy for L2TP/IKEv2 connection») (Рис.23):

24. Далее в консоли RRAS открываем свойства портов, выбираем «WAN miniport (L2TP)» и ограничиваем количество портов (Рис.24):

25. Чтобы дать пользователю доступ к VPN, открываем свойства нужного нам пользователя и переходим на вкладку Dial-in, в разделе Network Access Permission выбираем «Allow Access» и нажимаем Apply (Рис.25):

26. Также необходимо открыть следующие порты на фаерволе:
- PPTP TCP — 1723
- L2TP — UDP порт 1701
- IKE — UDP порт 500
- IPSec ESP — UDP порт 50
- IPSec NAT-T — UDP порт 4500
- SSTP — TCP 443


