- Installing Windows Server 2012
- Preinstallation information
- System requirements
- Processor
- Disk space requirements
- Other requirements
- Important information for x64-based operating systems
- Before you start Setup
- Supported upgrade paths
- Copyright
- Add workstations to domain
- Reference
- Possible values
- Best practices
- Location
- Default values
- Operating system version differences
- Policy management
- Group Policy
- Security considerations
- Vulnerability
- Countermeasure
- Potential impact
- Установка Windows Server 2012 (R2) на VMware Workstation 9 или 10
Installing Windows Server 2012
Applies To: Windows Server 2012, Windows Server 2012 R2
This document provides information about installing the Windows Server 2012 operating system, including any known issues that you may need to work around before starting an installation. It also provides information that you can use to troubleshoot problems that may occur during the installation. For information about serious known issues that you may need to work around after installation is complete, see the release notes, available at the same location as this document.
Setup works in several stages. You will be prompted for some basic information, and then Setup will copy files and restart the computer. Setup concludes by presenting a menu for Initial Configuration Tasks, which you can use to configure your server for your specific needs.
Preinstallation information
System requirements
The following are estimated system requirements for the Windows Server 2012. If your computer has less than the «minimum» requirements, you will not be able to install this product correctly. Actual requirements will vary based on your system configuration and the applications and features you install.
Processor
Processor performance depends not only on the clock frequency of the processor, but also on the number of processor cores and the size of the processor cache. The following are the processor requirements for this product:
- Minimum: 1.4В GHz 64-bit processor
The following are the estimated RAM requirements for this product:
- Minimum: 512 MB
Disk space requirements
The following are the estimated minimum disk space requirements for the system partition.
Minimum: 32 GB
Be aware that 32 GB should be considered an absolute minimum value for successful installation. The system partition will need extra space for any of the following circumstances: If you install the system over a network. Computers with more than 16 GB of RAM will require more disk space for paging, hibernation, and dump files.
Other requirements
You also need to have the following:
Super VGA (800 x 600) or higher-resolution monitor
Keyboard and MicrosoftВ® mouse (or other compatible pointing device)
Internet access (fees may apply)
Important information for x64-based operating systems
Ensure that you have updated and digitally signed kernel-mode drivers for Windows ServerВ 2012
If you install a Plug and Play device, you may receive a warning if the driver is not digitally signed. If you install an application that contains a driver that is not digitally signed, you will not receive an error during Setup. In both cases, Windows Server 2012 will not load the unsigned driver.
If you are not sure whether the driver is digitally signed, or if you are unable to boot into your computer after the installation, use the following procedure to disable the driver signature requirement. This procedure enables your computer to start correctly, and the unsigned driver will load successfully.
To disable the signature requirement for the current boot process:
Restart the computer and during startup, press F8.
Select Advanced Boot Options.
Select Disable Driver Signature Enforcement.
Boot into WindowsВ® and uninstall the unsigned driver.
Before you start Setup
Before you install Windows Server 2012, follow the steps in this section to prepare for the installation.
Disconnect UPS devices. If you have an uninterruptible power supply (UPS) connected to your destination computer, disconnect the serial cable before running Setup. Setup automatically attempts to detect devices that are connected to serial ports, and UPS equipment can cause issues with the detection process.
Back up your servers. Your backup should include all data and configuration information that is necessary for the computer to function. It is important to perform a backup of configuration information for servers, especially those that provide network infrastructure, such as Dynamic Host Configuration Protocol (DHCP) servers. When you perform the backup, be sure to include the boot and system partitions and the system state data. Another way to back up configuration information is to create a backup set for Automated System Recovery.
Disable your virus protection software. Virus protection software can interfere with installation. For example, it can make installation much slower by scanning every file that is copied locally to your computer.
Provide mass storage drivers. If your manufacturer has supplied a separate driver file, save the file to a floppy disk, CD, DVD, or Universal Serial Bus (USB) flash drive in either the root directory of the media or the amd64 folder. To provide the driver during Setup, on the disk selection page, click Load Driver (or press F6). You can browse to locate the driver or have Setup search the media.
Be aware that Windows Firewall is on by default. Server applications that must receive unsolicited inbound connections will fail until you create inbound firewall rules to allow them. Check with your application vendor to determine which ports and protocols are necessary for the application to run correctly.
Supported upgrade paths
The table below briefly summarizes supported upgrade paths to Windows Server 2012. For more details on upgrade paths, important caveats to upgrade, and additional information about evaluation versions, see https://go.microsoft.com/fwlink/?LinkId=260917.
If you do not see your current version in the left column, upgrading to this release of Windows Server 2012 is not supported.
If you see more than one edition in the right column, upgrade to either edition from the same starting version is supported.
If you are running:
You can upgrade to these editions:
Windows Server 2008 Standard with SP2 or Windows Server 2008 Enterprise with SP2
Windows Server 2012 Standard, Windows Server 2012 Datacenter
Windows Server 2008 Datacenter with SP2
Windows Server 2012 Datacenter
Windows Web Server 2008
Windows Server 2012 Standard
Windows ServerВ 2008В R2 Standard with SP1 or Windows ServerВ 2008В R2 Enterprise with SP1
Windows Server 2012 Standard, Windows Server 2012 Datacenter
Windows ServerВ 2008В R2 Datacenter with SP1
Windows Server 2012 Datacenter
Windows Web ServerВ 2008В R2
Windows Server 2012 Standard
Copyright
This document is provided “as-is”. Information and views expressed in this document, including URL and other Internet Web site references, may change without notice.
This document does not provide you with any legal rights to any intellectual property in any Microsoft product. You may copy and use this document for your internal, reference purposes.
В©2012 Microsoft Corporation. All rights reserved.
Microsoft, Active Directory, Hyper-V, MS-DOS, Windows, WindowsВ NT, Windows Server, and Windows Vista are either registered trademarks or trademarks of Microsoft Corporation in the United States and/or other countries.
This product contains graphics filter software; this software is based in part on the work of the Independent JPEG Group.
All other trademarks are property of their respective owners.
Add workstations to domain
Applies To: Windows Vista, Windows Server 2008, Windows 7, Windows 8.1, Windows Server 2008 R2, Windows Server 2012 R2, Windows Server 2012, Windows 8
This security policy reference topic for the IT professional describes the best practices, location, values, policy management and security considerations for this policy setting.
Reference
This policy setting determines which users can add a computer to a specific domain. For it to take effect, it must be assigned so that it applies to at least one domain controller. A user who is assigned this user right can add up to ten workstations to the domain.
Adding a computer account to the domain allows the computer to participate in Active Directory-based networking.
This policy setting is supported on versions of Windows that are designated in the Applies To list at the beginning of this topic.
Possible values
User-defined list of accounts
Best practices
- Configure this setting so that only authorized members of the IT team are allowed to add computers to the domain.
Location
Computer Configuration\Windows Settings\Security Settings\User Rights Assignment\
Default values
By default, this setting allows access for Authenticated Users on domain controllers, and it is not defined on stand-alone servers.
The following table lists the actual and effective default policy values for the most recent supported versions of Windows. Default values are also listed on the policy’s property page.
Server type or GPO
Default Domain Policy
Default Domain Controller Policy
Stand-Alone Server Default Settings
Domain Controller Effective Default Settings
Member Server Effective Default Settings
Client Computer Effective Default Settings
Operating system version differences
There are no differences in the way this policy setting works between the supported versions of Windows that are designated in the Applies To list at the beginning of this topic.
Policy management
Users can also join a computer to a domain if they have the Create Computer Objects permission for an organizational unit (OU) or for the Computers container in the directory. Users who are assigned this permission can add an unlimited number of computers to the domain regardless of whether they have the Add workstations to domain user right.
Furthermore, computer accounts that are created by means of the Add workstations to domain user right have Domain Administrators as the owner of the computer account. Computer accounts that are created by means of permissions on the computer’s container use the creator as the owner of the computer account. If a user has permissions on the container and also has the Add workstation to domain user right, the computer is added based on the computer container permissions rather than the user right.
A restart of the computer is not required for this policy setting to be effective.
Any change to the user rights assignment for an account becomes effective the next time the owner of the account logs on.
Group Policy
Settings are applied in the following order through a Group Policy Object (GPO), which will overwrite settings on the local computer at the next Group Policy update:
Local policy settings
Site policy settings
Domain policy settings
OU policy settings
When a local setting is greyed out, it indicates that a GPO currently controls that setting.
Security considerations
This policy has the following security considerations:
Vulnerability
The Add workstations to domain user right presents a moderate vulnerability. Users with this right could add a computer to the domain that is configured in a way that violates organizational security policies. For example, if your organization does not want its users to have administrative privileges on their computers, users could install Windows on their computers and then add the computers to the domain. The user would know the password for the local administrator account, could log on with that account, and then add a personal domain account to the local Administrators group.
Countermeasure
Configure this setting so that only authorized members of the IT team are allowed to add computers to the domain.
Potential impact
For organizations that have never allowed users to set up their own computers and add them to the domain, this countermeasure has no impact. For those that have allowed some or all users to configure their own computers, this countermeasure forces the organization to establish a formal process for these procedures going forward. It does not affect existing computers unless they are removed from and then added to the domain.
Установка Windows Server 2012 (R2) на VMware Workstation 9 или 10
Здравствуйте, дорогие читатели. Сегодня мы займемся установкой операционной системы Windows Server 2012 R2 на эмуляторе виртуальных машин VMware Workstation 9 или 10 версии. Для начала необходимо скачать архив самой ОС. Архив должен быть в формате ISO (.iso). После скачивания операционной системы запускаем VMware.
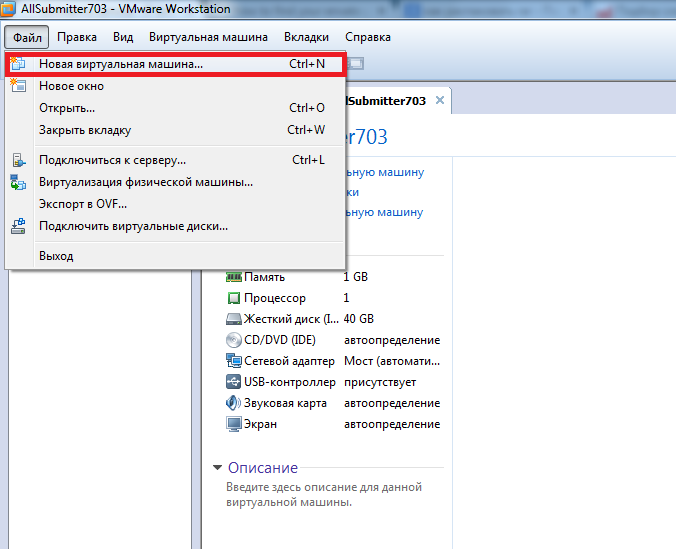
После запуска заходим в меню Файл — Новая виртуальная машина (или в программе нажимаем комбинацию клавиш CTRL+N).
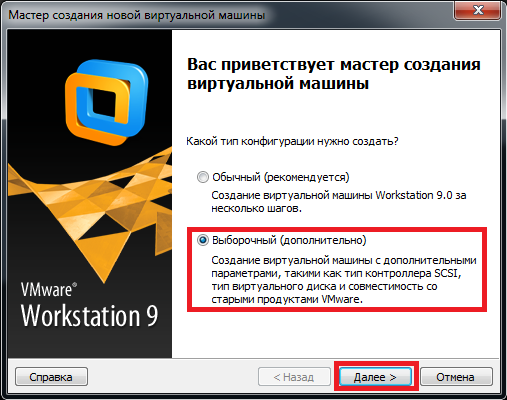
Программа спросит какой тип конфигурации необходимо создать, необходимо выбрать Выборочный (дополнительно) и нажать кнопку далее.
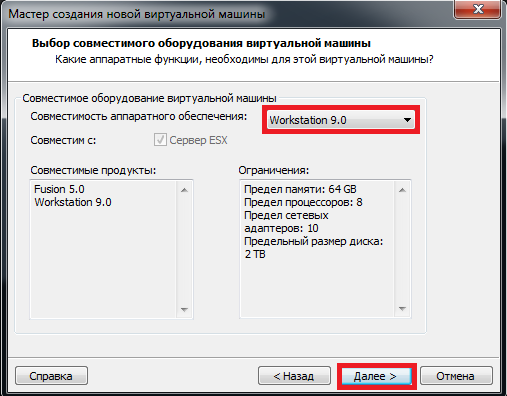
В совместимости аппаратного обеспечения выбираем Workstation 9 и нажимаем Далее.
Указываем место расположения нашего файла-образа (скачанный образ Windows Server 2012) если образ находится на DVD диске выбираем 1-й пункт (установить с диска), если образ находится на жестком диске выбираем 2-й пункт и нажимаем кнопку Далее
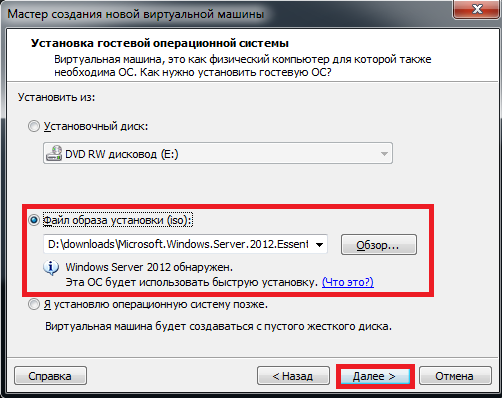
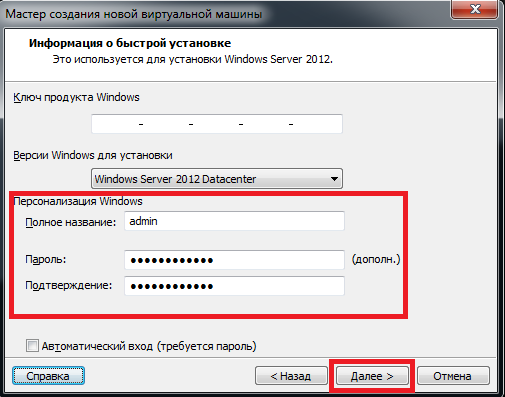
Программа просит ввести лицензионный ключ к Windows и учетные данные (пользователь/пароль) для последующего входа в систему.
Если лицензионного ключа нет (как в моем случае), его можно не вводить (а с помощью windows loadrer и других подобных программ активировать нашу операционную систему позднее).
Заполняем имя пользователя и дважды вводим пароль и опять же нажимаем далее.
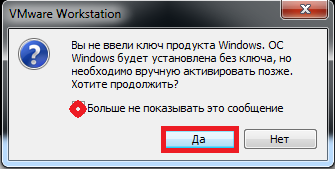
Программа предупредит нас, что мы не ввели ключ продукта и что его можно ввести в последствии, мы соглашаемся и нажимаем Да
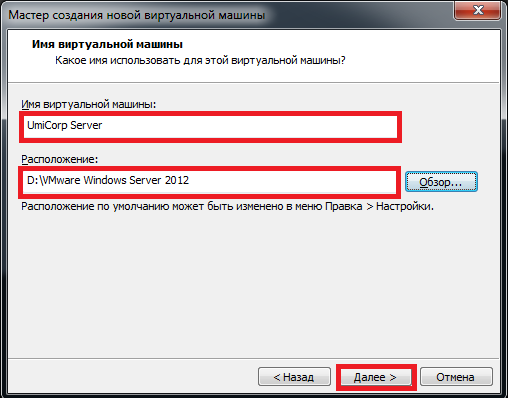
Присваиваем имя для нашей виртуальной машины и указываем путь установки и подтверждаем наши действия.
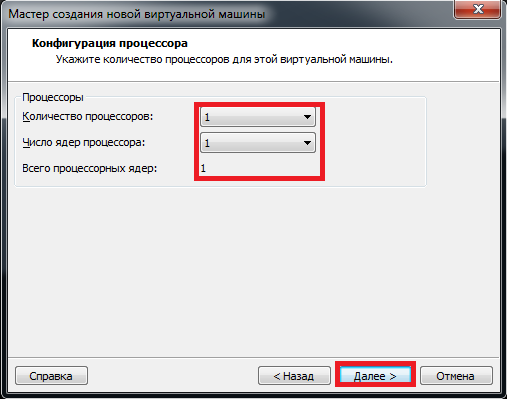
Указываем количество выделяемых для ОС процессоров и ядер (позже это количество можно изменять в большую или меньшую сторону), на своем ПК я выбрал 1 процессор и 1 ядро (у меня Intel Core i7 3630QM).
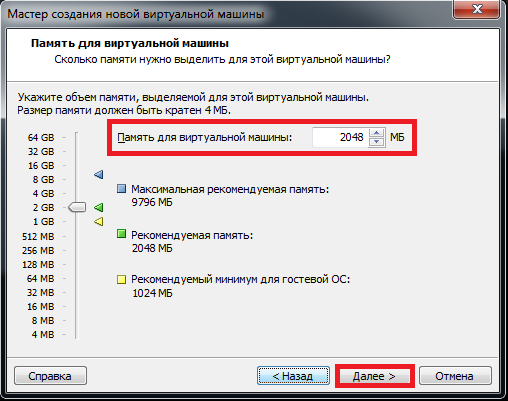
Выделяем оперативную память для Windows Server 2012. По рекомендуемым требованиям необходимо 2 Гб оперативной памяти (минимум 512 Мб), для жесткого диска рекомендуется 80 Гб и более.
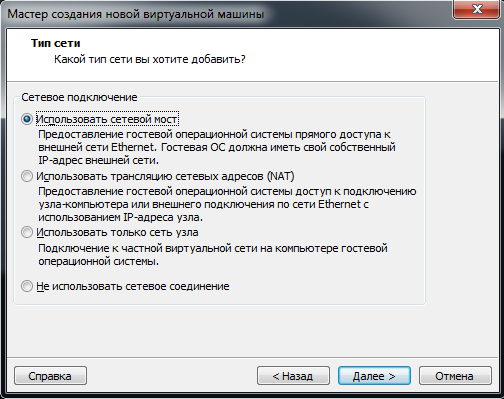
Далее программа спросит: Какой тип сети вы хотите выбрать? Я обычно выбираю 1-й пункт (сетевой мост), т.к. данный тип позволяет виртуальной машине находиться в единой сети с реальными компьютерами. Выбираем необходимый нам пункт и подтверждаем выбор.
В типе контроллера ввода-вывода выбираем рекомендуемый программой пункт (LSI logic SAS) и нажимаем Далее.
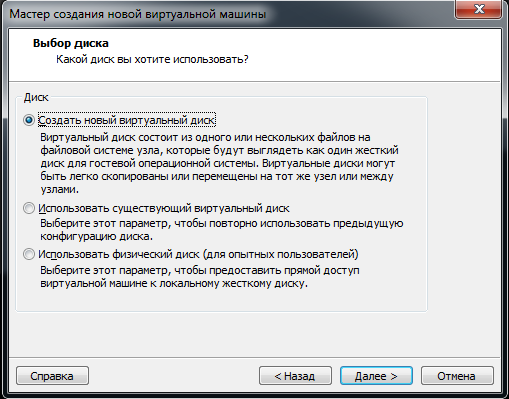
После программа спросит какой диск мы хотим использовать. Я выбрал пункт Создать новый виртуальный диск и нажал Далее.
Затем выбираем тип виртуального диска, который по умолчания предлагает нам VMware (SCSI).
В максимальном размере диска я указал рекомендуемый Microsoft объем равный 80 Гб, также для производительности я выбрал пункт выбелить все дисковое пространство сейчас.
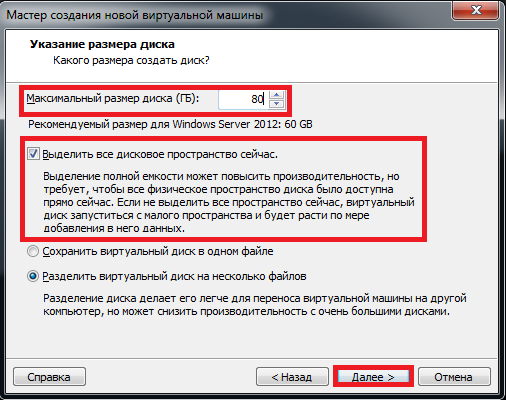
Программа спросит где хранить файлы диска, я указал директорию установки схожей с директорией основных файлов нашей операционной системы.
В конце программа выведет список всех наших настроек, проверяем их, оставляем «галочку» на пункте запустить виртуальную машину после создания (если желаем сразу приступить к установке) и жмем кнопку готово.
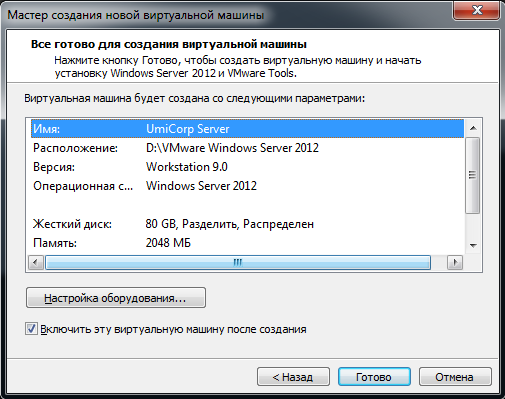
Программа создает диск и приступает к установке.
Многие сталкиваются с проблемой, на экране выскакивает ошибка:
 (This virtual machine is configured for 64-bit guest operating systems. However, 64-bit operation is not possible.) Как справиться с данной проблемой я писал в своей статье.
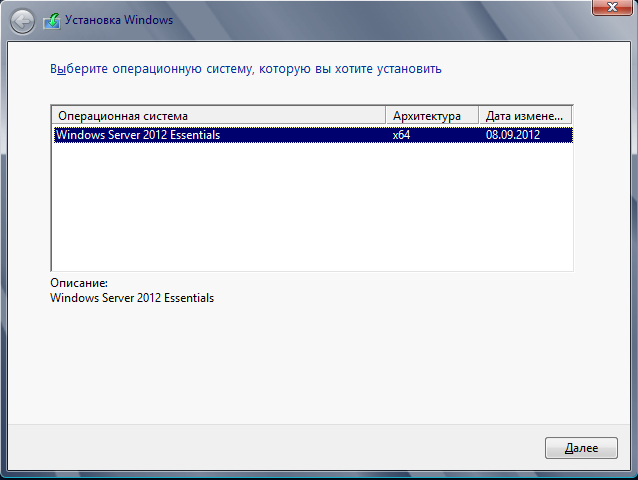
Первым шагом установки является выбор устанавливаемой операционной системы:
После подтверждения начинается процесс установки Windows Server 2012.
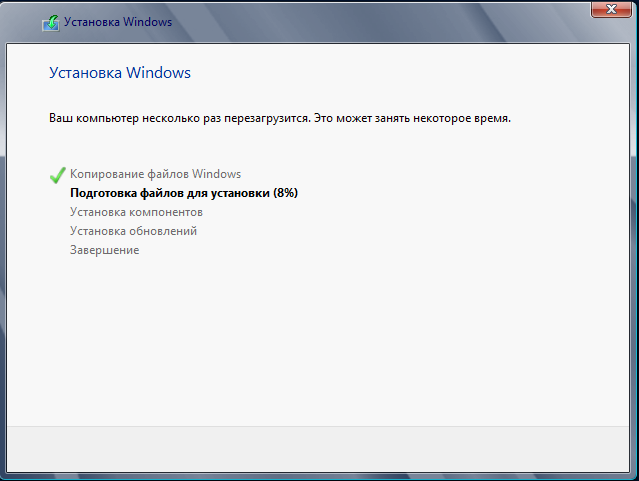
Процесс установки занимает от 15 до 50 минут (у меня система установилась за 25 минут). В процессе установки VMware перезагружает систему несколько раз. И вот спустя 25 минут ОС установлена и просит нажить CTRL+ALT+DEL, для этого во вкладке Виртуальная машина выбираем пункт Отправить команду CTRL+ALT+DEL.

Затем вводим ранее заданные учетные данные логин+пароль и нажимаем ENTER.
После входа в систему сервер готов к работе.

После установки Windows Server 2012 можно продолжить настройку ОС. Если сервер будет использоваться в организации первой ролью можно установить роль домен контроллера.
Про установку AD DS на Windows Server 2012 я писал в одной из своих статей.
На этом все, надеюсь статья Вам понравилась, если у кого-то возникнут вопросы или ошибки в процессе установки пишите, попробую Вам помочь.


