- Windows Authentication
- Overview
- New in IIS 7.5
- Compatibility
- Setup
- Windows Server 2012 or Windows Server 2012 R2
- Windows 8 or Windows 8.1
- Windows Server 2008 or Windows Server 2008 R2
- Windows Vista or Windows 7
- How To
- How to enable Windows authentication for a Web site, Web application, or Web service
- How to enable Extended Protection for Windows authentication
- Configuration
- Attributes
- Child Elements
- Configuration Sample
- Sample Code
- Настройка Kerberos авторизации на сайте IIS
Windows Authentication
Overview
The element defines configuration settings for the Internet Information Services (IIS) 7 Windows authentication module. You can use Windows authentication when your IIS 7 server runs on a corporate network that is using Microsoft Active Directory service domain identities or other Windows accounts to identify users. Because of this, you can use Windows authentication whether or not your server is a member of an Active Directory domain.
Windows authentication (formerly named NTLM, and also referred to as Windows NT Challenge/Response authentication) is a secure form of authentication because the user name and password are hashed before being sent across the network. When you enable Windows authentication, the client browser sends a strongly hashed version of the password in a cryptographic exchange with your Web server.
Windows authentication supports two authentication protocols, Kerberos and NTLM, which are defined in the
element. When you install and enable Windows authentication on IIS 7, the default protocol is Kerberos. The element can also contain a useKernelMode attribute that configures whether to use the kernel mode authentication feature that is new to Windows Server 2008.
Windows authentication is best suited for an intranet environment for the following reasons:
- Client computers and Web servers are in the same domain.
- Administrators can make sure that every client browser is Internet Explorer 2.0 or later.
- HTTP proxy connections, which are not supported by NTLM, are not required.
- Kerberos version 5 requires a connection to Active Directory, which is not feasible in an Internet environment.
New in IIS 7.5
The element was introduced in IIS 7.5, which allows you to configure the settings for the new extended protection features that have been integrated into Windows authentication.
Compatibility
| Version | Notes |
|---|---|
| IIS 10.0 | The element was not modified in IIS 10.0. |
| IIS 8.5 | The element was not modified in IIS 8.5. |
| IIS 8.0 | The element was not modified in IIS 8.0. |
| IIS 7.5 | The element was added in IIS 7.5. |
| IIS 7.0 | The element was introduced in IIS 7.0. |
| IIS 6.0 | The element replaces portions of the IIS 6.0 AuthType and AuthFlags metabase properties. |
Setup
The default installation of IIS 7 and later does not include the Windows authentication role service. To use Windows authentication on IIS, you must install the role service, disable Anonymous authentication for your Web site or application, and then enable Windows authentication for the site or application.
After you install the role service, IIS 7 commits the following configuration settings to the ApplicationHost.config file.
Windows Server 2012 or Windows Server 2012 R2
- On the taskbar, click Server Manager.
- In Server Manager, click the Manage menu, and then click Add Roles and Features.
- In the Add Roles and Features wizard, click Next. Select the installation type and click Next. Select the destination server and click Next.
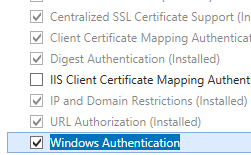
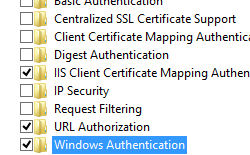
- On the Server Roles page, expand Web Server (IIS), expand Web Server, expand Security, and then select Windows Authentication. Click Next.
 .
. - On the Select features page, click Next.
- On the Confirm installation selections page, click Install.
- On the Results page, click Close.
 .
.Windows 8 or Windows 8.1
- On the Start screen, move the pointer all the way to the lower left corner, right-click the Start button, and then click Control Panel.
- In Control Panel, click Programs and Features, and then click Turn Windows features on or off.
- Expand Internet Information Services, expand World Wide Web Services, expand Security, and then select Windows Authentication.
- Click OK.
- Click Close.
Windows Server 2008 or Windows Server 2008 R2
- On the taskbar, click Start, point to Administrative Tools, and then click Server Manager.
- In the Server Manager hierarchy pane, expand Roles, and then click Web Server (IIS).
- In the Web Server (IIS) pane, scroll to the Role Services section, and then click Add Role Services.
- On the Select Role Services page of the Add Role Services Wizard, select Windows Authentication, and then click Next.
- On the Confirm Installation Selections page, click Install.
- On the Results page, click Close.

Windows Vista or Windows 7
- On the taskbar, click Start, and then click Control Panel.
- In Control Panel, click Programs and Features, and then click Turn Windows Features on or off.
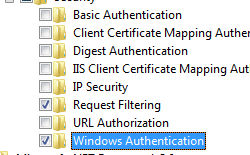
- Expand Internet Information Services, then World Wide Web Services, then Security.
- Select Windows Authentication, and then click OK.
How To
How to enable Windows authentication for a Web site, Web application, or Web service
Open Internet Information Services (IIS) Manager:
If you are using Windows Server 2012 or Windows Server 2012 R2:
- On the taskbar, click Server Manager, click Tools, and then click Internet Information Services (IIS) Manager.
If you are using Windows 8 or Windows 8.1:
- Hold down the Windows key, press the letter X, and then click Control Panel.
- Click Administrative Tools, and then double-click Internet Information Services (IIS) Manager.
If you are using Windows Server 2008 or Windows Server 2008 R2:
- On the taskbar, click Start, point to Administrative Tools, and then click Internet Information Services (IIS) Manager.
If you are using Windows Vista or Windows 7:
- On the taskbar, click Start, and then click Control Panel.
- Double-click Administrative Tools, and then double-click Internet Information Services (IIS) Manager.
In the Connections pane, expand the server name, expand Sites, and then the site, application, or Web service for which you want to enable Windows authentication.
Scroll to the Security section in the Home pane, and then double-click Authentication.
In the Authentication pane, select Windows Authentication, and then click Enable in the Actions pane. 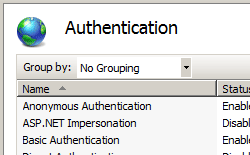
How to enable Extended Protection for Windows authentication
Open Internet Information Services (IIS) Manager:
If you are using Windows Server 2012 or Windows Server 2012 R2:
- On the taskbar, click Server Manager, click Tools, and then click Internet Information Services (IIS) Manager.
If you are using Windows 8 or Windows 8.1:
- Hold down the Windows key, press the letter X, and then click Control Panel.
- Click Administrative Tools, and then double-click Internet Information Services (IIS) Manager.
If you are using Windows Server 2008 or Windows Server 2008 R2:
- On the taskbar, click Start, point to Administrative Tools, and then click Internet Information Services (IIS) Manager.
If you are using Windows Vista or Windows 7:
- On the taskbar, click Start, and then click Control Panel.
- Double-click Administrative Tools, and then double-click Internet Information Services (IIS) Manager.
In the Connections pane, expand the server name, expand Sites, and then the site, application, or Web service for which you want to enable Extended Protection for Windows authentication.
Scroll to the Security section in the Home pane, and then double-click Authentication.
In the Authentication pane, select Windows Authentication.
Click Enable in the Actions pane. 
Click Advanced Settings in the Actions pane.
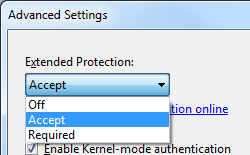
When the Advanced Settings dialog box appears, select one of the following options in the Extended Protection drop-down menu:
- Select Accept if you want to enable extended protection while providing down-level support for clients that do not support extended protection.
- Select Required if you want to enable extended protection without providing down-level support.
Click OK to close the Advanced Settings dialog box.
Configuration
The element is configurable at the site, application, or virtual directory level in the ApplicationHost.config file.
Attributes
| Attribute | Description |
|---|---|
| authPersistNonNTLM | Optional Boolean attribute. |
Specifies whether IIS automatically reauthenticates every non-NTLM (for example, Kerberos) request, even those on the same connection. False enables multiple authentications for the same connections.
Note: A setting of true means that the client will be authenticated only once on the same connection. IIS will cache a token or ticket on the server for a TCP session that stays established.
The default is false .
Setting this flag to true specifies that authentication persists only for a single request on a connection. IIS resets the authentication at the end of each request, and forces reauthentication on the next request of the session.
The default value is false .
Specifies whether Windows authentication is enabled.
The default value is false .
Specifies whether Windows authentication is done in kernel mode. True specifies that Windows authentication uses kernel mode.
Kernel-mode authentication may improve authentication performance and prevent authentication problems with application pools that are configured to use a custom identity.
As a best practice, do not disable this setting if you use Kerberos authentication and have a custom identity on the application pool.
The default is true .
Child Elements
| Element | Description |
|---|---|
| extendedProtection | Optional element. |
Specifies extended protection options for Windows authentication.
Note: This element was added in IIS 7.5.
Specifies security support providers used for Windows authentication.
Configuration Sample
The following default element is configured at the root ApplicationHost.config file in IIS 7.0, and disables Windows authentication by default. It also defines the two Windows authentication providers for IIS 7.0.
The following example enables Windows authentication and disables Anonymous authentication for a Web site named Contoso.
Sample Code
The following examples disable Anonymous authentication for a site named Contoso, then enable Windows authentication for the site.
Настройка Kerberos авторизации на сайте IIS
Пошаговая инструкция по настройке на веб-сайте IIS на Windows Server 2012 R2 прозрачной авторизации доменных пользователей в режиме SSO (Single Sign-On) по протоколу Kerberos.
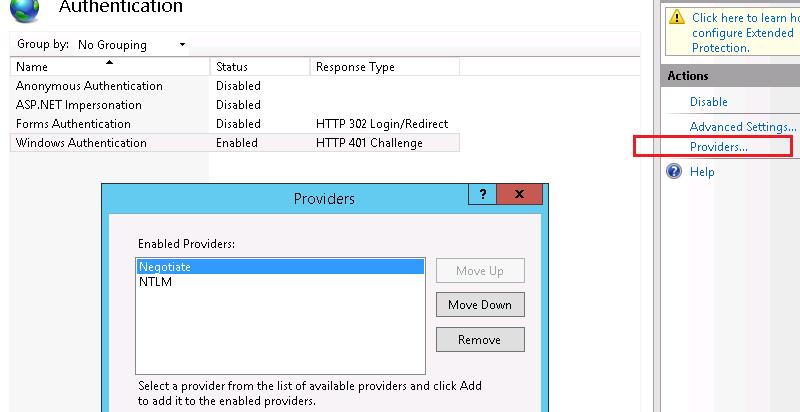
На веб сервере запустите консоль IIS Manager, выберите нужный сайт и откройте раздел Authentication. Как вы видите, по умолчанию разрешена только анонимная аутентификация (Anonymous Authentication). Отключаем ее и включаем Windows Authentication (IIS всегда сначала пытается выполнить анонимную аутентификацию).
 Открываем список провайдеров, доступных для Windows аутентификации (Providers). По умолчанию доступны два провайдера: Negotiate и NTLM. Negotiate – это контейнер, который в качестве первого метода проверки подлинности использует Kerberos, если эта аутентификация не удается, используется NTLM. Необходимо, чтобы в списке провайдеров метод Negotiate стоял первым.
Следующий этап – регистрация Service Principal Name (SPN) записей для имени сайта, к которому будут обращаться пользователи. В том случае, если сайт IIS должен быть доступен только по имени сервера, на котором он расположен (http://server-name или http://server-name.contoso.com), создавать дополнительные SPN записи не нужно (SPN записи уже имеются в учетной записи сервера в AD). При использовании адреса сайта, отличного от имени хоста, или при построении веб-фермы с балансировкой, придется привязывать дополнительные записи SPN к учётной записи сервера или пользователя.
Предположим, у нас имеется ферма IIS серверов. В этом случае оптимально создать отдельную учетную запись в AD и привязать SPN записи к ней. Из-под этой же учетной записи будут запускать целевой Application Pool нашего сайта.
Создадим доменную учетную запись iis_service. Убедимся, что SPN записи для этого объекта не назначены (атрибут servicePrincipalName пустой).
![]() Предположим, что сайт должен отвечать по адресам _http://webportal and _http://webportal.contoso.loc. Мы должны прописать эти адреса в SPN атрибут служебной учетной записи
Предположим, что сайт должен отвечать по адресам _http://webportal and _http://webportal.contoso.loc. Мы должны прописать эти адреса в SPN атрибут служебной учетной записи
Setspn /s HTTP/webportal contoso\iis_service
Setspn /s HTTP/webportal.contoso.loc contoso\iis_service
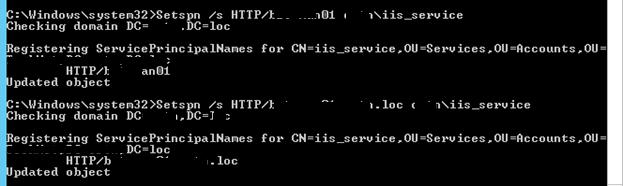 Таким образом, мы разрешим этой учетной записи расшифровывать тикеты Kerberos при обращении пользователей к данным адресам и аутентифицировать сессии.
Проверить настройки SPN у учетной записи можно так:
setspn /l iis_service

Следующий этап – настройка в IIS Application Pool для запуска из-под созданной сервисной учетной записи.
Выберите Application Pool сайта (в нашем примере это DefaultAppPool).
 Откройте раздел настроек Advanced Settings и перейдите к параметру Identity.
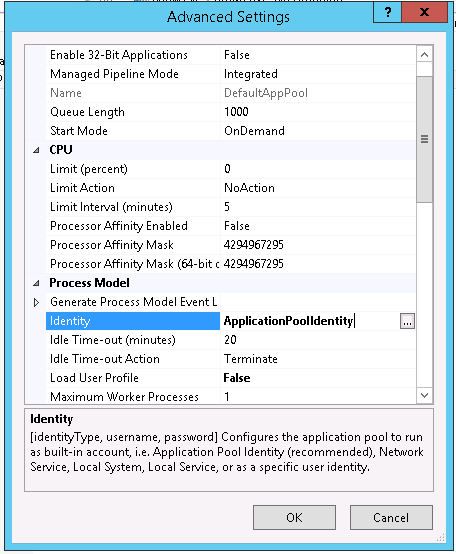 Измените его с ApplicationPoolIdentity на contoso\iis_service.
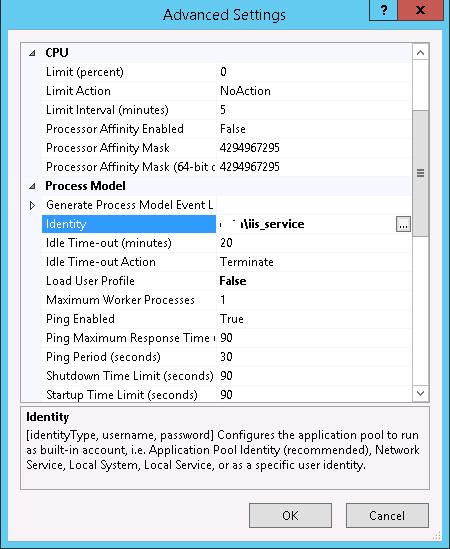
Затем в консоли IIS Manager перейдите на свой сайт и выберите секцию Configuration Editor.
В выпадающем меню перейдите в раздел system.webServer > security > authentication > windowsAuthentication

Измените useAppPoolCredentials на True.
Тем самым мы разрешим IIS использовать доменную учетку для расшифровки билетов Kerberos от клиентов.
Перезапустим IIS командой:
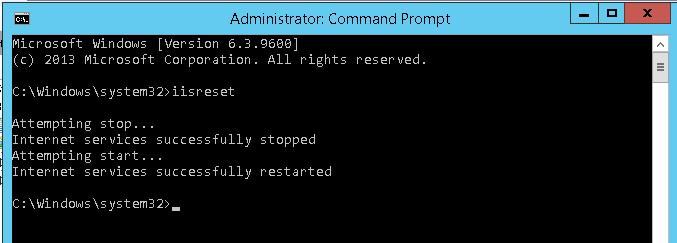 Аналогичную настройку нужно выполнить на всех серверах веб-фермы.
Протестируем работу Kerberos авторизации, открыв в браузере клиента (браузер нужно предварительно настроить для использования Kerberos) адрес _http://webportal.contoso.loc
Убедится, что для авторизации на сайте используется Kerberos можно с помощью инспектирования HTTP трафика утилитой Fiddler (ранее мы уже упоминали эту утилиту).
Запускаем Fiddler, в браузере открываем целевой сайт. В левом окне находим строку обращения к сайте. Справа переходим на вкладку Inspectors. Строка Authorization Header (Negotiate) appears to contain a Kerberos ticket, говорит о том, что для авторизации на IIS сайте использовался протокол Kerberos.


