- Установка OpenSSH для Windows Server 2019 и Windows 10 Installation of OpenSSH For Windows Server 2019 and Windows 10
- Установка OpenSSH через пользовательский интерфейс настройки в Windows Server 2019 или Windows 10 версии 1809 Installing OpenSSH from the Settings UI on Windows Server 2019 or Windows 10 1809
- Установка OpenSSH с помощью PowerShell Installing OpenSSH with PowerShell
- Удаление OpenSSH Uninstalling OpenSSH
- Начальная настройка сервера SSH Initial Configuration of SSH Server
- Начальное использование SSH Initial use of SSH
- Raymii.org
- SSH on Windows Server 2019 (including how to sudo)
- Table of Contents
- Installing OpenSSH on Windows
- CMD or Powershell?
- Windows OpenSSH client
- Generating an SSH keypair on Windows
- Add the key to another Windows server
- Windows OpenSSH server
- OpenSSH server configuration
- PermitRootLogin on Windows
- AuthorizedKeysFile location on Windows
- Tips and tricks
- ssh-copy-id
- Настройка OpenSSH-сервера на Windows Server 2019
- Установка OpenSSH в Windows Server 2019
- Первичная конфигурация SSH-сервера
- Запуск службы OpenSSH
- Подключение к серверу
- Копирование файлов
- sshd_config
Установка OpenSSH для Windows Server 2019 и Windows 10 Installation of OpenSSH For Windows Server 2019 and Windows 10
Клиент OpenSSH и сервер OpenSSH являются отдельными устанавливаемыми компонентами в Windows Server 2019 и Windows 10 1809. The OpenSSH Client and OpenSSH Server are separately installable components in Windows Server 2019 and Windows 10 1809. Пользователи с этими версиями Windows могут установить и настроить OpenSSH, используя приведенные ниже инструкции. Users with these Windows versions should use the instructions that follow to install and configure OpenSSH.
Пользователи, которые получили OpenSSH из репозитория PowerShell на сайте GitHub (https://github.com/PowerShell/OpenSSH-Portable) должны использовать инструкции из репозитория, а не эти инструкции. Users who acquired OpenSSH from the PowerShell GitHub repo (https://github.com/PowerShell/OpenSSH-Portable) should use the instructions from there, and should not use these instructions.
Установка OpenSSH через пользовательский интерфейс настройки в Windows Server 2019 или Windows 10 версии 1809 Installing OpenSSH from the Settings UI on Windows Server 2019 or Windows 10 1809
Клиент и сервер OpenSSH устанавливаются в Windows 10 версии 1809 как отдельные компоненты. OpenSSH client and server are installable features of Windows 10 1809.
Чтобы установить OpenSSH, откройте раздел Параметры и последовательно выберите Приложения > Приложения и возможности > Управление дополнительными компонентами. To install OpenSSH, start Settings then go to Apps > Apps and Features > Manage Optional Features.
Просмотрите этот список и выясните, установлен ли клиент OpenSSH. Scan this list to see if OpenSSH client is already installed. Если нет, то выберите пункт Добавить компонент в верхней части страницы, а затем: If not, then at the top of the page select «Add a feature», then:
- чтобы установить клиент OpenSSH, найдите элемент Клиент OpenSSH и щелкните Установить; To install the OpenSSH client, locate «OpenSSH Client», then click «Install».
- чтобы установить сервер OpenSSH, найдите элемент Сервер OpenSSH и щелкните Установить. To install the OpenSSH server, locate «OpenSSH Server», then click «Install».
После завершения установки вернитесь в раздел Приложения > Приложения и возможности > Управление дополнительными компонентами, где теперь должны появиться компоненты OpenSSH. Once the installation completes, return to Apps > Apps and Features > Manage Optional Features and you should see the OpenSSH component(s) listed.
Установка сервера OpenSSH создаст и включит правило брандмауэра с именем OpenSSH-Server-in-TCP. Installing OpenSSH Server will create and enable a firewall rule named «OpenSSH-Server-In-TCP». Правило разрешает входящий трафик SSH через порт 22. This allows inbound SSH traffic on port 22.
Установка OpenSSH с помощью PowerShell Installing OpenSSH with PowerShell
Чтобы установить OpenSSH с помощью PowerShell, запустите PowerShell от имени администратора. To install OpenSSH using PowerShell, first launch PowerShell as an Administrator. Убедитесь, что функции OpenSSH доступны для установки, выполнив следующие действия. To make sure that the OpenSSH features are available for install:
Затем установите компонент сервера и (или) клиента. Then, install the server and/or client features:
Удаление OpenSSH Uninstalling OpenSSH
Чтобы удалить OpenSSH через раздел Параметры в ОС Windows, откройте этот раздел и последовательно выберите Приложения > Приложения и возможности > Управление дополнительными компонентами. To uninstall OpenSSH using the Windows Settings, start Settings then go to Apps > Apps and Features > Manage Optional Features. В списке установленных компонентов выберите компонент Клиент OpenSSH или Сервер OpenSSH и щелкните Удалить. In the list of installed features, select the OpenSSH Client or OpenSSH Server component, then select Uninstall.
Чтобы удалить OpenSSH с помощью PowerShell, выполните одну из следующих команд: To uninstall OpenSSH using PowerShell, use one of the following commands:
После удаления OpenSSH может потребоваться перезагрузка Windows, если служба использовалась в момент удаления. A Windows restart may be required after removing OpenSSH, if the service is in use at the time it was uninstalled.
Начальная настройка сервера SSH Initial Configuration of SSH Server
Чтобы настроить только что установленный сервер OpenSSH для использования в ОС Windows, запустите PowerShell от имени администратора и выполните следующие команды, чтобы запустить службу SSHD: To configure the OpenSSH server for initial use on Windows, launch PowerShell as an administrator, then run the following commands to start the SSHD service:
Начальное использование SSH Initial use of SSH
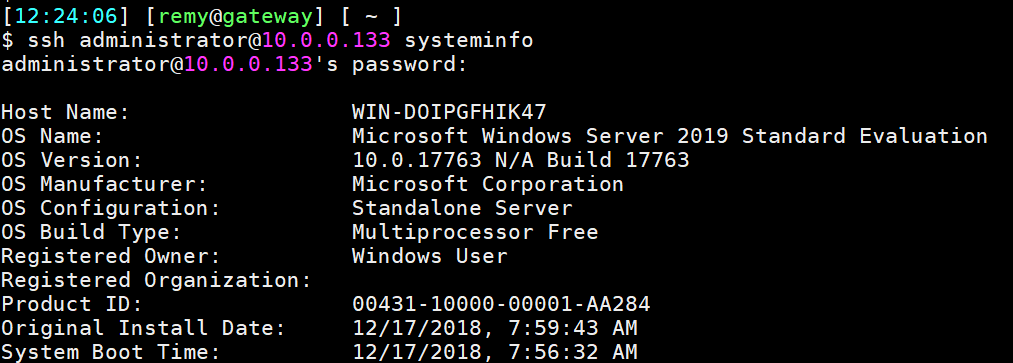
После установки сервера OpenSSH в Windows вы можете быстро проверить его работу с помощью PowerShell на любом устройстве Windows, где установлен клиент SSH. Once you have installed the OpenSSH Server on Windows, you can quickly test it using PowerShell from any Windows device with the SSH Client installed. В PowerShell запустите следующую команду: In PowerShell type the following command:
Первое подключение к любому серверу сопровождается сообщением примерно такого содержания: The first connection to any server will result in a message similar to the following:
В качестве ответа принимаются значения yes (да) или no (нет). The answer must be either «yes» or «no». Ответ «Да» приведет к добавлению этого сервера в список известных узлов SSH в локальной системе. Answering Yes will add that server to the local system’s list of known ssh hosts.
После этого появится запрос на ввод пароля. You will be prompted for the password at this point. В целях безопасности пароль не будет отображаться по мере ввода. As a security precaution, your password will not be displayed as you type.
После успешного подключения вы увидите командную оболочку, которая выглядит примерно так: Once you connect you will see a command shell prompt similar to the following:
По умолчанию для сервера OpenSSH в ОС Windows используется командная оболочка Windows. The default shell used by Windows OpenSSH server is the Windows command shell.
Raymii.org
SSH on Windows Server 2019 (including how to sudo)
❗ This post is over two years old. It may no longer be up to date. Opinions may have changed.
Table of Contents
On hackernews I saw a Microsoft blog post stating that Windows Server 2019 now includes OpenSSH. In this post I’ll try out both the client and server on a Windows 2019 server, including how to login as a Active Directory Domain user. All documentation from Microsoft on OpenSSH can be found here. The bonus this time is how to elevate permissions via SSH on Windows, sudo but way more complicated. This guide is also applicable on Windows 10, build 1809 and up.

Installing OpenSSH on Windows
Fire up a powershell prompt as administrator and execute the following command to see if it’s installed already:
If they are NotPresent , install them with the below powershell commands:
Example output for both:
I had to install all Windows updates before the server part would install (up to december 2018).
Start the openssh server and make sure it starts up automatically. Not required when you only want to use the openssh client.
The setup automatically creates a firewall rule to allow OpenSSH. Check to make sure it is actually created.
CMD or Powershell?
The default prompt when SSHing in to a windows server is cmd.exe . Rather bare and sparse, I recommend you change that to Powershell. It’s Windows, so it has to be changed in the registry, but there is a powershell command to do so:
If you have installed bash you can set that to be the default shell by changing the full -Value path to the bash.exe binary.
Windows OpenSSH client
Using SSH on Windows (open up a powershell window) is as simple as typing in the command and the server to connect to:
You will be prompted for a password, type it, and you’re in.
However, using passwords is insecure and will get your server compromised (eventually). SSH has the concept of keys, cryptographicly secure public private keys which can be used for authentication. The rest of this section covers the creation and placement of an SSH keypair on Windows.
You want to install the ssh-agent if you are going to use Windows as ssh client:
With an ssh-agent , you don’t have to type the password for your private key every time you SSH to a server.
Generating an SSH keypair on Windows
Generate your SSH keypair with the following command:
Make sure to enter a passphrase. Create a backup of the folder ( C:\Users\Username\.ssh ), if you loose that private key you won’t be able to login anymore.
Remember that private key files are the equivalent of a password should be protected the same way you protect your password. To help with that, use ssh- agent to securely store the private keys within a Windows security context, associated with your Windows login. To do that, start the ssh-agent service as Administrator (we already did that when installing) and use ssh-add to store the private key:
Add the key to another Windows server
Using the following commands we can copy our public key (not the private, never share your private parts) to a server running SSH. I assume you know how to do this on Linux, this example is for another Windows server. The permissions are managed differently.
In this example I use the user remy in the AD domain SPCS . The format then to login is remy@spcs@example.org , the first part ( remy@spcs ) is the username (and AD domain), the last part ( @example.org ) is the server to connect to.
Create the folder where the authorized_keyfile belongs:
Use scp to copy the public key file generated previously:
Change the permissions on the authorized_keys file on the server, otherwise ssh will ignore the file:
The OpenSSHUtils powershell module needs to be installed for the Repair- AuthorizedKeyPermission cmdlet to work.
You can now login to the Windows server using your private key.
Windows OpenSSH server
The Windows OpenSSH server is quite simple to configure. It has the regular sshd_config file for settings, with some parts specific to Windows.
This is a screenshot where I SSH into a Windows server using my linux workstation:
OpenSSH server configuration
This section is specifically for Windows related settings. I assume you know how to configure openssh on linux.
The server reads it’s configuration from %programdata%\ssh\sshd_config . You can copy and paste that path into a Windows Run dialog ( WIN+R ) to open Explorer in the correct location.
When configuring user/group based rules with a domain user or group, use the following format: user?domain*. Windows allows multiple of formats for specifying domain principals, but many will conflict with standard Linux patterns. For that reason, * is added to cover FQDNs. Also, this approach uses ? instead of @ avoids conflict with the username@host format.
To allow all users from the domain EXAMPLE in group Domain Admins to login via SSH:
It’s better to create a specific security group (e.g. sshusers ) and add the Domain Admins as a member. With a seperate group you can give or restrict the ssh permissions more granulary.
To allow local users (non-domain) or local groups:
PermitRootLogin on Windows
PermitRootLogin is not applicable in Windows. To deny administrators from logging in via SSH, use a DenyGroups directive:
For Windows OpenSSH, the only available authentication methods are password and publickey .
At the bottom of this article there is an alternative to sudo . How otherwise would you elevate permissions? Do note that it is quite complex.
AuthorizedKeysFile location on Windows
The default AuthorizedKeysFile locations are .ssh/authorized_keys and .ssh/authorized_keys2 . This is in the users home folder ( C:\Users\Username ) (or the profile image path). If required, an absolute path can be provided ( D:\folder\authorized_keys ).
Tips and tricks
Here are a few tips on Windows and SSH I found while using it for some time.
ssh-copy-id
From a linux machine, the command ssh-copy-id can be used to copy your public key easily to another linux machine. This does not work on Windows:
You need to use the above commands listed under the SSH client section to copy the key and fix the permissions.
As you’ve denied access to Administrators via SSH (just as you would not allow root login on Linux), you now need to have a way for people to elevate their permissions. On linux you would use sudo su — or the likes. On Windows, there is no sudo. There is also no way to elevate permissions of an already running process.
Using the runas command fails because it cannot create a new window or ask UAC (because you’re in a console SSH session).
There is a complex way of elevating your privileges. You need to run this in a powershell session as your user. First you create a Credentials object which has the username and password of the Administrator user. Then you use that $Cred object with either Invoke-Command to run a single noninteractive command, or with Enter-PSSession to get an interactive Powershell.
Note that you first need to ssh into your windows server and start powershell. This can be done with one command:
Interactive shell example:
This is a screenshot of the entire process:
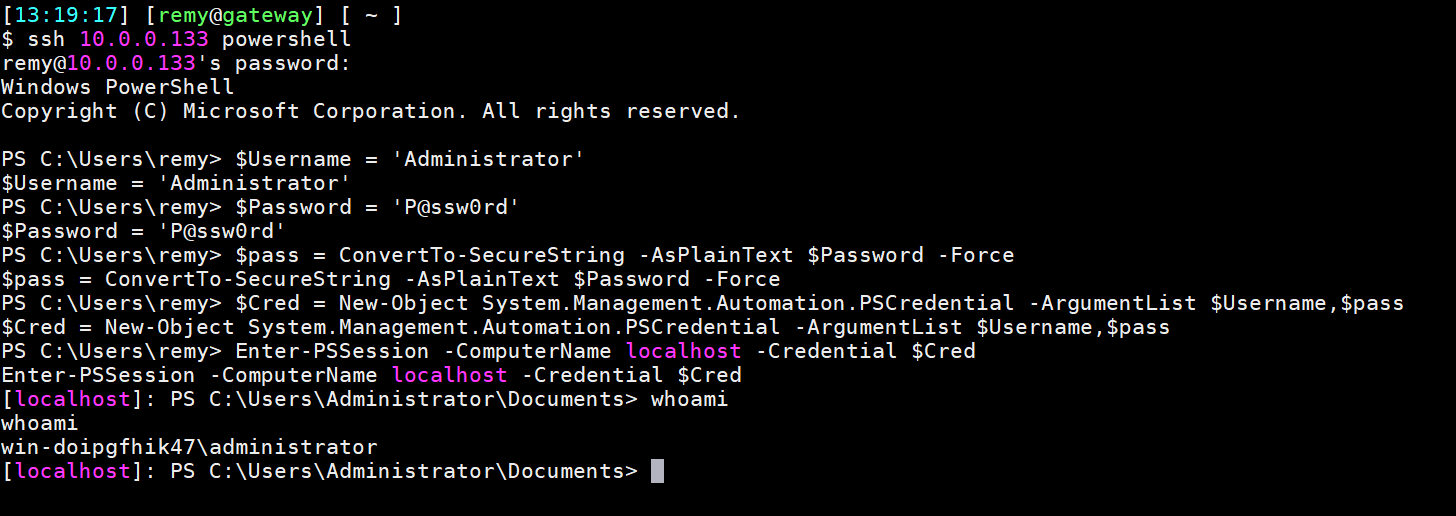
Note that this by default only works on localhost, not from a remote computer. Unless you change the trustedhosts you will get an Access denied error.
This is also not really like sudo, but more like setting up a new ssh session from localhost to localhost as root. (But, with powershell remoting).
Настройка OpenSSH-сервера на Windows Server 2019
Прежде всего, вы можете спросить, зачем нам вообще нужен SSH-сервер на Windows-сервере? В среде Windows SSH может показаться не очень полезным. В конце концов, у нас есть RDP и PowerShell Remoting с WinRM, которые уже обеспечивают мощные возможности удаленного управления. Тем не менее, SSH в Windows определенно имеет свои преимущества. Среди них можно выделить такие вещи, как:
- Простое подключение и управление Windows-серверами из Linux или MacOS с помощью встроенных инструментов.
- Подключение из систем Windows к серверам Linux — это простое решение с интегрированным SSH-клиентом. Есть много администраторов Linux, которые должны управлять серверами на работе с помощью ОС Windows, и всегда должны устанавливать некоторые дополнительные инструменты, такие как PuTTY или WinSCP. Теперь они могут использовать знакомые команды SSH прямо из командной строки Windows.
- Используются те же инструменты удаленного управления для серверов Linux и Windows (SSH, SCP, аутентификация с открытым ключом и т. д.).
- Кроссплатформенный PowerShell Remoting. PowerShell Core использует SSH для включения удаленного сеанса PowerShell в Windows, MacOS и Linux. В отличие от WinRM PowerShell Remoting — Windows PowerShell работает только на Windows.
- Вместе с подсистемой Windows для Linux вы можете получить Linux-подобные сеансы SSH с Bash и обычные инструменты Linux также на сервере Windows, который позволяет администраторам Linux использовать свои знания для управления системами Windows.
- И наоборот: администраторы Windows могут использовать PowerShell для управления сервером Linux, если на нем будет присутствовать соответствующий shell от Microsoft.
- Просто другой вариант для удаленного управления, который дает еще большую гибкость.
Установка OpenSSH в Windows Server 2019
Открываем Settings — Apps & features — Manage optional features:

Нажимаем Add a feature, ищем OpenSSH Server — Install:

На предыдущем экране дожидаемся окончания процесса инсталляции. OpenSSH сервер можем считать установленным.
Обращаем внимание, что установка этим методом автоматически создаст правило Windows Firewall, с названием «OpenSSH-Server-In-TCP», открывающее 22 порт для входящих подключений.
Проверим, присутствует ли на нашей системе встроенный OpenSSH:
Get-WindowsCapability -Online | ? Name -like ‘OpenSSH*’
В ответ должны получить:
0.0.1.0
State : NotPresent #или Install, если клиент уже установлен
Name : OpenSSH.Server
0.0.1.0
State : NotPresent
Устанавливаем клиент, если он не установлен:
Add-WindowsCapability -Online -Name OpenSSH.Client
Для установки сервера вводим:
Add-WindowsCapability -Online -Name OpenSSH.Server
В обоих случаях вывод должен быть следующим:
Path :
Online : True
RestartNeeded : False
Первичная конфигурация SSH-сервера
По умолчанию при подключении к OpenSSH-серверу используется командная строка Windows. Вы можете использовать практически любую оболочку на вашем компьютере с Windows через SSH-соединение. Даже возможно использовать Bash, когда подсистема Windows для Linux (WSL) также установлена на целевой машине. Также возможно изменение оболочки по умолчанию на SSH-сервере на нечто иное, чем командная оболочка. Для этого ключ реестра «DefaultShell» необходимо изменить.
Сделать это можно как через редактор реестра regedit.exe, открыв в нем следующий путь: HKEY_LOCAL_MACHINESOFTWAREOpenSSH и изменив в нем параметр DefaultShell, указав в нем полный путь до исполняемого файла необходимой командной строки, например:
Тоже самое можно сделать используя PowerShell:
New-ItemProperty -Path «HKLM:SOFTWAREOpenSSH» -Name DefaultShell -Value «C:WindowsSystem32WindowsPowerShellv1.0powershell.exe» -PropertyType String -Force
Проверим настройки Windows Firewall, используя для этого PowerShell:
Get-NetFirewallRule -Name *ssh*
Введя данную команду мы получим параметры правила, разрешающего SSH-подключение к серверу. Если правила не оказалось, введем следующую команду, создав его:
New-NetFirewallRule -Name sshd -DisplayName ‘OpenSSH Server (sshd)’ -Enabled True -Direction Inbound -Protocol TCP -Action Allow -LocalPort 22
Запуск службы OpenSSH
После установки функции SSH-сервера нам остается только его запустить:
Опционально можно установить для службы sshd автоматический запуск:
Set-Service -Name sshd -StartupType ‘Automatic’
Подключение к серверу
Теперь мы готовы к работе и можем подключиться через установленное приложение к нашему хосту. Это можно осуществить либо с Windows 10, компьютера с Linux, с putty.exe на более старой машине с Windows, либо с Bash в настольной операционной системе от Microsoft. Все, что вам нужно, это найти какой-либо SSH-клиент, ввести в него имя пользователя, имя вашего сервера или IP-адрес и подключиться.
Для SSH-клиента в PowerShell синтаксис будет таким:
При первом подключении с неизвестного хоста будет показано следующее сообщение:

Ответив на него yes, хост подключения будет добавлен в список известных хостов сервера. После чего необходимо ввести пароль пользователя (по соображениям безопасности вводимые символы отображаться не будут). После успешного подключения отобразится интерфейс используемой командной строки:

Копирование файлов
Также, как с сервером OpenSSH в любой системе * nix, вы можете использовать SCP для копирования файлов на сервер или с сервера.
Например, администратор Linux может быстро получить файл журнала с сервера Windows с помощью той же команды, что и для сервера Linux.
scp username@servername:C:/inetpub/logs/LogFiles/W3SVC1/u_ex191017.log u_ex191017.log
Когда вы подключаетесь из Bash/*nix к машине с Windows, нужно помнить, что пути Windows также должны указываться с обычными косыми чертами Unix вместо обратных косых черт. Например, C:/Windows вместо C:Windows.
sshd_config
Аналогично операционным системам семейства Linux, OpenSSH Server в Windows имеет в своем составе особый файл, где хранятся все параметры для выполнения более подробных настроек. Например, для ограничения входа .
По умолчанию файл конфигурации находится в «%programdata%sshsshd_config».
Самые различные настройки, применимые к этому файлу можно найти на сайте https://man.openbsd.org/sshd_config.
Кроме того, у Microsoft есть документация для специфичных настроек Windows.


