Развертывание сервера DNS и подготовка к установке Active Directory.
Это будет пошаговый пример по настройке Active Directory под виртуальной машиной Oracle VM VirtualBox.
Сперва установим операционную систему — Windows Server 2008 R2 Ent English.
Имя сервера – dc1
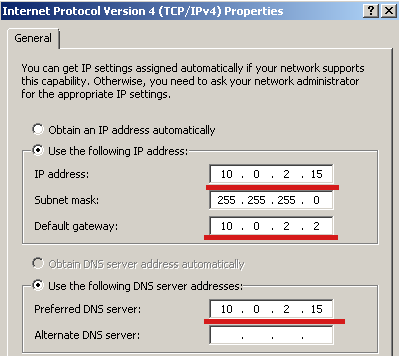
IP адрес сервера – 10.0.2.15
Default Gateway – 10.0.2.2
Все действия выполняю под локальной учетной записью Administrator
После необходимо убедиться, что на Вашем сервере настроен статический IP-адрес и в качестве сервера DNS указан собственный IP-адресс вашего сервера.
Из меню “Start” – “Control Panel” – “Network and Sharing Center” – “Change adapter settings” – отрываем настройки нашего сетевого интерфейса и прописываем:
Теперь поднимем роль DNS на нашем сервере:
Из меню “Start” – “Control Panel” – “Administrative Tools” – запускаем оснастку “Server Manager” – добавляем роль (Add Roles) – “DNS Server”.
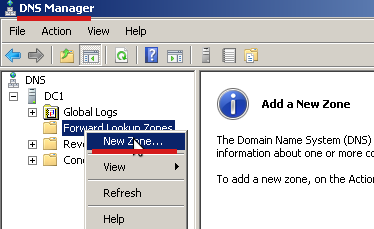
Cоздадим зоны DNS:
Из меню “Start” – “Control Panel” – “Administrative Tools” – запускаем оснастку DNS, щелкаем правой кнопкой мыши по узлу Forward Lookup Zones и в выпадающем меню выбираем меню New Zone (Создать новую зону).
Смотрите рисунок для наглядного понимания:
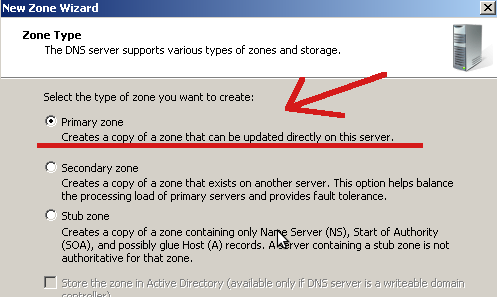
На этапе Zone Type (Тип зоны) выставляем переключатель на поле – Primazy zone (Основная зона)
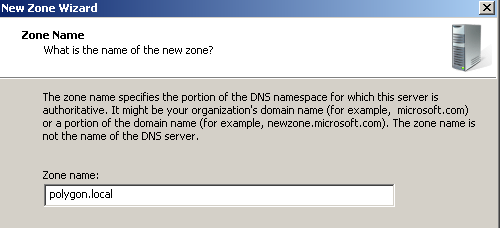
На этапе Zone Name (Имя зоны) вводим имя зоны DNS. В моем случае это будет polygon.local
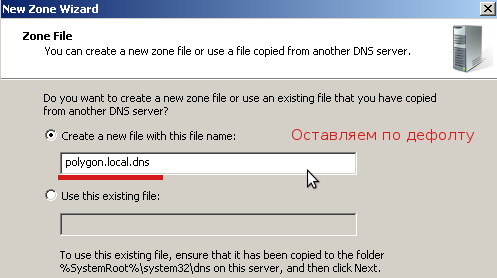
На этапе Zone File (Файл зоны) принимаем имя файла зоны по дефолту.
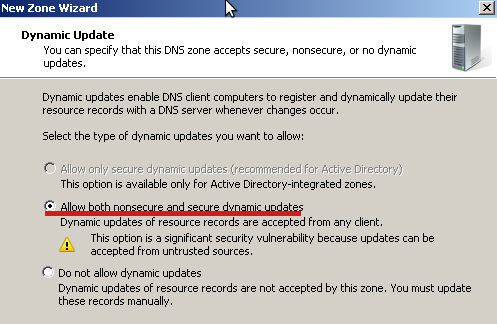
На этапе Dynamic Update (Динамические обновления) выставляем положение переключателя в Allow both nonsecure and secure dynamic updates (Разрешить любые динамические обновления).
На последнем этапе нажимаем кнопку Finish (Готово), чтобы завершить создание зоны прямого просмотра.
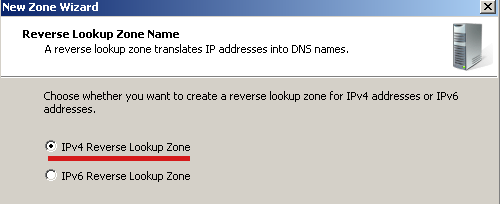
А сейчас произведем настроки касательно Reverse Lookup Zones (Зоны обратного просмотра)
Из меню Start – Control Panel – Administrative Tools – запускаем оснастку DNS, щелкаем правой кнопкой мыши по узлу Reverse Lookup Zones и в выпадающем меню выбираем меню New Zone (Создать новую зону).
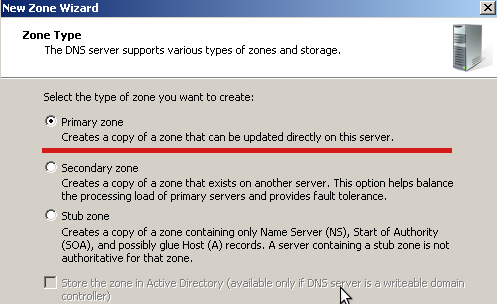
На этапе Zone Type (Тип зоны) выставляем переключатель на поле – Primary Zone (Основная зона)
На этапе Reverse Lookup Zone Name (Имя зоны обратного просмотра) оставляем переключатель в положении IPv4 Reverse Lookup Zone (Зона обратного просмотра IPv4)
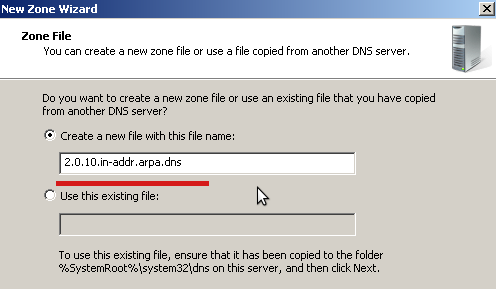
На этапе Network ID нужно будет ввести первые три октета IP-адреса этого сервера – в моем случае это 10.0.2

На этапе Zone File оставляем значения по умолчанию.
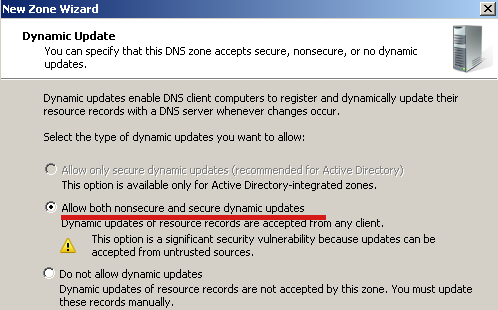
На этапе Dynamic Update (Динамическое обновление) выставляем переключатель в положение Allow both nonsecure and secury dynamic updates (Разрешить любые динамические обновления).
На последнем этапе нажимаем кнопку Finish (Готово), чтобы завершить создание зоны прямого просмотра.
Сейчас настроим принадлежность компьютеров к доменам DNS:
Открываем свойства объекта компьютер.
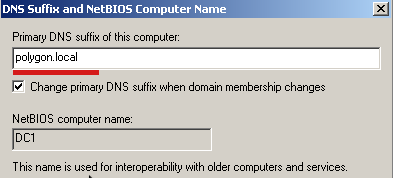
Из меню Start – Control Panel – System – Change Sessings далее во вкладке Computer Name нажимаем Change – More в окне “DNS Suffix and NetBIOS Computer Name” (DNS-суффикс и NetBIOS имя компьютера) в поле “Primary DNS suffix of this computer” (Основной DNS-суффикс этого компьютера) вводим имя домена DNS которое мы использовали как имя зоны DNS: polygon.local
После внесения изменений, перезагружаем сервер.
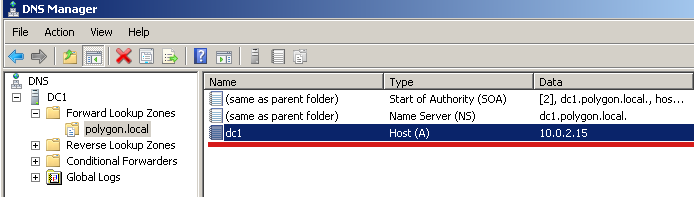
Проверкой правильности внесенных изменений является появление в зоне прямого просмотра записи A для нашего сервера:
С этим справились. Теперь перейдем собственно к установке Active Directory Domain Services.
Для установки следует нажать сочетание клавиш Win+R для вызова диалогового окна Run (Выполнить) и набрать в нем команду dcpromo.

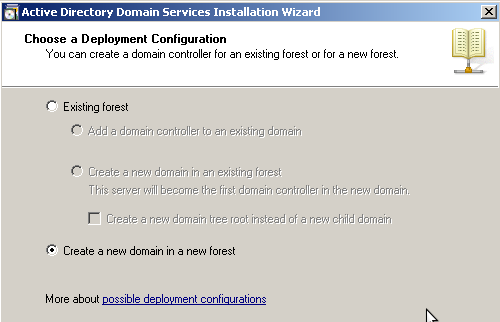
На этапе Choose a Deployment Configuration (Выберите конфигурацию развертывания) установим переключатель в положение Create a new domain in a new forest (Создать новый домен в новом лесу).
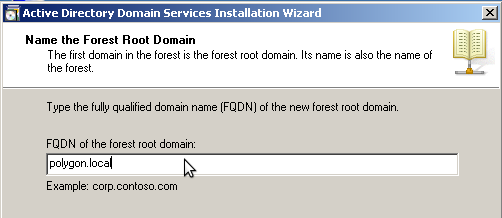
Укажем имя корневого домена леса, аналогичное имени домена DNS – polygon.local
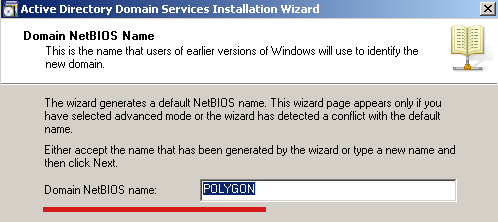
Далее, оставляем NetBIOS name по умолчанию — POLYGON
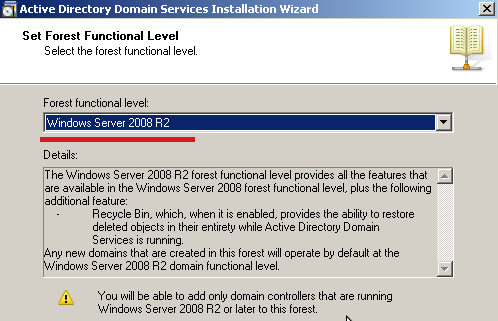
На этапе Set Forest Functional Level (Задание режима работы леса) выбираем уровень функциональности: Windows Server 2008 R2
На этапе Additional Domain Controller Options (Дополнительные параметры контроллера домена) смотрим значения параметров установленных по умолчанию и двигаемся дальше.

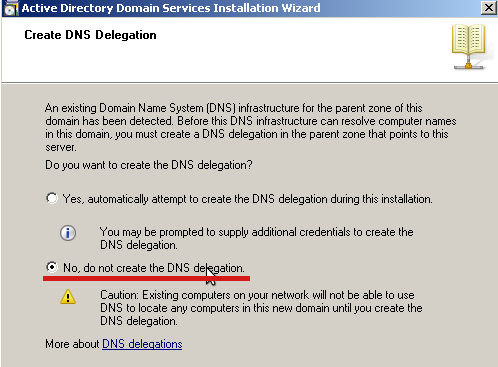
На этапе Create DNS Delegation (Создание DNS-делегирования) переводим переключатель в положение No, do not create the DNS delegation (Нет, не создавать DNS-делегирование).
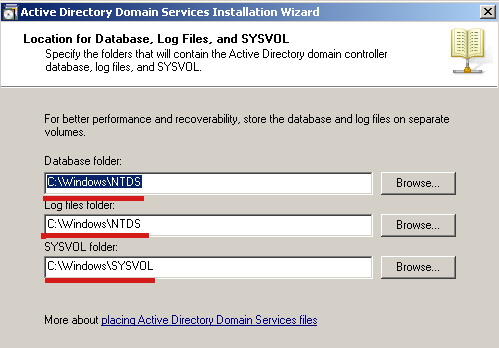
На этапе Location for Database, Log Files, and SYSVOL (Расположение для базы данных, журнала и SYSVOL) оставляем те значения, которые предложены по дефолту.
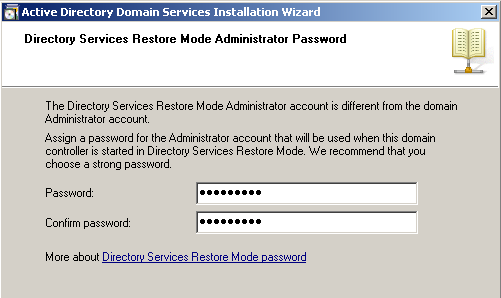
И вот настал последний этап, это создание пароля для администратора который пригодится если нужно будет восстанавливать службу каталогов.
В моем примере — Aa1234567
Перезагружаем сервер. На этом домен контроллер готов. Можете заводить учетные записи, создавать группы, организационные подразделения, групповые политики. Все это я рассмотрю в дальнейшем.
Active Directory in the VirtualBox
Normally it would make much more sense to do such thing in Hyper-V, as it does come with Windows 8 and Windows 10, but as I do like to play with the Linux systems a lot, I prefer to stick with VirtualBox.
This tutorial will cover configuration of VirtualBox and Windows 10, also Windows Server 2016 (Tech Preview).
In order to start this you need to download and install VirtualBox also to acquire .iso files for installation of Windows 10 and Windows Server 2016.
Installing both Windows operating systems should not be an issue, just make sure to use “Fixed Size Disks” in order to get best performance, personally I am doing this so I could install only few tools and check how they behave in Active Directory, as result both disk are 60GB, as I do have plenty of RAM, both systems received 4GB, which is mostly overkill. Please note that at the time of this guide, there are no release version of Windows Server 2016, as result VirtualBox does not have that Windows version, closest match at the moment is Windows 2012. 
After installing both systems make sure they are up to date and have guest additions installed. Power them off and then go to both Virtual machine settings and change Network adapter from NAT to Bridged Adapter, make sure correct real adapter is selected and that it allows all. 
Next what we need to do is to get static IP address for these adapters. Copy MAC address and go to your router settings, most of the time, by default, it is at 192.168.1.1 or 192.168.0.1. Settings might look different, because you have different router, but they still will sound the same, look for DHCP and address reservation. Reserve static IP address for MAC which you copied. 
You might need to reboot your router after these changes. At my side server will receive static IP address of 192.168.0.200 and client computer 192.168.0.170.
Let’s prepare client computer for Active Directory. Go the the Network and Sharing Center – Change Adapter Settings – Properties. Select Internet Protocol version 4 (TACP/IPv4) and click Settings. Depending on your configuration fill it in.
Let me explain few things, IP address should be clear, use default subnet mask. Default gateway is IP address to your router. Now regarding DNS, we need to add server computer IP address (we set it to be 192.168.0.200) that we could connect client computer to active directory in the server.
Client computer is ready and now we need to install Active Directory to the server computer. Open Server Manager on it, go to Local Server and click on Computer Name, rename it to something easier to type, I will set it to “Server”  Do not reboot yet, go the Network and Sharing Center and change settings same way you did before, just use other IP address:
  Now we need to reboot, after system is running again check if Computer name is changed, if yes go to Manage – Add Roles and Features, it is in the same Server Manager Window, top right side.
Click Next in the first window, leave “Role-based or feature-based installation” checked. In the next window you should see your computer name and IP address which we reserved. Do not change anything and click Next  In the next window mark “Active Directory Domain Services” and click “Add Features”
  Then click Next few times and Install in the end. Wait until that is done and click “Promote this server to a domain controller”
  In the next window select “Add a new forest” in there input name which you want to use for your domain (example.com). Click Next and then input password, then leave all the rest of the settings as they are set by default hit Next until the end and click Install. You might receive few warning, that is normal. In the end VirtualMachine will reboot and add it self to the domain. Login back to the system after reboot and leave it running.
Now go to client PC, open This PC/My Computer, right click on This PC in the left side of that screen and select Properties. Then in the new window click “Change Settings”, then Change… In the new window then input your full domain name, click OK and enter login information. 
After that you will be greeted with message informing that computer has been added to the domain, click it and accept incoming reboot request. 
Last thing which we need to do is to create new windows user account for domain computer, for that simply start the “Active Directory Users and Computer on the server computer, go to domain name – Users. Then just simply copy Administrator account and fill in new information. Then you will be able to use it for login in the client computer.
And that is all. There mostly are more correct ways to do that to achieve something else, but as I only needed to have two computers in virtual machine which are linked to Active Directory, it was enough.


