- Windows server add domain
- Добавление дополнительного контроллера домена в существующий домен AD
- Добавление дополнительного контроллера домена в существующий домен AD
- Настройка дополнительного контроллера домена
- Настройка репликации между новым и имеющимся контроллером домена
- Upgrade Domain Controllers to Windows Server 2016
- Pre-requisites
- Installation steps and required administrative levels
- Supported in-place upgrade paths
- Adprep and Domainprep
- Functional level features and requirements
- Rolling back functional levels
- AD DS interoperability with other server roles and Windows operating systems
- Administration of Windows Server 2016 servers
- Step-by-Step for Upgrading to Windows Server 2016
Windows server add domain
После того, как установлен и настроен DNS-сервер и Active Directory на Windows Server 2016 , пришло время ввести в домен компьютер. Ввод компьютера с установленной операционной системой Windows в домен сервера Windows Server 2016 возможен с помощью графического интерфейса, командной строки и PowerShell. Операции ввода не отличаются от предыдущих версий, например Windows Server 2012 . Для ввода в домен необходимо права администратора домена.
1. Перед вводом компьютера в домен необходимо произвести подготовительные действия:
- задать имя комьпютера;
- задать сетевые настройки.
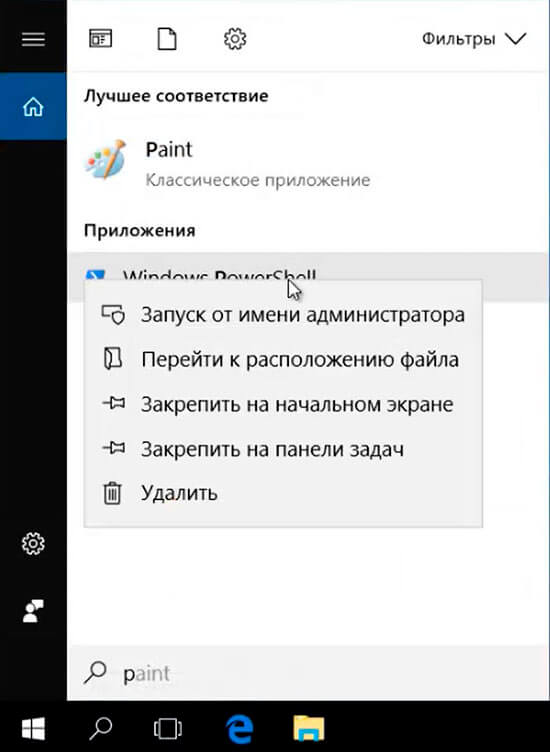
Для переименования комьпютера открываем PowerShell, для этого в поиске пишем одну букву p, дальше правый клик на Windows PowerShell — Запуск от имени администратора.
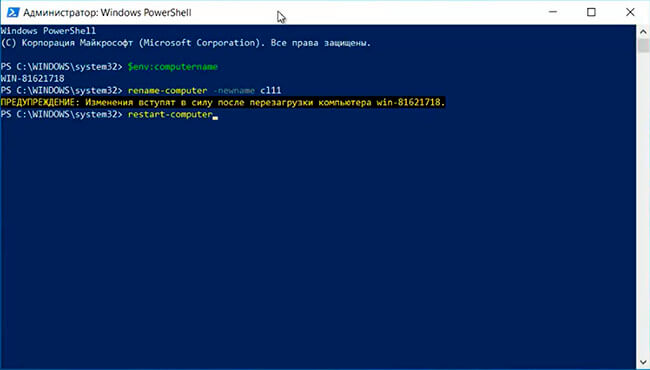
2. В терминале powershell набираем команду, которая выведет текущее имя компьютера:
$env:computername
Далее задаём новое имя компьютера (в данном случае имя компьютера будет cl11):
rename-computer -newname cl11
Для того, чтобы изменения вступили в силу необходимо перезагрузить компьютер. Задаем перезагрузку с помощью команды:
restart-computer
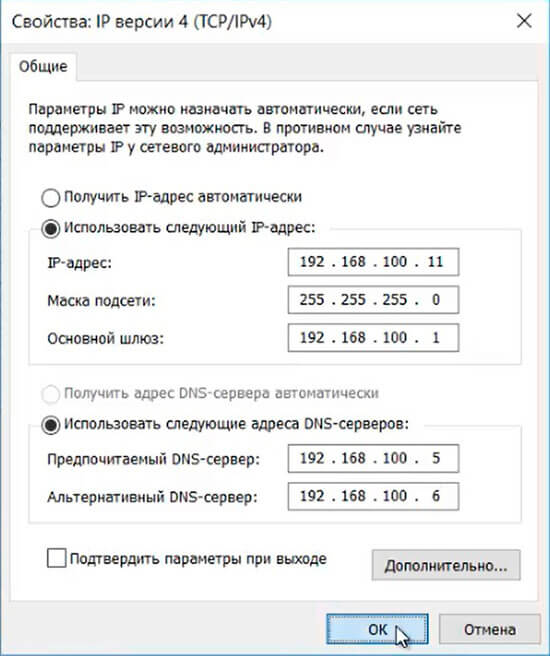
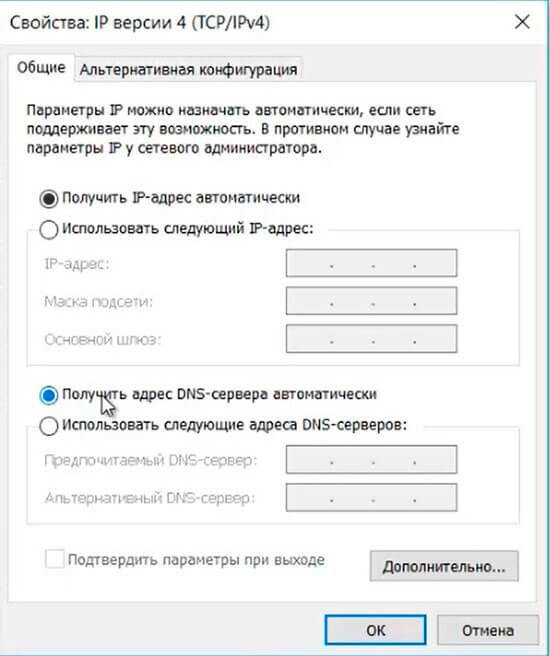
3. После перезагрузки компьютера производим сетевые настройки. Для этого в поле поиск пишем ncpa.cpl. В открывшемся окне выбираем нужный сетевой интерфейс. Правой клавишей мыши — Свойства — IP версии 4 (TCP/IPv4) — Свойства. Если в сети не развернут DHCP-сервер, то сетевые настройки придется вводить вручную. Придется задать IP-адрес, Маска подсети, Шлюз (если есть), Предпочитаемый DNS-сервер, Альтернативный DNS-сервер (если есть). Далее нажимаем «ОК».
4. Если в сети развернут DHCP-сервер, то главное проверить, чтобы в настройках сетевого интерфейса стояли чекбоксы:
- получить IP-адрес автоматически;
- получить адрес DNS-сервера автоматически.
Далее нажимаем «ОК», на этом настройки сетевого интерфейса закончены.
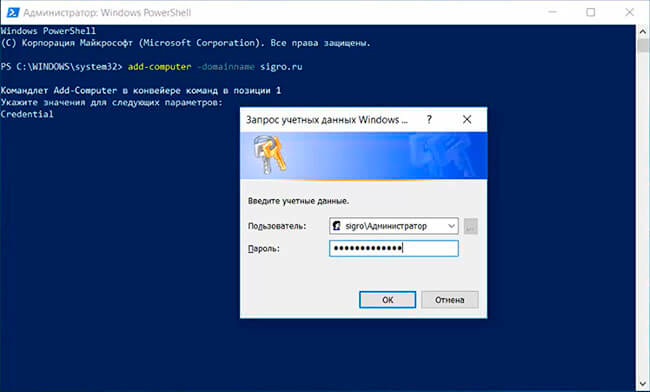
5. Подготовительные действия закончены, теперь можно ввести компьютер в домен. Для этого открываем PowerShell и в терминале пишем команду (в данном случае имя домена sigro.ru):
add-computer -domainname sigro.ru
Появится запрос учетных данных Windows. Вводим учётные данные пользователя, имеющего право вводить комьпютер в домен и его пароль.
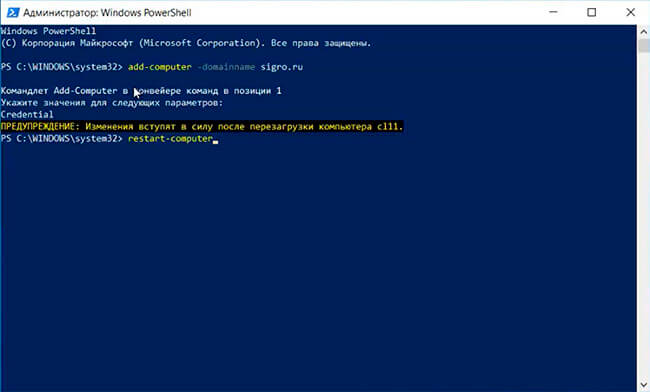
6. После этого появится предупреждение о том, что изменения вступят в силу после перезагрузки компьютера.
Набираем команду и перезагружаем компьютер:
restart-computer
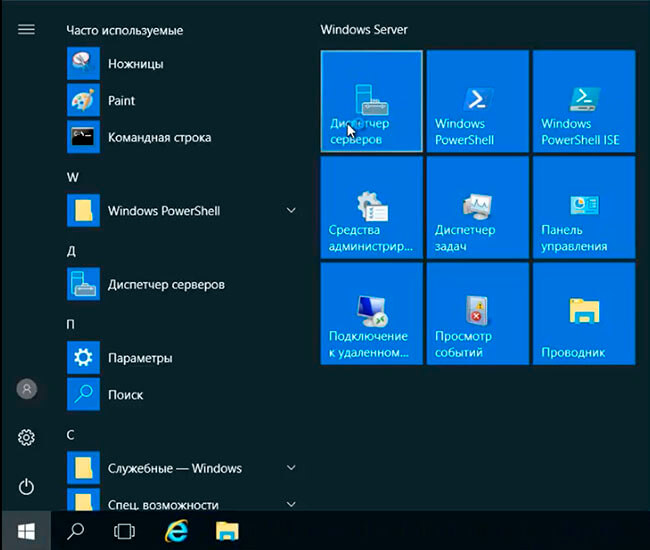
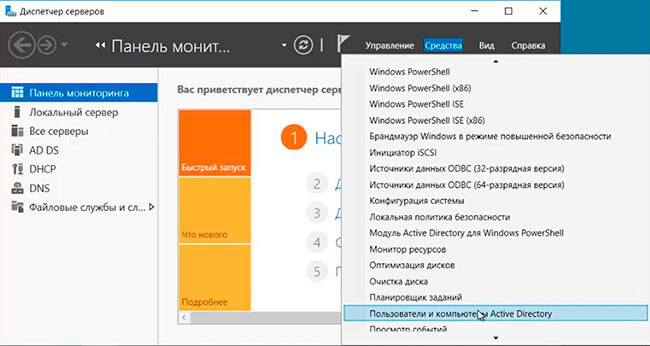
7. После перезагрузки компьютера посмотреть полное имя компьютера (в данном случае cl11.sigro.ru) возможно с помощью команды sysdm.cpl. Для проверки ввода компьютера в домен на сервере выбираем «Диспетчер серверов».
8. В следующем окне выбираем «Средства» — «Пользователи и комьпютеры Active Directory».
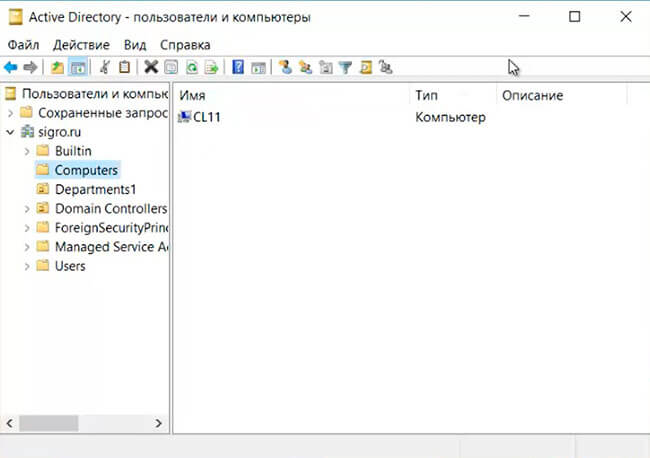
9. В новом окне «Active Directory — пользователи и компьютеры» в «Сomputers» видим компьютер, который был добавлен в домен.
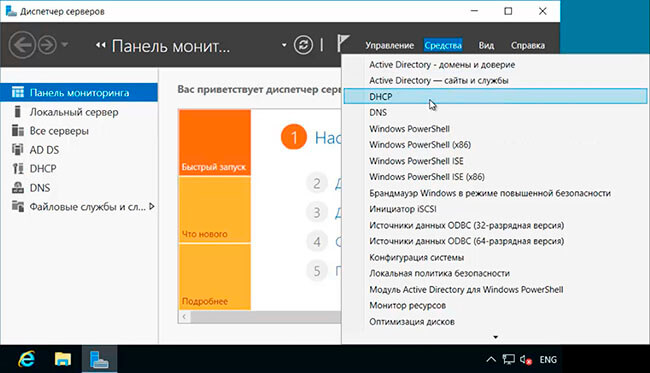
10. Далее открываем «Диспетчер серверов» — «Средства» — «DHCP».
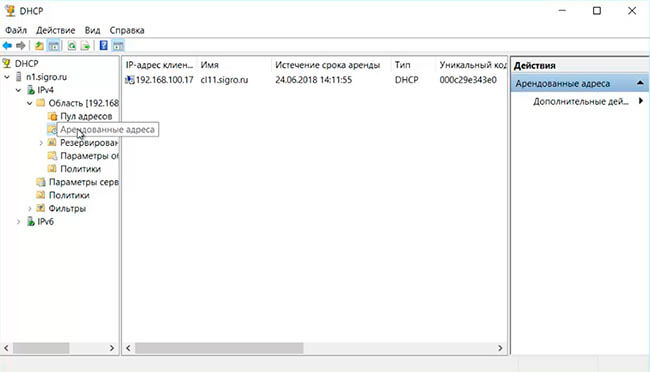
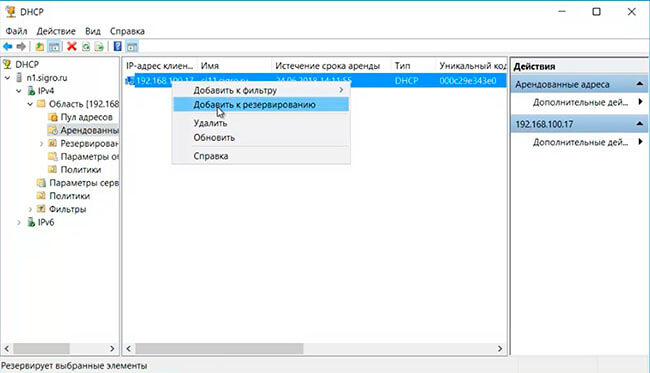
11. В окне DHCP-сервера открываем «Арендованные адреса» и справа видим IP-адрес компьютера, который добавили в домен, его имя, а также срок истечения аренды.
12. Если выданный DHCP-ервером IP-адрес нужно зарезервировать, то правый клик на IP-адресе компьютера, далее «Добавить к резервированию».
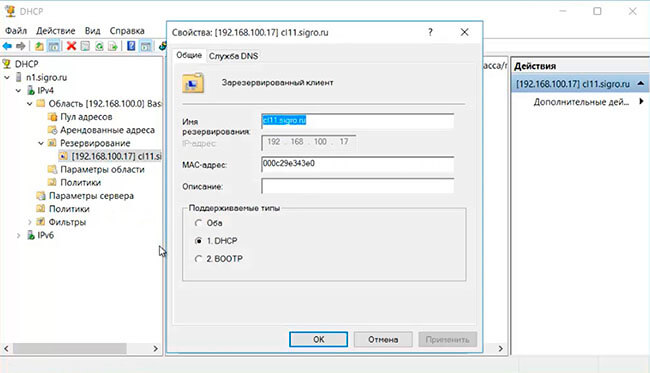
13. Открываем «Резервирование». Здесь появится компьютер, за которым DHCP-сервер закрепил IP-адрес. Посмотреть свойства можно правым кликом на IP-адрес компьютера.
Теперь компьютер добавлен в домен Windows Server 2016, с этим компьютером можно работать в том числе с помощью GPO.
Посмотреть, что и как делать, можно здесь:
Добавление дополнительного контроллера домена в существующий домен AD
Как вы знаете, службы Active Directory Domain Services (AD DS) устанавливаются на сервере, который называется контроллер домена (DC). В активный каталог домена AD можно добавить десятки дополнительных контроллеров для балансировки нагрузки, отказоустойчивости, уменьшения нагрузки на WAN каналы и т.д. Все контроллеры домена должны содержать одинаковую базу учетных записей пользователей, учетных записей компьютеров, групп и других объектов LDAP каталога.
Для корректной работы всем контроллерам домена необходимо синхронизироваться и копировать информацию между собой. Когда вы добавляете новый контроллер домена в существующий домен, контроллеры домена должны автоматически синхронизировать данные между собой. Если новый контроллер домена и существующий DC находятся в одном сайте, они могут легко реплицировать данные между собой. Если новый DC находится на удаленном сайте, то автоматическая репликация не так эффективна. Поскольку репликация будет идти через медленные (WAN каналы), которые как правило стоят дорого и скорость передачи данных по ним не велика.
В этой статье мы покажем, как добавить дополнительный контроллер домена в существующий домен Active Directory (Установка домена AD на примере Windows 2016).
Добавление дополнительного контроллера домена в существующий домен AD
Прежде всего, нам нужно установить роль Active Directory Domain Services на сервере, который будет новым DC.
Установка роли ADDS
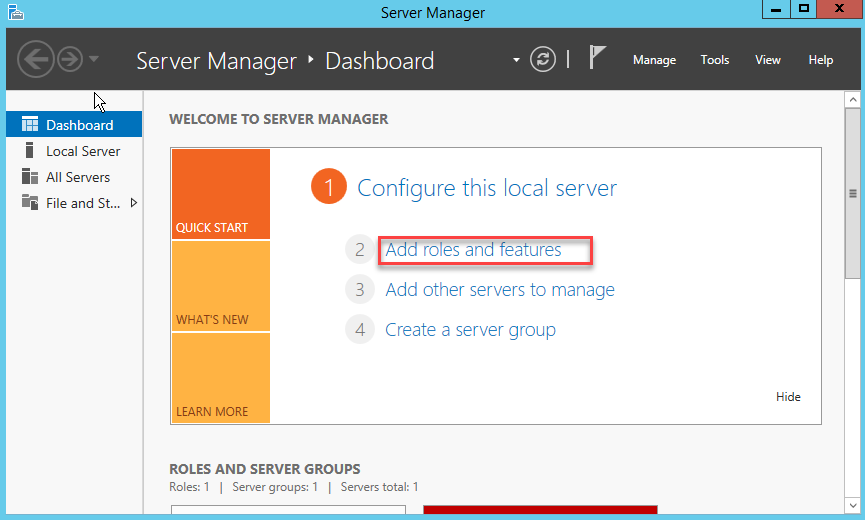
Прежде всего, откройте консоль Server Manager. Когда откроется Server Manager, нажмите «Add roles and features», чтобы открыть консоль установки ролей сервера.
Пропустите страницу «Before you Begin». Выберите «Role-based or featured-based installation» нажмите кнопку «Next». На странице «Server Selection» снова нажмите кнопку «Next».
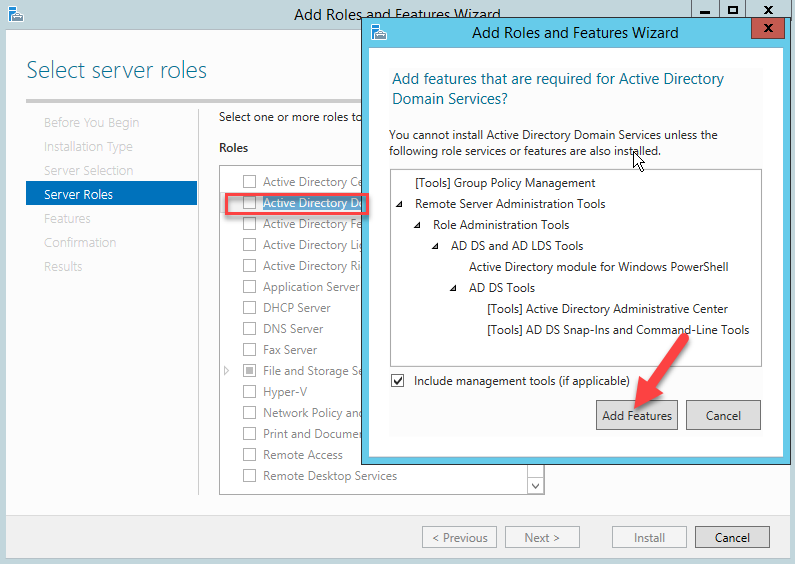
Выберите роль Active Directory Domain Services. В открывшемся окне нажмите кнопку «Add Features», чтобы добавить необходимые инструменты управления Active Directory Management Tools.
Когда процесс установки будет завершен, перезагрузите сервер, войдите в систему под администратором и выполните следующие действия.
Настройка дополнительного контроллера домена
Теперь в мастере установки ролей нажмите ссылку «Promote this server to a domain controller».

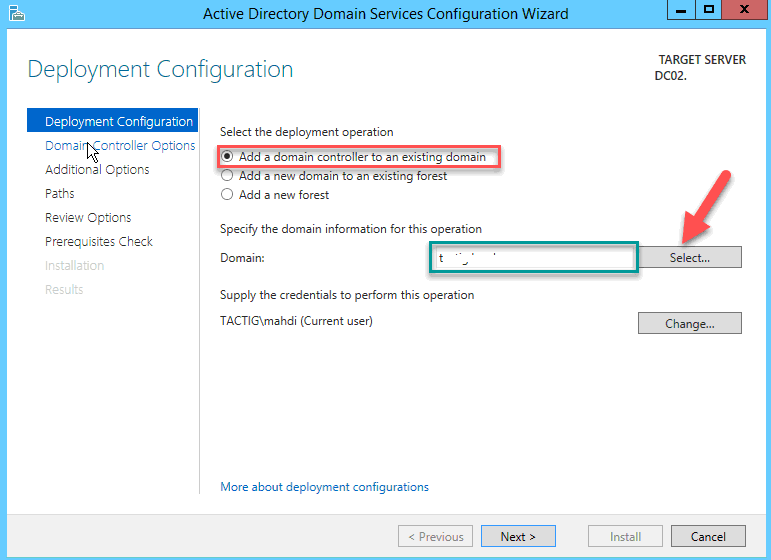
Выберите «Add a domain controller to an existing domain», ниже укажите имя вашего домена AD. Если вы авторизованы под обычным пользователем, вы можете изменить учетные данные на администратора домена. Нажмите кнопку «Select», откроется новое окно, выберите имя вашего домена и нажмите «Ok», затем «Next».
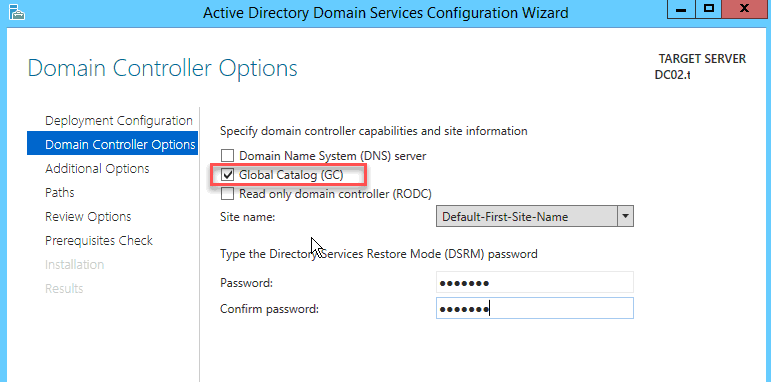
На странице Domain Controller Options, можно выбрать, что нужно установить роль DNS-сервера на вашем DC. Также выберите роль Global Catalog. Введите пароль администратора для режима DSRM и подтвердите его, затем нажмите кнопку «Next».
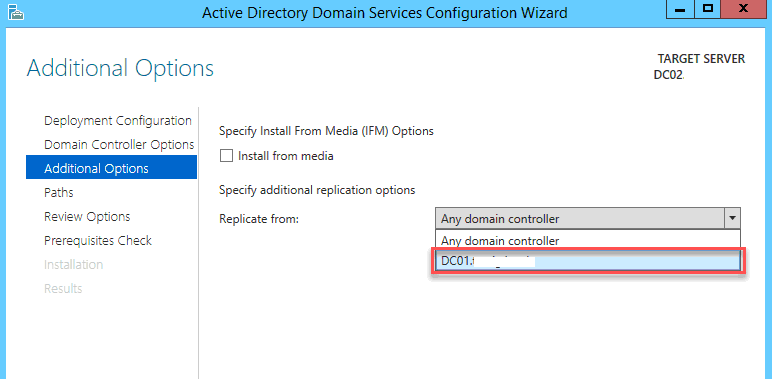
На странице Additional options укажите сервер, с которым вы хотите выполнить первоначальную репликацию базы Active Directory ( с указанного сервера будет скопирована схема и все объекты каталога AD). Вы можете сделать снимок (snapshot) текущего состояния Active Directory на одном из контроллеров домена и применить его на новой машине. После этого база AD этого сервера будет представлять собой точную копию имеющегося контроллера домена. Подробнее о функции Install From Media (IFM) – установки нового DC с носителя в одной из следующих статей (https://vmblog.ru/razvertyvanie-kontrollera-domena-s-pomoshhyu-install-from-media-ifm/):
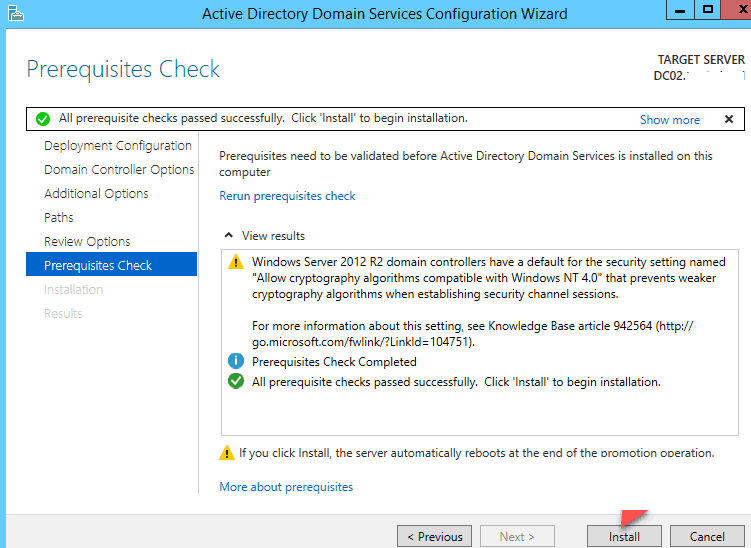
На страницах «Paths and Review options» нам ничего не придется настраивать, пропустите их, нажав кнопку «Next». На странице «Prerequisite», если вы видите какую-либо ошибку, проверьте и выполните все указанные требования, затем нажмите кнопку «Install».
Настройка репликации между новым и имеющимся контроллером домена
Мы почти закончили, теперь проверим и запустим репликацию между первичным DC (DC01.vmblog.ru) и новым DC (DC02.vmblog.ru). При копировании информации между этими двумя контроллерами домена данные базы Active Directory будут скопированы из DC01.vmblog.ru в DC02.vmblog.ru. После завершения процесса все данные корневого контроллера домена появятся на новом контроллере домена.
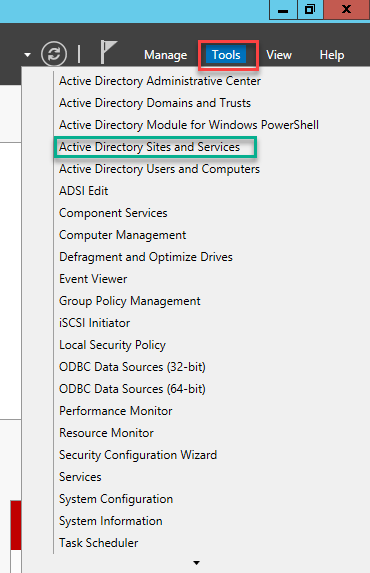
В «Server Manager» выберите вкладку «Tools» затем пункт «Active directory sites and services».
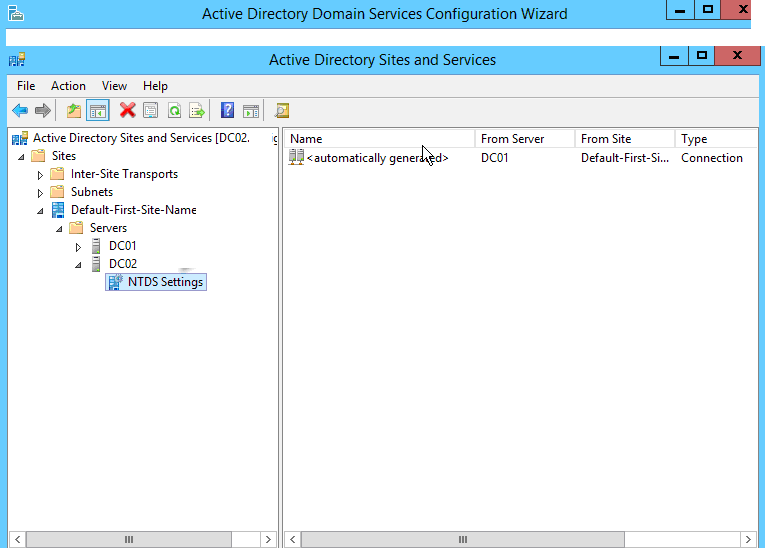
В левой панели разверните вкладку Sites -> Default-First-Site-Name -> Servers. Оба новых DC находятся в одном сайте AD (это подразумевает, что они находятся в одной подсети, либо сетях, соединенных высокоскоростным каналом связи). Затем выберите имя текущего сервера, на котором вы сейчас работаете, затем нажмите «NTDS Settings». В моем случае DC01 является корневым контроллером домена, в данный момент консоль запущена на DC02, который будет дополнительным контроллером домена.
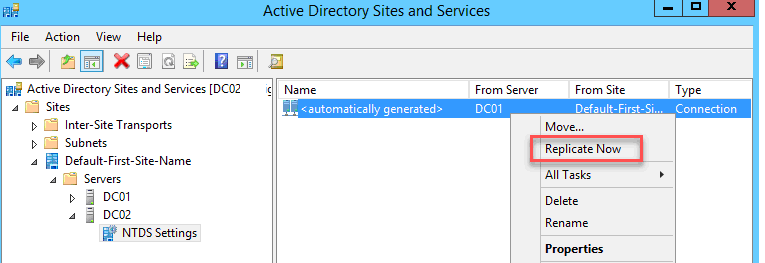
Щелкните правой кнопкой мыши по элементу с именем «automatically generated». Нажмите «Replicate now». Появится предупреждение о запуске репликации между корневым контроллером домена и новым контроллером домена.
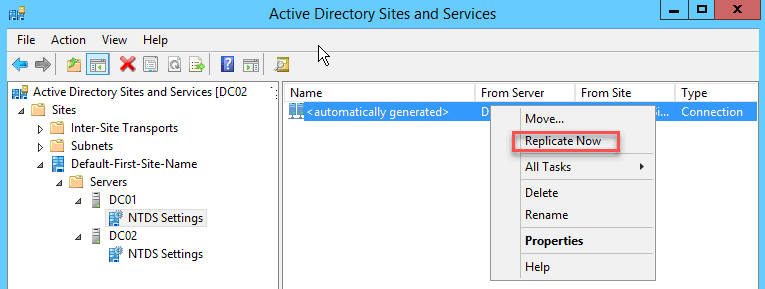
Сделайте то же самое для DC01. Разверните вкладку DC01 и нажмите «NTDS Settings». Щелкните правой кнопкой мыши на «automatically generated», затем нажмите «Replicate now». Оба сервера реплицируются друг с другом, и все содержимое DC01 будет скопировано в DC02.
Итак, мы закончили! Вы успешно добавили новый DC и принудительно запустили репликацию между двумя контроллерами домена.
Upgrade Domain Controllers to Windows Server 2016
Applies To: Windows Server
This topic provides background information about Active Directory Domain Services in Windows Server 2016 and explains the process for upgrading domain controllers from Windows Server 2012 or Windows Server 2012 R2.
Pre-requisites
The recommended way to upgrade a domain is to promote domain controllers that run newer versions of Windows Server and demote the older domain controllers as needed. That method is preferable to upgrading the operating system of an existing domain controller. This list covers general steps to follow before you promote a domain controller that runs a newer version of Windows Server:
- Verify the target server meets system requirements.
- Verify Application compatibility.
- Review Recommendations for moving to Windows Server 2016
- Verify security settings. For more information, see Deprecated features and behavior changes related to AD DS in Windows Server 2016.
- Check connectivity to the target server from the computer where you plan to run the installation.
- Check for availability of necessary operation master roles:
- To install the first DC that runs Windows Server 2016 in an existing domain and forest, the machine where you run the installation needs connectivity to the schema master in order to run adprep /forestprep and the infrastructure master in order to run adprep /domainprep.
- To install the first DC in a domain where the forest schema is already extended, you only need connectivity to the infrastructure master.
- To install or remove a domain in an existing forest, you need connectivity to the domain naming master.
- Any domain controller installation also requires connectivity to the RID master.
- If you are installing the first read-only domain controller in an existing forest, you need connectivity to the infrastructure master for each application directory partition, also known as a non-domain naming context or NDNC.
Installation steps and required administrative levels
The following table provides a summary of the upgrade steps and the permission requirements to accomplish these steps
| Installation action | Credential requirements |
|---|---|
| Install a new forest | Local Administrator on the target server |
| Install a new domain in an existing forest | Enterprise Admins |
| Install an additional DC in an existing domain | Domain Admins |
| Run adprep /forestprep | Schema Admins, Enterprise Admins, and Domain Admins |
| Run adprep /domainprep | Domain Admins |
| Run adprep /domainprep /gpprep | Domain Admins |
| Run adprep /rodcprep | Enterprise Admins |
For additional information on new features in Windows Server 2016, see What’s new in Windows Server 2016.
Supported in-place upgrade paths
Domain controllers that run 64-bit versions of Windows Server 2012 or Windows Server 2012 R2 can be upgraded to Windows Server 2016. Only 64-bit version upgrades are supported because Windows Server 2016 only comes in a 64-bit version.
| If you are running this edition: | You can upgrade to these editions: |
|---|---|
| Windows Server 2012 Standard | Windows Server 2016 Standard or Datacenter |
| Windows Server 2012 Datacenter | Windows Server 2016 Datacenter |
| Windows Server 2012 R2 Standard | Windows Server 2016 Standard or Datacenter |
| Windows Server 2012 R2 Datacenter | Windows Server 2016 Datacenter |
| Windows Server 2012 R2 Essentials | Windows Server 2016 Essentials |
| Windows Storage Server 2012 Standard | Windows Storage Server 2016 Standard |
| Windows Storage Server 2012 Workgroup | Windows Storage Server 2016 Workgroup |
| Windows Storage Server 2012 R2 Standard | Windows Storage Server 2016 Standard |
| Windows Storage Server 2012 R2 Workgroup | Windows Storage Server 2016 Workgroup |
For more information about supported upgrade paths, see Supported Upgrade Paths
Adprep and Domainprep
If you are doing an in-place upgrade of an existing domain controller to the Windows Server 2016 operating system, you will need to run adprep /forestprep and adprep /domainprep manually. Adprep /forestprep needs to be run only once in the forest. Adprep /domainprep needs to be run once in each domain in which you have domain controllers that you are upgrading to Windows Server 2016.
If you are promoting a new Windows Server 2016 server you do not need to run these manually. These are integrated into the PowerShell and Server Manager experiences.
For more information on running adprep see Running Adprep
Functional level features and requirements
Windows Server 2016 requires a Windows Server 2003 forest functional level. That is, before you can add a domain controller that runs Windows Server 2016 to an existing Active Directory forest, the forest functional level must be Windows Server 2003 or higher. If the forest contains domain controllers running Windows Server 2003 or later but the forest functional level is still Windows 2000, the installation is also blocked.
Windows 2000 domain controllers must be removed prior to adding Windows Server 2016 domain controllers to your forest. In this case, consider the following workflow:
- Install domain controllers that run Windows Server 2003 or later. These domain controllers can be deployed on an evaluation version of Windows Server. This step also requires running adprep.exe for that operating system release as a prerequisite.
- Remove the Windows 2000 domain controllers. Specifically, gracefully demote or forcibly remove Windows Server 2000 domain controllers from the domain and used Active Directory Users and Computers to remove the domain controller accounts for all removed domain controllers.
- Raise the forest functional level to Windows Server 2003 or higher.
- Install domain controllers that run Windows Server 2016.
- Remove domain controllers that run earlier versions of Windows Server.
Rolling back functional levels
After you set the forest functional level (FFL) to a certain value, you cannot roll back or lower the forest functional level, with the following exceptions:
- If you are upgrading from Windows Server 2012 R2 FFL, you can lower it back to Windows Server 2012 R2.
- If you are upgrading from Windows Server 2008 R2 FFL, you can lower it back to Windows Server 2008 R2.
After you set the domain functional level to a certain value, you cannot roll back or lower the domain functional level, with the following exceptions:
- When you raise the domain functional level to Windows Server 2016 and if the forest functional level is Windows Server 2012 or lower, you have the option of rolling the domain functional level back to Windows Server 2012 or Windows Server 2012 R2.
For more information about features that are available at lower functional levels, see Understanding Active Directory Domain Services (AD DS) Functional Levels.
AD DS interoperability with other server roles and Windows operating systems
AD DS is not supported on the following Windows operating systems:
- Windows MultiPoint Server
- Windows Server 2016 Essentials
AD DS cannot be installed on a server that also runs the following server roles or role services:
- Microsoft Hyper-V Server 2016
- Remote Desktop Connection Broker
Administration of Windows Server 2016 servers
Use the Remote Server Administration Tools for Windows 10 to manage domain controllers and other servers that run Windows Server 2016. You can run the Windows Server 2016 Remote Server Administration Tools on a computer that runs Windows 10.
Step-by-Step for Upgrading to Windows Server 2016
The following is a simple example of upgrading the Contoso forest from Windows Server 2012 R2 to Windows Server 2016.

Join the new Windows Server 2016 to your forest. Restart when prompted.
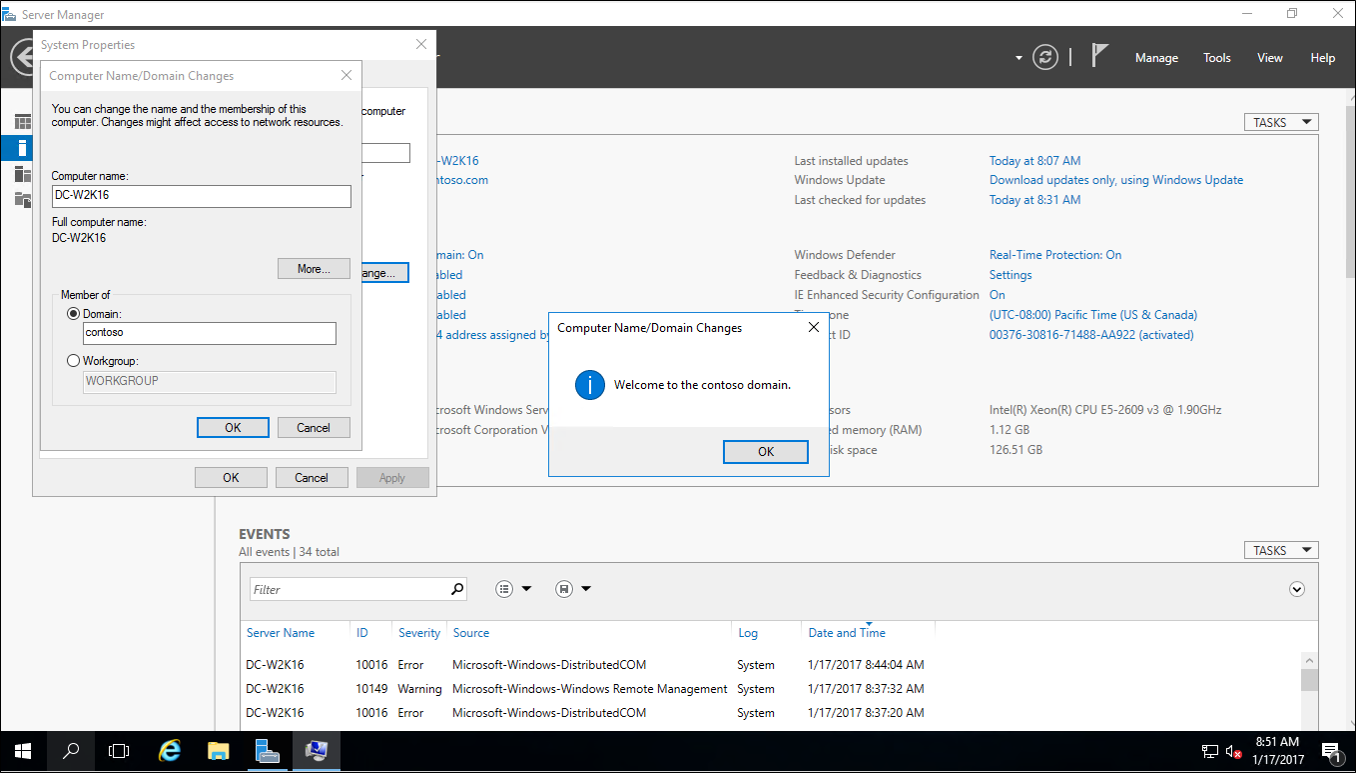
Sign in to the new Windows Server 2016 with a domain admin account.
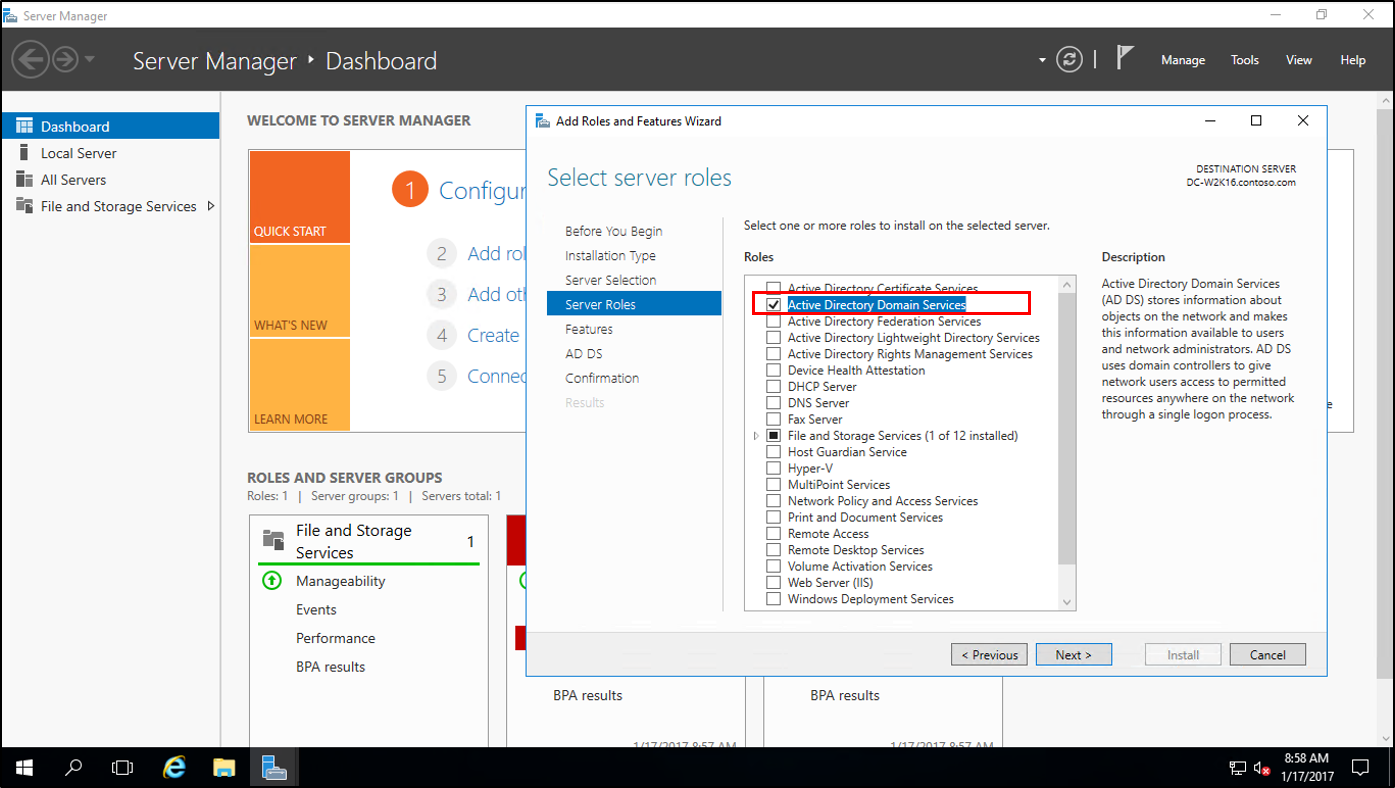
In Server Manager, under Add Roles and Features, install Active Directory Domain Services on the new Windows Server 2016. This will automatically run adprep on the 2012 R2 forest and domain.
In Server Manager, click the yellow triangle, and from the drop-down click Promote the server to a domain controller.

On the Deployment Configuration screen, select Add a domain controller to an existing forest and click next.

On the Domain Controller options screen, enter the Directory Services Restore Mode (DSRM) password and click next.
For the remainder of the screens click Next.
On the Prerequisite Check screen, click install. Once the restart has completed you can sign back in.
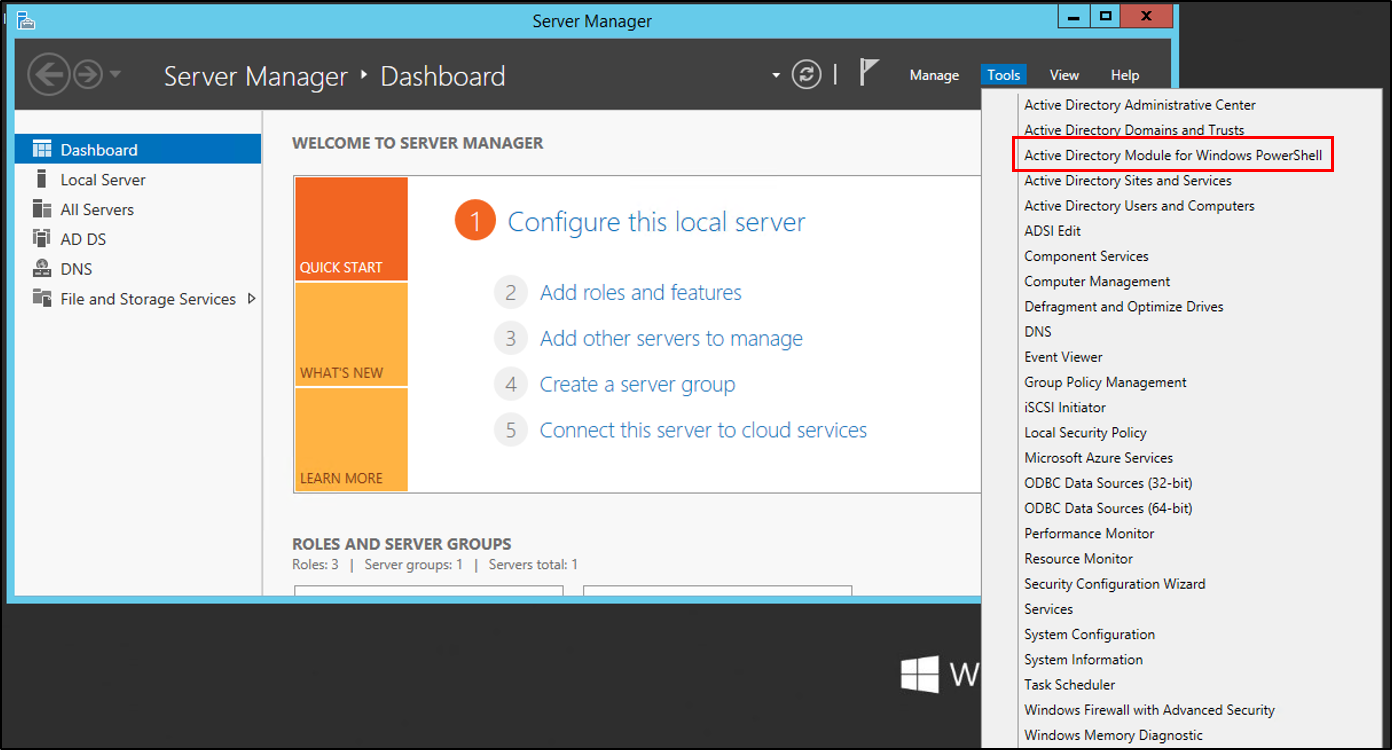
On the Windows Server 2012 R2 server, in Server Manager, under tools, select Active Directory Module for Windows PowerShell.
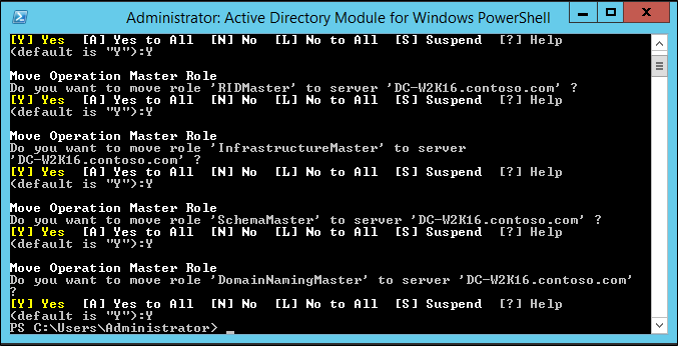
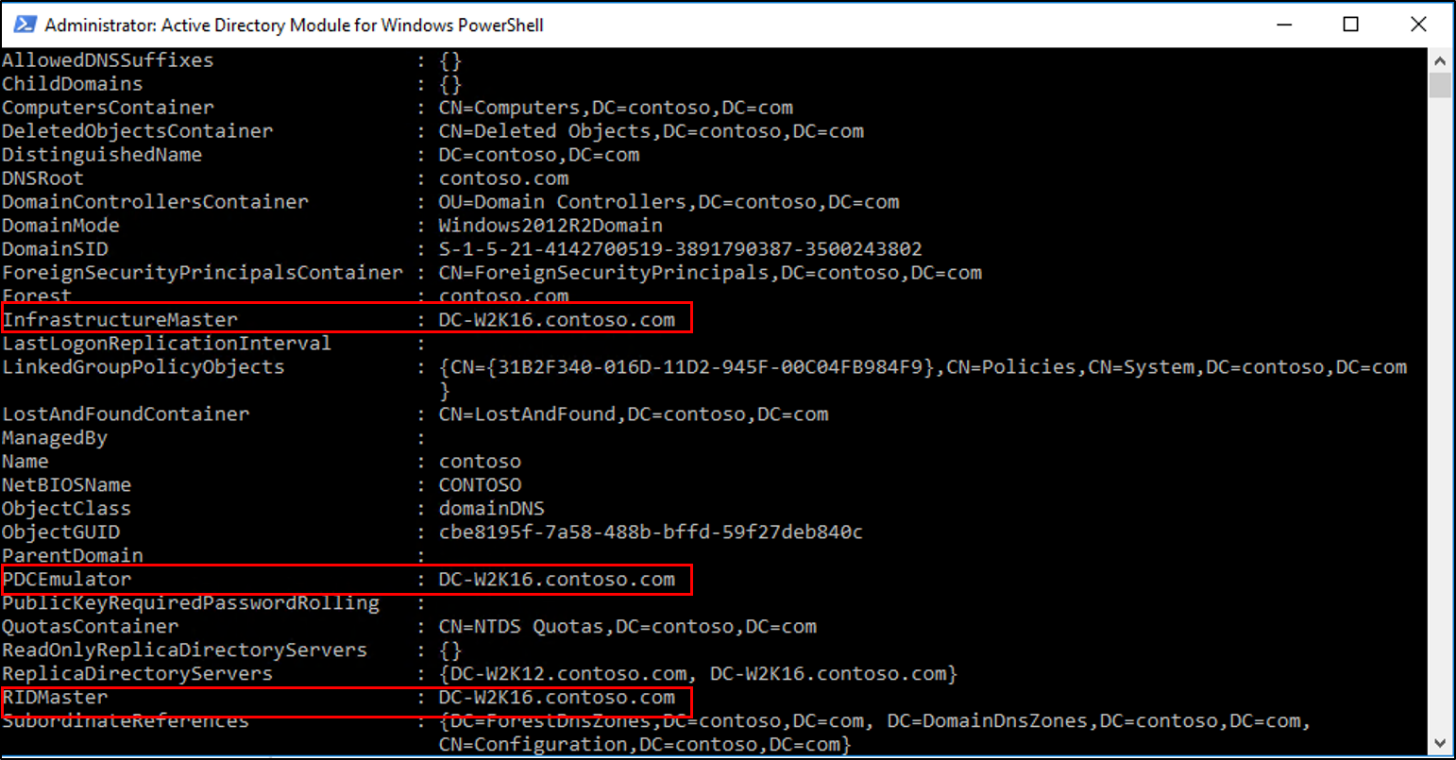
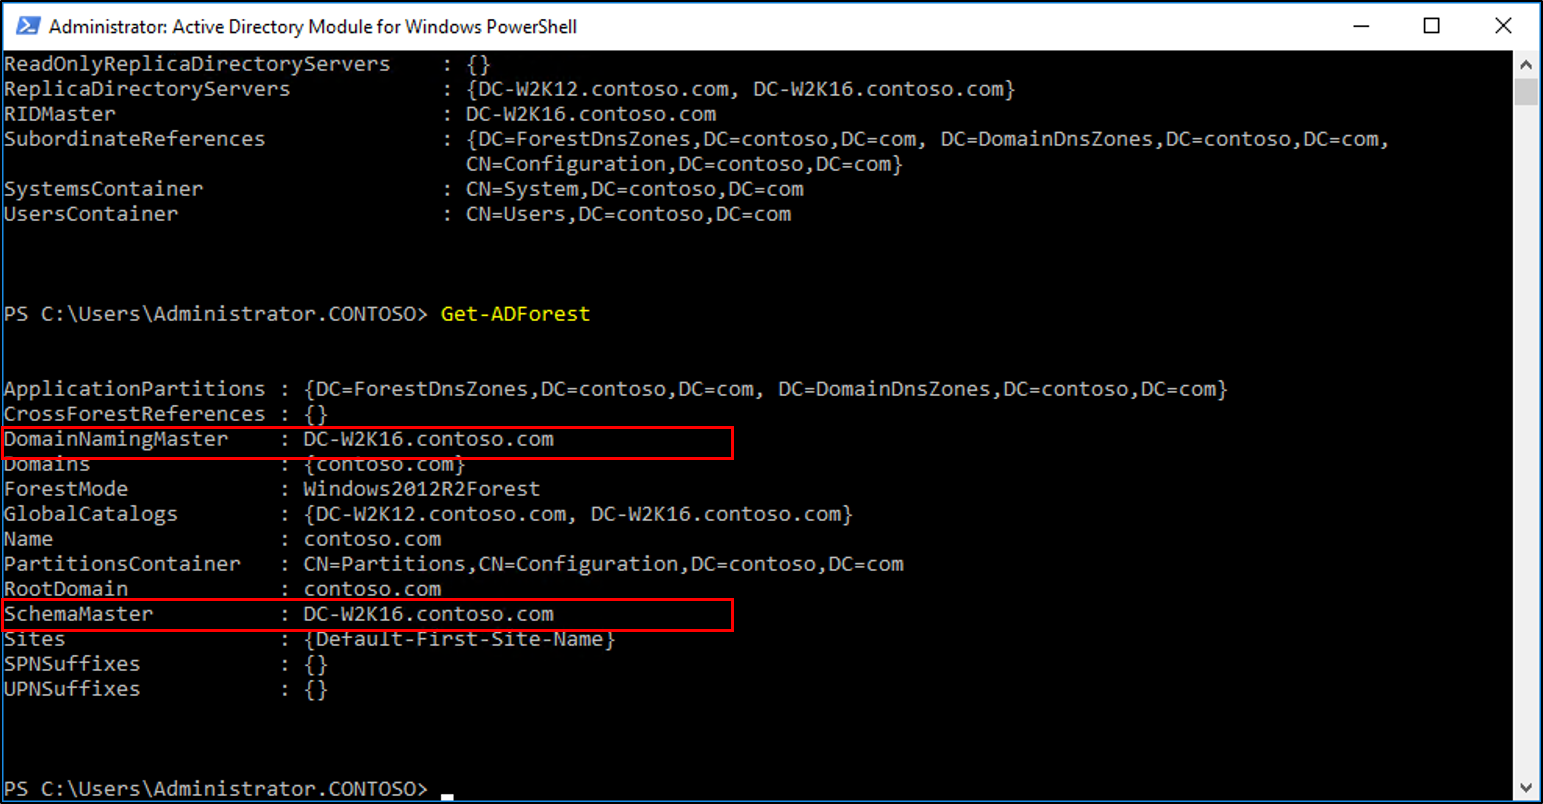
In the PowerShell windows use the Move-ADDirectoryServerOperationMasterRole to move the FSMO roles. You can type the name of each -OperationMasterRole or use numbers to specify the roles. For more information see Move-ADDirectoryServerOperationMasterRole
Verify the roles have been moved by going to the Windows Server 2016 server, in Server Manager, under tools, select Active Directory Module for Windows PowerShell. Use the Get-ADDomain and Get-ADForest cmdlets to view the FSMO role holders.
Demote and remove the Windows Server 2012 R2 domain controller. For information on demoting a dc, see Demoting Domain Controllers and Domains
Once the server is demoted and removed you can raise the forest functional and domain functional levels to Windows Server 2016.


