- Remote Server Administration Tools (RSAT) for Windows
- Introduction
- Download locations for RSAT
- RSAT for Windows 10 platform and tools support matrix
- RSAT for Windows 10, version 1809 or later versions
- Администрирование сервера Server Core Administer a Server Core server
- Задачи администрирования с помощью командлетов PowerShell Administrative tasks using PowerShell cmdlets
- Настройка статического IP-адреса Set a static IP address
- Присоединить к домену Join a domain
- Изменение имени сервера Rename the server
- Активация сервера Activate the server
- Настройка брандмауэра Windows Configure Windows Firewall
- Разрешение удаленного взаимодействия с Windows PowerShell Enable Windows PowerShell remoting
- Задачи администрирования из командной строки Administrative tasks from the command line
- Настройка и установка Configuration and installation
- Сеть и брандмауэр Networking and firewall
Remote Server Administration Tools (RSAT) for Windows
RSAT enables IT administrators to remotely manage roles and features in Windows Server from a computer that is running Windows 10 and Windows 7 Service Pack 1.
Original product version: В Windows 10, version 1909, Windows 10, version 1903, Windows 10, version 1809, Windows 7 Service Pack 1, Windows Server 2019, Windows Server 2012 R2
Original KB number: В 2693643
Introduction
You can’t install RSAT on computers that are running Home or Standard editions of Windows. You can install RSAT only on Professional or Enterprise editions of the Windows client operating system. Unless the download page specifically states that RSAT applies to a beta, preview, or other prerelease version of Windows, you must be running a full (RTM) release of the Windows operating system to install and use RSAT. Some users have found ways of manually cracking or hacking the RSAT MSU to install RSAT on unsupported releases or editions of Windows. This behavior is a violation of the Windows end-user license agreement.
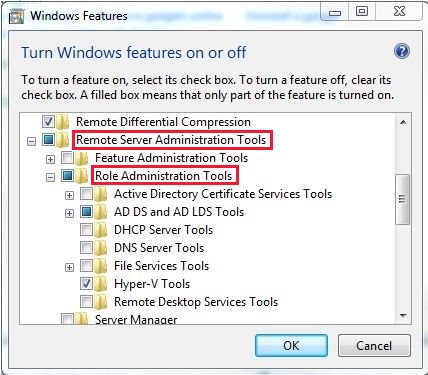
Installing RSAT is similar to installing Adminpak.msi in Windows 2000-based or Windows XP-based client computers. However, there’s one major difference: in Windows 7, the tools aren’t automatically available after you download and install RSAT. Enable the tools that you want to use by using Control Panel. To enable the tools, click Start, click Control Panel, click Programs and Features, and then click Turn Windows features on or off.
In the RSAT releases for Windows 10, tools are again all enabled by default. You can open Turn Windows features on or off to disable tools that you don’t want to use for Windows 7.

For RSAT in Windows 7, you must enable the tools for the roles and features that you want to manage after you run the downloaded installation package.
You can’t do the following changes for RSAT in Windows 8 or later versions.
If you have to install management tools in Windows Server 2012 R2 for specific roles or features that are running on remote servers, you don’t have to install additional software. Start the Add Roles and Features Wizard in Windows Server 2012 R2 and later versions. Then, on the Select Features page, expand Remote Server Administration Tools, and then select the tools that you want to install. Complete the wizard to install your management tools.

Download locations for RSAT
RSAT for Windows 10 platform and tools support matrix
| Remote Server Administration Tools Technology | Description | Manages technology in Windows Server 2012 R2 | Manages technology in Windows Server 2016 Technical Preview and Windows Server 2012 R2 |
|---|---|---|---|
| Active Directory Certificate Services (AD CS) tools | AD CS tools include the Certification Authority, Certificate Templates, Enterprise PKI, and Online Responder Management snap-ins. | в€љ | в€љ |
| Active Directory Domain Services (AD DS) tools and Active Directory Lightweight Directory Services (AD LDS) tools | AD DS and AD LDS tools include the following tools: |
— Active Directory Administrative Center
— Active Directory Domains and Trusts
— Active Directory Sites and Services
— Active Directory Users and Computers
— ADSI Edit
— Active Directory module for Windows PowerShell
— Tools such as
- DCPromo.exe
- LDP.exe
- NetDom.exe
- NTDSUtil.exe
- RepAdmin.exe
- DCDiag.exe
- DSACLs.exe
- DSAdd.exe
- DSDBUtil.exe
- DSMgmt.exe
- DSMod.exe
- DSMove.exe
- DSQuery.exe
- DSRm.exe
- GPFixup.exe
- KSetup.exe
- NlTest.exe
- NSLookup.exe
- W32tm.exe
— Connection Manager Administration Kit console
— Remote Access provider for Windows PowerShell
— Web Application Proxy
GUI tools support Windows Server 2016 Technical Preview and Windows Server 2012 R2. Only PowerShell tools work in Windows Server 2012.
— Share and Storage Management tools
— Distributed File System tools
- The DFS Management snap-in
- The Dfsradmin.exe , Dfsrdiag.exe , Dfscmd.exe , Dfsdiag.exe , and Dfsutil.exe command-line tools
- PowerShell modules for DFSN and DFSR
— File Server Resource Manager tools
- The File Server Resource Manager snap-in
- The Dirquota.exe , Filescrn.exe , and Storrept.exe command-line tools.
— Services for NFS Administration tools
— iSCSI management cmdlets for Windows PowerShell
— Work Folders Management tools
The Share and Storage Management snap-in is deprecated after the release of Windows Server 2016. Storage Replica is new in Windows Server 2016 Technical Preview, and won’t work in Windows Server 2012 R2.
Group Policy has some new features in Windows Server 2016 Technical Preview that aren’t available on older operating systems.
IPAM tools in Remote Server Administration Tools for Windows 10 can’t be used to manage IPAM running in Windows Server 2012 R2.
IPAM tools in Remote Server Administration Tools for Windows 10 can’t be used to manage IPAM running in Windows Server 2012 R2.
— Remote Desktop snap-ins
— RD Gateway Manager
— tsgateway.msc
— RD Licensing Manager
— licmgr.exe
— RD Licensing Diagnoser
— lsdiag.msc
Use Server Manager to administer all other RDS role services except RD Gateway and RD Licensing.
Remote management with Server Manager is available in Windows Server 2016 Technical Preview, Windows Server 2012 R2, and Windows Server 2012.
WSRM has been deprecated in Windows Server 2012 R2. Tools for managing WSRM aren’t available in RSAT for Windows 8.1 and later releases of RSAT.
RSAT for Windows 10, version 1809 or later versions
You can’t use the Turn Windows features on and off dialog from the Control Panel
Installing the RSAT Tools for Windows 10 version 1809 and later version is slightly different from earlier versions. RSAT is now part of the Operating System an can be installed via Optional Features.
To enable the tools, click Start, click Settings, click Apps, and then click Optional features, after that click on the panel Add a feature and enter Remote in the search bar.
Администрирование сервера Server Core Administer a Server Core server
Область применения: Windows Server 2019, Windows Server 2016 и Windows Server (половина ежегодного канала) Applies to: Windows Server 2019, Windows Server 2016, and Windows Server (Semi-Annual Channel)
Поскольку серверное ядро не имеет пользовательского интерфейса, для выполнения основных задач администрирования необходимо использовать командлеты Windows PowerShell, средства командной строки или средства удаленного управления. Because Server Core doesn’t have a UI, you need to use Windows PowerShell cmdlets, command line tools, or remote tools to perform basic administration tasks. В следующих разделах описаны командлеты и команды PowerShell, используемые для основных задач. The following sections outline the PowerShell cmdlets and commands used for basic tasks. Для администрирования установки можно также использовать центр администрирования Windows— единый портал управления, находящиеся в общедоступной предварительной версии. You can also use Windows Admin Center, a unified management portal currently in public preview, to administer your installation.
Задачи администрирования с помощью командлетов PowerShell Administrative tasks using PowerShell cmdlets
Используйте следующие сведения для выполнения основных задач администрирования с помощью командлетов Windows PowerShell. Use the following information to perform basic administrative tasks with Windows PowerShell cmdlets.
Настройка статического IP-адреса Set a static IP address
При установке сервера Server Core по умолчанию он имеет адрес DHCP. When you install a Server Core server, by default it has a DHCP address. Если вам нужен статический IP-адрес, его можно задать, выполнив следующие действия. If you need a static IP address, you can set it using the following steps.
Чтобы просмотреть текущую конфигурацию сети, используйте Get-нетипконфигуратион. To view your current network configuration, use Get-NetIPConfiguration.
Чтобы просмотреть IP-адреса, которые вы уже используете, используйте Get-нетипаддресс. To view the IP addresses you’re already using, use Get-NetIPAddress.
Чтобы задать статический IP-адрес, выполните следующие действия. To set a static IP address, do the following:
Выполните команду Get-нетипинтерфаце. Run Get-NetIPInterface.
Обратите внимание на число в столбце ifindex для IP-интерфейса или строки интерфацедескриптион . Note the number in the IfIndex column for your IP interface or the InterfaceDescription string. При наличии нескольких сетевых адаптеров Обратите внимание на число или строку, соответствующие интерфейсу, для которого нужно задать статический IP-адрес. If you have more than one network adapter, note the number or string corresponding to the interface you want to set the static IP address for.
Выполните следующий командлет, чтобы задать статический IP-адрес: Run the following cmdlet to set the static IP address:
- InterfaceIndex — это значение ifindex из шага 2. InterfaceIndex is the value of IfIndex from step 2. (В нашем примере — 12) (In our example, 12)
- IPAddress — это статический IP-адрес, который вы хотите задать. IPAddress is the static IP address you want to set. (В нашем примере это 191.0.2.2) (In our example, 191.0.2.2)
- PrefixLength — это длина префикса (другая форма маски подсети) для НАСТРОЕННОГО IP-адреса. PrefixLength is the prefix length (another form of subnet mask) for the IP address you’re setting. (Для нашего примера — 24) (For our example, 24)
- DefaultGateway — это IP-адрес шлюза по умолчанию. DefaultGateway is the IP address to the default gateway. (В нашем примере это 192.0.2.1) (For our example, 192.0.2.1)
Выполните следующий командлет, чтобы задать адрес сервера клиента DNS: Run the following cmdlet to set the DNS client server address:
- InterfaceIndex — это значение ifindex из шага 2. InterfaceIndex is the value of IfIndex from step 2.
- Сервераддрессес — это IP-адрес DNS-сервера. ServerAddresses is the IP address of your DNS server.
Чтобы добавить несколько DNS-серверов, выполните следующий командлет: To add multiple DNS servers, run the following cmdlet:
в этом примере 192.0.2.4 и 192.0.2.5 являются IP-адресами DNS-серверов. where, in this example, 192.0.2.4 and 192.0.2.5 are both IP addresses of DNS servers.
Если необходимо переключиться на использование DHCP, выполните команду Set-днсклиентсервераддресс – InterfaceIndex 12 – ресетсервераддрессес. If you need to switch to using DHCP, run Set-DnsClientServerAddress –InterfaceIndex 12 –ResetServerAddresses.
Присоединить к домену Join a domain
Используйте следующие командлеты для приподключения компьютера к домену. Use the following cmdlets to join a computer to a domain.
Запустите Add-Computer. Run Add-Computer. Вам будет предложено ввести оба учетных данных для приподключения к домену и доменному имени. You’ll be prompted for both credentials to join the domain and the domain name.
Если необходимо добавить учетную запись пользователя домена в группу локальных администраторов, выполните следующую команду в командной строке (не в окне PowerShell): If you need to add a domain user account to the local Administrators group, run the following command at a command prompt (not in the PowerShell window):
Перезагрузите компьютер. Restart the computer. Это можно сделать, запустив Restart-Computer. You can do this by running Restart-Computer.
Изменение имени сервера Rename the server
Чтобы переименовать сервер, выполните следующие действия. Use the following steps to rename the server.
- Определите текущее имя сервера с помощью команды » HostName » или » ipconfig «. Determine the current name of the server with the hostname or ipconfig command.
- Выполните команду Rename-Computer -ComputerName. Run Rename-Computer -ComputerName .
- Перезагрузите компьютер. Restart the computer.
Активация сервера Activate the server
Запустите slmgr.vbs — ИПК
. Run slmgr.vbs –ipk
. Затем запустите slmgr.vbs — ATO. Then run slmgr.vbs –ato. Если активация прошла удачно, сообщение не будет получено. If activation succeeds, you won’t get a message.
Вы также можете активировать сервер по телефону, используя сервер службы управления ключами (KMS)или удаленно. You can also activate the server by phone, using a Key Management Service (KMS) server, or remotely. Для удаленной активации выполните следующий командлет с удаленного компьютера: To activate remotely, run the following cmdlet from a remote computer:
Настройка брандмауэра Windows Configure Windows Firewall
Брандмауэр Windows на компьютере с основными серверными компонентами можно настроить локально, используя командлеты и сценарии Windows PowerShell. You can configure Windows Firewall locally on the Server Core computer using Windows PowerShell cmdlets and scripts. Командлеты, которые можно использовать для настройки брандмауэра Windows, см. в разделе NetSecurity . See NetSecurity for the cmdlets you can use to configure Windows Firewall.
Разрешение удаленного взаимодействия с Windows PowerShell Enable Windows PowerShell remoting
Можно разрешить удаленное взаимодействие с Windows PowerShell, при котором команды Windows PowerShell, введенные на одном компьютере, выполняются на другом компьютере. You can enable Windows PowerShell Remoting, in which commands typed in Windows PowerShell on one computer run on another computer. Включите удаленное взаимодействие Windows PowerShell с помощью Enable-PSRemoting. Enable Windows PowerShell Remoting with Enable-PSRemoting.
Дополнительные сведения см. в статье об удаленном решении вопросов и ответов. For more information, see About Remote FAQ.
Задачи администрирования из командной строки Administrative tasks from the command line
Используйте следующие справочные сведения для выполнения административных задач из командной строки. Use the following reference information to perform administrative tasks from the command line.
Настройка и установка Configuration and installation
| Задача Task | Get-Help Command |
|---|---|
| Установка локального пароля администратора Set the local administrative password | администратор пользователей сети* net user administrator * |
| Присоединение компьютера к домену Join a computer to a domain | netdom join% ComputerName% /Domain: /усерд: /пассвордд:* netdom join %computername% /domain: /userd: /passwordd:* Перезагрузите компьютер. Restart the computer. |
| Подтверждение изменения домена Confirm that the domain has changed | set set |
| Удаление компьютера из домена Remove a computer from a domain | Netdom Remove netdom remove |
| Добавление пользователя в локальную группу администраторов Add a user to the local Administrators group | net localgroup «Администраторы»/Add net localgroup Administrators /add |
| Удаление пользователя из локальной группы администраторов Remove a user from the local Administrators group | net localgroup «Администраторы»/Delete net localgroup Administrators /delete |
| Добавление пользователя на локальный компьютер Add a user to the local computer | NET User * /Add net user * /add |
| Добавление группы на локальный компьютер Add a group to the local computer | net localgroup /Add net localgroup /add |
| Изменение имени компьютера в домене Change the name of a domain-joined computer | netdom ренамекомпутер% ComputerName%/newname.: /усерд: /пассвордд:* netdom renamecomputer %computername% /NewName: /userd: /passwordd: * |
| Подтверждение нового имени компьютера Confirm the new computer name | set set |
| Изменение имени компьютера в рабочей группе Change the name of a computer in a work group | Netdom ренамекомпутер /newname.: netdom renamecomputer /NewName: Перезагрузите компьютер. Restart the computer. |
| Запрет управления файлом подкачки Disable paging file management | WMIC ComputerSystem, где name = » » Set аутоматикманажедпажефиле = false wmic computersystem where name=» » set AutomaticManagedPagefile=False |
| Конфигурация файла подкачки Configure the paging file | WMIC пажефилесет WHERE Name = « |
» Set инитиалсизе = , MaximumSize = wmic pagefileset where name=”
” set InitialSize= ,MaximumSize=
Где путь/имя файла — это путь к файлу подкачки и его имя, инитиалсизе — это начальный размер файла подкачки в байтах, а параметр MAXSIZE — максимальный размер страничного файла в байтах. Where path/filename is the path to and name of the paging file, initialsize is the starting size of the paging file, in bytes, and maxsize is the maximum size of the page file, in bytes.
Запишите соответствующие сведения или перенаправьте их в текстовый файл (ipconfig/all >ipconfig.txt). Record the relevant information or redirect it to a text file (ipconfig /all >ipconfig.txt).
Интерфейс Netsh интерфейса IPv4 показывать интерфейсы netsh interface ipv4 show interfaces
Убедитесь в наличии списка интерфейсов. Verify that there is an interface list.
netsh interface IPv4 Set адрес источник = статический адрес =
шлюз =
netsh interface ipv4 set address source=static address=gateway=
Выполните команду ipconfig/all , чтобы убедиться, что параметр DHCP включен в значение нет. Run ipconfig /all to verify that DHCP enabled is set to No.
netsh interface IPv4 Add dnsserver Name = адрес = индекс = 2** netsh interface ipv4 add dnsserver name= address= index=2**
Повторите эти действия, чтобы добавить дополнительные серверы. Repeat as appropriate to add additional servers.
Выполните команду ipconfig/all , чтобы убедиться в правильности адресов. Run ipconfig /all to verify that the addresses are correct.
Выполните команду ipconfig/all , чтобы убедиться, что для параметра DCHP Enabled задано значение Да. Run ipconfig /all to verify that DCHP enabled is set to Yes.
slmgr.vbs –ipk
cscript slmgr.vbs –ipk
cscript slmgr.vbs — ATO
cscript slmgr.vbs -ato
Получите идентификатор GUID компьютера, выполнив cscript slmgr.vbs — Get the GUID of the computer by running cscript slmgr.vbs -did
Запуск cscript slmgr.vbs-dli Run cscript slmgr.vbs -dli
Убедитесь, что для состояния лицензии задано значение лицензировано (активировано). Verify that License status is set to Licensed (activated).
Сеть и брандмауэр Networking and firewall
| Задача Task | Get-Help Command |
|---|---|
| Настройка сервера для использования прокси-сервера Configure your server to use a proxy server | Netsh WinHTTP Set Proxy : |
netsh Winhttp set proxy :
Примечание. Установка основных серверных компонентов не может получить доступ к Интернету через прокси-сервер, для которого требуется пароль, чтобы разрешить подключения. Note: Server Core installations can’t access the Internet through a proxy that requires a password to allow connections.
обход-List = » «
netsh winhttp set proxy :


