- Тестирование на устройстве или эмуляторе Android Test on an Android device or emulator
- Запуск на реальном устройстве Android Run on a real Android device
- Подготовка устройства к разработке Enable your device for development
- Запуск приложения на устройстве Run your app on the device
- Запуск приложения на виртуальном устройстве Android с помощью эмулятора Run your app on a virtual Android device using an emulator
- Включить поддержку виртуализации Enable virtualization support
- Эмулятор для разработки машинного кода с Android Studio Emulator for native development with Android Studio
- Эмулятор для кросс-платформенной разработки с помощью Visual Studio Emulator for cross-platform development with Visual Studio
- Установка эмулятора Android с помощью Visual Studio Install Android emulator with Visual Studio
- Get started with the Android client
- Download the Remote Desktop client
- Add a Remote Desktop connection
- Add remote resources
- Remove remote resources
- Pin a connection to your home screen
- Manage general app settings
- Manage display settings
- Manage your RD Gateways
- Manage your user accounts
- Start a Remote Desktop connection
- Use the connection bar
- Use the session selection bar
- Use the command bar
- Touch gestures and mouse modes
- Join the Beta channel
Тестирование на устройстве или эмуляторе Android Test on an Android device or emulator
Существует несколько способов тестирования и отладки приложения Android с помощью реального устройства или эмулятора на компьютере Windows. There are several ways to test and debug your Android application using a real device or emulator on your Windows machine. В этом разделе описаны некоторые рекомендации. We have outlined a few recommendations in this guide.
Запуск на реальном устройстве Android Run on a real Android device
Чтобы запустить приложение на реальном устройстве Android, сначала необходимо включить устройство Android для разработки. To run your app on a real Android device, you will first need to enable your Android device for development. Параметры разработчика на Android были скрыты по умолчанию, начиная с версии 4,2, и их включение может варьироваться в зависимости от версии Android. Developer options on Android have been hidden by default since version 4.2 and enabling them can vary based on the Android version.
Подготовка устройства к разработке Enable your device for development
Для устройства под управлением последней версии Android 9.0 +: For a device running a recent version of Android 9.0+:
- Подключите устройство к компьютеру разработки Windows с помощью USB-кабеля. Connect your device to your Windows development machine with a USB cable. Вы можете получить уведомление для установки драйвера USB. You may receive a notification to install a USB driver.
- Откройте экран параметров на устройстве Android. Open the Settings screen on your Android device.
- Выберите о телефоне. Select About phone.
- Прокрутите вниз и коснитесь пункта номер сборки семь раз, пока вы не станете разработчиком! Scroll to the bottom and tap Build number seven times, until You are now a developer! . is visible.
- Вернитесь на предыдущий экран, выберите система. Return to the previous screen, select System.
- Выберите Дополнительно, прокрутите вниз и нажмите кнопку Параметры разработчика. Select Advanced, scroll to the bottom, and tap Developer options.
- В окне Параметры разработчика прокрутите вниз, чтобы найти и включить отладку по USB. In the Developer options window, scroll down to find and enable USB debugging.
Сведения об устройстве, на котором работает более старая версия Android, см. в разделе Настройка устройства для разработки. For a device running an older version of Android, see Set Up Device for Development.
Запуск приложения на устройстве Run your app on the device
На панели инструментов Android Studio выберите свое приложение в раскрывающемся меню Run Configurations (конфигурации запуска ). In the Android Studio toolbar, select your app from the run configurations drop-down menu.
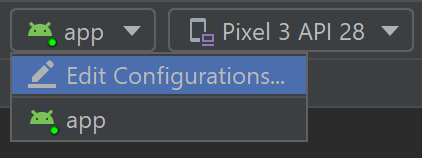
В раскрывающемся меню целевое устройство выберите устройство, на котором требуется запустить приложение. From the target device drop-down menu, select the device that you want to run your app on.

Выберите запустить ▷. Select Run ▷. Это приведет к запуску приложения на подключенном устройстве. This will launch the app on your connected device.
Запуск приложения на виртуальном устройстве Android с помощью эмулятора Run your app on a virtual Android device using an emulator
Первое, что нужно узнать о запуске эмулятора Android на компьютере Windows, это то, что независимо от интегрированной среды разработки (Android Studio, Visual Studio и т. д.) производительность эмулятора значительно улучшена за счет поддержки виртуализации. The first thing to know about running an Android emulator on your Windows machine is that regardless of your IDE (Android Studio, Visual Studio, etc), emulator performance is vastly improved by enabling virtualization support.
Включить поддержку виртуализации Enable virtualization support
Перед созданием виртуального устройства с помощью эмулятора Android рекомендуется включить виртуализацию, включив компоненты Hyper-V и платформы низкоуровневой оболочки Windows (ВХПКС). Before creating a virtual device with the Android emulator, it is recommended that you enable virtualization by turning on the Hyper-V and Windows Hypervisor Platform (WHPX) features. Это позволит процессору компьютера значительно повысить скорость выполнения эмулятора. This will allow your computer’s processor to significantly improve the execution speed of the emulator.
Для запуска платформы Hyper-V и низкоуровневой оболочки Windows компьютер должен: To run Hyper-V and Windows Hypervisor Platform, your computer must:
- Доступно 4 ГБ памяти Have 4GB of memory available
- Наличие 64-разрядного процессора Intel или ЦП AMD ризен с преобразованием адресов второго уровня (SLAT) Have a 64-bit Intel processor or AMD Ryzen CPU with Second Level Address Translation (SLAT)
- Запустите Windows 10 Build 1803 + (Проверьте номер сборки) Be running Windows 10 build 1803+ (Check your build #)
- Обновлены графические драйверы (диспетчер устройств > видеоадаптеры, > обновление драйвера) Have updated graphics drivers (Device Manager > Display adapters > Update driver)
Если компьютер не соответствует этим критериям, вы можете запустить гипервизор Intel HAXM или AMD. If your machine doesn’t fit this criteria, you may be able to run Intel HAXM or AMD Hypervisor. Дополнительные сведения см. в статье аппаратное ускорение для производительности эмулятора или в документации по эмулятору Android Studio. For more info, see the article: Hardware acceleration for emulator performance or the Android Studio Emulator documentation.
Убедитесь, что оборудование и программное обеспечение компьютера совместимы с Hyper-V, открыв командную строку и введя следующую команду: systeminfo Verify that your computer hardware and software is compatible with Hyper-V by opening a command prompt and entering the command: systeminfo

В поле поиска Windows (в нижнем левом углу) введите «компоненты Windows». In the Windows search box (lower left), enter «windows features». Выберите Включение или отключение компонентов Windows в результатах поиска. Select Turn Windows features on or off from the search results.
После появления списка компонентов Windows прокрутите экран, чтобы найти Hyper-V (включая средства управления и платформу) и платформу низкоуровневой оболочки Windows, убедитесь, что флажок установлен, чтобы включить обе функции, а затем нажмите кнопку ОК. Once the Windows Features list appears, scroll to find Hyper-V (includes both Management Tools and Platform) and Windows Hypervisor Platform, ensure that the box is checked to enable both, then select OK.
Перезагрузите компьютер при появлении соответствующего запроса. Restart your computer when prompted.
Эмулятор для разработки машинного кода с Android Studio Emulator for native development with Android Studio
При создании и тестировании собственного приложения Android рекомендуется использовать Android Studio. When building and testing a native Android app, we recommend using Android Studio. Когда приложение будет готово к тестированию, вы можете создать и запустить приложение, выполнив следующие действия. Once your app is ready for testing, you can build and run your app by:
На панели инструментов Android Studio выберите свое приложение в раскрывающемся меню Run Configurations (конфигурации запуска ). In the Android Studio toolbar, select your app from the run configurations drop-down menu.
В раскрывающемся меню целевое устройство выберите устройство, на котором требуется запустить приложение. From the target device drop-down menu, select the device that you want to run your app on.
Выберите запустить ▷. Select Run ▷. Запустится Android Emulator. This will launch the Android Emulator.
После установки приложения на устройстве эмулятора можно использовать параметр Применить изменения для развертывания определенных изменений кода и ресурсов без создания нового apk. Once your app is installed on the emulator device, you can use Apply Changes to deploy certain code and resource changes without building a new APK.
Эмулятор для кросс-платформенной разработки с помощью Visual Studio Emulator for cross-platform development with Visual Studio
Для компьютеров с Windows доступно множество вариантов эмулятора Android . There are many Android emulator options available for Windows PCs. Мы рекомендуем использовать эмулятор AndroidGoogle, так как он предоставляет доступ к последним образам ОС Android и Google Play службам. We recommend using Google’s Android emulator, as it offers access to the latest Android OS images and Google Play services.
Установка эмулятора Android с помощью Visual Studio Install Android emulator with Visual Studio
Если вы еще не установили его, скачайте Visual Studio 2019. If you don’t already have it installed, download Visual Studio 2019. Используйте Visual Studio Installer, чтобы Изменить рабочие нагрузки и убедиться, что у вас есть Рабочая нагрузка для разработки мобильных приложений на .NET. Use the Visual Studio Installer to Modify your workloads and ensure that you have the Mobile development with .NET workload.
Создайте новый проект. Create a new project. После настройки Android Emulatorможно использовать Android Device Manager для создания, дублирования, настройки и запуска различных виртуальных устройств Android. Once you’ve set up the Android Emulator, you can use the Android Device Manager to create, duplicate, customize, and launch a variety of Android virtual devices. Запустите Android Device Manager из меню Сервис с помощью средства: инструменты > Android > Android Device Manager. Launch the Android Device Manager from the Tools menu with: Tools > Android > Android Device Manager.
После открытия Android Device Manager выберите + создать , чтобы создать новое устройство. Once the Android Device Manager opens, select + New to create a new device.
Необходимо присвоить имя устройству, выбрать тип базового устройства из раскрывающегося меню, выбрать процессор и версию ОС, а также несколько других переменных для виртуального устройства. You will need to give the device a name, choose the base device type from a drop-down menu, choose a processor, and OS version, along with several other variables for the virtual device. Дополнительные сведения см. Android Device Manager главном экране. For more information, Android Device Manager Main Screen.
На панели инструментов Visual Studio выберите Отладка (присоединяется к процессу приложения, выполняемому в эмуляторе после запуска приложения) или режим выпуска (отключает отладчик). In the Visual Studio toolbar, choose between Debug (attaches to the application process running inside the emulator after your app starts) or Release mode (disables the debugger). Затем выберите виртуальное устройство в раскрывающемся меню устройство и нажмите кнопку Play ▷ ( воспроизвести ), чтобы запустить приложение в эмуляторе. Then choose a virtual device from the device drop-down menu and select the Play button ▷ to run your application in the emulator.
Get started with the Android client
Applies to: Android 7.0 and later
You can use the Remote Desktop client for Android to work with Windows apps and desktops directly from your Android device or a Chromebook that supports the Google Play Store.
This article will show you how to get started using the client. If you have any additional questions, make sure to check our FAQ.
- Curious about the new releases for the Android client? Check out What’s new for the Android client.
- The Android client supports devices running Android 6.0 and later, as well as Chromebooks with ChromeOS 53 and later. Learn more about Android applications on Chrome at Chrome OS Systems Supporting Android Apps.
Download the Remote Desktop client
Here’s how to set up the Remote Desktop client on your Android device:
- Download the Microsoft Remote Desktop client from Google Play.
- Launch RD client from your list of apps.
- Add a Remote Desktop connection or remote resources. Remote Desktop connections let you connect directly to a Windows PC and remote resources to access apps and desktops published to you by an admin.
Add a Remote Desktop connection
Now that you have the client on your device, you can add Remote Desktop connections to access your remote resources.
Before you add a connection, if you haven’t done so already, set up your PC to accept remote connections.
To add a Remote Desktop connection:
In the Connection Center, tap +, and then tap Desktop.
Enter the name of the remote PC into PC name. This name can be a Windows computer name, an Internet domain name, or an IP address. You can also append port information to the PC name (for example, MyDesktop:3389 or 10.0.0.1:3389). This field is the only required field.
Select the User name you use to access the Remote PC.
- Select Enter every time for the client to ask for your credentials every time you connect to the remote PC.
- Select Add user account to save an account that you use frequently so you don’t have to enter credentials every time you sign in. To learn more about user accounts, see Manage your user accounts.
You can also tap on Show additional options to set the following optional parameters:
- In Friendly name, you can enter an easy-to-remember name for the PC you’re connecting to. If you don’t specify a friendly name, the PC name is displayed instead.
- The Gateway is the Remote Desktop gateway you’ll use to connect to a computer from an external network. Contact your system administrator for more information.
- Sound selects the device your remote session uses for audio. You can choose to play sound on your local device, the remote device, or not at all.
- Customize display resolution sets the resolution for the remote session. When turned off, the resolution specified in global settings is used.
- Swap mouse buttons switches the commands sent by right and left mouse gestures. Ideal for left-handed users.
- Connect to admin session lets you connect to an admin session on the remote PC.
- Redirect local storage enables local storage redirection. This setting is disabled by default.
When you’re done, tap Save.
Need to edit these settings? Tap the More options menu (. ) next to the name of the desktop, and then tap Edit.
Want to remove the connection? Again, tap the More options menu (. ), and then tap Remove.
If you get an error name «0xf07» that says something like «We couldn’t connect to the remote PC because the password associated with the user account has expired,» try again with a new password.
Add remote resources
Remote resources are RemoteApp programs, session-based desktops, and virtual desktops published by your admin. The Android client supports resources published from Remote Desktop Services and Windows Virtual Desktop deployments.
To add remote resources:
- In the Connection Center, tap +, and then tap Remote Resource Feed.
- Enter the Feed URL. This URL can be a URL or an email address:
- The URL is the RD Web Access server provided to you by your admin. If accessing resources from Windows Virtual Desktop, you can use one of the following URLs depending on which version you’re using:
- If you’re using Windows Virtual Desktop (classic), use: https://rdweb.wvd.microsoft.com/api/feeddiscovery/webfeeddiscovery.aspx .
- If you’re using Windows Virtual Desktop, use: https://rdweb.wvd.microsoft.com/api/arm/feeddiscovery .
- If you plan to use Email, enter your email address in this field. Filling out this field tells the client to search for an RD Web Access server associated with your email address if it was configured by your admin.
- The URL is the RD Web Access server provided to you by your admin. If accessing resources from Windows Virtual Desktop, you can use one of the following URLs depending on which version you’re using:
- Tap Next.
- Provide your sign-in information when prompted. The credentials you should use can vary based on the deployment and can include:
- The User name that has permission to access the resources.
- The Password associated with the user name.
- Additional factor, which you may be prompted for a if authentication was configured that way by your admin.
- When you’re done, tap Save.
The remote resources will be displayed in the Connection Center.
Remove remote resources
To remove remote resources:
- In the Connection Center, tap the overflow menu (. ) next to the remote resource.
- Tap Remove.
- Confirm you’ve removed the resource.
Pin a connection to your home screen
The Remote Desktop client supports using the Android widget feature to pin connections to your home screen. The widget adding process depends on which type of Android device and Android OS version you’re using.
To add a widget:
- Tap Apps to launch the apps menu.
- Tap Widgets.
- Swipe through the widgets and look for the Remote Desktop icon with the description: Pin Remote Desktop.
- Tap and hold that Remote Desktop widget and move it to the home screen.
- When you release the icon, you’ll see the saved remote desktops. Choose the connection that you want to save to your home screen.
Now you can start the remote desktop connection directly from your home screen by tapping it.
If you rename the desktop connection in the Remote Desktop client, its pinned label won’t update.
Manage general app settings
To change the general app settings, go to the Connection Center, tap Settings, and then tap General.
You can set the following general settings:
- Show desktop previews lets you see a preview of a desktop in the Connection Center before you connect to it. This setting is enabled by default.
- Pinch to zoom remote session lets you use pinch-to-zoom gestures. If the app you’re using through Remote Desktop supports multi-touch (introduced in Windows 8), disable this feature.
- Enable Use scancode input when available if your remote app doesn’t respond properly to keyboard input sent as scancode. Input is sent as unicode when disabled.
- Help improve Remote Desktop sends anonymous data about how you use Remote Desktop for Android to Microsoft. We use this data to improve the client. To learn more about our privacy policy and what kinds of data we collect, see the Microsoft Privacy Statement. This setting is enabled by default.
Manage display settings
To change the display settings tap Settings, and then tap Display from the Connection Center.
You can set the following display settings:
Orientation sets the preferred orientation (landscape or portrait) for your session.
If you connect to a PC running Windows 8 or earlier, the session won’t scale correctly if the orientation of the device changes. To make the client scale correctly, disconnect from the PC, then reconnect in the orientation you want to use. You can also ensure correct scaling by using a PC with Windows 10 instead.
Resolution sets the remote resolution you want to use for desktop connections globally. If you have already set a custom resolution for an individual connection, this setting won’t change that.
When you change the display settings, the changes only apply to new connections you make after the you changed the setting. To apply your changes to the session you’re currently connected to, refresh your session by disconnecting and reconnecting.
Manage your RD Gateways
A Remote Desktop Gateway (RD Gateway) lets you connect to a remote computer on a private network from anywhere on the Internet. You can create and manage your gateways using the Remote Desktop client.
To set up a new RD Gateway:
- In the Connection Center, tap Settings, and then tap Gateways.
- Tap + to add a new gateway.
- Enter the following information:
- Enter the name of the computer you want to use as a gateway into Server name. This name can be a Windows computer name, an Internet domain name, or an IP address. You can also add port information to the server name (for example: RDGateway:443 or 10.0.0.1:443).
- Select the User account you’ll use to access the RD Gateway.
- Select Use desktop user account to use the same credentials that you specified for the remote PC.
- Select Add user account to save an account that you use frequently so you don’t have to enter credentials every time you sign in. For more information, see Manage your user accounts.
To delete an RD Gateway:
- In the Connection Center, tap Settings, and then tap Gateways.
- Tap and hold a gateway in the list to select it. You can select multiple gateways at once.
- Tap the trash can to delete the selected gateway.
Manage your user accounts
You can save user accounts to use whenever you connect to a remote desktop or remote resources.
To save a user account:
- In the Connection Center, tap Settings, and then tap User accounts.
- Tap + to add a new user account.
- Enter the following information:
- The User Name to save for use with a remote connection. You can enter the user name in any of the following formats: user_name, domain\user_name, or user_name@domain.com.
- The Password for the user you specified. Every user account that you want to save to use for remote connections needs to have a password associated with it.
- When you’re done, tap Save.
To delete a saved user account:
- In the Connection Center, tap Settings, and then tap User accounts.
- Tap and hold a user account in the list to select it. You can select multiple users at the same time.
- Tap the trash can to delete the selected user.
Start a Remote Desktop connection
Now that you’ve set up your Remote Desktop Android client, let’s learn how to start a Remote Desktop session.
To start a session:
- Tap the name of your Remote Desktop connection to start the session.
- If you’re asked to verify the certificate for the remote desktop, tap Connect. You can also select Don’t ask me again for connections to this computer to always accept the certificate by default.
Use the connection bar
The connection bar gives you access to additional navigation controls. By default, the connection bar is placed in the middle at the top of the screen. Drag the bar to the left or right to move it.
- Pan Control: The pan control enables the screen to be enlarged and moved around. Pan control is only available for direct touch.
- To show the pan control, tap the pan icon in the connection bar to display the pan control and zoom the screen. Tap the pan icon again to hide the control and return the screen to its original size.
- To use the pan control, tap and hold it, then drag it in the direction you want to move the screen.
- To move the pan control, double-tap and hold it to move the control around on the screen.
- Additional options: Tap the additional options icon to display the session selection bar and command bar.
- Keyboard: Tap the keyboard icon to display or hide the keyboard. The pan control is displayed automatically when the keyboard is displayed.
Use the session selection bar
You can have multiple connections open to different PCs at the same time. Tap the connection bar to display the session selection bar on the left side of the screen. The session selection bar lets you view your open connections and switch between them.
When you’re connected to remote resources, you can switch between apps within that session by tapping the expander menu ( > ) and choosing from the list of available items.
To start a new session within your current connection, tap Start New, then choose from the list of available items.
To disconnect a session, tap X in the left side of the session tile.
Use the command bar
Tap the connection bar to display the command bar on the right side of the screen. On the command bar, you can switch between mouse modes (direct touch and mouse pointer) or tap the Home button to return to the Connection Center. You can also tap the Back button to return to the Connection Center. Returning to the Connection Center won’t disconnect your active session.
Touch gestures and mouse modes
The Remote Desktop for Android client uses standard touch gestures. You can also use touch gestures to replicate mouse actions on the remote desktop. The following table explains which gestures match which mouse actions in each mouse mode.
Native touch gestures are supported in Direct Touch mode in Windows 8 or later.
| Mouse mode | Mouse action | Gesture |
|---|---|---|
| Direct touch | Left-click | Tap with one finger |
| Direct touch | Right-click | Tap with one finger and hold, then release |
| Mouse pointer | Zoom | Use two fingers and pinch to zoom out or move fingers apart to zoom in. |
| Mouse pointer | Left-click | Tap with one finger |
| Mouse pointer | Left-click and drag | Double-tap and hold with one finger, then drag |
| Mouse pointer | Right-click | Tap with two fingers |
| Mouse pointer | Right-click and drag | Double-tap and hold with two fingers, then drag |
| Mouse pointer | Mouse wheel | Tap and hold with two fingers, then drag up or down |
Join the Beta channel
If you want to help us test new builds or find issues in upcoming version updates before they’re released, you should join our Beta channel. Enterprise admins can use the Beta channel to validate new versions of the Android client for their users.
To join the Beta, download our Beta client and give consent to access preview versions and download the client. You’ll receive preview versions directly through the Google Play Store.


