- Условное разрешение DNS имен в Windows Server: DNS Conditional Forwarding, политики DNS
- Настройка DNS Conditional Forwarder в Windows Server
- Настройка DNS Conditional Forwarding с помощью PowerShell
- Фильтрация запросов DNS, политики разрешения имен в Windows Server 2016
- How to Set Up a DNS Forwarder in Windows Server 2012 R2
- Prerequisites
- Setting Up a DNS Forwarder in Windows Server 2012 R2
- Configuring DNS Forwarders in Windows Server 2016
Условное разрешение DNS имен в Windows Server: DNS Conditional Forwarding, политики DNS
В этой статье мы рассмотрим два способа организации условного разрешения имен в DNS сервере на Windows Server 2016: DNS conditional forwarding и DNS policy. Эти технологии позволяют настроить условное разрешение DNS имен в зависимости от запрошенного имени, IP адреса и местоположения клиента, времени суток и т.д.
Условная пересылка DNS (Conditional Forwarding) позволяет перенаправить DNS запросы об определенном домене на определенные DNS-сервера. Обычно Conditional Forwarders используется, когда нужно настроить быстрое разрешение имен между несколькими внутренними приватными доменами, или вы не хотите, чтобы DNS запросы с вашего сервера пересылались через публичную сеть Интернет. В этом случае вы можете создать на DNS сервере правило DNS пересылки DNS запросов для определенной доменной зоны (только . ) на определенный DNS сервер.
Настройка DNS Conditional Forwarder в Windows Server
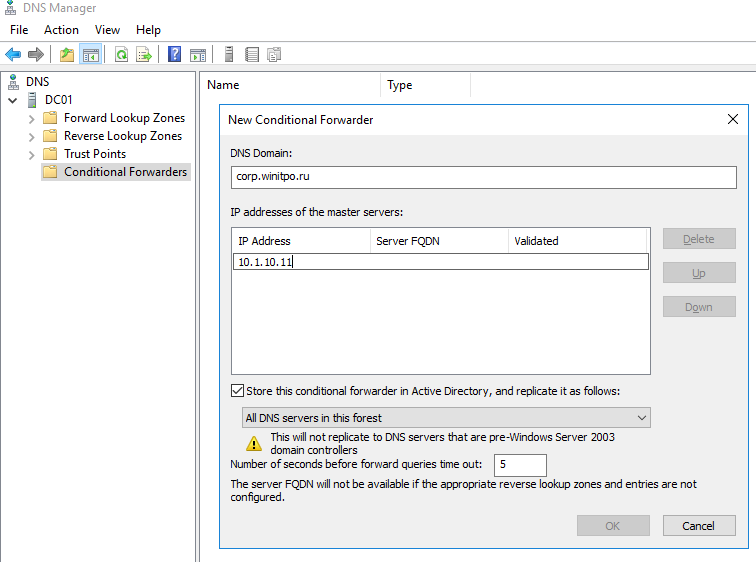
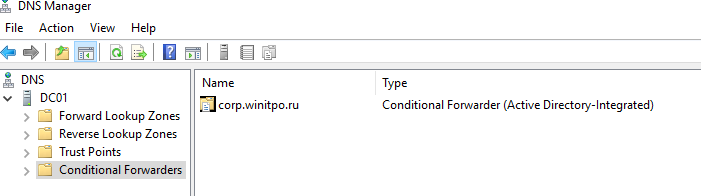
Попробуем настроить условное перенаправление DNS запросов для определенной доменной зоны на Windows Server 2016. Например, я хочу, чтобы все DNS запросы к зоне corp.winitpro.ru пересылались на DNS сервер 10.1.10.11.
- Запустите консоль управления DNS ( dnsmgmt.msc );
- Разверните ваш DNS сервер, щелкните правой кнопкой по разделу Conditional Forwarders и выберите New Conditional Forwarder;
- В поле DNS domain укажите FQDN имя домена, для которого нужно включить условную пересылку;
- В поле IP addresses of the master servers укажите IP адрес DNS сервера, на который нужно пересылать все запросы для указанного пространства имен;

- Если вы хотите хранить правило условной переадресации не только на этом DNS сервере, вы можете интегрировать его в AD. Выберите опцию “Store this conditional forwarder in Active Directory”;
- Выберите правило репликации записи conditional forwarding (All DNS servers in this forest, All DNS servers in this domain или All domain controllers in this domain).
Настройка DNS Conditional Forwarding с помощью PowerShell
Вы можете создать правило Conditional Forward для определенной DNS зоны с помощью PowerShell. Воспользуйтесь командлетом Add-DnsServerConditionalForwarderZone:
Add-DnsServerConditionalForwarderZone -Name dmz.winitpro.ru -MasterServers 192.168.1.11,192.168.101.11 -ReplicationScope Forest
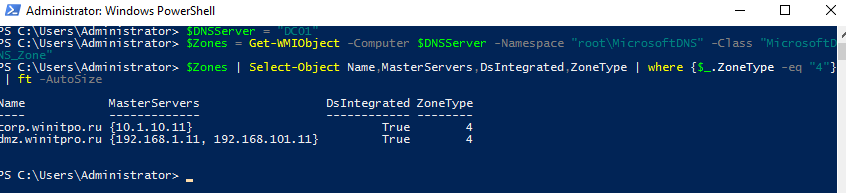
Чтобы вывести список DNS Conditional Forwarders на определенном сервере, выполните следующий PowerShell скрипт:
$DNSServer = «DC01»
$Zones = Get-WMIObject -Computer $DNSServer -Namespace «root\MicrosoftDNS» -Class «MicrosoftDNS_Zone»
$Zones | Select-Object Name,MasterServers,DsIntegrated,ZoneType | where <$_.ZoneType -eq "4">| ft -AutoSize
Фильтрация запросов DNS, политики разрешения имен в Windows Server 2016
В Windows Server 2016 появилась новая фича в службе DNS сервера – DNS политики. DNS политики позволяют настроить DNS сервер так, чтобы он возвращал различные ответы на DNS запросы в зависимости от местоположения клиента (с какого IP адреса или подсети пришел запрос), интерфейса DNS сервера, времени суток, типа запрошенной записи (A, CNAME, PTR, MX) и т.д. DNS политики в Windows Server 2016 позволяют реализовать сценарии балансировки нагрузки, фильтрации DNS трафика, возврата DNS записей в зависимости от геолокации (IP адреса клиента) и многие другие сложные сценарии.
Вы можете создать политику как на уровне DNS сервера, так и на уровне всей зоны. Настройка DNS политик в Windows Server 2016 возможна только из командной строки PowerShell.
Попробуем создать простую политику, которая позволяет вернуть разный ответ на DNS запрос в зависимости от геолокации клиента. Допустим, вы хотите, чтобы клиенты в каждом офисе использовали собственный прокси на площадке. Вы создали политику назначения прокси в домене (на всех клиентах будет указано proxy.winitpro.ru). Но клиент из каждого офиса должен резолвить этот адрес по-разному, чтобы использовать для доступа свой локальный прокси-сервер.
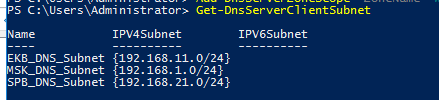
Я создал 3 подсети для разных офисов компании:
Add-DnsServerClientSubnet -Name «MSK_DNS_Subnet» -IPv4Subnet «192.168.1.0/24»
Add-DnsServerClientSubnet -Name «EKB_DNS_Subnet» -IPv4Subnet «192.168.11.0/24»
Add-DnsServerClientSubnet -Name «SPB_DNS_Subnet» -IPv4Subnet «192.168.21.0/24»
Чтобы вывести список всех IP подсетей клиентов, выполните:
Теперь нужно для каждого офиса создать отдельную DNS область:
Add-DnsServerZoneScope -ZoneName “winitpro.ru” -Name “MSKZoneScope”
Add-DnsServerZoneScope -ZoneName “winitpro.ru” -Name “EKBZoneScope”
Add-DnsServerZoneScope -ZoneName “winitpro.ru” -Name “SPBZoneScope”
Следующие команды добавят 3 DNS записи с одним именем, но указывающие на разные IP адреса в разных областях DNS:
Add-DnsServerResourceRecord -ZoneName “winitpro.ru” -A -Name “proxy” -IPv4Address “192.168.1.10” -ZoneScope “MSKZoneScope”
Add-DnsServerResourceRecord -ZoneName “winitpro.ru” -A -Name “proxy” -IPv4Address “192.168.11.10” -ZoneScope “EKBZoneScope”
Add-DnsServerResourceRecord -ZoneName “winitpro.ru” -A -Name “proxy” -IPv4Address “192.168.21.10” -ZoneScope “SPBZoneScope”
Get-DnsServerResourceRecord -ZoneName “winitpro.ru” -ZoneScope SPBZoneScope

Теперь нужно создать DNS политики, которые свяжут IP подсети, DNS области и A записи.
Add-DnsServerQueryResolutionPolicy -Name “MSKResolutionPolicy” -Action ALLOW -ClientSubnet “eq,MSK_DNS_Subnet” -ZoneScope “MSKZoneScope,1” -ZoneName “winitpro.ru” –PassThru
Add-DnsServerQueryResolutionPolicy -Name “EKBResolutionPolicy” -Action ALLOW -ClientSubnet “eq,EKB_DNS_Subnet” -ZoneScope “EKBZoneScope,1” -ZoneName “winitpro.ru” -PassThru
Add-DnsServerQueryResolutionPolicy -Name “SPBResolutionPolicy” -Action ALLOW -ClientSubnet “eq,SPB_DNS_Subnet” -ZoneScope “SPBZoneScope,1” -ZoneName “winitpro.ru” –PassThru
- -Action ALLOW
- -Action DENY
- -Action IGNORE
Можно использовать следующие параметры в фильтре DNS:
-InternetProtocol «EQ,IPv4,NE,IPv6»
-TransportProtocol «EQ,UDP,TCP»
-ServerInterfaceIP «EQ,192.168.1.21»
-QType «EQ,A,AAAA,NE,PTR»
-TimeOfDay «EQ,9:00-18:00»
Вывести список всех DNS политик для DNS зоны на сервере можно так:
Get-DnsServerQueryResolutionPolicy -ZoneName winitpro.ru

Теперь с устройств из различных офисов проверьте, что DNS сервер на один и тот же запрос возвращает различные IP адреса прокси:
Можно запретить DNS серверу возвращать DNS адреса для определенного пространства имен (домена):
How to Set Up a DNS Forwarder in Windows Server 2012 R2
In this article, I will demonstrate you how to configure a DNS forwarder in Windows Server 2012 R2. I assume you have already configured DNS on both servers. If you haven’t, read my other article on configuring DNS on Windows Server 2012 R2.
Prerequisites
Following five are prerequisites:
- Ensure that the Administrator account has a strong password.
- A static IP is configured.
- Latest windows updates are installed.
- Firewall is turned off.
- DNS is already configured on both machines (primary DNS and secondary DNS servers).
Setting Up a DNS Forwarder in Windows Server 2012 R2
Step 1: Open server manager dashboard and click on Tools. Scroll down the menu and click on DNS .
Step 2: In DNS manager, right-click and scroll down the menu. Click Properties
Step 3: Click Forwarders tab and then click Edit
Step 4: Enter the IP address of your secondary DNS server you want to forward DNS queries. Click OK
Step 5: Click OK
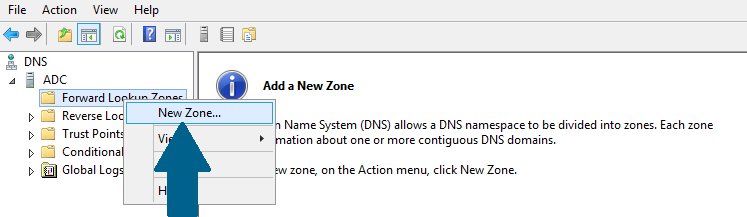
Step 6: Go to your secondary DNS server manager and expand the machine name. Right-click Forward Look Up Zones and scroll down the menu. Click New Zone
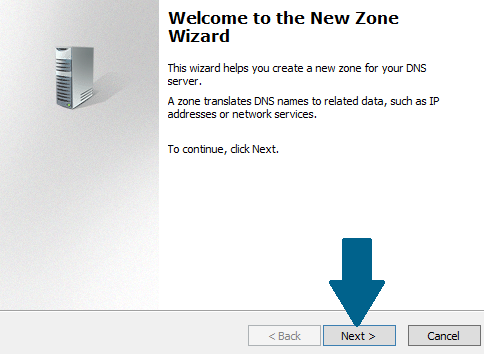
Step 7: Click Next
Step 8: Choose Primary zone and click Next

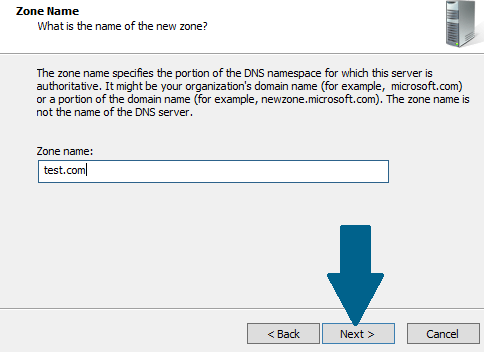
Step 9: Provide the zone name and click Next
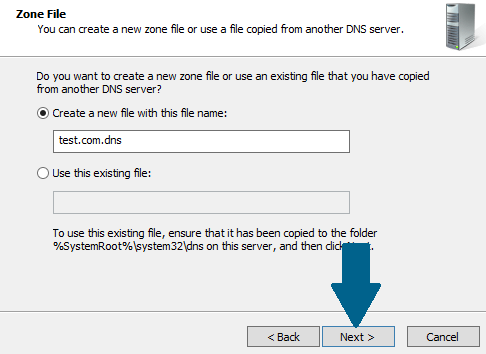
Step 10: Choose to create the zone file with the suggested name and click Next.
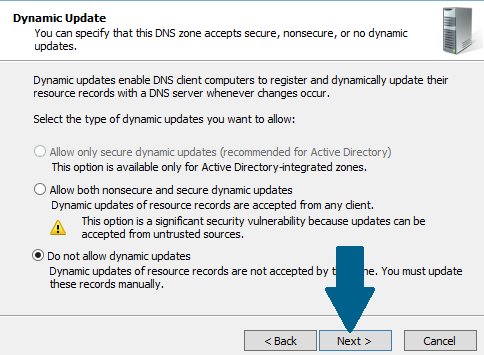
Step 11: Select «Do not allow Dynamic Updates» and click Next.
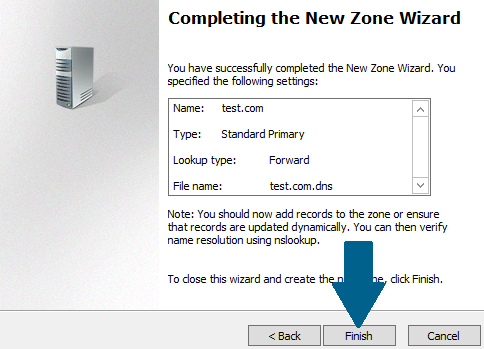
Step 12: Click Finish to create the new DNS zone.
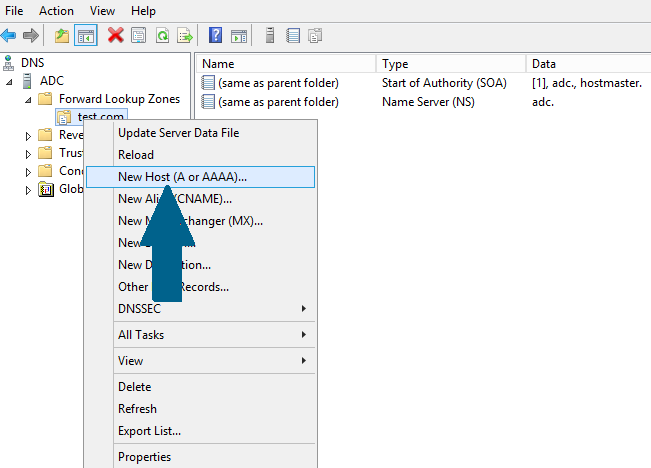
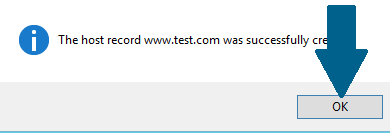
Step 13: Right-click the zone you just created and scroll down the menu. Click New Host (A or AAAA)
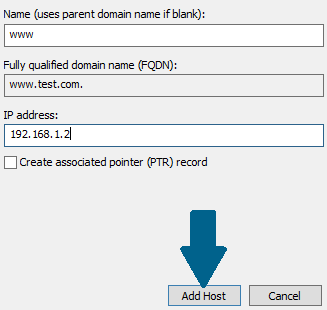
Step 14: Provide the name and IP address of this host and click Add Host
Step 15: Click OK to create the A-Record in the DNS zone.
Step 16: Go to your client machine and configure the DNS settings. Provide the IP address of your primary DNS server in Preferred DNS server field
Configuring DNS Forwarders in Windows Server 2016
Last time we go together, we looked at installing the DNS server role to your Windows 2016 server. Now we’re going to dive into configuration baby!
To configure the DNS forwarder (so it can resolve names it doesn’t have cached or in its zone file) we need to open the DNS manager.
So hit the Windows Logo key on your keyboard, type “Server Manager” and then choose “DNS” from the Tools drop down menu in the upper-right corner of the screen.

Yeah, I know it looks like nothing is going on here but there’s a magical world hiding under that FBV-DNS host in the left pane… check this out.

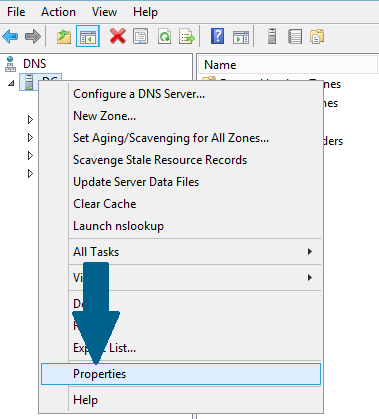
Right click the hostname go to Properties…

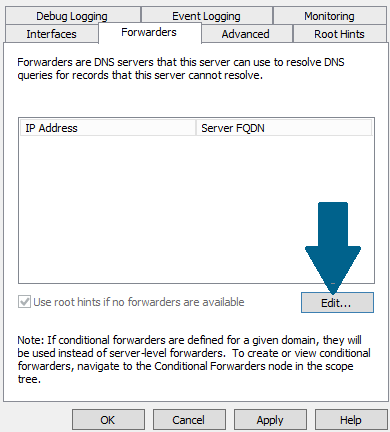
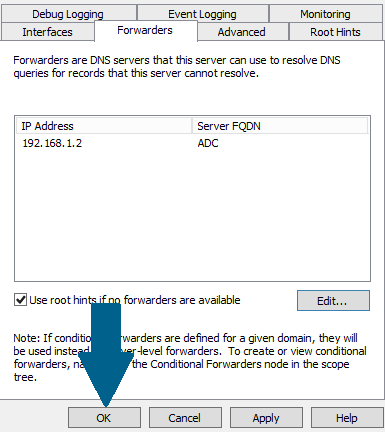
Hit the Forwarders tab, click the Edit button to prepare to add a DNS server that can resolve names for us.

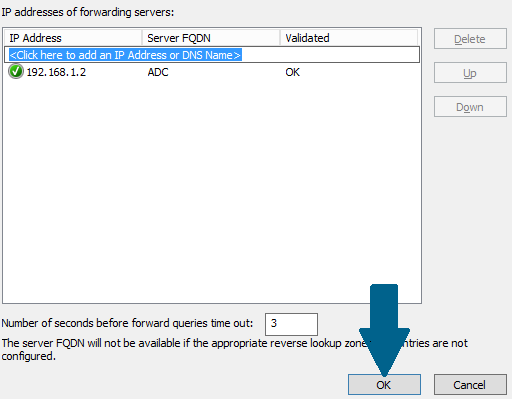
We’ll add 8.8.8.8 to resolve the addresses.

So to test this we’ll type ping youtube.com from our Windows 10 client machine.
This will force our local computer to check its %WinDir%\System32\Drivers\Etc\hosts file for static entries and then its local cache for an A record mapped to the youtube.com domain name.
We can take a look to see if there’s a mapping already with the following command:
Alright nothing there.

So now we can check the local DNS cache
So we have no mappings right now.
Let’s ping youtube.com and then check the local DNS cache.
Basically what happened is the client said:
Yo, DNS server, I need you to give the IP address of youtube.com.
So our local DNS server, the Windows 2016 Server was like, “let me check my host file and my local cache… dang… I have no idea let me forward this request up the chain”
This is called a Forward Lookup request and the DNS server made a forward lookup request for the A record belonging to youtube.com. Since we configured 8.8.8.8 as the forwarder, 8.8.8.8 took care of it.
That Google DNS server, 8.8.8.8, looked up the name, replied to the Windows 2016 Server with the answer, the 2016 server cached the response and then forwarded the reply on to the client which can then cached the result as well.
So we need to view the DNS cache.
On our Windows 10 machine we can type:

And on the server we can type:

You can see the DNS cache record there.
And if you want to see what’s happening at the packet level just check this out:

I took this from the client. You can see the client (192.168.1.15) sending a DNS query to our Windows 2016 server (192.168.1.14) with the query of Type: A for youtube.com. This is in the middle pane.
So the Windows 2016 Server received the query, forwarded it along and then sent back the response it received from 8.8.8.8


