- DirectAccess Offline Domain Join
- Offline domain join overview
- Offline domain join with DirectAccess policies scenario overview
- Prepare for offline domain join
- Operating system requirements
- Credential requirements
- Granting user rights to join workstations to the domain
- Offline domain join process
- Steps for performing a DirectAccess offline domain join
- How to Join Windows Server Core to Domain
- How to Join Windows Server Core to Domain
- DJOIN – присоединить компьютер к домену (Offline domain join).
- Формат командной строки:
- Параметры командной строки:
- Примеры использования djoin :
DirectAccess Offline Domain Join
Applies To: Windows Server (Semi-Annual Channel), Windows Server 2016
This guide explains the steps to perform an offline domain join with DirectAccess. During an offline domain join, a computer is configured to join a domain without physical or VPN connection.
This guide includes the following sections:
Offline domain join overview
Requirements for offline domain join
Offline domain join process
Steps for performing an offline domain join
Offline domain join overview
Introduced in Windows Server 2008 R2, domain controllers include a feature called Offline Domain Join. A command line utility named Djoin.exe lets you join a computer to a domain without physically contacting a domain controller while completing the domain join operation. The general steps for using Djoin.exe are:
Run djoin /provision to create the computer account metadata. The output of this command is a .txt file that includes a base-64 encoded blob.
Run djoin /requestODJ to insert the computer account metadata from the .txt file into the Windows directory of the destination computer.
Reboot the destination computer, and the computer will be joined to the domain.
Offline domain join with DirectAccess policies scenario overview
DirectAccess offline domain join is a process that computers running Windows Server 2016, Windows Server 2012, Windows 10 and Windows 8 can use to join a domain without being physically joined to the corporate network, or connected through VPN. This makes it possible to join computers to a domain from locations where there is no connectivity to a corporate network. Offline domain join for DirectAccess provides DirectAccess policies to clients to allow remote provisioning.
A domain join creates a computer account and establishes a trust relationship between a computer running a Windows operating system and an Active Directory domain.
Prepare for offline domain join
Create the machine account.
Inventory the membership of all security groups to which the machine account belongs.
Gather the required computer certificates, group policies, and group policy objects to be applied to the new client(s).
. The following sections explain operating system requirements and credential requirements for performing a DirectAccess offline domain join using Djoin.exe.
Operating system requirements
You can run Djoin.exe for DirectAccess only on computers that run Windows Server 2016, Windows Server 2012 or Windows 8. The computer on which you run Djoin.exe to provision computer account data into AD DS must be running Windows Server 2016, Windows 10, Windows Server 2012 or Windows 8. The computer that you want to join to the domain must also be running Windows Server 2016, Windows 10, Windows Server 2012 , or Windows 8.
Credential requirements
To perform an offline domain join, you must have the rights that are necessary to join workstations to the domain. Members of the Domain Admins group have these rights by default. If you are not a member of the Domain Admins group, a member of the Domain Admins group must complete one of the following actions to enable you to join workstations to the domain:
Use Group Policy to grant the required user rights. This method allows you to create computers in the default Computers container and in any organizational unit (OU) that is created later (if no Deny access control entries (ACEs) are added).
Edit the access control list (ACL) of the default Computers container for the domain to delegate the correct permissions to you.
Create an OU and edit the ACL on that OU to grant you the Create child — Allow permission. Pass the /machineOU parameter to the djoin /provision command.
The following procedures show how to grant the user rights with Group Policy and how to delegate the correct permissions.
Granting user rights to join workstations to the domain
You can use the Group Policy Management Console (GPMC) to modify the domain policy or create a new policy that has settings that grant the user rights to add workstations to a domain.
Membership in Domain Admins, or equivalent, is the minimum required to grant user rights. Review details about using the appropriate accounts and group memberships at Local and Domain Default Groups (https://go.microsoft.com/fwlink/?LinkId=83477).
To grant rights to join workstations to a domain
Click Start, click Administrative Tools, and then click Group Policy Management.
Double-click the name of the forest, double-click Domains, double-click the name of the domain in which you want to join a computer, right-click Default Domain Policy, and then click Edit.
In the console tree, double-click Computer Configuration, double-click Policies, double-click Windows Settings, double-click Security Settings, double-click Local Policies, and then double-click User Rights Assignment.
In the details pane, double-click Add workstations to domain.
Select the Define these policy settings check box, and then click Add User or Group.
Type the name of the account that you want to grant the user rights to, and then click OK twice.
Offline domain join process
Run Djoin.exe at an elevated command prompt to provision the computer account metadata. When you run the provisioning command, the computer account metadata is created in a binary file that you specify as part of the command.
For more information about the NetProvisionComputerAccount function that is used to provision the computer account during an offline domain join, see NetProvisionComputerAccount Function (https://go.microsoft.com/fwlink/?LinkId=162426). For more information about the NetRequestOfflineDomainJoin function that runs locally on the destination computer, see NetRequestOfflineDomainJoin Function (https://go.microsoft.com/fwlink/?LinkId=162427).
Steps for performing a DirectAccess offline domain join
The offline domain join process includes the following steps:
Create a new computer account for each of the remote clients and generate a provisioning package using the Djoin.exe command from an already domain joined computer in the corporate network.
Add the client computer to the DirectAccessClients security group
Transfer the provisioning package securely to the remote computers(s) that will be joining the domain.
Apply the provisioning package and join the client to the domain.
Reboot the client to complete the domain join and establish connectivity.
There are two options to consider when creating the provisioning packet for the client. If you used the Getting Started Wizard to install DirectAccess without PKI, then you should use option 1 below. If you used the Advanced Setup Wizard to install DirectAccess with PKI, then you should use option 2 below.
Complete the following steps to perform the offline domain join:
Option1: Create a provisioning package for the client without PKI
At a command prompt of your Remote Access server, type the following command to provision the computer account:
Option2: Create a provisioning package for the client with PKI
At a command prompt of your Remote Access server, type the following command to provision the computer account:
Add the client computer to the DirectAccessClients security group
On your Domain Controller, from Start screen, type Active and select Active Directory Users and Computers from Apps screen.
Expand the tree under your domain, and select the Users container.
In the details pane, right-click DirectAccessClients, and click Properties.
On the Members tab, click Add.
Click Object Types, select Computers, and then click OK.
Type the client name to add, and then click OK.
Click OK to close the DirectAccessClients Properties dialog, and then close Active Directory Users and Computers.
Copy and then apply the provisioning package to the client computer
Copy the provisioning package from c:\files\provision.txt on the Remote Access Server, where it was saved, to c:\provision\provision.txt on the client computer.
On the client computer, open an elevated command prompt, and then type the following command to request the domain join:
Reboot the client computer. The computer will be joined to the domain. Following the reboot, the client will be joined to the domain and have connectivity to the corporate network with DirectAccess.
How to Join Windows Server Core to Domain
If you have installed a Windows Server Core and you want to join Windows Server core to domain, it’s easy. Using the SConfig command you can join a Windows Server Core to an Active Directory domain.
The Windows Server Core option is a minimal installation option that is available when you deploy Windows Server. Server Core includes most but not all server roles. The Server Core has a smaller disk footprint, and therefore a smaller attack surface due to a smaller code base. To learn more about server core, visit this link.
Suppose that you have installed Windows Server 2019 core and now you want to add this server to your domain. However you may want to rename this server first and then join the server to domain. Since a Server Core does not have a Desktop Experience GUI, SConfig utility will be used.
How to Join Windows Server Core to Domain
The steps to join Windows Server core to Active Directory Domain are as follows.
- First of all login to the Windows Server core with local administrator account.
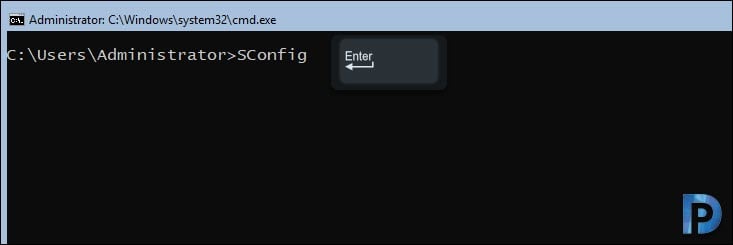
- Type SConfig at the command prompt and press Enter.
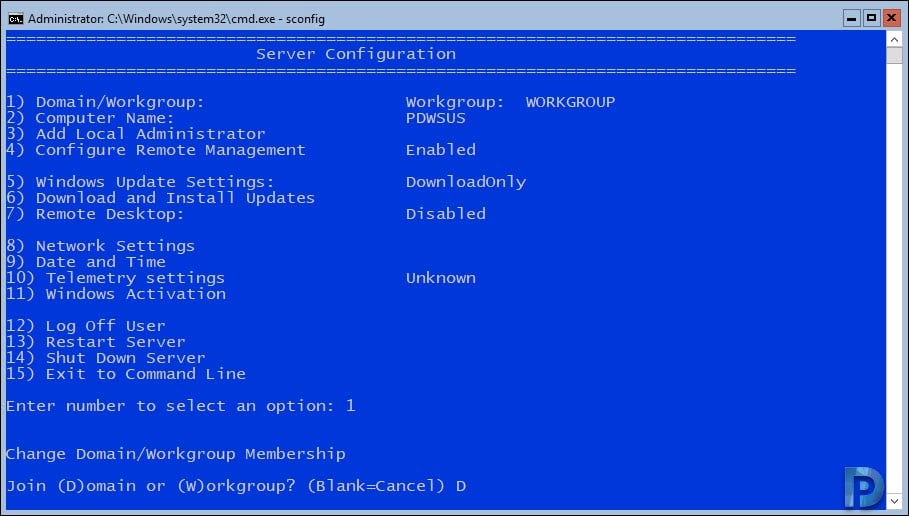
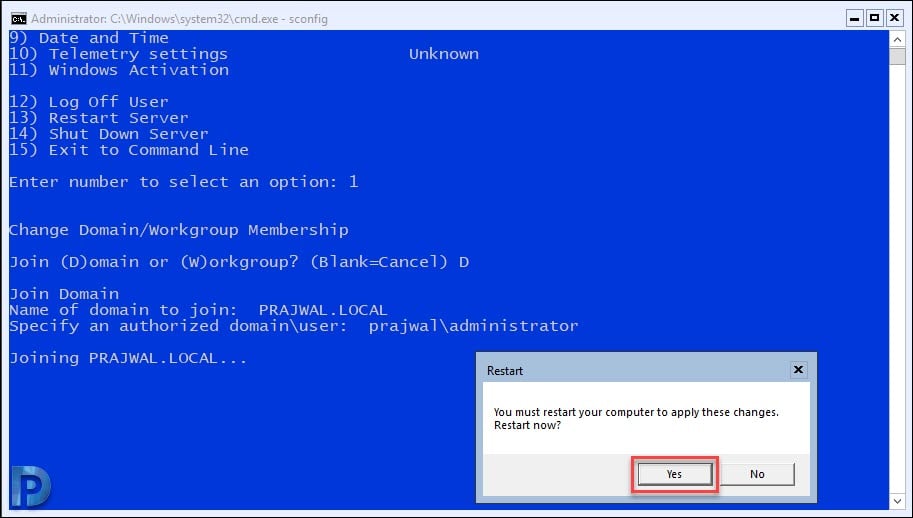
- From the list of options, choose Option 1 (Domain/Workgroup) by typing 1 and press ENTER.
- To join the server to the domain, type D and press ENTER.
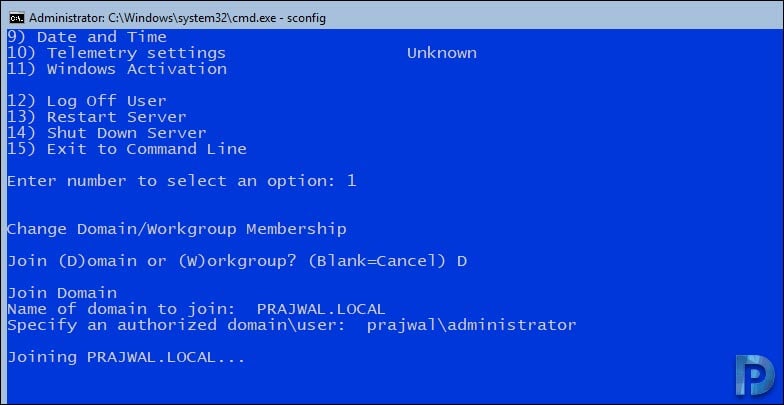
- Specify the domain name and a valid user for this domain (domain\user). Type the user password when prompted.
- Reboot the server.
As I mentioned earlier, you may want to rename the server before you join it to the domain. Type SConfig and press enter.
Under Server Configuration, type 2 and press Enter to change computer name. Enter the new computer name and press Enter. You see a pop asking you to restart the computer, click Yes.
Login to the server and again type SConfig to get back to Server Configuration. The computer name is now changed. Now type 1 to join the server to domain.
You get the option to Change Domain or Workgroup Membership, type D and press Enter. Specify the name of the domain to join and authorized domain/user.
Another command prompt opens where-in you must enter the password of the domain account.
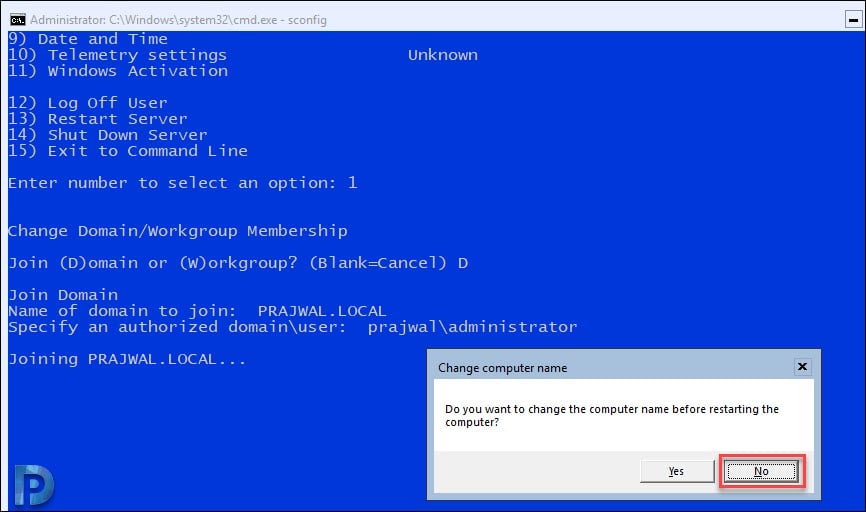
While joining the server core to the domain, you also get an option to change the computer name before restarting. Since we have already changed the computer name in the above step, click No.
You must restart the computer to join the server to domain. Click Yes.
After the system reboots, login to the server and type SConfig. The Windows Server core is now part of active directory domain.
DJOIN – присоединить компьютер к домену (Offline domain join).
Начиная с Windows 7/Windows Server 2008R2, в операционных системах семейства Windows появилось стандартное средство для автономного присоединения компьютера к домену — утилита djoin.exe . Присоединение выполняется в два этапа. Сначала, на любом компьютере домена, к которому нужно присоединить новый компьютер, выполняется команда djoin /provision для подготовки файла с данными новой учетной записи, а затем, на компьютере, присоединяемом к домену, выполняется команда djoin.exe /REQUESTODJ с использованием полученного на предыдущем шаге файла.
Формат командной строки:
djoin.exe [параметр1 … параметрN]
Параметры командной строки:
/PROVISION — Подготовка учетной записи компьютера в домене.
/DOMAIN — имя домена, к которому необходимо присоединиться.
/MACHINE — имя компьютера, присоединяемого к домену.
/MACHINEOU — Необязательный параметр, определяющий подразделение ( Organizational Unit ) OU , в котором создается учетная запись.
/DCNAME — Необязательный параметр, определяющий целевой контроллер домена DC , для которого создается учетная запись.
/REUSE — Повторное использование любой существующей учетной записи (ее пароль будет сброшен).
/SAVEFILE — Сохранение данных подготовки в файле, указанном как путь_к_файлу . /NOSEARCH — Пропуск обнаружения конфликтов учетных записей, требуется параметр DCNAME (более высокая производительность).
/DOWNLEVEL — Поддержка с использованием контроллера домена Windows Server 2008 или более ранней версии.
/PRINTBLOB — Возврат большого двоичного объекта метаданных с кодировкой base64 для файла ответов.
/DEFPWD — Использование пароля учетной записи компьютера по умолчанию (не рекомендуется использовать).
/REQUESTODJ — Запрос автономного присоединения к домену при следующей загрузке.
/LOADFILE — имя и путь к файлу, указанные ранее в параметре /SAVEFILE .
/WINDOWSPATH — путь к каталогу с автономным образом Windows.
/LOCALOS — Позволяет указать в /WINDOWSPATH локальную ОС.
Команда djoin должна выполняться от имени администратора. Подготовка учетной записи для присоединения к домену должна выполняться в контексте учетной записи с правами администратора домена. Для применения изменений на присоединяемом компьютере потребуется перезагрузка.
Примеры использования djoin :
Формат команды для подготовки учетной записи компьютера в домене:
djoin.exe /PROVISION /DOMAIN /MACHINE /SAVEFILE
Формат команды для запроса на автономное присоединение локального компьютера к домену:
djoin.exe /REQUESTODJ /LOADFILE /WINDOWSPATH
Общий порядок действий при автономном присоединении компьютера к домену:
1. На компьютере, который уже присоединен к домену необходимо зарегистрироваться под учетной записью с правами присоединения компьютеров к домену (администратора домена).
2. Выполнить команду с параметром /PROVISION , например:
djoin.exe /PROVISION /DOMAIN mydomain.ru /MACHINE WS105-01 /SAVEFILE C:\newws.txt — Подготовить присоединение к домену mydomain.ru компьютера WS105-01 с записью метаданных в файл C:\newws.txt
В процессе выполнения команды могут отображаться информационные сообщения:
Подготовка учетной записи компьютера.
Если при подготовке учетной записи возникла ошибка, то будет выдано диагностическое сообщение, содержащее код ошибки и вероятную ее причину:
Не удалось подготовить [WS105-01] в домене [mydomain.ru]: 0x54b.
Произошел сбой при подготовке учетной записи компьютера: 0x54b.
Указанный домен не существует или к нему невозможно подключиться.
Метаданные, записанные в файл при выполнении команды на присоединение, представляют собой текст в кодировке Base64 и содержат конфиденциальную информацию – имя домена, имя контроллера домена, идентификатор Security ID домена, пароль учетной записи компьютера и т.п.
3. Передать полученный в результате успешного выполнения команды файл с метаданными на носитель, доступный с присоединяемого компьютера.
4. На присоединяемом компьютере в контексте учетной записи с правами локального администратора выполнить запрос на автономное присоединение компьютера к домену, например:
djoin.exe /requestODJ /LOADFILE C:\newws.txt /WINDOWSPATH %Windir%\Recovery /LocalOS —
5. Перезагрузить присоединяемый компьютер.
В случае успешного выполнения запроса, после перезагрузки, компьютер будет присоединен к домену.

