- Default permissions for the MachineKeys folders
- Summary
- Default permissions for MachineKeys folder
- Permissions for Everyone group
- How permissions are handled when you copy and move files and folders
- Summary
- More information
- Windows server folder permissions
- Книга: Windows Server 2012 R2 Storage, Security, & Networking Pocket Consultant
- Setting special permissions on files and folders
- When you select Continue for folder access in Windows Explorer, your user account is added to the ACL for the folder
- Introduction
- More information
- Known issues
- Workaround 1
- Workaround 2
Default permissions for the MachineKeys folders
This article describes default permissions for the MachineKeys folders.
Original product version: В Windows Server 2003
Original KB number: В 278381
Summary
The MachineKeys folder stores certificate pair keys for both the computer and users. Both Certificate services and Internet Explorer use this folder. The default permissions on the folder may be misleading when you attempt to determine the minimum permissions that are necessary for proper installation and the accessing of certificates.
Default permissions for MachineKeys folder
The MachineKeys folder is located under the All Users Profile\Application Data\Microsoft\Crypto\RSA folder. If the administrator didn’t set the folder to the minimum level, a user may receive the following errors when generating a server certificate by using Internet Information Server (IIS).:
- Failed to Generate Certificate Request
- Internal Server Error (The Private Key that you are importing might require a cryptographic service provider that is not installed on your system)
The following settings are the default permissions for the MachineKeys folder:
- Administrators (Full Control) This folder only
- Everyone (Special) This folder only
Permissions for Everyone group
To view the special permissions for the Everyone group, right-click the MachineKeys folder, select Advanced on the Security tab, and then select View/Edit. The permissions consist of the following permissions:
- List Folder/Read Data
- Read Attributes
- Read Extended Attributes
- Create Files/Write Data
- Create Folders/Append Data
- Write Attributes
- Write Extended Attributes
- Read Permissions
Select the Reset Permissions on all Child objects and enable propagation of inheritable permissions check box. The administrator doesn’t have full control on child objects to protect a user’s private part of the key pair. But the administrator can still delete certificates for a user.
For more information, see the following article:
How permissions are handled when you copy and move files and folders
This article describes how Windows Explorer handles file and folder permissions in different situations.
Original product version: В Windows 10 — all editions, Windows Server 2012 R2
Original KB number: В 310316
Summary
In Microsoft Windows 2000, in Windows Server 2003, and in Windows XP, you have the option of using either the FAT32 file system or the NTFS file system. When you use NTFS, you can grant permissions to your folders and files to control access to those objects. When you copy or move a file or folder on an NTFS volume, how Windows Explorer handles the permissions on the object varies, depending on whether the object is copied or moved within the same NTFS volume or to a different volume.
More information
By default, an object inherits permissions from its parent object, either at the time of creation or when it is copied or moved to its parent folder. The only exception to this rule occurs when you move an object to a different folder on the same volume. In this case, the original permissions are retained.
Additionally, note the following rules:
The Everyone group is granted Allow Full Control permissions to the root of each NTFS drive.
Deny permissions always take precedence over Allow permissions.
Explicit permissions take precedence over inherited permissions.
If NTFS permissions conflict, for example, if group and user permissions are contradictory, the most liberal permissions take precedence.
Permissions are cumulative.
To preserve permissions when files and folders are copied or moved, use the Xcopy.exe utility with the /O or the /X switch.
The object’s original permissions will be added to inheritable permissions in the new location.
To add an object’s original permissions to inheritable permissions when you copy or move an object, use the Xcopy.exe utility with the -O and -X switches.
To preserve existing permissions without adding inheritable permissions from the parent folder, use the Robocopy.exe utility, which is available in the Windows 2000 Resource Kit.
You can modify how Windows Explorer handles permissions when objects are copied or moved to another NTFS volume. When you copy or move an object to another volume, the object inherits the permissions of its new folder. However, if you want to modify this behavior to preserve the original permissions, modify the registry as follows.
This section, method, or task contains steps that tell you how to modify the registry. However, serious problems might occur if you modify the registry incorrectly. Therefore, make sure that you follow these steps carefully. For added protection, back up the registry before you modify it. Then, you can restore the registry if a problem occurs. For more information about how to back up and restore the registry, see How to back up and restore the registry in Windows.
Click Start, click Run, type regedit in the Open box, and then press ENTER.
Locate and then click the registry key: HKEY_CURRENT_USER\SOFTWARE\Microsoft\Windows\CurrentVersion\Policies\Explorer .
On the Edit menu, click Add Value, and then add the following registry value:
- Value name: ForceCopyAclwithFile
- Data type: DWORD
- Value data: 1
Exit Registry Editor.
You can modify how Windows Explorer handles permissions when objects are moved in the same NTFS volume. As mentioned, when an object is moved within the same volume, the object preserves its permissions by default. However, if you want to modify this behavior so that the object inherits the permissions from the parent folder, modify the registry as follows:
Click Start, click Run, type regedit, and then press ENTER.
Locate and then click the registry subkey: HKEY_LOCAL_MACHINE\SOFTWARE\Microsoft\Windows\CurrentVersion\Explorer .
On the Edit menu, click Add Value, and then add the following registry value:
- Value name: MoveSecurityAttributes
- Data type: DWORD
- Value data: 0
Exit Registry Editor.
Make sure that the user account that is used to move the object has the Change Permissions permission set. If the permission is not set, grant the Change Permissions permission to the user account.
The MoveSecurityAttributes registry value only applies to Windows XP and to Windows Server 2003. The value does not affect Windows 2000.
Windows server folder permissions


Книга: Windows Server 2012 R2 Storage, Security, & Networking Pocket Consultant
Setting special permissions on files and folders
Setting special permissions on files and folders
To set special NTFS permissions for files and folders, follow these steps:
1. In File Explorer, press and hold or right-click the file or folder with which you
want to work, and then tap or click Properties.
2. In the Properties dialog box, select the Security tab, and then tap or click Advanced to display the Advanced Security Settings dialog box. Before you can modify permissions, you must click Change Permissions. As shown in Figure 4–2, the permissions are presented much as they are on the Security tab. The key differences are that you see individual allow or deny permission sets, whether permissions are inherited and where they are from, and the resources to which the permissions apply.
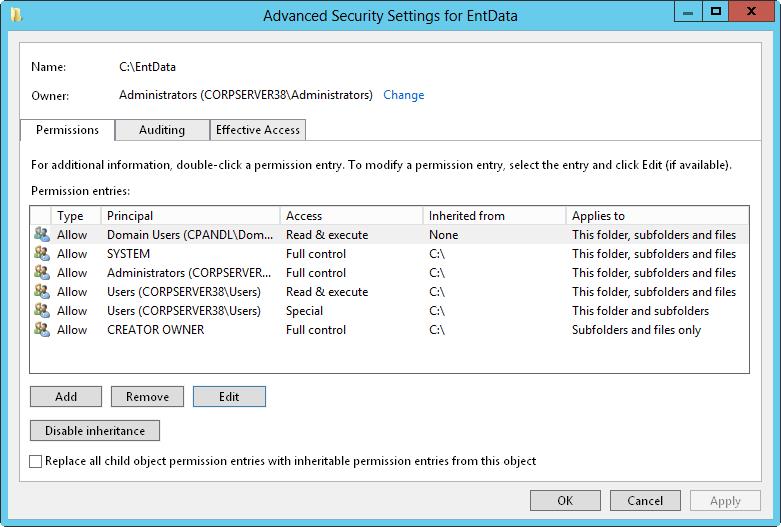
FIGURE 4–2 Configure special permissions on files and folders.
3. If a user or group already has permissions set for the file or folder (and those permissions are not being inherited), you can modify the special permissions by selecting the user or group, and then clicking Edit. Afterward, skip steps 4–7, and then follow the rest of the steps in this procedure.
4. To add special permissions for a user or group, tap or click Add to display the Permission Entry dialog box. Tap or click Select A Principal to display the Select User, Computer, Service Account, Or Group dialog box.
5. Enter the name of a user or a group account. Be sure to reference the user account name rather than the user’s full name. Only one name can be entered at a time.
6. Tap or click Check Names. If a single match is found for each entry, the dialog box is automatically updated and the entry is underlined; otherwise, you’ll get an additional dialog box. If no matches are found, you either entered the name incorrectly, or you’re working with an incorrect location. Modify the name in the Name Not Found dialog box and try again, or tap or click Locations to select a new location. When multiple matches are found, in the Multiple Names Found dialog box, select the name you want to use, and then tap or click OK.
7. Tap or click OK. The user and group are added as the Principal, and the Permission Entry dialog box is updated to show this.
8. When you are editing permissions, only basic permissions are listed by default. Tap or click Show Advanced Permissions to display the special permissions, as shown in Figure 4–3.
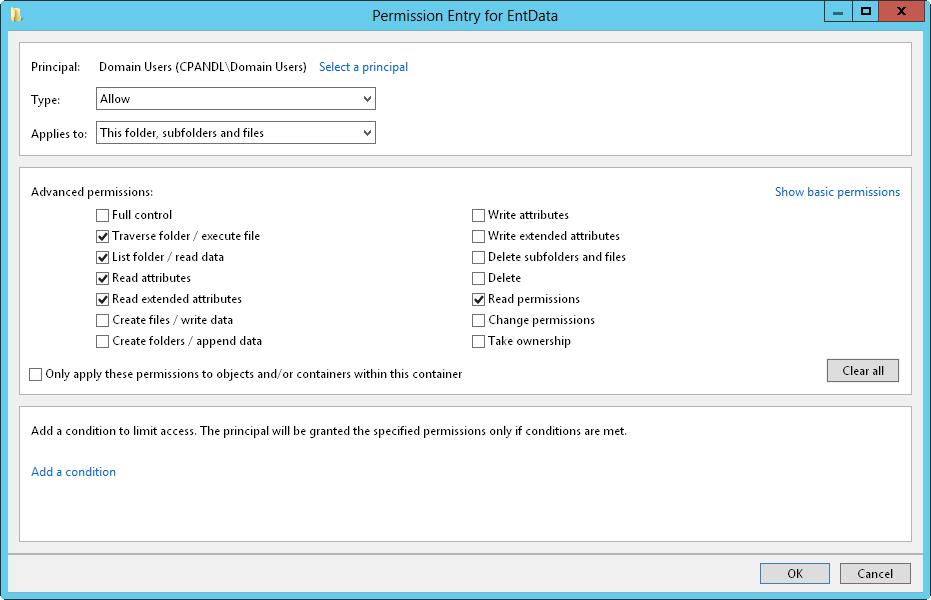
FIGURE 4–3 Configure the special permissions that should be allowed or denied.
9. Use the Type list to specify whether you are configuring allowed or denied special permissions, and then select the special permissions you want to allow or deny. If any permissions are dimmed (unavailable), they are inherited from a parent folder.
NOTE You allow and deny special permissions separately. Therefore, if you want to both allow and deny special permissions, you need to configure the allowed permissions, and then repeat this procedure starting with step 1 to configure the denied permissions.
10. If the options in the Applies To list are available, choose the appropriate option to ensure that the permissions are properly inherited. The options include the following:
? This Folder Only The permissions apply only to the currently selected folder.
? This Folder, Subfolders And Files The permissions apply to this folder, any subfolders of this folder, and any files in any of these folders.
? This Folder And Subfolders The permissions apply to this folder and any subfolders of this folder. They do not apply to any files in any of these folders.
? This Folder And Files The permissions apply to this folder and any files in this folder. They do not apply to any subfolders of this folder.
When you select Continue for folder access in Windows Explorer, your user account is added to the ACL for the folder
This article provides a solution to an issue when you select Continue to gain access to a file system folder for which you don’t have Read permissions.
Original product version: В Windows 10 — all editions, Windows Server 2012 R2
Original KB number: В 950934
Introduction
This article describes a scenario in which Windows Explorer prompts you to select Continue to gain access to a file system folder for which you don’t have Read permissions. It also describes workarounds to avoid particular aspects of this behavior. This issue occurs in Windows Vista and later versions of Windows and in Windows Server 2008 and later versions of Windows Server. Windows Explorer is called File Explorer in Windows 8 and later versions.
More information
Assume that User Account Control (UAC) is enabled, and you use Windows Explorer to access a folder for which you don’t have Read permissions. Additionally, the folder is not marked by both the Hidden and System attributes. In this situation, Windows Explorer displays a dialog box that prompts you with the following message:
You don’t currently have permission to access this folder. Click Continue to permanently get access to this folder.
In Windows Vista and Windows Server 2008, the second sentence doesn’t include the word permanently; it just says Click Continue to get access to this folder.
You then can select Continue or Cancel. (Continue is selected by default.) If you select Continue, UAC tries to obtain administrative rights on your behalf. Depending on the UAC security settings that control the behavior of the UAC elevation prompt, and on whether you’re a member of the Administrators group, you may be prompted for consent or for credentials. Or, you may not be prompted at all. If UAC can obtain administrative rights, a background process will change the permissions on the folder, and on all its subfolders and files, to grant your user account access to them. In Windows Vista and Windows Server 2008, the background process grants your user account Read and Execute permissions. In later versions of Windows, this process grants your user account Full Control.
This behavior is by design. But because the typical pattern with UAC elevation is to run an instance of the elevated program with administrative rights, users may expect that by selecting Continue, which will generate an elevated instance of Windows Explorer, and not make permanent changes to file system permissions. However, this expectation isn’t possible, as Windows Explorer’s design doesn’t support the running of multiple process instances in different security contexts in an interactive user session.
If UAC is disabled, UAC elevation isn’t possible. All programs that are run by members of the Administrators group, including Windows Explorer, always have administrative rights. So administrators don’t need to use elevation to access resources that require administrative rights. For example, if a folder grants access only to the Administrators group and the System account, an administrator can browse it directly without being prompted to alter the folder’s permissions. If the user doesn’t have Read permissions, Windows Explorer displays the dialog box that was described earlier. However, if UAC is disabled, Windows can’t request administrative credentials for the user through a UAC elevation prompt. So Windows won’t start a background process with administrative permissions to change file system permissions.
However, if the user selects Continue and the folder’s current security descriptor grants the user permission to both read and change the object’s permissions, Windows will start the background process in the user’s current security context and modify the folder’s permissions to grant the user greater access, as described earlier. The user may have permission to read and change the object’s permissions from object ownership or from the object’s access control list (ACL).
Known issues
This feature may cause unexpected behavior. For example, assume that you belong to the Administrators group and that you use Windows Explorer to access a folder that requires administrative access. After the permissions have been changed, any program that’s running through your user account can have full control of the folder, even if the program isn’t elevated and even after your account has been removed from the Administrators group. Such altered permissions may violate an organization’s security policies and may be flagged in a security audit. Additionally, if a program verifies file system permissions, it may refuse to run if the permissions have been changed.
UAC should remain enabled in all cases except under the constrained circumstances that are described in How to disable User Account Control (UAC) on Windows Server.
Workaround 1
To avoid changing permissions in a folder that’s accessible only to administrators, consider using another program that can run elevated instead of using Windows Explorer. Examples include Command Prompt, PowerShell, and the Computer Management MMC snap-in for share management.
Workaround 2
If you have an application-specific folder that’s locked down to prevent ordinary users from accessing it, you can also add permissions for a custom group and then add authorized users to that group. For example, consider a scenario in which an application-specific folder grants access only to the Administrators group and to the System account. In this situation, create a domain or a local AppManagers group, and then add authorized users to it. Then, use a utility such as icacls.exe, the security tab of the folder’s Properties dialog box, or the PowerShell Set-Acl cmdlet to grant the AppManagers group Full Control of the folder, in addition to the existing permissions.
Users who are members of AppManagers can use Windows Explorer to browse the folder without UAC having to change the folder’s permissions. This alternative applies only to application-specific folders. You should never make any permission changes to folders that are part of the Windows operating system, such as C:\Windows\ServiceProfiles .


