- How to troubleshoot errors that occur when you join Windows-based computers to a domain
- Where to find the Netsetup.log file
- Networking error messages and resolutions
- Error 1
- Resolution
- Error 2
- Resolution
- Error 3
- Resolution
- Error 4
- Resolution
- Error 5
- Resolution
- Error 6
- Resolution
- Error 7
- Resolution
- Error 8
- Resolution
- Error 9
- Resolution
- Error 10
- Resolution
- Authentication error messages and resolutions
- Error 1
- Resolution
- Error 2
- Resolution
- Error 3
- Resolution
- Error 4
- Resolution
- Error 5
- Resolution
- Error 6
- Resolution
- Error 7
- Resolution
- Error 8
- Resolution
- Tutorial: Join a Windows Server virtual machine to an Azure Active Directory Domain Services managed domain
- Prerequisites
- Sign in to the Azure portal
- Create a Windows Server virtual machine
- Connect to the Windows Server VM
- Join the VM to the managed domain
- Clean up resources
- Unjoin the VM from the managed domain
- Delete the VM
- Troubleshoot domain-join issues
- Connectivity issues
- Credentials-related issues
- Next steps
How to troubleshoot errors that occur when you join Windows-based computers to a domain
This article describes several common error messages that can occur when you join client computers that are running Windows to a domain. This article also provides troubleshooting suggestions for these errors.
Original product version: В Windows Server 2016, Windows Server 2012 R2
Original KB number: В 4341920
Where to find the Netsetup.log file
Windows clients log the details of domain join operations in the %windir%\debug\Netsetup.log file.
Networking error messages and resolutions
Error 1
An attempt to resolve the DNS name of a DC in the domain being joined has failed. Please verify this client is configured to reach a DNS server that can resolve DNS names in the target domain.
Resolution
When you type the domain name, make sure that you type the Domain Name System (DNS) name and not the Network Basic Input/Output System (NetBIOS) name. For example, if the DNS name of the target domain is contoso.com , make sure that you enter contoso.com instead of the NetBIOS domain name of «contoso.»
Additionally, verify that the computer can reach a DNS server that hosts the DNS zone of the target domain or can resolve DNS names in that domain. Make sure that the correct DNS server is configured on this client as the preferred DNS, and that the client has connectivity to that server. To verify this, you can run one of the following commands:
Error 2
An attempt to resolve the DNS name of a domain controller in the domain being joined has failed. Please verify this client is configured to reach a DNS server that can resolve DNS names in the target Domain.
Resolution
When you type the domain name, make sure that you type the DNS name and not the NetBIOS name.
Additionally, verify that the computer can reach a DNS server that hosts the DNS zone of the target domain or can resolve DNS names in that domain. Make sure that the correct DNS server is configured on this client as the preferred DNS, and that the client has connectivity to that server. To verify this, you can run one of the following commands:
Error 3
An operation was attempted on a nonexistent network connection.
Resolution
When you type the domain name, make sure that you type the DNS name and not the NetBIOS name. Additionally, restart the computer before you try to join the computer to the domain.
Error 4
Multiple connections to a server or shared resource by the same user, using more than one user name, are not allowed. Disconnect all previous connections to the server or shared resource and try again.
Resolution
Restart the computer that you are trying to join to the domain to make sure that there are no latent connections to any of the domain servers.
When you type the domain name, make sure that you type the DNS name and not the NetBIOS name.
Error 5
Resolution
Verify that the computer can reach a DNS server that hosts the DNS zone of the target domain or can resolve DNS names in that domain. Make sure that the correct DNS server has been configured on this client as the preferred DNS, and that the client has connectivity to that server. To verify this, you can run one of the following commands:
When you type the domain name, make sure that you type the DNS name and not the NetBIOS name.
Additionally, you can update the network adapter driver.
Error 6
No more connections can be made to this remote computer at this time because there are already as many connections as the computer can accept.
Resolution
Before joining the computer to the domain, make sure that you have cleared all mapped connections to any drives.
Restart the computer that you are trying to join to the domain to make sure that there are no latent connections to any of the domain servers.
When you type the domain name, make sure that you type the DNS name and not the NetBIOS name.
The error may be transient. Try again later. If the issue persists, verify the status of the DC that the client is connecting to (active connections, network connectivity, and so on). You may want to restart the DC if the issue persists.
Error 7
The format of the specified network name is invalid.
Resolution
Verify that the computer can reach a DNS server that hosts the DNS zone of the target domain or can resolve DNS names in that domain. Make sure that the correct DNS server has been configured on this client as the preferred DNS, and that the client has connectivity to that server. To verify this, you can run one of the following commands:
When you type the domain name, make sure that you type the DNS name and not the NetBIOS name. Make sure that you have the most up-to-date drivers installed for the client computer’s network adapter. Verify connectivity between the client that is being joined and the target DC over the required ports and protocols. Disable the TCP Chimney offload feature and IP offloading.
Error 8
The directory service has exhausted the pool of relative identifiers.
Resolution
Make sure that the DC that hosts the relative ID (RID) operations master is online and functional. For more information, see Event ID 16650: The account-identifier allocator failed to initialize in Windows Server.
You can use the net query fsmo command to determine which DC has the RID Master role.
Verify that Active Directory is replicating between all DCs. You can use the following command to detect any errors:
Error 9
The remote procedure call failed and did not execute.
Resolution
Make sure that you have the most up-to-date drivers installed for the client computer’s network adapter. Verify connectivity between the client that is being joined and the target DC over the required ports and protocols. Disable the TCP Chimney offload feature and IP offloading.
This problem can also be caused by one of the following conditions:
- A network device (router, firewall, or VPN device) is blocking connectivity over the ports and protocols that are used by the MSRPC protocol.
- A network device (router, firewall, or VPN device) is rejecting network packets between the client that is being joined and the DC.
Error 10
Changing the Primary Domain DNS name of this computer to «» failed. The name will remain «.».The specified server cannot perform the operation.
Resolution
This error occurs when you use the domain join UI to join a Windows 7 or Windows Server 2008 R2 workgroup computer to an Active Directory domain by specifying the target DNS domain. To fix this error, see 2018583 Windows 7 or Windows Server 2008 R2 domain join displays error «Changing the Primary Domain DNS name of this computer to «» failed. «.
Authentication error messages and resolutions
Error 1
You have exceeded the maximum number of computer accounts you are allowed to create in this domain.
Resolution
Make sure that you have permissions to add computers to the domain, and that you have not exceeded the quota that is defined by your Domain Administrator.
To join a computer to the domain, the user account must be granted Create computer object permissions in Active Directory.
By default, a non-administrator user can join a maximum of 10 computers to an Active Directory domain.
Error 2
Logon failure: The target account name is incorrect.
Resolution
Check that the domain controllers (DCs) are registered by using correct IP addresses on the DNS server, and that their Service Principal Names (SPNs) are registered correctly in their Active Directory accounts.
Error 3
Logon failure: the user has not been granted the requested logon type at this computer.
Resolution
Make sure that you have permissions to add computers to the domain. To join a computer to the domain, the user account must be granted the Create computer object permission in Active Directory.
Additionally, make sure that the specified user account is allowed to log on locally to the client computer. To do this, configure the Allow log on locally setting in Group Policy under Computer Configuration > Windows Settings > Security Settings > Local Policies > User Rights Assignment.
Error 4
Logon failure: unknown user name or bad password.
Resolution
Make sure that you use the correct user name and password combination of an existing Active Directory user account when you are prompted for credentials to add the computer to the domain.
Error 5
No mapping between account names and security IDs was done.
Resolution
This error is likely a transient error that is logged when a domain join searches the target domain to determine whether a matching computer account was already created or whether the join operation has to dynamically create a computer account on the target domain.
Error 6
Not enough storage is available to complete this operation.
Resolution
This error can occur when the Kerberos token size is larger than the maximum default size. If this situation, you have to increase the Kerberos token size of the computer that you try to join to the domain. For more information, see the following Knowledge Base articles:
935744 «Not enough storage is available to complete this operation» error message when you use a domain controller to join a computer to a domain
327825 Problems with Kerberos authentication when a user belongs to many groups
Error 7
The account is not authorized to login from this station.
Resolution
This problem is related to mismatched SMB Signing settings between the client computer and the DC that is being contacted for the domain join operation. Review the following documentation to further investigate the current and recommended values in your environment:
281648 Error message: The account is not authorized to login from this station 823659 Client, service, and program issues can occur if you change security settings and user rights assignments
Error 8
The account specified for this service is different from the account specified for other services running in the same process.
Resolution
Make sure that the DC through which you are trying to join the domain has the Windows Time service started.
Tutorial: Join a Windows Server virtual machine to an Azure Active Directory Domain Services managed domain
Azure Active Directory Domain Services (Azure AD DS) provides managed domain services such as domain join, group policy, LDAP, Kerberos/NTLM authentication that is fully compatible with Windows Server Active Directory. With an Azure AD DS managed domain, you can provide domain join features and management to virtual machines (VMs) in Azure. This tutorial shows you how to create a Windows Server VM then join it to a managed domain.
In this tutorial, you learn how to:
- Create a Windows Server VM
- Connect the Windows Server VM to an Azure virtual network
- Join the VM to the managed domain
If you don’t have an Azure subscription, create an account before you begin.
Prerequisites
To complete this tutorial, you need the following resources:
- An active Azure subscription.
- If you don’t have an Azure subscription, create an account.
- An Azure Active Directory tenant associated with your subscription, either synchronized with an on-premises directory or a cloud-only directory.
- If needed, create an Azure Active Directory tenant or associate an Azure subscription with your account.
- An Azure Active Directory Domain Services managed domain enabled and configured in your Azure AD tenant.
- If needed, create and configure an Azure Active Directory Domain Services managed domain.
- A user account that’s a part of the managed domain.
- Make sure that Azure AD Connect password hash synchronization or self-service password reset has been performed so the account is able to sign in to managed domain.
- An Azure Bastion host deployed in your Azure AD DS virtual network.
- If needed, create an Azure Bastion host.
If you already have a VM that you want to domain-join, skip to the section to join the VM to the managed domain.
Sign in to the Azure portal
In this tutorial, you create a Windows Server VM to join to your managed domain using the Azure portal. To get started, first sign in to the Azure portal.
Create a Windows Server virtual machine
To see how to join a computer to a managed domain, let’s create a Windows Server VM. This VM is connected to an Azure virtual network that provides connectivity to the managed domain. The process to join a managed domain is the same as joining a regular on-premises Active Directory Domain Services domain.
If you already have a VM that you want to domain-join, skip to the section to join the VM to the managed domain.
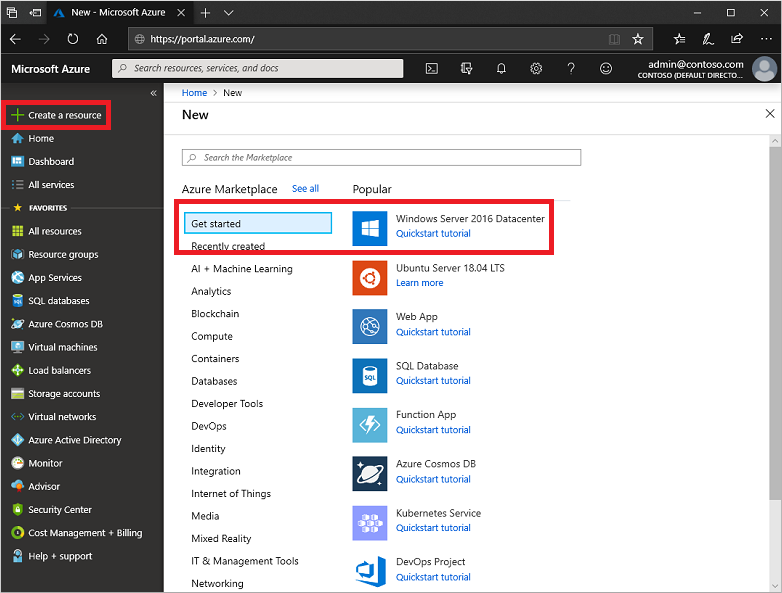
From the Azure portal menu or from the Home page, select Create a resource.
From Get started, choose Windows Server 2016 Datacenter.
In the Basics window, configure the core settings for the virtual machine. Leave the defaults for Availability options, Image, and Size.
| Parameter | Suggested value |
|---|---|
| Resource group | Select or create a resource group, such as myResourceGroup |
| Virtual machine name | Enter a name for the VM, such as myVM |
| Region | Choose the region to create your VM in, such as East US |
| Username | Enter a username for the local administrator account to create on the VM, such as azureuser |
| Password | Enter, and then confirm, a secure password for the local administrator to create on the VM. Don’t specify a domain user account’s credentials. |
By default, VMs created in Azure are accessible from the Internet using RDP. When RDP is enabled, automated sign-in attacks are likely to occur, which may disable accounts with common names such as admin or administrator due to multiple failed successive sign-in attempts.
RDP should only be enabled when required, and limited to a set of authorized IP ranges. This configuration helps improve the security of the VM and reduces the area for potential attack. Or, create and use an Azure Bastion host that allows access only through the Azure portal over TLS. In the next step of this tutorial, you use an Azure Bastion host to securely connect to the VM.
Under Public inbound ports, select None.
When done, select Next: Disks.
From the drop-down menu for OS disk type, choose Standard SSD, then select Next: Networking.
Your VM must connect to an Azure virtual network subnet that can communicate with the subnet your managed domain is deployed into. We recommend that a managed domain is deployed into its own dedicated subnet. Don’t deploy your VM in the same subnet as your managed domain.
There are two main ways to deploy your VM and connect to an appropriate virtual network subnet:
- Create a, or select an existing, subnet in the same the virtual network as your managed domain is deployed.
- Select a subnet in an Azure virtual network that is connected to it using Azure virtual network peering.
If you select a virtual network subnet that isn’t connected to the subnet for your managed domain, you can’t join the VM to the managed domain. For this tutorial, let’s create a new subnet in the Azure virtual network.
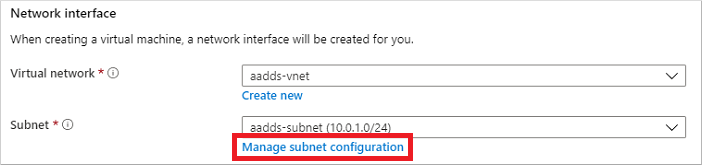
In the Networking pane, select the virtual network in which your managed domain is deployed, such as aaads-vnet
In this example, the existing aaads-subnet is shown that the managed domain is connected to. Don’t connect your VM to this subnet. To create a subnet for the VM, select Manage subnet configuration.
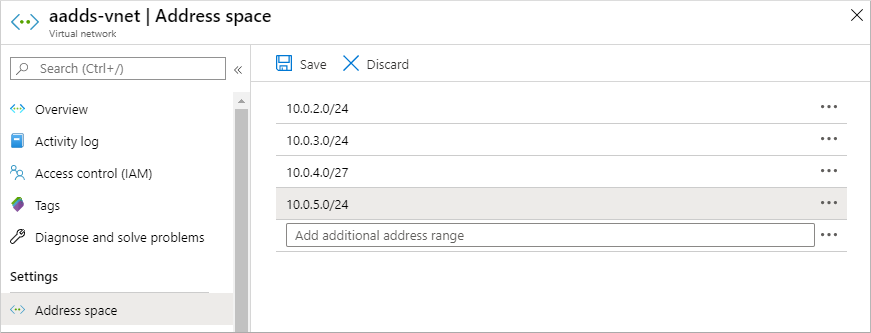
In the left-hand menu of the virtual network window, select Address space. The virtual network is created with a single address space of 10.0.2.0/24, which is used by the default subnet. Other subnets, such as for workloads or Azure Bastion may also already exist.
Add an additional IP address range to the virtual network. The size of this address range and the actual IP address range to use depends on other network resources already deployed. The IP address range shouldn’t overlap with any existing address ranges in your Azure or on-premises environment. Make sure that you size the IP address range large enough for the number of VMs you expect to deploy into the subnet.
In the following example, an additional IP address range of 10.0.5.0/24 is added. When ready, select Save.
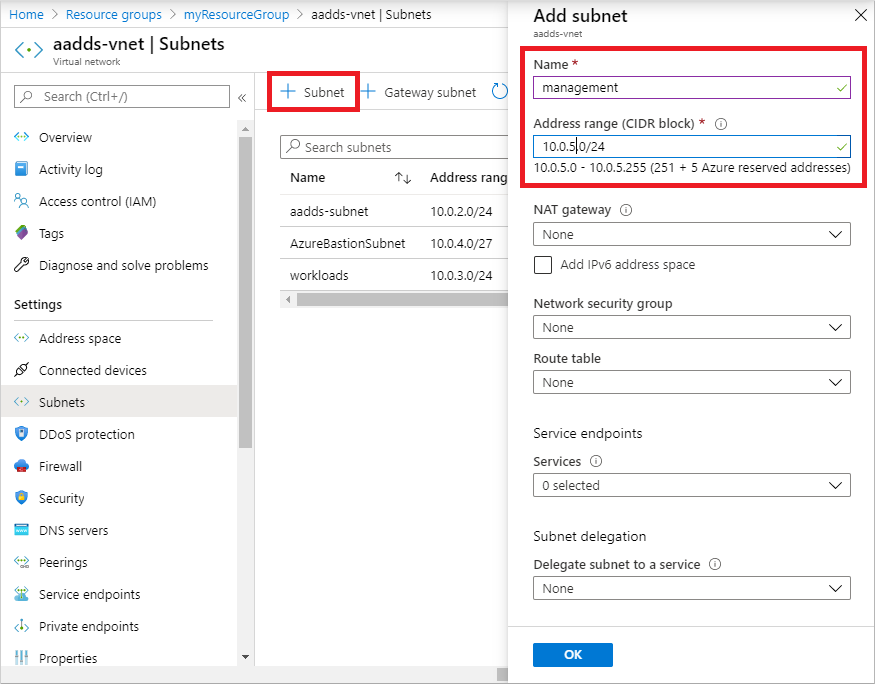
Next, in the left-hand menu of the virtual network window, select Subnets, then choose + Subnet to add a subnet.
Select + Subnet, then enter a name for the subnet, such as management. Provide an Address range (CIDR block), such as 10.0.5.0/24. Make sure that this IP address range doesn’t overlap with any other existing Azure or on-premises address ranges. Leave the other options as their default values, then select OK.
It takes a few seconds to create the subnet. Once it’s created, select the X to close the subnet window.
Back in the Networking pane to create a VM, choose the subnet you created from the drop-down menu, such as management. Again, make sure you choose the correct subnet and don’t deploy your VM in the same subnet as your managed domain.
For Public IP, select None from the drop-down menu. As you use Azure Bastion in this tutorial to connect to the management, you don’t need a public IP address assigned to the VM.
Leave the other options as their default values, then select Management.
Set Boot diagnostics to Off. Leave the other options as their default values, then select Review + create.
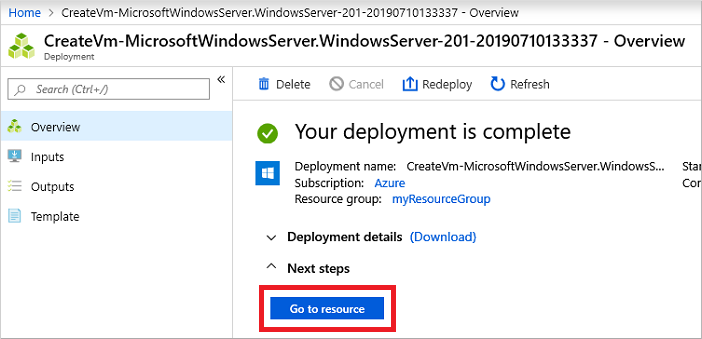
Review the VM settings, then select Create.
It takes a few minutes to create the VM. The Azure portal shows the status of the deployment. Once the VM is ready, select Go to resource.
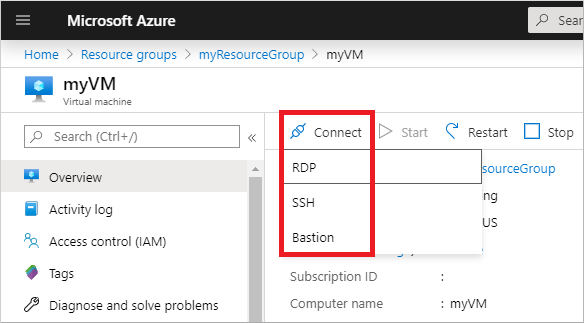
Connect to the Windows Server VM
To securely connect to your VMs, use an Azure Bastion host. With Azure Bastion, a managed host is deployed into your virtual network and provides web-based RDP or SSH connections to VMs. No public IP addresses are required for the VMs, and you don’t need to open network security group rules for external remote traffic. You connect to VMs using the Azure portal from your web browser. If needed, create an Azure Bastion host.
To use a Bastion host to connect to your VM, complete the following steps:
In the Overview pane for your VM, select Connect, then Bastion.
Enter the credentials for your VM that you specified in the previous section, then select Connect.
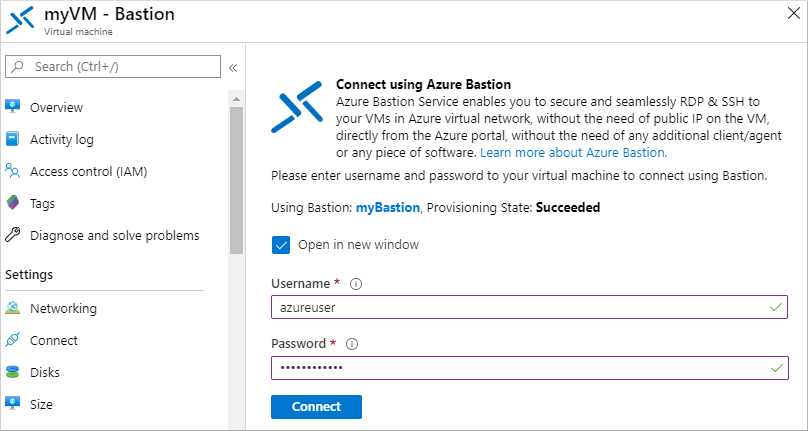
If needed, allow your web browser to open pop-ups for the Bastion connection to be displayed. It takes a few seconds to make the connection to your VM.
Join the VM to the managed domain
With the VM created and a web-based RDP connection established using Azure Bastion, now let’s join the Windows Server virtual machine to the managed domain. This process is the same as a computer connecting to a regular on-premises Active Directory Domain Services domain.
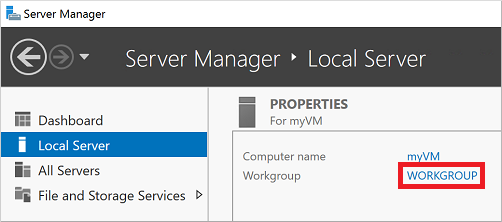
If Server Manager doesn’t open by default when you sign in to the VM, select the Start menu, then choose Server Manager.
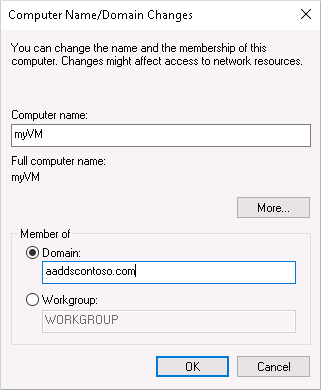
In the left pane of the Server Manager window, select Local Server. Under Properties on the right pane, choose Workgroup.
In the System Properties window, select Change to join the managed domain.

In the Domain box, specify the name of your managed domain, such as aaddscontoso.com, then select OK.
Enter domain credentials to join the domain. Provide credentials for a user that’s a part of the managed domain. The account must be part of the managed domain or Azure AD tenant — accounts from external directories associated with your Azure AD tenant can’t correctly authenticate during the domain-join process.
Account credentials can be specified in one of the following ways:
- UPN format (recommended) — Enter the user principal name (UPN) suffix for the user account, as configured in Azure AD. For example, the UPN suffix of the user contosoadmin would be contosoadmin@aaddscontoso.onmicrosoft.com . There are a couple of common use-cases where the UPN format can be used reliably to sign in to the domain rather than the SAMAccountName format:
- If a user’s UPN prefix is long, such as deehasareallylongname, the SAMAccountName may be autogenerated.
- If multiple users have the same UPN prefix in your Azure AD tenant, such as dee, their SAMAccountName format might be autogenerated.
- SAMAccountName format — Enter the account name in the SAMAccountName format. For example, the SAMAccountName of user contosoadmin would be AADDSCONTOSO\contosoadmin .
It takes a few seconds to join to the managed domain. When complete, the following message welcomes you to the domain:
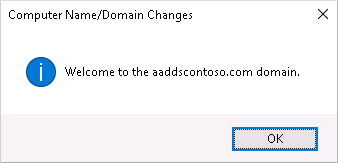
Select OK to continue.
To complete the process to join to the managed domain, restart the VM.
You can domain-join a VM using PowerShell with the Add-Computer cmdlet. The following example joins the AADDSCONTOSO domain and then restarts the VM. When prompted, enter the credentials for a user that’s a part of the managed domain:
Add-Computer -DomainName AADDSCONTOSO -Restart
To domain-join a VM without connecting to it and manually configuring the connection, you can use the Set-AzVmAdDomainExtension Azure PowerShell cmdlet.
Once the Windows Server VM has restarted, any policies applied in the managed domain are pushed to the VM. You can also now sign in to the Windows Server VM using appropriate domain credentials.
Clean up resources
In the next tutorial, you use this Windows Server VM to install the management tools that let you administer the managed domain. If you don’t want to continue in this tutorial series, review the following clean up steps to delete the VM. Otherwise, continue to the next tutorial.
Unjoin the VM from the managed domain
To remove the VM from the managed domain, follow through the steps again to join the VM to a domain. Instead of joining the managed domain, choose to join a workgroup, such as the default WORKGROUP. After the VM has rebooted, the computer object is removed from the managed domain.
If you delete the VM without unjoining from the domain, an orphaned computer object is left in Azure AD DS.
Delete the VM
If you’re not going use this Windows Server VM, delete the VM using the following steps:
- From the left-hand menu, select Resource groups
- Choose your resource group, such as myResourceGroup.
- Choose your VM, such as myVM, then select Delete. Select Yes to confirm the resource deletion. It takes a few minutes to delete the VM.
- When the VM is deleted, select the OS disk, network interface card, and any other resources with the myVM- prefix and delete them.
Troubleshoot domain-join issues
The Windows Server VM should successfully join to the managed domain, the same way as a regular on-premises computer would join an Active Directory Domain Services domain. If the Windows Server VM can’t join the managed domain, that indicates there’s a connectivity or credentials-related issue. Review the following troubleshooting sections to successfully join the managed domain.
Connectivity issues
If you don’t receive a prompt that asks for credentials to join the domain, there’s a connectivity problem. The VM can’t reach the managed domain on the virtual network.
After trying each of these troubleshooting steps, try to join the Windows Server VM to the managed domain again.
- Verify the VM is connected to the same virtual network that Azure AD DS is enabled in, or has a peered network connection.
- Try to ping the DNS domain name of the managed domain, such as ping aaddscontoso.com .
- If the ping request fails, try to ping the IP addresses for the managed domain, such as ping 10.0.0.4 . The IP address for your environment is displayed on the Properties page when you select the managed domain from your list of Azure resources.
- If you can ping the IP address but not the domain, DNS may be incorrectly configured. Confirm that the IP addresses of the managed domain are configured as DNS servers for the virtual network.
- Try to flush the DNS resolver cache on the virtual machine using the ipconfig /flushdns command.
Credentials-related issues
If you receive a prompt that asks for credentials to join the domain, but then an error after you enter those credentials, the VM is able to connect to the managed domain. The credentials you provided don’t then let the VM join the managed domain.
After trying each of these troubleshooting steps, try to join the Windows Server VM to the managed domain again.
- Make sure that the user account you specify belongs to the managed domain.
- Confirm that the account is part of the managed domain or Azure AD tenant. Accounts from external directories associated with your Azure AD tenant can’t correctly authenticate during the domain-join process.
- Try using the UPN format to specify credentials, such as contosoadmin@aaddscontoso.onmicrosoft.com . If there are many users with the same UPN prefix in your tenant or if your UPN prefix is overly long, the SAMAccountName for your account may be autogenerated. In these cases, the SAMAccountName format for your account may be different from what you expect or use in your on-premises domain.
- Check that you have enabled password synchronization to your managed domain. Without this configuration step, the required password hashes won’t be present in the managed domain to correctly authenticate your sign-in attempt.
- Wait for password synchronization to be completed. When a user account’s password is changed, an automatic background synchronization from Azure AD updates the password in Azure AD DS. It takes some time for the password to be available for domain-join use.
Next steps
In this tutorial, you learned how to:
- Create a Windows Server VM
- Connect to the Windows Server VM to an Azure virtual network
- Join the VM to the managed domain
To administer your managed domain, configure a management VM using the Active Directory Administrative Center (ADAC).


