- Активируем LDAP over SSL (LDAPS) в Windows Server 2012 R2
- magnetikonline / README.md
- This comment has been minimized.
- np422 commented Jan 28, 2017
- This comment has been minimized.
- magnetikonline commented Jan 29, 2017
- This comment has been minimized.
- nrauso commented Feb 21, 2017
- This comment has been minimized.
- Hg-203 commented Jun 15, 2017 •
- This comment has been minimized.
- diegograssato commented Oct 7, 2017
- This comment has been minimized.
- magnetikonline commented Oct 9, 2017
- This comment has been minimized.
- brucenelson6655 commented Nov 23, 2017
- This comment has been minimized.
- dabenavidesd commented Dec 12, 2017
- This comment has been minimized.
- dabenavidesd commented Dec 13, 2017
- The command has completed successfully
- Active Directory — Enabling the LDAP over SSL
- Active Directory — Enabling the LDAP over SSL
- Hardware List:
- Windows Playlist:
- Windows Related Tutorial:
- Tutorial — Active Directory Installation on Windows
- Tutorial — Testing the LDAP over SSL communication
- Tutorial — Certification Authority Installation on Windows
- Tutorial — Testing the LDAP over SSL Communication Again
Активируем LDAP over SSL (LDAPS) в Windows Server 2012 R2
По-умолчанию в Active Directory трафик по протоколу LDAP между контроллерами домена и клиентами не шифруется, т.е. данные по сети передаются в открытом виде. Потенциально это означает, что злоумышленник с помощью снифера пакетов может прочитать эти данные. Для стандартной среды Windows среды это в общем-то не критично, но ограничивает возможности разработчиков сторонних приложений, которые используют LDAP.
Так, например, операция смены пароля должна обязательно осуществляться через безопасный канал (например Kerberos или SSL/TLS). Это означает, что например, с помощью функции-php, обеспечивающей работу с AD по протоколу LDAP изменить пароль пользователя в домене не удастся.
Защитить данные, передаваемых по протоколу LDAP между клиентом и контроллером домена можно с помощью SSL версии протокола LDAP – LDAPS, который работает по порту 636 (LDAP «живет» на порту 389). Для этого на контроллере домена необходимо установить специальный SSL сертификат. Сертификат может быть как сторонним, выданным 3-ей стороной (например, Verisign), самоподписанным или выданным корпоративным центром сертификации.
В этой статье мы покажем, как с помощью установки сертификата задействовать LDAPS (LDAP over Secure Sockets Layer) на котроллере домена под управление Windows Server 2012 R2. При наличии требуемого сертификата служба LDAP на контроллере домена может устанавливать SSL соединения для передачи трафика LDAP и трафика сервера глобального каталога (GC).
Отметим, что LDAPS преимущественно используется сторонними приложениями (имеются в виде не-Microsoft клиенты) в целях защиты передаваемых по сети данных (обеспечить невозможности перехвата имена и паролей пользователей и других приватных данных).
Предположим, в вашей инфраструктуре уже развернут корпоративный удостоверяющий сервер Certification Authority (CA). Это может быть как полноценная инфраструктура PKI, так и отдельной-стоящий сервер с ролью Certification Authority.
На севере с ролью Certification Authority запустите консоль Certification Authority Management Console, выберите раздел шаблонов сертификатов (Certificate Templates ) и в контекстном меню выберите Manage. 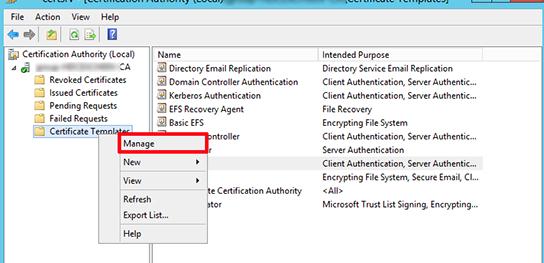
Найдите шаблон Kerberos Authentication certificate и создайте его копию, выбрав в меню Duplicate Template. 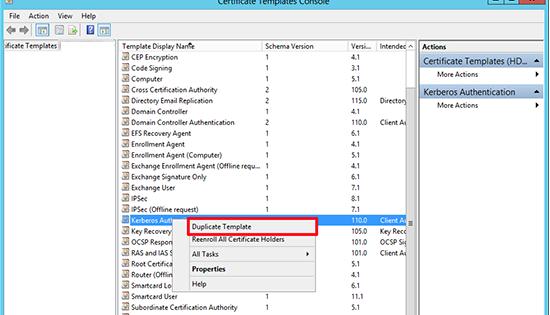
На вкладке General переименуйте шаблон сертификата в LDAPoverSSL, укажите период его действия и опубликуйте его в AD (Publish certificate in Active Directory). 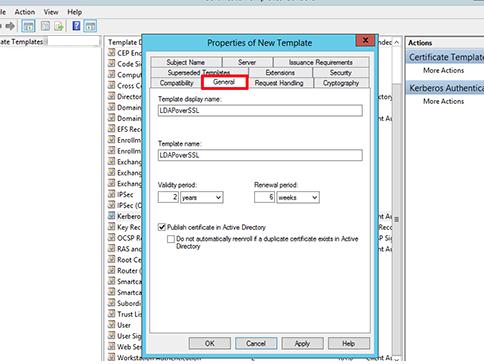
На вкладке Request Handling поставьте чекбокс у пункта Allow private key to be exported и сохраните шаблон.

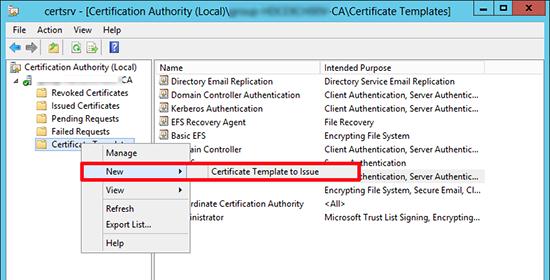
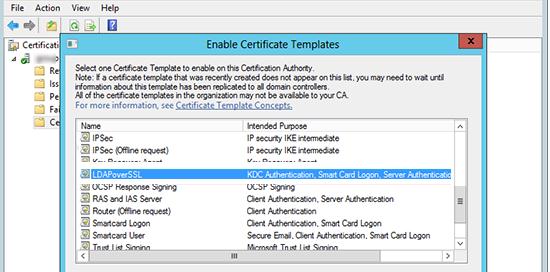
На базе созданного шаблона, опубликуем новый тип сертификата. Для этого, в контекстном меню раздела Certificate Templates выберем пункт New -> Certificate Template to issue.
Из списка доступных шаблонов выберите LDAPoverSSL и нажмите OK.
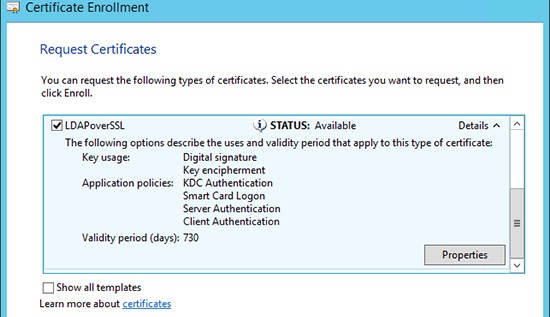
На контроллере домена, для которого планируется задействовать LDAPS, откройте оснастку управления сертификатами и в хранилище сертификатов Personal запросим новый сертификат (All Tasks -> Request New Certificate).

В списке доступных сертификатов выберите сертификат LDAPoverSSL и нажмите Enroll (выпустить сертификат).
Следующее требование – необходимо, чтобы контроллер домена и клиенты, которые будут взаимодействовать через LDAPS доверяли удостоверяющему центру (CA), который выдал сертификат для контроллера домена.
Если это еще не сделано, экспортируем корневой сертификат удостоверяющего центра в файл, выполнив на сервере с ролью Certification Authority команду:
certutil -ca.cert ca_name.cer 
А затем добавьте экспортированный сертификат в контейнере сертификатов Trusted Root Certification Authorities хранилища сертификатов на клиенте и контроллере домена. Сделать это можно через вручную через оснастку управления сертификатами, через GPO или из командной строки (подробнее здесь).
certmgr.exe -add C:\ca_name.cer -s -r localMachine ROOT
Необходимо перезапустить службы Active Directory на контроллере домена, либо целиком перезагрузить DC.
Осталось протестировать работу по LDAPS. Для этого на клиенте запустим утилиту ldp.exe и в меню выбираем Connection-> Connect->Укажите полное (FQDN) имя контроллера домена, выберите порт 636 и отметьте SSL -> OK. Если все сделано правильно, подключение должно установиться.
magnetikonline / README.md
Enable LDAP over SSL (LDAPS) for Microsoft Active Directory servers
Microsoft active directory servers will default to offer LDAP connections over unencrypted connections (boo!).
The steps below will create a new self signed certificate appropriate for use with and thus enabling LDAPS for an AD server. Of course the «self-signed» portion of this guide can be swapped out with a real vendor purchased certificate if required.
Steps have been tested successfully with Windows Server 2012R2, but should work with Windows Server 2008 without modification. Requires a working OpenSSL install (ideally Linux/OSX) and (obviously) a Windows Active Directory server.
Create root certificate
Using OpenSSL, create new private key and root certificate. Answer country/state/org questions as suitable:
Hold onto the resulting ca.key and ca.crt .
Import root certificate into trusted store of domain controller
- From the active directory server, open Manage computer certificates .
- Add the generated ca.crt to the certificate path Trusted Root Certification Authorities\Certificates .
- Done.
Create client certificate
We will now create a client certificate to be used for LDAPS, signed against our generated root certificate.
From the active directory server:
Create a new request.inf definition with the following contents — replacing ACTIVE_DIRECTORY_FQDN with the qualified domain name of your active directory server:
Run the following to create a client certificate request of client.csr (note: it’s critical this is run from the active directory server itself to ensure correct private key -> certificate association):
Back to our OpenSSL system:
Create v3ext.txt containing the following:
Create a certificate client.crt from certificate request client.csr and root certificate (with private key):
Verify generated certificate:
Ensure the following X509v3 extensions are all present:
- X509v3 Key Usage: Digital Signature, Key Encipherment
- X509v3 Extended Key Usage: TLS Web Server Authentication
- X509v3 Subject Key Identifier
Accept and import certificate
From the active directory server with client.crt present, run the following:
Open Manage computer certificates , the new certificate should now be present under Personal\Certificates . Ensure that:
- Certificate has a private key association.
- The «Intended Purposes» is defined as «Server Authentication».
- Certificate name is the FQDN of the active directory server.
Reload active directory SSL certificate
Alternatively you can just reboot the server, but this method will instruct the active directory server to simply reload a suitable SSL certificate and if found, enable LDAPS:
Create ldap-renewservercert.txt containing the following:
Run the following command:
Test LDAPS using ldp.exe utility
From another domain controller, firstly install our generated root certificate ca.crt to the certificate path Trusted Root Certification Authorities\Certificates .
From Connection , select Connect .
Enter name of target domain controller.
Enter 636 as port number (this is the LDAPS port).
Click OK to confirm the connection works.
- Enable LDAP over SSL with a third-party certification authority: https://support.microsoft.com/en-us/kb/321051
- LDAP renewServerCertificate: https://msdn.microsoft.com/en-us/library/cc223311.aspx
- How to Enable LDAPS in Active Directory (similar outcome to above): http://www.javaxt.com/tutorials/windows/how_to_enable_ldaps_in_active_directory
- DigiCert LDAPS certificate install guide: https://www.digicert.com/ssl-certificate-installation-microsoft-active-directory-ldap-2012.htm
This comment has been minimized.
Copy link Quote reply
np422 commented Jan 28, 2017
Great guide, thank you for making this public!
This comment has been minimized.
Copy link Quote reply
magnetikonline commented Jan 29, 2017
Glad you liked it @np422 👍
This comment has been minimized.
Copy link Quote reply
nrauso commented Feb 21, 2017
Great shot! Very helpful, thx!
This comment has been minimized.
Copy link Quote reply
Hg-203 commented Jun 15, 2017 •
Thanks that was very helpful. The only issue I ran into was the root cert needs to be added to the «Local Machine» not «Current User»
This comment has been minimized.
Copy link Quote reply
diegograssato commented Oct 7, 2017
This comment has been minimized.
Copy link Quote reply
magnetikonline commented Oct 9, 2017
@diegograssato already referenced in the README 👍
This comment has been minimized.
Copy link Quote reply
brucenelson6655 commented Nov 23, 2017
Worked like a charm !
This comment has been minimized.
Copy link Quote reply
dabenavidesd commented Dec 12, 2017
Hello all; I have been trying to follow all steps but due unsuffcient permissions (I guess) I got:
C:\Users\AAA\Downloads\certif4>ldifde -i -f ldap-renewservercert.txt
Connecting to «XXX.yyy.zzz»
Logging in as current user using SSPI
Importing directory from file «ldap-renewservercert.txt»
Loading entries.
Add error on entry starting on line 1: Inappropriate Authentication
The server side error is: 0x8009030e No credentials are available in the securit
y package
The extended server error is:
8009030E: SecErr: DSID-0C02042A, problem 4001 (INAPPROPRIATE_AUTH), data 0
0 entries modified successfully.
An error has occurred in the program
No log files were written. In order to generate a log file, please
specify the log file path via the -j option.
Please help getting it right
This comment has been minimized.
Copy link Quote reply
dabenavidesd commented Dec 13, 2017
Hello: it turns out; as I made a first attempt (wrongly, becasue I used just domain name instead of FQDN), and that certificate wrongly issued was on Service Account Store, so I deleted and export it from Computer Account Store the correct one, and got it to work:
C:\Users\AAA\Downloads\certif5>ldifde -i -f ldap-renewservercert.txt
Connecting to «XXX.yyy.zzz»
Logging in as current user using SSPI
Importing directory from file «ldap-renewservercert.txt»
Loading entries..
1 entry modified successfully.
The command has completed successfully
Thanks very much for your very short and clear tutorial
Active Directory — Enabling the LDAP over SSL
Active Directory — Enabling the LDAP over SSL
Would you like to learn how to install the Active Directory service and enable the LDAP over SSL feature on a computer runnin Windows server?In this tutorial, we are going to show you how enable the LDAP over SSL feature on a computer running Windows server.
• Windows 2012 R2
Hardware List:
The following section presents the list of equipment used to create this Windows tutorial.
Every piece of hardware listed above can be found at Amazon website.
Windows Playlist:
On this page, we offer quick access to a list of videos related to Windows installation.
Don’t forget to subscribe to our youtube channel named FKIT.
Windows Related Tutorial:
On this page, we offer quick access to a list of tutorials related to Windows.
Tutorial — Active Directory Installation on Windows
• IP — 192.168.15.10.
• Operacional System — Windows 2012 R2
• Hostname — TECH-DC01
• Active Directory Domain: TECH.LOCAL
If you already have an Active Directory domain, you may skip this part of the tutorial.
Open the Server Manager application.
Access the Manage menu and click on Add roles and features.

Access the Server role screen, select the Active Directory Domain Service and click on the Next button.

On the following screen, click on the Add features button.

Keep clicking on the Next button until you reach the last screen.

On the confirmation screen, click on the Install button.

Wait the Active directory installation to finish.

Open the Server Manager application.
Click on the yellow flag menu and select the option to promote this server to a domain controller

Select the option to Add a new forest and enter a root domain name.
In our example, we created a new domain named: TECH.LOCAL.

Enter a password to secure the Active Directory restoration.

On the DNS options screen, click on the Next button.

Verify the Netbios name assigned to your domain and click on the Next button.

Click on the Next button.

Review your configuration options and click on the Next button.

On the Prerequisites Check screen, click on the Install button.

Wait the Active Directory Configuration to finish.

After finishing the Active directory installation, the computer will restart automatically
You have finished the Active directory configuration on Windows server.
Tutorial — Testing the LDAP over SSL communication
We need to test if your domain controller is offering the LDAP over SSL service on port 636.
On the domain controller, access the start menu and search for the LDP application.

First, let’s test if your domain controller is offering the LDAP service on port 389.
Access the Connection menu and select the Connect option.

Try to connect to the localhost using the TCP port 389.

You should be able to connect to the LDAP service on the localhost port 389.

Now, we need to test if your domain controller is offering the LDAP over SSL service on port 636.
Open a new LDP application Window and try to connect to the localhost using the TCP port 636.
Select the SSL checkbox and click on the Ok button.

If the system displays an error message, your domain controller is not offering the LDAPS service yet.
To solve this, we are going to install a Windows Certification authority on the next part of this tutorial.

If you were able to successfully connect to the localhost on port 636 using SSL encryption, you may skip the next part of this tutorial.
Tutorial — Certification Authority Installation on Windows
We need to install the Windows certification authority service.
The local certification authority will provide the domain controller with a certificate that will allow the LDAPS service to operate on the TCP port 636.
Open the Server Manager application.
Access the Manage menu and click on Add roles and features.
Access the Server role screen, select the Active Directory Certificate Services and click on the Next button.

On the following screen, click on the Add features button.

Keep clicking on the Next button until you reach the role service screen.
Enable the option named Certification Authority and click on the Next button.

On the confirmation screen, click on the Install button.

Wait the Certification Authority installation to finish.

Open the Server Manager application.
Click on the yellow flag menu and select the option: Configure Active Directory Certificate Services

On the credentials screen, click on the Next button.
Select the Certification Authority option and click on the Next button.

Select the Enterprise CA option and click on the Next button.

Select the Create a new private key option and click on the Next button.

Keep the default cryptography configuration and click on the Next button.

Set a common name to the Certification authority and click on the Next button.
In our example, we set the common name: TECH-CA

Set the Windows Certification authority validity period.

Keep the default Windows Certification authority database location.

Verify the summary and click on the Configure button.

Wait for the Windows server certification authority installation to finish.

After finishing the certification authority installation, reboot your computer.
You have finished the Windows Certification authority installation.
Tutorial — Testing the LDAP over SSL Communication Again
We need to test if your domain controller is offering the LDAP over SSL service on port 636.
After finishing the Certification authority installation, wait 5 minutes and restart your domain controller.
During boot time, your domain controller will automatically request a server certificate from the local certification authority.
After getting the server certificate, your domain controller will start offering the LDAP service over SSL on the 636 port.
On the domain controller, access the start menu and search for the LDP application.
Access the Connection menu and select the Connect option.
Try to connect to the localhost using the TCP port 636.
Select the SSL checkbox and click on the Ok button.
Try to connect to the localhost using the TCP port 636.
Select the SSL checkbox and click on the Ok button.
This time, you should be able to connect to the LDAP service on the localhost port 636.

If you are not able to connect to port 636, reboot the computer again and wait 5 minutes more.
It may take sometime before your domain controller receives the certificate requested from the Certification Authority.


