- Создание групп серверов и управление ими create and Manage Server Groups
- Группы серверов Server groups
- Создание новой группы серверов To create a new server group
- Изменение существующей группы серверов To edit an existing server group
- Удаление существующей группы серверов To delete an existing server group
- Group Managed Service Accounts в Windows Server 2012
- Создаем KDS ключ
- Создаем учетную запись gMSA
- Установка gMSA на сервере
- «Тонкая» настройка gMSA
- Manage users in your RDS collection
- Create your users and groups in Active Directory
- Install AD DS tools
- Create a group
- Create a user and add to a group
- Assign users and groups to collections
Создание групп серверов и управление ими create and Manage Server Groups
Область применения. Windows Server (Semi-Annual Channel), Windows Server 2016, Windows Server 2012 R2, Windows Server 2012 Applies To: Windows Server (Semi-Annual Channel), Windows Server 2016, Windows Server 2012 R2, Windows Server 2012
В этом разделе описывается создание пользовательских групп серверов, определяемых пользователем, в диспетчер сервера в Windows Server. This topic describes how to create custom, user-defined groups of servers in Server Manager in Windows Server.
Группы серверов Server groups
Серверы, добавленные в пул серверов, отображаются на странице все серверы в Диспетчер сервера. Servers that you add to the server pool are displayed on the All Servers page in Server Manager. Вы можете создавать настраиваемые группы из уже добавленных серверов. You can create custom groups of servers that you have added. Группы серверов позволяют просматривать и управлять меньшим подмножеством пула серверов в качестве логического устройства. Например, можно создать группу « серверы учета » для всех серверов в бухгалтерии организации или группу под названием « Чикаго » для всех серверов, географически расположенных в Чикаго. Server groups allow you to view and manage a smaller subset of your server pool as a logical unit; for example, you can create a group called Accounting Servers for all servers in your organization’s Accounting department, or a group called Chicago for all servers that are geographically located in Chicago. После создания группы серверов на домашней странице группы в диспетчер сервера отображаются сведения о событиях, службах, счетчиках производительности, анализатор соответствия рекомендациям результатах, а также об установленных ролях и функциях группы в целом. After you create a server group, the group’s home page in Server Manager displays information about events, services, performance counters, Best Practices Analyzer results, and installed roles and features for the group as a whole.
Серверы могут входить в несколько групп. Servers can be a member of more than one group.
Создание новой группы серверов To create a new server group
В меню Управление выберите команду создать группу серверов. On the Manage menu, click create Server Group.
В текстовом поле Имя группы серверов укажите понятное имя для вашей группы серверов, например Серверы учета. In the Server group name text box, type a friendly name for your server group, such as Accounting Servers.
Добавьте серверы в выбранный список из пула серверов или добавьте другие серверы в группу с помощью вкладок Active Directory, DNS или Импорт . add servers to the selected list from the server pool, or add other servers to the group by using the active directory, DNS, or import tabs. Дополнительные сведения об использовании этих вкладок см. в разделе Добавление серверов в Диспетчер сервера в этом руководство. For more information about how to use these tabs, see add Servers to Server Manager in this guide.
После добавления серверов в группу нажмите кнопку ОК. When you have finished adding servers to the group, click OK. Новая группа отобразится в области навигации диспетчер сервера в группе все серверы . The new group is displayed in the Server Manager navigation pane under the All Servers group.
Изменение существующей группы серверов To edit an existing server group
Выполните одно из следующих действий. Do one of the following.
В области навигации диспетчер сервера щелкните правой кнопкой мыши группу серверов и выберите команду изменить группу серверов. In the Server Manager navigation pane, right-click a server group, and then click edit Server Group.
На домашней странице группы серверов откройте меню задачи на плитке серверы и выберите команду изменить группу серверов. On the home page for the server group, open the Tasks menu on the Servers tile, and then click edit Server Group.
Измените имя группы или добавьте или удалите серверы из группы. change the group name, or add or remove servers from the group.
Удаление серверов из группы серверов не приводит к удалению серверов из диспетчер сервера. removing servers from a server group does not remove servers from Server Manager. Удаленные из группы серверы сохраняются в группе Все серверы в пуле серверов. Servers that you remove from a group remain in the All Servers group, in the server pool.
После изменения группы нажмите кнопку ОК. When you are finished with changes to the group, click OK.
Удаление существующей группы серверов To delete an existing server group
Выполните одно из следующих действий. Do one of the following.
В области навигации диспетчер сервера щелкните правой кнопкой мыши группу серверов и выберите команду Удалить группу серверов. In the Server Manager navigation pane, right-click a server group, and then click delete Server Group.
На домашней странице группы серверов откройте меню задачи на плитке серверы , а затем щелкните Удалить группу серверов. On the home page for the server group, open the Tasks menu on the Servers tile, and then click delete Server Group.
Чтобы подтвердить удаление группы серверов, нажмите кнопку Да. When you are prompted to make sure you want to delete the server group, click Yes.
Удаление группы серверов не приводит к удалению серверов из диспетчер сервера. deleting a server group does not remove servers from Server Manager. Удаленные из группы серверы сохраняются в группе Все серверы в пуле серверов. Servers that were in a deleted group remain in the All Servers group, in the server pool.
После изменения группы нажмите кнопку ОК. When you are finished with changes to the group, click OK.
Group Managed Service Accounts в Windows Server 2012
Технология управляемых служебных записей (Managed Service Accounts – MSA) впервые была представлена в Windows Server 2008 R2 и предназначена для автоматического управления (смены) паролей служебных (сервисных) учетных записей. Благодаря использованию механизма Managed Service Accounts можно существенно снизить риск компрометации системных учетных записей, из-под которых запущены системные службы(не секрет, что существует большое количество утилит, позволяющих извлечь пароли локальных пользователей из LSASS).
Для учетных записей MSA генерируется пароль длиной 240 символов, из которых половина – английские буквы, другая половина – служебные символы. Пароль такой учетной записи меняется автоматически (по-умолчанию каждые 30 дней) и не хранится на локальной системе
Основным недостатком MSA является возможность использования подобной служебной записи только на одном компьютере. Это означает, что служебные учетные записи MSA не могут работать с кластерными и NLB службами (веб-фермы), которые работают одновременно на нескольких серверах и используют одну учетную запись и пароль.
Для преодоления указанного недостатка Microsoft в Windows Server 2012 добавила функционал групповых управляемых учетных записей служб (gMSA — Group Managed Service Accounts). Такие учетные записи можно одновременно использовать на нескольких серверах, чтобы все экземпляры службы использовали одну и ту же учетную запись, например в службе балансировки нагрузки (NLB), кластерных службах и т.п.
Требования gMSA :
Чтобы воспользоваться возможностями gMSA, нужно, чтобы инфраструктура соответствовала следующим требованиям:
- Уровень схемы AD — Windows Server 2012 (как ее обновить описано здесь).
- Контроллер домена Windows Server 2012 (и выше) со службой Microsoft Key Distribution Service (служба распространения ключей) – именно это служба отвечает за генерацию паролей
- PowerShell модуль для управления Active Directory
- В качестве клиентов могут использоваться Windows Server 2012/2012 R2 и Windows 8/8.1
- Служба, использующая gMSA должна быть совместима с этим типом аккаунтов (должно быть указано в документации). На данный момент gMSA поддерживают: SQL Server 2008 R2 SP1, 2012;IIS; AD LDS; Exchange 2010/2013
Создаем KDS ключ
Прежде, чем приступить к созданию учетной записи gMSA, необходимо выполнить разовую операцию по созданию корневого ключа KDS (KDS root key). Для этого на контроллере домена с правами администратора выполните команду (служба Microsoft Key Distribution Services должна быть установлена и включена):
В этом случае ключ будет создан и доступен через 10 часов, после окончания репликации.
Проверим, что корневой ключ KDS создался успешно:

Создаем учетную запись gMSA
Создадим новую учетную запись gMSA командой:
Где, gmsa1 – имя создаваемой учетной записи gMSA
dc1.winitpro.ru – имя DNS сервера
gmsa1Group – группа Active Directory, в которую включены все системы, которые будут использовать эту групповую учетную запись (группа должна быть создана предварительно)
После выполнения команды нужно открыть консоль ADUC (Active Directory Users and Computers) и проверить, что в контейнере (OU) Managed Service Accounts появилась советующая учетная запись (по умолчанию этот контейнер не отображается, чтобы его увидеть, нужно в меню View оснастки включить опцию Advanced Features) 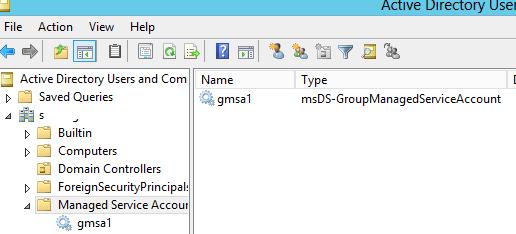
Установка gMSA на сервере
Подключим модуль Powershell для поддержки среды Active Directory:
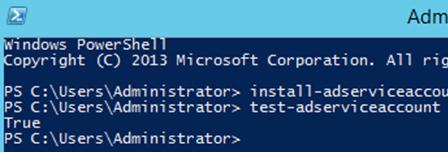
Далее нам нужно установить управляемую учетную запись на сервера, на которых она будет использоваться (из-под этой учетки в дальнейшем будет запущен некий сервис). В первую очередь нужно проверить, что этому серверу разрешено получать пароль учетной записи gMSA из Active Directory. Для этого его учетная запись должна состоять в указанной при создании доменной группе (в нашем случае gmsa1Group). Установим запись gmsa1 на данном сервере:
Проверить, что учетная групповая сервисная запись установлена корректно можно так (для Windows PowerShell 4.0):
Если команда вернет True – все настроено правильно.
Далее в свойствах службы укажем, что она будет запускаться их под учетной записи gMSA. Для этого на вкладке Log on нужно выбрать This account и указать имя сервисной учетной записи. В конце имени обязательно указывается символ $, пароль указывать не нужно. После сохранения изменений службу нужно перезапустить.
Сервисной учетной записи автоматически будут предоставлены права «Log On As a Service».
«Тонкая» настройка gMSA
Периодичность смены пароля можно изменить (по умолчанию 30 дней):
Учетную запись gMSA можно использовать и в задачах планировщика. Тонкий нюанс в том, что задание можно настроить только через PowerShell.
Аргумент «-LogonType Password» означает, что пароль для этой gMSA учетной записи будет получен с контроллера домена.
Manage users in your RDS collection
Applies to: Windows Server (Semi-Annual Channel), Windows Server 2019, Windows Server 2016
As an admin, you can directly manage which users have access to specific collections. This way, you can create one collection with standard applications for information workers, but then create a separate collection with graphics-intensive modeling applications for engineers. There are two primary steps to managing user access in a Remote Desktop Services (RDS) deployment:
Create your users and groups in Active Directory
In an RDS deployment, Active Directory Domain Services (AD DS) is the source of all users, groups, and other objects in the domain. You can manage Active Directory directly with PowerShell, or you can use built in UI tools that add ease and flexibility. The following steps will guide you to install those tools — if you do not have them already installed — and then use those tools to manage users and groups.
Install AD DS tools
The following steps detail how to install the AD DS tools on a server already running AD DS. Once installed, you can then create users or create groups.
- Connect to the server running Active Directory Domain Services. For Azure deployments:
- In the Azure portal, click Browse > Resource groups, and then click the resource group for the deployment
- Select the AD virtual machine.
- Click Connect > Open to open the Remote Desktop client. If Connect is grayed out, the virtual machine might not have a public IP address. To give it one perform the following steps, then try this step again.
- Click Settings > Network interfaces, and then click the corresponding network interface.
- Click Settings > IP address.
- For Public IP address, select Enabled, and then click IP address.
- If you have an existing public IP address you want to use, select it from the list. Otherwise, click Create new, enter a name, and then click OK and Save.
- In the client, click Connect, and then click Use another account. Enter the user name and password for a domain administrator account.
- Click Yes when asked about the certificate.
- Install the AD DS tools:
- In Server Manager click Manage > Add Roles and Features.
- Click Role-based or feature-based installation, and then click the current AD server. Follow the steps until you get to the Features tab.
- Expand Remote Server Administration Tools > Role Administration Tools > AD DS and AD LDS Tools, and then select AD DS Tools.
- Select Restart the destination server automatically if required, and then click Install.
Create a group
You can use AD DS groups to grant access to a set of users that need to use the same remote resources.
- In Server Manager on the server running AD DS, click Tools > Active Directory Users and Computers.
- Expand the domain in the left-hand pane to view its subfolders.
- Right-click the folder where you want to create the group, and then click New > Group.
- Enter an appropriate group name, then select Global and Security.
Create a user and add to a group
- In Server Manager on the server running AD DS, click Tools > Active Directory Users and Computers.
- Expand the domain in the left-hand pane to view its subfolders.
- Right-click Users, and then click New > User.
- Enter, at minimum, a first name and a user logon name.
- Enter and confirm a password for the user. Set appropriate user options, like User must change password at next logon.
- Add the new user to a group:
- In the Users folder right-click the new user.
- Click Add to a group.
- Enter the name of the group to which you want to add the user.
Assign users and groups to collections
Now that you’ve created the users and groups in Active Directory, you can add some granularity regarding who has access to the Remote Desktop collections in your deployment.
Connect to the server running the Remote Desktop Connection Broker (RD Connection Broker) role, following the steps described earlier.
Add the other Remote Desktop servers to the RD Connection Broker’s pool of managed servers:
- In Server Manager click Manage > Add Servers.
- Click Find Now.
- Click each server in your deployment that is running a Remote Desktop Services role, and then click OK.
Edit a collection to assign access to specific users or groups:
- In Server Manager click Remote Desktop Services > Overview, and then click a specific collection.
- Under Properties, click Tasks > Edit properties.
- Click User groups.
- Click Add and enter the user or group that you want to have access to the collection. You can also remove users and groups from this window by selecting the user or group you want to remove, and then clicking Remove.
The User groups window can never be empty. To narrow the scope of users who have access to the collection, you must first add specific users or groups before removing broader groups.


