- Process Explorer v16.32
- Introduction
- Related Links
- Download
- Installation
- Note on use of symbols
- Learn More
- Manage a Server Core server
- Managing Server Core with Windows Admin Center
- Managing Server Core remotely with Server Manager
- Managing with Microsoft Management Console
- To configure Windows Firewall to allow MMC snap-in(s) to connect
- Managing with Remote Desktop Services
- Add hardware and manage drivers locally
- Windows System Resource Manager Overview
- Role/Feature description
- Practical applications
- Methods of resource management
- Built-in resource management policies
- Custom resource management
- Removed or deprecated functionality
Process Explorer v16.32
By Mark Russinovich
Published: April 28, 2020
 Download Process Explorer (2.5 MB)
Run now from Sysinternals Live.
Introduction
Ever wondered which program has a particular file or directory open? Now you can find out. Process Explorer shows you information about which handles and DLLs processes have opened or loaded.
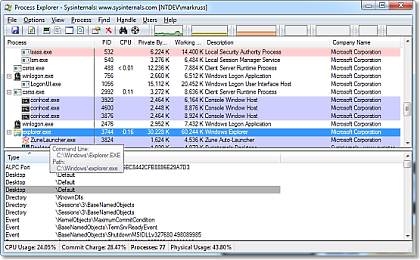
The Process Explorer display consists of two sub-windows. The top window always shows a list of the currently active processes, including the names of their owning accounts, whereas the information displayed in the bottom window depends on the mode that Process Explorer is in: if it is in handle mode you’ll see the handles that the process selected in the top window has opened; if Process Explorer is in DLL mode you’ll see the DLLs and memory-mapped files that the process has loaded. Process Explorer also has a powerful search capability that will quickly show you which processes have particular handles opened or DLLs loaded.
The unique capabilities of Process Explorer make it useful for tracking down DLL-version problems or handle leaks, and provide insight into the way Windows and applications work.

Related Links
- Windows Internals Book The official updates and errata page for the definitive book on Windows internals, by Mark Russinovich and David Solomon.
- Windows Sysinternals Administrator’s Reference The official guide to the Sysinternals utilities by Mark Russinovich and Aaron Margosis, including descriptions of all the tools, their features, how to use them for troubleshooting, and example real-world cases of their use.
Download
Download Process Explorer (2.5 MB)
Run now from Sysinternals Live.
Runs on:
- Client: Windows Vista and higher (Including IA64).
- Server: Windows Server 2008 and higher (Including IA64).
Installation
Simply run Process Explorer (procexp.exe).
The help file describes Process Explorer operation and usage. If you have problems or questions please visit the Process Explorer forum on Technet.
Note on use of symbols
When you configure the path to DBGHELP.DLL and the symbol path uses the symbol server, the location of DBGHELP.DLL also has to contain the SYMSRV.DLL supporting the server paths used. See SymSrv documentation or more information on how to use symbol servers.
Learn More
Here are some other handle and DLL viewing tools and information available at Sysinternals:
- The case of the Unexplained. In this video, Mark describes how he has solved seemingly unsolvable system and application problems on Windows.
- Handle — a command-line handle viewer
- ListDLLs — a command-line DLL viewer
- PsList — local/remote command-line process lister
- PsKill — local/remote command-line process killer
- Defrag Tools: #2 — Process Explorer In this episode of Defrag Tools, Andrew Richards and Larry Larsen show how to use Process Explorer to view the details of processes, both at a point in time and historically.
- Windows Sysinternals Primer: Process Explorer, Process Monitor and More Process Explorer gets a lot of attention in the first Sysinternals Primer delivered by Aaron Margosis and Tim Reckmeyer at TechEd 2010.
—>
Manage a Server Core server
Applies to: Windows Server 2019, Windows Server 2016, and Windows Server (Semi-Annual Channel)
You can manage a Server Core server in the following ways:
You can also add hardware and manage drivers locally, as long as you do that from the command line.
There are some important limitations and tips to keep in mind when you work with Server Core:
- If you close all command prompt windows and want to open a new Command Prompt window, you can do that from the Task Manager. Press CTRL+ALT+DELETE, click Start Task Manager, click More Details > File > Run, and then type cmd.exe. (Type Powershell.exe to open a PowerShell command windows.) Alternatively, you can sign out and then sign back in.
- Any command or tool that attempts to start Windows Explorer will not work. For example, running start . from a command prompt won’t work.
- There is no support for HTML rendering or HTML help in Server Core.
- Server Core supports Windows Installer in quiet mode so that you can install tools and utilities from Windows Installer files. When installing Windows Installer packages on Server Core, use the /qb option to display the basic user interface.
- To change the time zone, run Set-Date.
- To change international settings, run control intl.cpl.
- Control.exe won’t run on its own. You must run it with either Timedate.cpl or Intl.cpl.
- Winver.exe isn’t available in Server Core. To obtain version information use Systeminfo.exe.
Managing Server Core with Windows Admin Center
Windows Admin Center is a browser-based management app that enables on-premises administration of Windows Servers with no Azure or cloud dependency. Windows Admin Center gives you full control over all aspects of your server infrastructure and is particularly useful for management on private networks that are not connected to the Internet. You can install Windows Admin Center on Windows 10, on a gateway server, or on an installation of Windows Server with Desktop Experience, and then connect to the Server Core system that you want to manage.
Managing Server Core remotely with Server Manager
Server Manager is a management console in Windows Server that helps you provision and manage both local and remote Windows-based servers from your desktops, without requiring either physical access to servers, or the need to enable Remote Desktop protocol (RDP) connections to each server. Server Manager supports remote, multi-server management.
To enable your local server to be managed by Server Manager running on a remote server, run the Windows PowerShell cmdlet Configure-SMRemoting.exe –Enable.
Managing with Microsoft Management Console
You can use many snap-ins for Microsoft Management Console (MMC) remotely to manage your Server Core server.
To use an MMC snap-in to manage a Server Core server that is a domain member:
- Start an MMC snap-in, such as Computer Management.
- Right-click the snap-in, and then click Connect to another computer.
- Type the computer name of the Server Core server, and then click OK. You can now use the MMC snap-in to manage the Server Core server as you would any other PC or server.
To use an MMC snap-in to manage a Server Core server that is not a domain member:
Establish alternate credentials to use to connect to the Server Core computer by typing the following command at a command prompt on the remote computer:
If you want to be prompted for a password, omit the /pass option.
When prompted, type the password for the user name you specified. If the firewall on the Server Core server is not already configured to allow MMC snap-ins to connect, follow the steps below to configure Windows Firewall to allow MMC snap-in. Then continue with step 3.
On a different computer, start an MMC snap-in, such as Computer Management.
In the left pane, right-click the snap-in, and then click Connect to another computer. (For example, in the Computer Management example, you would right-click Computer Management (Local).)
In Another computer, type the computer name of the Server Core server, and then click OK. You can now use the MMC snap-in to manage the Server Core server as you would any other computer running a Windows Server operating system.
To configure Windows Firewall to allow MMC snap-in(s) to connect
To allow all MMC snap-ins to connect, run the following command:
To allow only specific MMC snap-ins to connect, run the following:
Where rulegroup is one of the following, depending on which snap-in you want to connect:
| MMC snap-in | Rule group |
|---|---|
| Event Viewer | Remote Event Log Management |
| Services | Remote Service Management |
| Shared Folders | File and Printer Sharing |
| Task Scheduler | Performance Logs and Alerts, File and Printer Sharing |
| Disk Management | Remote Volume Management |
| Windows Firewall and Advanced Security | Windows Firewall Remote Management |
Some MMC snap-ins don’t have a corresponding rule group that allows them to connect through the firewall. However, enabling the rule groups for Event Viewer, Services, or Shared Folders will allow most other snap-ins to connect.
Additionally, certain snap-ins require further configuration before they can connect through Windows Firewall:
- Disk Management. You must first start the Virtual Disk Service (VDS) on the Server Core computer. You must also configure the Disk Management rules appropriately on the computer that is running the MMC snap-in.
- IP Security Monitor. You must first enable remote management of this snap-in. To do this, at a command prompt, type cscript c:\windows\system32\scregedit.wsf /im 1
- Reliability and Performance. The snap-in does not require any further configuration, but when you use it to monitor a Server Core computer, you can only monitor performance data. Reliability data is not available.
Managing with Remote Desktop Services
You can use Remote Desktop to manage a Server Core server from remote computers.
Before you can access Server Core, you’ll need to run the following command:
This enables the Remote Desktop for Administration mode to accept connections.
Add hardware and manage drivers locally
To add hardware to a Server Core server, follow the instructions provided by the hardware vendor for installing new hardware.
If the hardware is not plug and play, you’ll need to manually install the driver. To do that, copy the driver files to a temporary location on the server, and then run the following command:
Where driverinf is the file name of the .inf file for the driver.
If prompted, restart the computer.
To see what drivers are installed, run the following command:
You must include the space after the equal sign for the command to complete successfully.
To disable a device driver, run the following:
Where service_name is the name of the service that you got when you ran sc query type= driver.
Windows System Resource Manager Overview
Applies To: Windows Server 2012
You can use Windows System Resource Manager to allocate processor and memory resources to applications, users, Remote Desktop Services sessions, and Internet Information Services (IIS) application pools.
With Windows System Resource Manager for the Windows ServerВ® 2012 operating system, you can manage server processor and memory usage with standard or custom resource policies. Managing your resources can help ensure that all the services provided by a single server are available on an equal basis or that your resources will always be available to high-priority applications, services, or users.
Windows System Resource Manager only manages processor resources when the combined processor load is greater than 70 percent. This means that it does not actively limit the resources that can be used by each consumer when processor load is low. When there is contention for processor resources, resource allocation policies help ensure minimum resource availability based on the management profile that you define.
Role/Feature description
You can use Windows System Resource Manager to:
Manage system resources (processor and memory) with preconfigured policies, or create custom policies that allocate resources per process, per user, per Remote Desktop Services session, or per Internet Information Services (IIS) application pool.
Use calendar rules to apply different policies at different times without manual intervention or reconfiguration.
Automatically select resource policies that are based on server properties and events (such as cluster events or conditions) or changes to installed physical memory or number of processors.
Collect resource usage data locally or in a custom SQL database. Resource usage data from multiple servers can be consolidated on a single computer running Windows System Resource Manager.
Create a computer group to help organize Remote Desktop Session Host servers that you want to manage. Policies can easily be exported or modified for an entire computer group.
Practical applications
Because Windows ServerВ 2008В R2 is designed to give as many resources as possible to non-operating system tasks, a server running a single role usually does not require resource management. However, when multiple applications and services are installed on a single server, they are not aware of competing processes. An unmanaged application or service will typically use all available resources to complete a task. Thus, it is important to use a tool such as Windows System Resource Manager to manage system resources on multipurpose servers. Using Windows System Resource Manager provides two key benefits:
More services can run on a single server because service availability can be improved through dynamically managed resources.
High-priority users or system administrators can access the system even during times of maximum resource load.
Methods of resource management
Windows System Resource Manager includes five built-in resource management policies that you can use to quickly implement management. In addition, you can create custom resource management policies to meet your specific needs.
Built-in resource management policies
You can enable built-in resource management policies by selecting the type of policy to use. No further configuration is required.
Equal per process
When the Equal_Per_Process resource allocation policy is managing the system, each running process is given equal treatment. For example, if a server that is running ten processes reaches 70 percent processor utilization, Windows System Resource Manager will limit each process to using 10 percent of the processor resources while they are in contention. Note that resources not used by low utilization processes will be allocated to other processes.
When the Equal_Per_User resource allocation policy is managing the system, processes are grouped according to the user account that is running them, and each of these process groups is given equal treatment. For example, if four users are running processes on the server, each user will be allocated 25 percent of the system resources to complete those processes. A user running a single application is allocated the same resources as a user running several applications. This policy is especially useful for application servers.
Equal per session
When the Equal_Per_Session resource allocation policy is managing the system, resources are allocated on an equal basis for each session connected to the system. This policy is for use with RD Session Host servers.
Equal per IIS application pool
When the Equal_Per_IISAppPool resource allocation policy is managing the system, each running IIS application pool is given equal treatment, and applications that are not in an IIS application pool can only use resources that are not being consumed by IIS application pools.
Weighted Remote Sessions
When the Weighted_Remote_Sessions resource allocation policy is managing the system, the processes are grouped according to the priority assigned with the user account. For example, if three users are remotely connected, the user assigned Premium priority will receive highest priority access to the CPU, the user assigned Standard priority will receive second priority to the CPU, and the user assigned Basic priority will receive lowest priority to the CPU. This policy is for use with RD Session Host servers.
.jpeg) Note Note |
|---|
| Note |
|---|


