- Windows server resolve dns
- Adam the Automator
- Resolve-DnsName: Resolving DNS Records with PowerShell
- June Castillote
- Prerequisites
- Resolve-DnsName: The PowerShell DNS Resolver
- Querying Different Types of DNS Records
- Using Specific Servers for DNS Lookup
- Reporting DNS Records using PowerShell Script
- Defining the Variables
- Performing DNS Lookups
- Conclusion
- Условное разрешение DNS имен в Windows Server: DNS Conditional Forwarding, политики DNS
- Настройка DNS Conditional Forwarder в Windows Server
- Настройка DNS Conditional Forwarding с помощью PowerShell
- Фильтрация запросов DNS, политики разрешения имен в Windows Server 2016
Windows server resolve dns
- Open up the command prompt (In Windows, you can use WINDOWS KEY+R to open Run dialogue box and type cmd)
(note: Use your up and down arrow keys to access recent commands you have entered in the command line.)
To see your current DNS settings, type ipconfig /displaydns and press Enter.
To delete the entries, type ipconfig /flushdns and press Enter.
To see your DNS settings again, type ipconfig /displaydns and press Enter.
You should see blank records or you might get the message «Could not display the DNS Resolver Cache.»
To perform a DNS lookup, type ping scisweb.ulster.ac.uk and press Enter.
To see your DNS settings again, type ipconfig /displaydns and press Enter.
You should see a DNS record for scisweb.ulster.ac.uk that includes the IP address and other information. Another field in the DNS cache is a TTL value, which is different from the TTL in an IP packet. This DNS TTL value is sent by the DNS server maintaining the scisweb.ulster.ac.uk record. It is measured in seconds and tells your DNS client how long to cache the DNS record as a safeguard against clients holding on to DNS records whose IP addresses might have changed.
To open your computer’s Hosts file, run Notepad as administrator. Easiest way is to press and then type notepad in windows 8 splashscreen, select notepad and right click and then select «Run as administrator» in bottom taskbar area of windows 8. In the Open dialog box, navigate to C:\Windows\System32\Drivers\Etc. In the File type drop-down list, click All Files. Double-click the hosts file to open it.
You should now have a hosts file open with various settings.
After the last line in the file, type 193.61.191.104 university, and then save the file and exit Notepad.
At the command prompt, type ipconfig /displaydns and press Enter to see that the entry is in your DNS cache.
Type ping university and press Enter.
Delete the DNS cache again by typing ipconfig /flushdns and press Enter.
Display your DNS cache by typing ipconfig /displaydns and press Enter.
Notice that the university entry remains in the cache because the Hosts file data always stays in the cache.
Type nslookup scisweb.ulster.ac.uk and press Enter.
Your DNS server’s name and IP address are displayed, along with the name and IP address of www.ulster.ac.uk. You use Nslookup to look up a host’s IP address without actually communicating with it.
Type nslookup and press Enter.
You should now have entered Nslookup’s interactive mode. You should see an arrow prompt.
Type www.google.com and press Enter.
Notice that more than one address is returned along with one or more aliases (other names that www.google.com goes by).
Type www.google.com again (or press the up arrow to repeat the last line you typed) and press Enter.
You should see the IP addresses returned in a different order. (If you don’t, keep trying, and the order will change.)
The www.google.com page can be reached by a number of different IP addresses, and the addresses are returned in a different order so that a different server is used each time, which is called load balancing.
Nslookup is also used to do reverse lookups, in which the IP address is given and the hostname is returned.
If you are ever concerned that your DNS server is not working correctly, you can test it with Nslookup and compare the results of your DNS server with the results from another server, such as Google’s.
Adam the Automator
Resolve-DnsName: Resolving DNS Records with PowerShell

June Castillote
Read more posts by this author.
If you’re managing web or mail servers, you know how heavily these servers rely on adequately configured DNS records. Missing DNS records can cause all sorts of problems, including users not being able to find your website or non-delivery of emails. It is a good thing that the PowerShell Resolve-DnsName cmdlet exists, and with it, monitoring DNS records can be automated through scripting.
An admin’s day is already full enough, and manually checking whether DNS records can be appropriately resolved means more manual effort.
In this article, you will learn what and how to use the Resolve-DnsName cmdlet to query DNS records with PowerShell. By the end of this article, you will have also learned how to create a basic script to make a report of your nominated DNS records to monitor.
Table of Contents
Prerequisites
This article is a walk-through, and if you plan to follow along with the examples, you will need:
Resolve-DnsName: The PowerShell DNS Resolver
There is more than one way to perform a DNS query. The Resolve-DnsName cmdlet is similar to the nslookup command-line tool that comes with Windows, or the dig command if you’re more of a Linux admin.
Some websites offer DNS record monitoring/reporting services. But, these third party services mostly come with a cost, of course. There’s a free alternative, which also allows you to show off your scripting skills!
The Resolve-DnsName cmdlet, as its name implies, resolves DNS names to IP addresses and vice versa. This cmdlet is part of the dnsclient PowerShell module that, as of this writing, shipping with Windows 10, Windows Server 2012/R2, Windows Server 2016, and Windows Server 2019.
Because Resolve-DnsName is a PowerShell cmdlet, it returns its results as objects that can be stored, manipulated, and exported. For example, looking up the DNS record of google.com using the command Resolve-DnsName google.com give you the output shown below.
The result was returned as an object that allows you to export the results to a CSV file, or manipulate the format to produce HTML reports.
The Resolve-DnsName cmdlet is different than the old school nslookup utility. nslookup returns a simple string. You can see an example in the following screenshot. If you need to parse out any of this information, it’s going to be a struggle.
Querying Different Types of DNS Records
By default, Resolve-DnsName queries the A and AAAA types of DNS records. For example, if you look up the DNS record for gmail.com using the command below:
As you can see below, only the AAAA and A records are returned. That’s because the DNS record type to look up was not specified.
Now, given that we all know that gmail.com is an email domain used by Google’s email service, there must be an MX record associated with it, right? Well, there’s no need to assume when you can confirm by using this command:
The output shown in the screenshot below shows the MX record list for gmail.com.
To know more about the different record types that can be used with Resolve-DnsName , visit this link and look for the table for the -Type parameter. Or you can just refer to the Resolve-DnsName help using the command get-help Resolve-DnsName .
Using Specific Servers for DNS Lookup
Resolve-DnsName uses the DNS server addresses configured on your computer by default. But, you can also make Resolve-DnsName use a specific DNS server when performing lookups.
For example, if you want to use Google Public DNS to lookup records, you can do so by adding the -Server parameter in your command similar to the example below.
The result of the command above would be similar to the one shown in the screenshot below.
At this point, you might be asking, “why would I need to use a different DNS server?”. That is a valid question. If you try looking up the same record using the default DNS server of your machine, or another DNS server, you might probably get the same result.
There could be many reasons to use different DNS servers with Resolve-DnsName . Some of these reasons may include:
- Speed – Some DNS servers may perform faster than others.
- Security – Some DNS servers may have more security measures than others that prevent hijacks and attacks.
- Records availability – In most scenarios, organizations have their own internal DNS servers that contain the zones and records for names that are only resolved internally. In this case, looking up an internal name using a public DNS server will fail.
- DNS servers are not forwarding requests – Some organizations do not allow DNS forwarding. Using them for DNS lookup of public DNS records will fail.
- Troubleshooting and Testing – When your favorite DNS servers are acting up, you may want to test your lookups using a different DNS server.
Reporting DNS Records using PowerShell Script
Now that you’ve learned the basics of how to use the Resolve-DnsName cmdlet, in this section, you’ll learn to create a PowerShell script to monitor and report DNS records. You should be able to apply the knowledge you’ve gained in the previous sections so far in building this script.
Fire up your script editor of choice and create a new file named GetDnsRecord.ps1.
Defining the Variables
First, determine variables to use. These variables will include the following:
- $NameList – This variable will hold the names of the DNS records you want your script to query
- $Serverlist – Use this variable to indicate the DNS servers that will be used by the script for lookups.
Copy the code below and paste it at the beginning of your script.
Performing DNS Lookups
Next, the code must be able to look up the DNS record of each of the names specified. In this case, the foreach loop will be used to iterate the list of records and look up each name using Resolve-DnsName .
The line $FinalResult = @() creates an empty array where the final result will be stored. Then, using the foreach loop, PowerShell passes each item in the $NameList variable to a variable named $Name .
In every iteration, the line $tempObj = «» | Select-Object Name,IPAddress,Status,ErrorMessage creates a temporary object with four properties is created to hold the result of succeeding DNS lookup.
Next, the try<> statement is used to run the Resolve-DnsName command to lookup DNS A records and populate the $tempObj values. If in case the DNS lookup fails, the catch<> statement catches the error, and the error will be included in the $tempObj object.
At the end of each iteration, the value of the $tempObj object will be appended to the $FinalResult . And once the last item in the $NameList array is processed, the loop will exit. Then, the value of the $FinalResult will be displayed.
Copy the code below and paste it at the end of your script. There is no need to change any values.
After saving the script, run it in PowerShell by calling its name GetDnsRecord.ps1. The demonstration below shows the output.
As you can see from the result above, the output is an object which is useful if you want to export the results to file like CSV using the command below.
The CSV output would look similar to the one below.
Conclusion
In this article, you’ve learned the basics of how to use the Resolve-DnsName cmdlet to perform DSN records lookup in PowerShell. You’ve also learned how Resolve-DnsName is different from other tools like the nslookup utility.
You’ve seen how Resolve-DnsName can be used in a script to automate the DNS record lookup. This would be useful as a monitoring tool to ensure that you are aware of the current status of the DNS records that you look after.
Using your PowerShell scripting skills, the reporting script can be further enhanced by adding code to automatically send the report by email to specified recipients. It can also be modified to create a visually pleasing HTML output.
In the end, Resolve-DnsName is an excellent tool for DNS lookup whether you use it manually or for automation in scripts. Now you have the knowledge about how it works, and it is up to you to find ways to use it as part of your administration tasks.
Условное разрешение DNS имен в Windows Server: DNS Conditional Forwarding, политики DNS
В этой статье мы рассмотрим два способа организации условного разрешения имен в DNS сервере на Windows Server 2016: DNS conditional forwarding и DNS policy. Эти технологии позволяют настроить условное разрешение DNS имен в зависимости от запрошенного имени, IP адреса и местоположения клиента, времени суток и т.д.
Условная пересылка DNS (Conditional Forwarding) позволяет перенаправить DNS запросы об определенном домене на определенные DNS-сервера. Обычно Conditional Forwarders используется, когда нужно настроить быстрое разрешение имен между несколькими внутренними приватными доменами, или вы не хотите, чтобы DNS запросы с вашего сервера пересылались через публичную сеть Интернет. В этом случае вы можете создать на DNS сервере правило DNS пересылки DNS запросов для определенной доменной зоны (только . ) на определенный DNS сервер.
Настройка DNS Conditional Forwarder в Windows Server
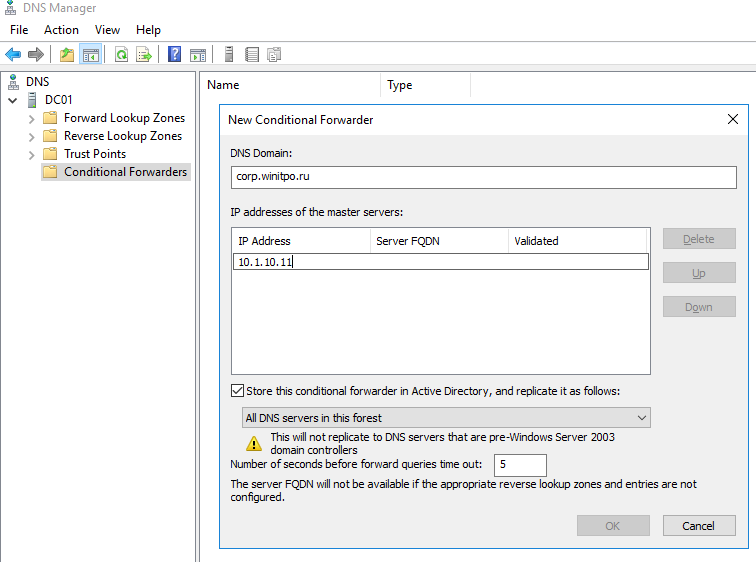
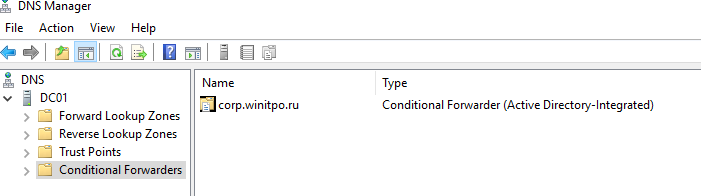
Попробуем настроить условное перенаправление DNS запросов для определенной доменной зоны на Windows Server 2016. Например, я хочу, чтобы все DNS запросы к зоне corp.winitpro.ru пересылались на DNS сервер 10.1.10.11.
- Запустите консоль управления DNS ( dnsmgmt.msc );
- Разверните ваш DNS сервер, щелкните правой кнопкой по разделу Conditional Forwarders и выберите New Conditional Forwarder;
- В поле DNS domain укажите FQDN имя домена, для которого нужно включить условную пересылку;
- В поле IP addresses of the master servers укажите IP адрес DNS сервера, на который нужно пересылать все запросы для указанного пространства имен;

- Если вы хотите хранить правило условной переадресации не только на этом DNS сервере, вы можете интегрировать его в AD. Выберите опцию “Store this conditional forwarder in Active Directory”;
- Выберите правило репликации записи conditional forwarding (All DNS servers in this forest, All DNS servers in this domain или All domain controllers in this domain).
Настройка DNS Conditional Forwarding с помощью PowerShell
Вы можете создать правило Conditional Forward для определенной DNS зоны с помощью PowerShell. Воспользуйтесь командлетом Add-DnsServerConditionalForwarderZone:
Add-DnsServerConditionalForwarderZone -Name dmz.winitpro.ru -MasterServers 192.168.1.11,192.168.101.11 -ReplicationScope Forest
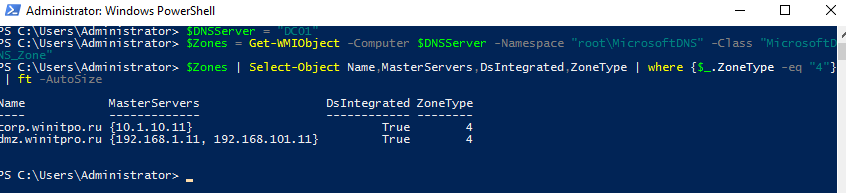
Чтобы вывести список DNS Conditional Forwarders на определенном сервере, выполните следующий PowerShell скрипт:
$DNSServer = «DC01»
$Zones = Get-WMIObject -Computer $DNSServer -Namespace «root\MicrosoftDNS» -Class «MicrosoftDNS_Zone»
$Zones | Select-Object Name,MasterServers,DsIntegrated,ZoneType | where <$_.ZoneType -eq "4">| ft -AutoSize
Фильтрация запросов DNS, политики разрешения имен в Windows Server 2016
В Windows Server 2016 появилась новая фича в службе DNS сервера – DNS политики. DNS политики позволяют настроить DNS сервер так, чтобы он возвращал различные ответы на DNS запросы в зависимости от местоположения клиента (с какого IP адреса или подсети пришел запрос), интерфейса DNS сервера, времени суток, типа запрошенной записи (A, CNAME, PTR, MX) и т.д. DNS политики в Windows Server 2016 позволяют реализовать сценарии балансировки нагрузки, фильтрации DNS трафика, возврата DNS записей в зависимости от геолокации (IP адреса клиента) и многие другие сложные сценарии.
Вы можете создать политику как на уровне DNS сервера, так и на уровне всей зоны. Настройка DNS политик в Windows Server 2016 возможна только из командной строки PowerShell.
Попробуем создать простую политику, которая позволяет вернуть разный ответ на DNS запрос в зависимости от геолокации клиента. Допустим, вы хотите, чтобы клиенты в каждом офисе использовали собственный прокси на площадке. Вы создали политику назначения прокси в домене (на всех клиентах будет указано proxy.winitpro.ru). Но клиент из каждого офиса должен резолвить этот адрес по-разному, чтобы использовать для доступа свой локальный прокси-сервер.
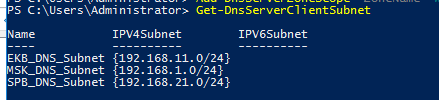
Я создал 3 подсети для разных офисов компании:
Add-DnsServerClientSubnet -Name «MSK_DNS_Subnet» -IPv4Subnet «192.168.1.0/24»
Add-DnsServerClientSubnet -Name «EKB_DNS_Subnet» -IPv4Subnet «192.168.11.0/24»
Add-DnsServerClientSubnet -Name «SPB_DNS_Subnet» -IPv4Subnet «192.168.21.0/24»
Чтобы вывести список всех IP подсетей клиентов, выполните:
Теперь нужно для каждого офиса создать отдельную DNS область:
Add-DnsServerZoneScope -ZoneName “winitpro.ru” -Name “MSKZoneScope”
Add-DnsServerZoneScope -ZoneName “winitpro.ru” -Name “EKBZoneScope”
Add-DnsServerZoneScope -ZoneName “winitpro.ru” -Name “SPBZoneScope”
Следующие команды добавят 3 DNS записи с одним именем, но указывающие на разные IP адреса в разных областях DNS:
Add-DnsServerResourceRecord -ZoneName “winitpro.ru” -A -Name “proxy” -IPv4Address “192.168.1.10” -ZoneScope “MSKZoneScope”
Add-DnsServerResourceRecord -ZoneName “winitpro.ru” -A -Name “proxy” -IPv4Address “192.168.11.10” -ZoneScope “EKBZoneScope”
Add-DnsServerResourceRecord -ZoneName “winitpro.ru” -A -Name “proxy” -IPv4Address “192.168.21.10” -ZoneScope “SPBZoneScope”
Get-DnsServerResourceRecord -ZoneName “winitpro.ru” -ZoneScope SPBZoneScope

Теперь нужно создать DNS политики, которые свяжут IP подсети, DNS области и A записи.
Add-DnsServerQueryResolutionPolicy -Name “MSKResolutionPolicy” -Action ALLOW -ClientSubnet “eq,MSK_DNS_Subnet” -ZoneScope “MSKZoneScope,1” -ZoneName “winitpro.ru” –PassThru
Add-DnsServerQueryResolutionPolicy -Name “EKBResolutionPolicy” -Action ALLOW -ClientSubnet “eq,EKB_DNS_Subnet” -ZoneScope “EKBZoneScope,1” -ZoneName “winitpro.ru” -PassThru
Add-DnsServerQueryResolutionPolicy -Name “SPBResolutionPolicy” -Action ALLOW -ClientSubnet “eq,SPB_DNS_Subnet” -ZoneScope “SPBZoneScope,1” -ZoneName “winitpro.ru” –PassThru
- -Action ALLOW
- -Action DENY
- -Action IGNORE
Можно использовать следующие параметры в фильтре DNS:
-InternetProtocol «EQ,IPv4,NE,IPv6»
-TransportProtocol «EQ,UDP,TCP»
-ServerInterfaceIP «EQ,192.168.1.21»
-QType «EQ,A,AAAA,NE,PTR»
-TimeOfDay «EQ,9:00-18:00»
Вывести список всех DNS политик для DNS зоны на сервере можно так:
Get-DnsServerQueryResolutionPolicy -ZoneName winitpro.ru

Теперь с устройств из различных офисов проверьте, что DNS сервер на один и тот же запрос возвращает различные IP адреса прокси:
Можно запретить DNS серверу возвращать DNS адреса для определенного пространства имен (домена):


