- Установка OpenSSH для Windows Server 2019 и Windows 10 Installation of OpenSSH For Windows Server 2019 and Windows 10
- Установка OpenSSH через пользовательский интерфейс настройки в Windows Server 2019 или Windows 10 версии 1809 Installing OpenSSH from the Settings UI on Windows Server 2019 or Windows 10 1809
- Установка OpenSSH с помощью PowerShell Installing OpenSSH with PowerShell
- Удаление OpenSSH Uninstalling OpenSSH
- Начальная настройка сервера SSH Initial Configuration of SSH Server
- Начальное использование SSH Initial use of SSH
- Установка сервера OpenSSH на Windows Server
- Установка пакета OpenSSH
- SSH авторизация в Windows по паролю
- SSH с аутентфикацией по ключу
- Подключение с клиента через модуль Posh-SSH
- OpenSSH Server Configuration for Windows 10 1809 and Server 2019
- Configuring the default shell for OpenSSH in Windows
- Windows Configurations in sshd_config
- AllowGroups, AllowUsers, DenyGroups, DenyUsers
- AuthenticationMethods
- AuthorizedKeysFile
- ChrootDirectory (Support added in v7.7.0.0)
- HostKey
- Match
- PermitRootLogin
- SyslogFacility
- Not supported
Установка OpenSSH для Windows Server 2019 и Windows 10 Installation of OpenSSH For Windows Server 2019 and Windows 10
Клиент OpenSSH и сервер OpenSSH являются отдельными устанавливаемыми компонентами в Windows Server 2019 и Windows 10 1809. The OpenSSH Client and OpenSSH Server are separately installable components in Windows Server 2019 and Windows 10 1809. Пользователи с этими версиями Windows могут установить и настроить OpenSSH, используя приведенные ниже инструкции. Users with these Windows versions should use the instructions that follow to install and configure OpenSSH.
Пользователи, которые получили OpenSSH из репозитория PowerShell на сайте GitHub (https://github.com/PowerShell/OpenSSH-Portable) должны использовать инструкции из репозитория, а не эти инструкции. Users who acquired OpenSSH from the PowerShell GitHub repo (https://github.com/PowerShell/OpenSSH-Portable) should use the instructions from there, and should not use these instructions.
Установка OpenSSH через пользовательский интерфейс настройки в Windows Server 2019 или Windows 10 версии 1809 Installing OpenSSH from the Settings UI on Windows Server 2019 or Windows 10 1809
Клиент и сервер OpenSSH устанавливаются в Windows 10 версии 1809 как отдельные компоненты. OpenSSH client and server are installable features of Windows 10 1809.
Чтобы установить OpenSSH, откройте раздел Параметры и последовательно выберите Приложения > Приложения и возможности > Управление дополнительными компонентами. To install OpenSSH, start Settings then go to Apps > Apps and Features > Manage Optional Features.
Просмотрите этот список и выясните, установлен ли клиент OpenSSH. Scan this list to see if OpenSSH client is already installed. Если нет, то выберите пункт Добавить компонент в верхней части страницы, а затем: If not, then at the top of the page select «Add a feature», then:
- чтобы установить клиент OpenSSH, найдите элемент Клиент OpenSSH и щелкните Установить; To install the OpenSSH client, locate «OpenSSH Client», then click «Install».
- чтобы установить сервер OpenSSH, найдите элемент Сервер OpenSSH и щелкните Установить. To install the OpenSSH server, locate «OpenSSH Server», then click «Install».
После завершения установки вернитесь в раздел Приложения > Приложения и возможности > Управление дополнительными компонентами, где теперь должны появиться компоненты OpenSSH. Once the installation completes, return to Apps > Apps and Features > Manage Optional Features and you should see the OpenSSH component(s) listed.
Установка сервера OpenSSH создаст и включит правило брандмауэра с именем OpenSSH-Server-in-TCP. Installing OpenSSH Server will create and enable a firewall rule named «OpenSSH-Server-In-TCP». Правило разрешает входящий трафик SSH через порт 22. This allows inbound SSH traffic on port 22.
Установка OpenSSH с помощью PowerShell Installing OpenSSH with PowerShell
Чтобы установить OpenSSH с помощью PowerShell, запустите PowerShell от имени администратора. To install OpenSSH using PowerShell, first launch PowerShell as an Administrator. Убедитесь, что функции OpenSSH доступны для установки, выполнив следующие действия. To make sure that the OpenSSH features are available for install:
Затем установите компонент сервера и (или) клиента. Then, install the server and/or client features:
Удаление OpenSSH Uninstalling OpenSSH
Чтобы удалить OpenSSH через раздел Параметры в ОС Windows, откройте этот раздел и последовательно выберите Приложения > Приложения и возможности > Управление дополнительными компонентами. To uninstall OpenSSH using the Windows Settings, start Settings then go to Apps > Apps and Features > Manage Optional Features. В списке установленных компонентов выберите компонент Клиент OpenSSH или Сервер OpenSSH и щелкните Удалить. In the list of installed features, select the OpenSSH Client or OpenSSH Server component, then select Uninstall.
Чтобы удалить OpenSSH с помощью PowerShell, выполните одну из следующих команд: To uninstall OpenSSH using PowerShell, use one of the following commands:
После удаления OpenSSH может потребоваться перезагрузка Windows, если служба использовалась в момент удаления. A Windows restart may be required after removing OpenSSH, if the service is in use at the time it was uninstalled.
Начальная настройка сервера SSH Initial Configuration of SSH Server
Чтобы настроить только что установленный сервер OpenSSH для использования в ОС Windows, запустите PowerShell от имени администратора и выполните следующие команды, чтобы запустить службу SSHD: To configure the OpenSSH server for initial use on Windows, launch PowerShell as an administrator, then run the following commands to start the SSHD service:
Начальное использование SSH Initial use of SSH
После установки сервера OpenSSH в Windows вы можете быстро проверить его работу с помощью PowerShell на любом устройстве Windows, где установлен клиент SSH. Once you have installed the OpenSSH Server on Windows, you can quickly test it using PowerShell from any Windows device with the SSH Client installed. В PowerShell запустите следующую команду: In PowerShell type the following command:
Первое подключение к любому серверу сопровождается сообщением примерно такого содержания: The first connection to any server will result in a message similar to the following:
В качестве ответа принимаются значения yes (да) или no (нет). The answer must be either «yes» or «no». Ответ «Да» приведет к добавлению этого сервера в список известных узлов SSH в локальной системе. Answering Yes will add that server to the local system’s list of known ssh hosts.
После этого появится запрос на ввод пароля. You will be prompted for the password at this point. В целях безопасности пароль не будет отображаться по мере ввода. As a security precaution, your password will not be displayed as you type.
После успешного подключения вы увидите командную оболочку, которая выглядит примерно так: Once you connect you will see a command shell prompt similar to the following:
По умолчанию для сервера OpenSSH в ОС Windows используется командная оболочка Windows. The default shell used by Windows OpenSSH server is the Windows command shell.
Установка сервера OpenSSH на Windows Server
В этой статье мы рассмотрим, как установить SSH сервер (OpenSSH) на Windows Server и использовать его для удаленного управления сервером с помощью PowerShell по протоколу SSH.
Для удаленного управления компьютерами и серверами через PowerShell можно воспользоваться возможностями протокола WinRM, однако для более гладкого стыка с Linux системами удобнее использовать единый протокол удаленного управления — SSH. Одним из проектов команды Microsoft, занимающейся разработкой функционала PowerShell, является портирование популярного открытого сервера OpenSSH на Windows системы. Проект называется Win32-OpenSSH
Установка пакета OpenSSH
Сервер Win32-OpenSSH для Windows можно установить, скачав дистрибутив с GitHub (https://github.com/PowerShell/Win32-OpenSSH), либо (гораздо проще), установив его через менеджер пакетов Chocolatey.
Если Chocolatey еще не установлен, установить его можно следующими командами PowerShell:
Set-ExecutionPolicy Unrestricted
iwr https://chocolatey.org/install.ps1 -UseBasicParsing | iex
Установка OpenSSH сервера после этого выполняется командой:
choco install openssh -params ‘»/SSHServerFeature /KeyBasedAuthenticationFeature»‘ –y
Данная команда выполнит установку как SSH сервера, так и клиента. Если нужно установить только клиент, нужно убрать аргумент param.
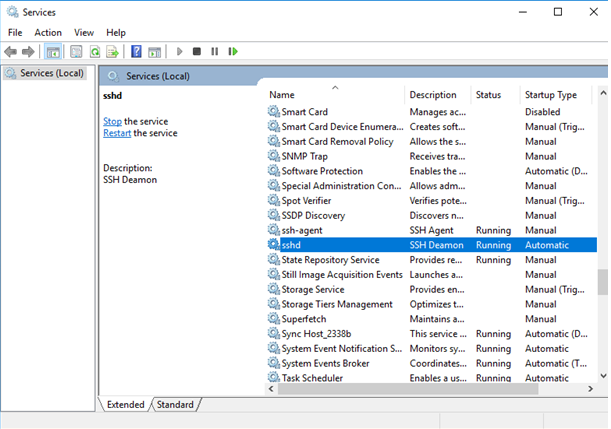
Сценарий установки автоматически создаст правило файервола, разрешающее подключение на 22 порт, и запустит службы sshd и ssh-agent.
Примечание. Если правило по каким-то причинам не создалось, вы можете создать его командой:
New-NetFirewallRule -Protocol TCP -LocalPort 22 -Direction Inbound -Action Allow -DisplayName SSH
Для перезагрузки переменных окружения, выполните команду:
SSH авторизация в Windows по паролю
Для удаленного подключения к данному SSH серверу под локальным пользователем user1, воспользуйтесь такой командой:
После запуска команды, для авторизации нужно указать пароль пользователя user1. Если SSH-сервер включен в домен, можно авторизоваться и под пользователем Active Directory. Имя пользователя в этом случае указывается в формате domain\domain_user_name или domain_user_name@domain.
ssh –l domain_user_name@domain remotehost
SSH с аутентфикацией по ключу
Для беспарольного входа можно использовать авторизацию на сервере SSH по ключу. Сначала нужно сгенерировать ключ на клиенте (в процессе нужно указать ключевую фразу)
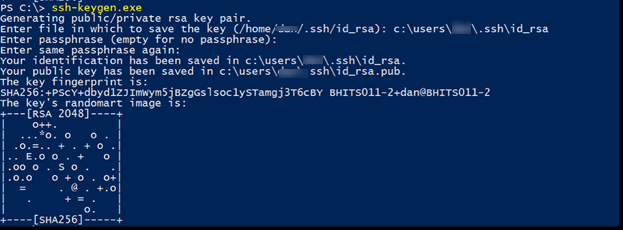
В результате в каталоге пользователя c:\users\username\.ssh появится два файла id_rsa и id_rsa.pub.
Теперь нужно запустить службу ssh-agent
И добавить в настройки агента путь к нашему закрытому ключу:
Затем нужно разрешить аутентфикацию по этому ключу на стороне сервера. Для этого, скопируйте файл открытого ключа(id_rsa.pub) на SSH сервер в файл C:\users\username\.ssh\authorized_keys. Либо, при наличии администартивного доступа сразу на обоих системах, скопировать файл можно так:
cat c:\users\username\.ssh\id_rsa.pub | Add-Content ‘\\192.168.1.100\c$\users\username\.ssh\authorized_keys’
Теперь службе сервера SSH нужно дать право на чтение данных их каталога.ssh.
icacls C:\users\username\.ssh /grant «NT Service\sshd:R» /T
Теперь можно подключится SSH-клиентом к серверу, указав параметр –i и путь к закрытому ключу:
Ssh –I c:\users\username\.ssh\id_rsa –l user@domain 192.168.1.100 
По умолчанию открывается командная строка cmd, но можно запустить и PowerShell:

Подключение с клиента через модуль Posh-SSH
Для удаленного подключения к SSH серверу, модуль Posh-SSH используется следующим образом:
Подключаемся к серверу с сохранением сессии и указанием ключа:
New-SSHSession myclient -KeyFile «c:\data\MyKeyPair.pem»
Выполним команду ifconfig в сессии с ID 0.
Invoke-SSHCommandStream «ifconfig» -SessionId 0
Для завершения сеанса, выполните:
Invoke-SSHCommand -SessionId 0 -Command «logout»
OpenSSH Server Configuration for Windows 10 1809 and Server 2019
This topic covers the Windows-specific configuration for OpenSSH Server (sshd).
OpenSSH maintains detailed documentation for configuration options online at OpenSSH.com, which is not duplicated in this documentation set.
Configuring the default shell for OpenSSH in Windows
The default command shell provides the experience a user sees when connecting to the server using SSH. The initial default Windows is the Windows Command shell (cmd.exe). Windows also includes PowerShell and Bash, and third party command shells are also available for Windows and may be configured as the default shell for a server.
To set the default command shell, first confirm that the OpenSSH installation folder is on the system path. For Windows, the default installation folder is SystemDrive:WindowsDirectory\System32\openssh. The following commands shows the current path setting, and add the default OpenSSH installation folder to it.
| Command shell | Command to use |
|---|---|
| Command | path |
| PowerShell | $env:path |
Configuring the default ssh shell is done in the Windows registry by adding the full path to the shell executable to Computer\HKEY_LOCAL_MACHINE\SOFTWARE\OpenSSH in the string value DefaultShell.
As an example, the following Powershell command sets the default shell to be PowerShell.exe:
Windows Configurations in sshd_config
In Windows, sshd reads configuration data from %programdata%\ssh\sshd_config by default, or a different configuration file may be specified by launching sshd.exe with the -f parameter. If the file is absent, sshd generates one with the default configuration when the service is started.
The elements listed below provide Windows-specific configuration possible through entries in sshd_config. There are other configuration settings possible in that are not listed here, as they are covered in detail in the online Win32 OpenSSH documentation.
AllowGroups, AllowUsers, DenyGroups, DenyUsers
Controlling which users and groups can connect to the server is done using the AllowGroups, AllowUsers, DenyGroups and DenyUsers directives. The allow/deny directives are processed in the following order: DenyUsers, AllowUsers, DenyGroups, and finally AllowGroups. All account names must be specified in lower case. See PATTERNS in ssh_config for more information on patterns for wildcards.
When configuring user/group based rules with a domain user or group, use the following format: user?domain* . Windows allows multiple of formats for specifying domain principals, but many conflict with standard Linux patterns. For that reason, * is added to cover FQDNs. Also, this approach uses «?», instead of @, to avoid conflicts with the username@host format.
Work group users/groups and internet-connected accounts are always resolved to their local account name (no domain part, similar to standard Unix names). Domain users and groups are strictly resolved to NameSamCompatible format — domain_short_name\user_name. All user/group based configuration rules need to adhere to this format.
Examples for domain users and groups
Examples for local users and groups
AuthenticationMethods
For Windows OpenSSH, the only available authentication methods are «password» and «publickey».
AuthorizedKeysFile
The default is «.ssh/authorized_keys .ssh/authorized_keys2». If the path is not absolute, it is taken relative to user’s home directory (or profile image path). Ex. c:\users\user. Note that if the user belongs to the administrator group, %programdata%/ssh/administrators_authorized_keys is used instead.
ChrootDirectory (Support added in v7.7.0.0)
This directive is only supported with sftp sessions. A remote session into cmd.exe wouldn’t honor this. To setup a sftp-only chroot server, set ForceCommand to internal-sftp. You may also set up scp with chroot, by implementing a custom shell that would only allow scp and sftp.
HostKey
The defaults are %programdata%/ssh/ssh_host_ecdsa_key, %programdata%/ssh/ssh_host_ed25519_key, %programdata%/ssh/ssh_host_dsa_key, and %programdata%/ssh/ssh_host_rsa_key. If the defaults are not present, sshd automatically generates these on a service start.
Match
Note that pattern rules in this section. User and group names should be in lower case.
PermitRootLogin
Not applicable in Windows. To prevent administrator login, use Administrators with DenyGroups directive.
SyslogFacility
If you need file based logging, use LOCAL0. Logs are generated under %programdata%\ssh\logs. For any other value, including the default value, AUTH directs logging to ETW. For more info, see Logging Facilities in Windows.
Not supported
The following configuration options are not available in the OpenSSH version that ships in Windows Server 2019 and Windows 10 1809:
- AcceptEnv
- AllowStreamLocalForwarding
- AuthorizedKeysCommand
- AuthorizedKeysCommandUser
- AuthorizedPrincipalsCommand
- AuthorizedPrincipalsCommandUser
- Compression
- ExposeAuthInfo
- GSSAPIAuthentication
- GSSAPICleanupCredentials
- GSSAPIStrictAcceptorCheck
- HostbasedAcceptedKeyTypes
- HostbasedAuthentication
- HostbasedUsesNameFromPacketOnly
- IgnoreRhosts
- IgnoreUserKnownHosts
- KbdInteractiveAuthentication
- KerberosAuthentication
- KerberosGetAFSToken
- KerberosOrLocalPasswd
- KerberosTicketCleanup
- PermitTunnel
- PermitUserEnvironment
- PermitUserRC
- PidFile
- PrintLastLog
- RDomain
- StreamLocalBindMask
- StreamLocalBindUnlink
- StrictModes
- X11DisplayOffset
- X11Forwarding
- X11UseLocalhost
- XAuthLocation
—>


