- Fix Windows Update errors by using the DISM or System Update Readiness tool
- Symptom
- Resolution for Windows 8.1, Windows 10 and Windows Server 2012 R2
- Resolution for Windows 7 Service Pack 1 (SP1) and Windows Server 2008 R2 SP1
- Resolution — Download the package from Microsoft Update Catalog directly
- Description of the common corruption errors
- What does the System Update Readiness tool do
- Verify the integrity of resources
- Logging
- How to fix errors that are found in the CheckSUR log file
- Troubleshoot issues with WSUS client agents
- Verify that the client is configured correctly
- Check for issues relating to BITS
- BITS fails to start
- BITS jobs are failing
- Repair a corrupted BITS configuration
- Issues with the WSUS agent service
- Make sure the WSUS server is reachable from the client
- Rebuild the Automatic Update Agent Store
- Check for clients with the same SUSclient ID
Fix Windows Update errors by using the DISM or System Update Readiness tool
Original product version: В Windows 10, version 1809 and later versions, Windows 8.1, Windows Server 2012 R2, Windows 7 Service Pack 1, Windows Server 2008 R2 Service Pack 1
Original KB number: В 947821
Symptom
Windows updates and service packs may fail to install if there are corruption errors. For example, an update might not install if a system file is damaged. The DISM or System Update Readiness tool may help you to fix some Windows corruption errors.
This article is intended for Support agents and IT professionals. If you are home users and looking for more information about fixing Windows update errors, see Fix Windows Update errors.
Resolution for Windows 8.1, Windows 10 and Windows Server 2012 R2
To resolve this problem, use the inbox Deployment Image Servicing and Management (DISM) tool. Then, install the Windows update or service pack again.
Open an elevated command prompt. To do this, open Start menu or Start screen, type Command Prompt, right-select Command Prompt, and then select Run as administrator. If you are prompted for an administrator password or for a confirmation, type the password, or select Allow.
Type the following command, and then press Enter. It may take several minutes for the command operation to be completed.
When you run this command, DISM uses Windows Update to provide the files that are required to fix corruptions. However, if your Windows Update client is already broken, use a running Windows installation as the repair source, or use a Windows side-by-side folder from a network share or from a removable media, such as the Windows DVD, as the source of the files. To do this, run the following command instead:
Replace the C:\RepairSource\Windows placeholder with the location of your repair source. For more information about using the DISM tool to repair Windows, reference Repair a Windows Image.
Type the sfc /scannow command and press Enter. It may take several minutes for the command operation to be completed.
Close the command prompt, and then run Windows Update again.
DISM creates a log file (%windir%/Logs/CBS/CBS.log) that captures any issues that the tool found or fixed. %windir% is the folder in which Windows is installed. For example, the %windir% folder is C:\Windows.
Resolution for Windows 7 Service Pack 1 (SP1) and Windows Server 2008 R2 SP1
To resolve this problem, use the System Update Readiness tool. Then, install the Windows update or service pack again.
Download the System Update Readiness tool.
select the download link in the following table that corresponds to the version of Windows that is running on your computer. For more information about how to find the version of Windows that you installed, see Find out if your computer is running the 32-bit or 64-bit version of Windows.
This tool is updated regularly, we recommend that you always download the latest version. This tool is not available in every supported language. Check the link below to see if it is available in your language.
| Operating system | Download link |
|---|---|
| x86-based (32-bit) versions of Windows 7 SP1 | Download the package now. |
| x64-based (64-bit) versions of Windows 7 SP1 | Download the package now. |
| x64-based (64-bit) versions of Windows Server 2008 R2 SP1 | Download the package now. |
| Itanium-based versions of Windows Server 2008 R2 SP1 | Download the package now. |
Install and run the tool.
Select Download on the Download Center webpage, then do one of the following:
- To install the tool immediately, select Open or Run, and then follow the instructions on your screen.
- To install the tool later, select Save, and then download the installation file to your computer. When you’re ready to install the tool, double-select the file.
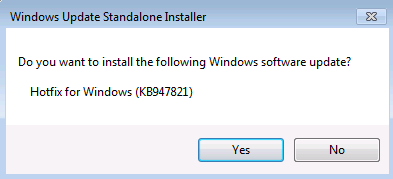
In the Windows Update Standalone Installer dialog box, select Yes.
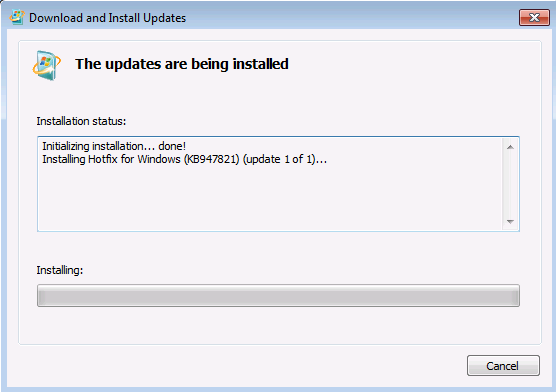
When the tool is being installed, it automatically runs. Although it typically takes less than 15 minutes to run, it might take much longer on some computers. Even if the progress bar seems to stop, the scan is still running, so don’t select Cancel.
When you see Installation complete, select Close.

Reinstall the update or service pack you were trying to install previously.
To manually fix corruption errors that the tool detects but can’t be fixed, see How to fix errors that are found in the CheckSUR log file.
Resolution — Download the package from Microsoft Update Catalog directly
You can also try to directly download the update package from Microsoft Update Catalog, and then install the update package manually.
For example, you may have problems when you try to install updates from Windows Update. In this situation, you can download the update package and try to install the update manually. To do this, follow these steps:
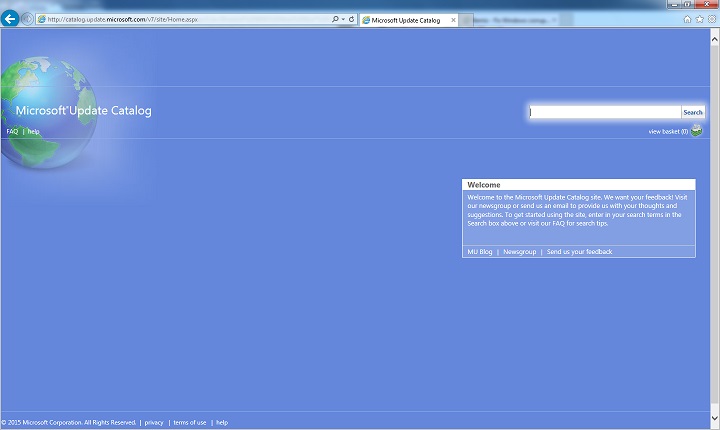
Open Microsoft Update Catalog in Internet Explorer.
In the search box, input the update number that you want to download. In this example, input 3006137. Then, select Search.

Find the update that applies to your operating system appropriately in the search results, and then select Add to add the update to your basket.

Select view basket to open your basket.

Select Download to download the update in your basket.

Select Browse to choose a location for the update you are downloading, and then select Continue.

Select Close after the download process is done. Then, you can find a folder that contains the update package in the location that you specified.
Open the folder, and then double-select the update package to install the update.
If the Windows update or service pack installed successfully, you are finished. If the problem is not fixed, or if System Update Readiness Tool cannot find the cause, contact us for more help.
Description of the common corruption errors
The following table lists the possible error code with Windows Update for your reference:
| Code | Error | Description |
|---|---|---|
| 0x80070002 | ERROR_FILE_NOT_FOUND | The system cannot find the file specified. |
| 0x8007000D | ERROR_INVALID_DATA | The data is invalid. |
| 0x800F081F | CBS_E_SOURCE_MISSING | The source for the package or file not found. |
| 0x80073712 | ERROR_SXS_COMPONENT_STORE_CORRUPT | The component store is in an inconsistent state. |
| 0x800736CC | ERROR_SXS_FILE_HASH_MISMATCH | A component’s file does not match the verification information present in the component manifest. |
| 0x800705B9 | ERROR_XML_PARSE_ERROR | Unable to parse the requested XML data. |
| 0x80070246 | ERROR_ILLEGAL_CHARACTER | An invalid character was encountered. |
| 0x8007370D | ERROR_SXS_IDENTITY_PARSE_ERROR | An identity string is malformed. |
| 0x8007370B | ERROR_SXS_INVALID_IDENTITY_ATTRIBUTE_NAME | The name of an attribute in an identity is not within the valid range. |
| 0x8007370A | ERROR_SXS_INVALID_IDENTITY_ATTRIBUTE_VALUE | The value of an attribute in an identity is not within the valid range. |
| 0x80070057 | ERROR_INVALID_PARAMETER | The parameter is incorrect. |
| 0x800B0100 | TRUST_E_NOSIGNATURE | No signature was present in the subject. |
| 0x80092003 | CRYPT_E_FILE_ERROR | An error occurred while Windows Update reads or writes to a file. |
| 0x800B0101 | CERT_E_EXPIRED | A required certificate is not within its validity period when verifying against the current system clock or the time stamp in the signed file. |
| 0x8007371B | ERROR_SXS_TRANSACTION_CLOSURE_INCOMPLETE | One or more required members of the transaction are not present. |
| 0x80070490 | ERROR_NOT_FOUND | Windows could not search for new updates. |
| 0x800f0984 | PSFX_E_MATCHING_BINARY_MISSING | Matching component directory exist but binary missing |
| 0x800f0986 | PSFX_E_APPLY_FORWARD_DELTA_FAILED | Applying forward delta failed |
| 0x800f0982 | PSFX_E_MATCHING_COMPONENT_NOT_FOUND | Can’t identify matching component for hydration |
What does the System Update Readiness tool do
Verify the integrity of resources
The System Update Readiness tool verifies the integrity of the following resources:
- Files that are located in the following directories:
- %SYSTEMROOT%\Servicing\Packages
- %SYSTEMROOT%\WinSxS\Manifests
- Registry data that is located under the following registry subkeys:
- HKEY_LOCAL_MACHINE\Components
- HKEY_LOCAL_MACHINE\Schema
- HKEY_LOCAL_MACHINE\Software\Microsoft\Windows\CurrentVersion\Component Based Servicing
This list may be updated at any time.
When the System Update Readiness tool detects incorrect manifests, Cabinets, or registry data, it may replace the incorrect data with a corrected version.
Logging
The System Update Readiness tool creates a log file that captures any issues that the tool found or fixed. The log file is located here:
How to fix errors that are found in the CheckSUR log file
To manually fix corruption errors that the System Update Readiness tool detects but can’t fix, follow these steps:
%SYSTEMROOT% is an environment variable that saves the folder in which Windows is installed. For example, generally the %SYSTEMROOT% folder is C:\Windows.
Identify the packages that the tool can’t fix. For example, you may find the following in the log file:
In this case, the package that is corrupted is KB958690.
Copy the package (.msu) to the %SYSTEMROOT%\CheckSUR\packages directory. By default, this directory doesn’t exist and you need to create the directory.
Troubleshoot issues with WSUS client agents
This article helps you diagnose and resolve issues with the Windows Server Update Services (WSUS) client agents.
Original product version: В Windows Server Update Services
Original KB number: В 10132
When you experience issues with the WSUS client agents, they can manifest themselves in many ways. Some common problems are listed here:
- It could be an issue with the client settings for Group Policy.
- It could be an issue with BITS.
- It could be an issue with the WSUS agent service.
- It could be related to a network issue that prevents the client from reaching the server.
- It could be an issue with the Automatic Update Agent Store.
- It could be an issue in which clients have duplicate WSUS client IDs caused by disk cloning.
Verify that the client is configured correctly
When you troubleshoot issues with a WSUS client agent, first make sure the client is properly configured. Make sure the proper Active Directory Group Policy is being received by the client, and the details of the WSUS server are present. You can do so by running the following command:
Open the text file in Notepad and find the name of your WSUS policy. For example, if your WSUS policy is named WSUS, you can find it in the GPRESULT.TXT file within the Computer Settings section under the Applied Group Policy Objects heading. Below is an example:
If the WSUS settings aren’t present, possible causes include:
- The system doesn’t have the Group Policy from the domain.
- The Group Policy isn’t targeted to the client system.
To fix this issue, ensure that the Group Policy is successfully updated on each client, and that the WSUS setting is properly configured.
To update the Group Policy on the client, run GPUpdate /force from a Command Prompt.
For more information about configuring Group Policy for WSUS clients, see Configure Automatic Updates by Using Group Policy.
Check for issues relating to BITS
Background Intelligent Transfer Service (BITS) is the service used by WSUS to download updates from Microsoft Update to the main WSUS server, and from WSUS servers to their clients. Some download issues may be caused by problems with BITS on the server or client computers. When you troubleshoot download problems, you should ensure that BITS is running properly on all affected computers.
The BITS service must run under the LocalSystem account by default. To configure the service to run under the correct account, follow these steps:
Open a Command Prompt and run the following command:
A space must occur between obj= and LocalSystem. If successful, you should receive the following output:
Stop and restart BITS.
To view the BITS service status, open a Command Prompt and run the following command:
If BITS is running, you should see the following output:
If BITS isn’t running, you’ll see the following output:
Usually it’s possible to resolve BITS issues by stopping the service and restarting it. To stop and restart the BITS service, run the following commands from a Command Prompt:
You must be logged on as a local administrator to stop and restart BITS.
BITS fails to start
If the BITS service fails to start, look in the event log for any BITS-related error. You can use the following table to diagnose the cause of these errors.
| Error name | Error code | Description |
|---|---|---|
| ERROR_SERVICE_DOES_NOT_EXIST | 0x80070424 | See the section on repairing the BITS configuration below. |
| ERROR_SERVICE_NOT_IN_EXE | 0x8007043B | BITS isn’t listed as one of the services in the netsvcs svchost group |
| ERROR_SERVICE_DISABLED | 0x80070422 | BITS has been disabled. Enable the BITS service. |
| ERROR_SERVICE_DEPENDENCY_DELETED ERROR_SERVICE_DEPENDENCY_FAIL | 0x80070433, 0x8007042c | A service appearing in the BITS service dependency list cannot be started. Make sure the dependency list for the BITS service is correct: Windows Vista: RpcSs, EventSystem (also http.sys and LanManWorkstation when peer caching is enabled) Windows Server 2003: Rpcss, EventSystem Windows XP: Rpcss Windows 2000: Rpcss, SENS, Wmi |
| ERROR_PATH_NOT_FOUND | 0x80070003 | Pre-Windows Vista: %ALLUSERSPROFILE%\Microsoft\Network doesn’t exist |
| ERROR_FILE_NOT_FOUND | 0x80070002 | The Parameters key is missing. Ensure that the following keys and values exist: HKLM\SYSTEM\CurrentControlSet\Services\BITS\Parameters\ServiceDll = %SystemRoot%\System32\qmgr.dll |
| REGDB_E_CLASSNOTREG, EVENT_E_INTERNALERROR | 0x80040154, 0x80040206 | BITS for Windows 2000 is dependent on SENS and EventSystem services. If the COM+ catalog is corrupted, BITS may fail with this error code. |
BITS jobs are failing
If the client is properly configured to receive updates, BITS is configured correctly, and BITS appears to start and run properly, you may be experiencing an issue where BITS jobs themselves are failing. To verify it, look in the event log for any BITS-related errors. You can use the following table to diagnose the cause of these errors.
| Error name | Error code | Description |
|---|---|---|
| E_INVALIDARG | 0x80070057 | An incorrect proxy server name was specified in the user’s Internet Explorer proxy settings. This error is also seen when credentials are supplied for authentication schemes that aren’t NTLM/Negotiate, but the user name or password is null. Change the user’s Internet Explorer proxy settings to be a valid proxy server. Or change the credentials not to be NULL user name/password for schemes other than NTLM/Negotiate. |
| ERROR_WINHTTP_NAME_NOT_RESOLVED | 0x80072ee7 | The server/proxy could not be resolved by BITS. Internet Explorer on the same machine in the context of the job owner would see the same problem. Try downloading the same file via the web browser using the context of the job owner. |
| ERROR_HTTP_INVALID_SERVER_RESPONSE | 0x80072f78 | It’s a transient error and the job will continue downloading. |
| BG_E_INSUFFICIENT_RANGE_SUPPORT | 0x80200013 | BITS uses range headers in HTTP requests to request parts of a file. If the server or proxy server doesn’t understand range requests and returns the full file instead of the requested range, BITS puts the job into the ERROR state with this error. Capture the network traffic during the error and examine if HTTP GET requests with Range header are getting valid responses. Check proxy servers to ensure that they are configured correctly to support Range requests. |
| BG_E_MISSING_FILE_SIZE | 0x80200011 | When BITS sends a HEAD request and the server/proxy doesn’t return Content-Length header in the response, BITS puts the job in ERROR state with this error. Check the proxy server and WSUS server to ensure that they are configured correctly. Some versions of the Apache 2.0 proxy server are known to exhibit this behavior. |
| BG_E_HTTP_ERROR_403 | 0x80190193 | When the server returns HTTP 403 response in any of the requests, BITS puts the job in ERROR state with this error code. HTTP 403 corresponds to Forbidden: Access is denied. Check access permissions for the account running the job. |
| ERROR_NOT_LOGGED_ON | 0x800704dd | The SENS service isn’t receiving user logon notifications. BITS (version 2.0 and later) depends on logon notifications from Service Control Manager, which in turn depends on the SENS service. Ensure that the SENS service is started and running correctly. |
Repair a corrupted BITS configuration
To repair corrupted BITS service configuration, you can enter the BITS service configuration manually.
This action should only be taken in circumstances where all other troubleshooting attempts have failed. You must be an administrator to modify the BITS configuration.
To repair a corrupted BITS configuration, follow these steps:
Open a Command Prompt.
Enter the following commands, press ENTER after you type each command:
Stop and restart BITS.
Issues with the WSUS agent service
Make sure that the Windows Update service can start successfully.
To view the current status of the Windows Update service, open a Command Prompt and run the following command:
If WUAUSERV is running, you should see the following output:
If WUAUSERV isn’t running, you see the following output:
Verify that you can start the WUAUSERV service successfully. You must be logged on as a local administrator to stop and restart WUAUSERV.
To start the WUAUSERV service, run the following commands from a Command Prompt:
If the client agent fails to start and run properly, check the Windows Update Agent version. If the agent isn’t up to date, update the Windows Update Agent to the latest version.
After you run the fix or update the agent, run wuauclt /detectnow . Check windowsupdate.log to make sure there’s no issues.
Make sure the WSUS server is reachable from the client
Make sure that you can access the URL http:// /iuident.cab and download the file without errors.
If the WSUS server is unreachable from the client, the most likely causes include:
- There’s a name resolution issue on the client.
- There’s a network-related issue, such as a proxy configuration issue.
Use standard troubleshooting procedures to verify name resolution is working on the network. If name resolution is working, the next step is to check for proxy issues. Check windowsupdate.log (C:\windows) to see if there are any proxy related errors. You can run the proxycfg command to check the WinHTTP proxy settings.
If there are proxy errors, go to Internet Explorer > Tools > Connections > LAN Settings, configure the correct proxy, and then make sure you can access the WSUS URL specified.
Once done, you can copy these user proxy settings to the WinHTTP proxy settings by using the proxycfg -u command. After the proxy settings are specified, run wuauclt /detectnow from a Command Prompt and check windowsupdate.log for errors.
Rebuild the Automatic Update Agent Store
When there are issues downloading updates and there are errors relating to the software distribution store, complete the following steps on the client:
- Stop the Automatic Updates service by running sc stop wuauserv from a Command Prompt.
- Rename the software distribution folder (for example, C:\Windows\SoftwareDistribution).
- Restart the Automatic Update service by running sc start wuauserv from a Command Prompt.
- From a Command Prompt, run wuauclt /resetauthorization /detectnow .
- From a Command Prompt, run wuauclt /reportnow .
Check for clients with the same SUSclient ID
You may experience an issue where only one WSUS client appears in the console. Or you may notice that out of a group of clients, only one appears in the console at a time but the exact one that does appear may change over time. This issue can happen when systems are imaged and the clients end up having the same SUSclientID .
For those clients that aren’t working properly because of the same SUSclientID , complete the following steps:
Stop the Automatic Updates service by running sc stop wuauserv from a Command Prompt.
Delete the SUSclientID registry key from the following location:
Restart the Automatic Update service by running sc start wuauserv from a Command Prompt.
From a Command Prompt, run wuauclt /resetauthorization /detectnow .
From a Command Prompt, run wuauclt /reportnow .


