- Windows Service Manager (SrvMan)
- Features
- SrvMan — Command Line Options
- Creating services
- Deleting services
- Starting/stopping/restarting services
- Testing legacy drivers
- Downloading
- How to open Windows Services Manager in Windows 10
- How to open Windows Services Manager
- Types of Windows Services startup
- Start, stop, disable Windows Services
- Manage Services using Command Line
- Windows service manager tool
Windows Service Manager (SrvMan)
Windows Service Manager is a small tool that simplifies all common tasks related to Windows services. It can create services (both Win32 and Legacy Driver) without restarting Windows, delete existing services and change service configuration. It has both GUI and Command-line modes. It can also be used to run arbitrary Win32 applications as services (when such service is stopped, main application window is closed automatically).
Features
Here is a list of SrvMan’s key features:
Allows creating driver and Win32 services without restarting.
Supports both GUI and Command Line.
Supports all modern 32-bit and 64-bit versions of Windows
Allows running arbitrary Win32 applications as services.
Allows installing & running legacy driver services in a single command line call.
SrvMan — Command Line Options
You can use SrvMan’s Command Line interface to perform the following tasks:
Install & start a legacy driver with a single call
Note that when you run SrvMan with command-line arguments from non-console application (for example, from a Run dialog box), it displays the «Press any key to continue. » message and pauses just before exiting. This does not happen, when SrvMan is run from a console application (such as cmd.exe). To override this behavior, use the /pause:no switch.
Creating services
Use the following command line to create services using SrvMan (parameters in brackets are optional):
Service name is an internal name used by Windows to reference the service. Display name is the name displayed in Windows Services snap-in. By default, both names are generated from the .exe or .sys file name, however, you can override it by specifying names explicitly.
Service type can be one of the following:
- drv — Create a kernel driver (selected by default for .sys files)
- exe — Create a Win32 service (selected by default for .exe files)
- sharedexe — Create a Win32 service with shared executable file
- fsd — Create a file system driver service
- app — Create a service running ordinary windows application (such as taskmgr.exe)
Start mode is one of the following:
- boot — The service is started by OS loader
- sys — The service is started by IoInitSystem() call
- auto — The service is started by Service Control Manager during startup
- man — The service is started manually (net start/net stop)
- dis — The service cannot be started
Win32 services are created as interactive by default. To create a non-interactive service, you should specify the /interactive:no parameter. Normally, if a specified service already exists, SrvMan reports an error and stops. However, if you specify the /overwrite:yes parameter, an existing service will be overwritten instead.
Deleting services
Deleting services using SrvMan command line is quite obvious:
Note that you need to specify the internal service name (same as used for net start command), not the display name.
Starting/stopping/restarting services
You can control all types of services using SrvMan command line:
Normally, SrvMan waits for the service to start. However, if you specify the /nowait parameter, SrvMan will return control immediately after the start/stop request was issued. Note that if you need SrvMan to wait before starting/stopping the service (for example, to switch to real-time log viewer window), you can use the /delay: parameter.
Testing legacy drivers
You can easily test your legacy driver by using the following command line:
This command creates (or overwrites) a service for a given legacy driver file and starts it. If you have specified the /copy:yes switch, the driver file will be copied to system32\drivers directory. If /overwrite:no is specified, DbgMan will return an error if the service (or the driver file in system32\drivers) already exists. If /after: is specified, the driver will be stopped msec milliseconds after successful start. You can use this switch to test driver load/unload cycle.
Downloading
The latest version of SrvMan for both x86 and x64 systems (including sources) can be downloaded here. Note that you need BazisLib library to build the sources.
How to open Windows Services Manager in Windows 10
At times you may need to open and manage your Windows Services. You may want to stop some service, start it, disable the service, delay its start-up or resume or pause the Windows Service. At such time, the Services Manager, which is a built-in tool in the Windows operating system, will help you. This post will show you how to open your Windows Services, using Services Manager as well as the Command Prompt.
Windows Services are applications that typically start when the computer is booted and run quietly in the background until it is shut down. Strictly speaking, a service is any Windows application that is implemented with the services API and handles low-level tasks that require little or no user interaction.
How to open Windows Services Manager
To open the Windows Services Manager on your Windows 10 computer, do the following:
- Right-click on the Start button to open the WinX Menu
- Select Run
- Type services.msc in the Run box which opens
- Windows Services Manager will open.
Here you will be able to start, stop, disable, delay Windows Services.
Let us see how to do this in a bit more detail.
Right-click on your Start button to open the WinX Menu. Select Run. This opens the Run box. Now type services.msc in it and hit Enter to open the Services Manager.
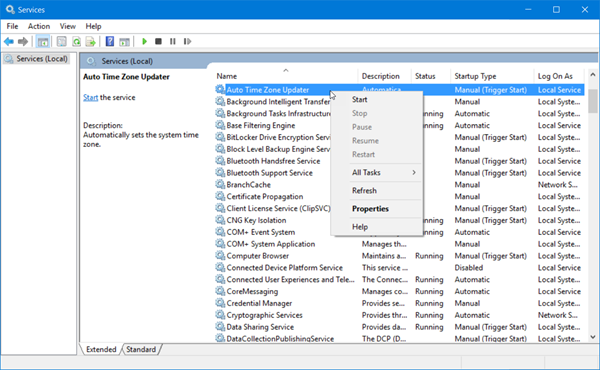
Here, under the Name column, you will see the list of Services running on your system, along with their description. You will also be able to see their Status -whether they are running or stopped, along with the Startup types.
Types of Windows Services startup
Windows 10 offers four start-ups types:
- Automatic
- Automatic (Delayed Start)
- Manual
- Disabled.
Start, stop, disable Windows Services
To start, stop, pause, resume or restart any Windows Service, select the Service and right-click on it. You will be offered these options.
If you wish to manage more options, double-click on the Service to open its Properties box.
Here, under the Startup type drop-down menu, you will be able to select the startup type for the Service.
Under Service status, you will see buttons to Start, Stop, Pause, Resume the Service.
In the Properties box, you will also see other tabs like Log On, Recovery & Dependencies, which offer additional options and information.
Once you have made your changes, you will have to click on Apply and restart your computer, for the changes to take effect.
Read: What does Automatic (Trigger Start) and Manual (Trigger Start) mean for Windows Services?
Manage Services using Command Line
You can also use the Command Prompt to start, stop, pause, resume service. To use it, from the WinX Menu, open Command Prompt (Admin) and execute one of the following commands:
To start a service:
To stop a service:
To pause a service:
To resume a service:
To disable a service:
It is recommended that you not change the default settings unless you know what you are doing, as this can cause some parts of your operating system to stop working. When you stop, start, or restart a service, any dependent services are also affected, so you want to be careful here.
Windows service manager tool
Advanced Windows Service Manager is the specialized software for smarter analysis of Windows Services. It offers many powerful and unique features which sets it apart from built-in Service Management Console as well as other similar softwares.
Services normally run with ‘Local System’ privilege thus enabling them to execute higher privilege operations which otherwise cannot be performed by normal processes. Due to these advantages, often malwares run as Services to monitor and control the target system.
‘Advanced Windows Service Manager’ can help you to detect those Malicious services easily from hundreds of running services. You can then use integrated ‘Online Scan’ to further verify it through one of online services such as VirusTotal, ProcessLibrary, Google etc.
Itis fully Portable version and comes with Installer also to help in local installation/un-installation.It works on all Windows system starting from Windows XP to new Windows 10 version.
- Smarter Detection of Hidden Malicious/Rootkit Services: Uses heuristic analysis along with other anti-rootkit techniques such as Bypass Hook method.
- Sophisticated Auto Analysis: Scanned services are automatically analyzed and classified based on various threat levels.
- Online Malicious Service Scan: Supports integrated ‘Online Scan’ service using VirusTotal, ProcessLibrary and Google to verify malicious nature of services.
- Service Filter Mechanism: Includes built-in Filters to display only Running, Third Party or core System services etc.
- Color based Threat Representation: Displays services as Dangerous, Suspicious, Normal using Color schemes making it easier for further analysis.
- Sort Feature: Quickly arrange the services based on service name, threat level, status, company name.
- Right Click Context Menu: For quick actions such as Start/Stop service, Online Scan, View properties etc.
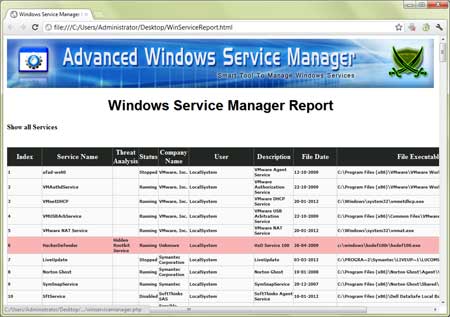
- Advanced Report: Detailed report generation in HTML/XML format.
- Integrated Installer:Helps you in quick installation & un-installation
C:\Program Files\SecurityXploded\AdvancedWinServiceManager
[Windows 64 bit]
C:\Program Files (x86)\SecurityXploded\AdvancedWinServiceManager
It is easy to use tool with its rich user friendly interface.
Here are quick usage tips,
- Launch AdvancedWinServiceManager after installation or from portable version folder.
- Next select the type of services from the Selection box and click on Refresh button.
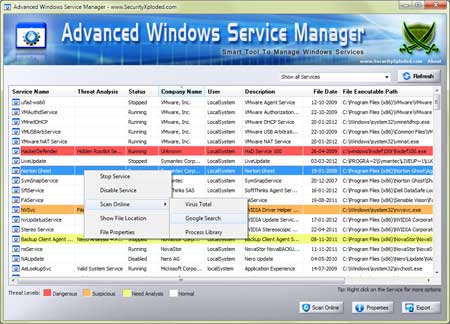
- Relevant services matching the filter will be displayed as shown below.
- Services will be represented as Dangerous, Suspicious, Analysis or Normal with different colors.
- You can then Right Click on the service and choose to Start/Stop Service, Enable/Disable Service, perform Online Scan, view properties etc.
- Finally you can export the displayed service list to HTML/XML file. Click on the ‘Export’ button and then select the type of file from the drop down box of ‘Save File Dialog’.
| Version 6.0: 31st Oct 2016 |
| Major release with new installer for simple installation & un-installation. |
| Version 5.5: 15th Mar 2016 |
| New 2016 edition with improved windows service managing operation |
| Version 5.0: 10th Sep 2015 |
| Mega release with support for managing services on new Windows 10 version. |
| Version 4.5: 13th Jul 2015 |
| New feature added to Installer to dynamically download latest version |
| Version 4.1: 11th Apr 2015 |
| Improved Installer screen along with few minor bug fixes. |
| Version 4.0: 19th Feb 2015 |
| Renovated GUI interface with glowing icon effects. Also integrated Uninstaller into Windows Add/Remove Programs, now you can uninstall it in a standard way. |
| Version 3.5: 16th Jun 2013 |
| Now by default it shows third party services at the start. Also launches in maximized mode. |
| Version 3.1: 12th Jan 2013 |
| Minor improvements in the user interface. Fixed the broken link to web page in the report. |
| Version 3.0: 3rd Apr 2012 |
| This mega version presents new enriched GUI interface with cool banner, Online Malicious Service Scan, Sophisticated Auto Analysis, Service Filter Mechanism, Color based Threat Representation, Right Click Context Menu for quick actions, HTML/XML Report generation and many more. |
| Version 2.0.1: 17th April 2009 |
| Release of AdvancedWinServiceManager with rich features such as hidden Rootkit service detection, enhanced user interface, arranging the services, exporting the service list to log file etc. |
| Version 1.2: 10th June 2008 |
| User interface improvement, Vista UAC compatibility along with bug fixes. |
| Version 1.0 : 30 Dec 2006 |
| First public release of WinServiceManager |


