- Popups and window methods
- Popup blocking
- window.open
- Example: a minimalistic window
- Accessing popup from window
- Accessing window from popup
- Comments
- Popup window in winform c#
- 6 Answers 6
- 10 классных сервисов для создания всплывающих окон
- Матчасть
- Способ 1: свой разработчик
- Способ 2: попап как модуль в другом сервисе
- Способ 3: отдельный сервис по формам на сайте
- Современные всплывающие окна в Windows 10
- Настроить всплывающее меню Windows 10
Popups and window methods
A popup window is one of the oldest methods to show additional document to user.
Basically, you just run:
…And it will open a new window with given URL. Most modern browsers are configured to open url in new tabs instead of separate windows.
Popups exist from really ancient times. The initial idea was to show another content without closing the main window. As of now, there are other ways to do that: we can load content dynamically with fetch and show it in a dynamically generated
Also, popups are tricky on mobile devices, that don’t show multiple windows simultaneously.
Still, there are tasks where popups are still used, e.g. for OAuth authorization (login with Google/Facebook/…), because:
- A popup is a separate window which has its own independent JavaScript environment. So opening a popup from a third-party, non-trusted site is safe.
- It’s very easy to open a popup.
- A popup can navigate (change URL) and send messages to the opener window.
Popup blocking
In the past, evil sites abused popups a lot. A bad page could open tons of popup windows with ads. So now most browsers try to block popups and protect the user.
Most browsers block popups if they are called outside of user-triggered event handlers like onclick .
This way users are somewhat protected from unwanted popups, but the functionality is not disabled totally.
What if the popup opens from onclick , but after setTimeout ? That’s a bit tricky.
The popup opens in Chrome, but gets blocked in Firefox.
…If we decrease the delay, the popup works in Firefox too:
The difference is that Firefox treats a timeout of 2000ms or less are acceptable, but after it – removes the “trust”, assuming that now it’s “outside of the user action”. So the first one is blocked, and the second one is not.
window.open
The syntax to open a popup is: window.open(url, name, params) :
url An URL to load into the new window. name A name of the new window. Each window has a window.name , and here we can specify which window to use for the popup. If there’s already a window with such name – the given URL opens in it, otherwise a new window is opened. params The configuration string for the new window. It contains settings, delimited by a comma. There must be no spaces in params, for instance: width=200,height=100 .
Settings for params :
- Position:
- left/top (numeric) – coordinates of the window top-left corner on the screen. There is a limitation: a new window cannot be positioned offscreen.
- width/height (numeric) – width and height of a new window. There is a limit on minimal width/height, so it’s impossible to create an invisible window.
- Window features:
- menubar (yes/no) – shows or hides the browser menu on the new window.
- toolbar (yes/no) – shows or hides the browser navigation bar (back, forward, reload etc) on the new window.
- location (yes/no) – shows or hides the URL field in the new window. FF and IE don’t allow to hide it by default.
- status (yes/no) – shows or hides the status bar. Again, most browsers force it to show.
- resizable (yes/no) – allows to disable the resize for the new window. Not recommended.
- scrollbars (yes/no) – allows to disable the scrollbars for the new window. Not recommended.
There is also a number of less supported browser-specific features, which are usually not used. Check window.open in MDN for examples.
Example: a minimalistic window
Let’s open a window with minimal set of features, just to see which of them browser allows to disable:
Here most “window features” are disabled and window is positioned offscreen. Run it and see what really happens. Most browsers “fix” odd things like zero width/height and offscreen left/top . For instance, Chrome open such a window with full width/height, so that it occupies the full screen.
Let’s add normal positioning options and reasonable width , height , left , top coordinates:
Most browsers show the example above as required.
Rules for omitted settings:
- If there is no 3rd argument in the open call, or it is empty, then the default window parameters are used.
- If there is a string of params, but some yes/no features are omitted, then the omitted features assumed to have no value. So if you specify params, make sure you explicitly set all required features to yes.
- If there is no left/top in params, then the browser tries to open a new window near the last opened window.
- If there is no width/height , then the new window will be the same size as the last opened.
Accessing popup from window
The open call returns a reference to the new window. It can be used to manipulate it’s properties, change location and even more.
In this example, we generate popup content from JavaScript:
And here we modify the contents after loading:
Please note: immediately after window.open , the new window isn’t loaded yet. That’s demonstrated by alert in line (*) . So we wait for onload to modify it. We could also use DOMContentLoaded handler for newWin.document .
Windows may freely access content of each other only if they come from the same origin (the same protocol://domain:port).
Otherwise, e.g. if the main window is from site.com , and the popup from gmail.com , that’s impossible for user safety reasons. For the details, see chapter Cross-window communication.
Accessing window from popup
A popup may access the “opener” window as well using window.opener reference. It is null for all windows except popups.
If you run the code below, it replaces the opener (current) window content with “Test”:
let newWin = window.open(«about:blank», «hello», «width=200,height=200»); newWin.document.write( «
Comments
- If you have suggestions what to improve — please submit a GitHub issue or a pull request instead of commenting.
- If you can’t understand something in the article – please elaborate.
- To insert few words of code, use the tag, for several lines – wrap them in
tag, for more than 10 lines – use a sandbox (plnkr, jsbin, codepen…)
Popup window in winform c#
I’m working on a project where I need a popup window. But the thing is I also want to be able to add textboxes etc in this popup window thru the form designer.
So basically I have a button and when you click on it it will open another window that I’ve designed in the form designer.
I’ve been doing some googling but I haven’t found what I needed yet so I was hoping you guys could help me!
6 Answers 6
Just create another form (let’s call it formPopup ) using Visual Studio. In a button handler write the following code:
If you need a non-modal window use: formPopup.Show(); . If you need a dialog (so your code will hang on this invocation until you close the opened form) use: formPopup.ShowDialog()
This is not so easy because basically popups are not supported in windows forms. Although windows forms is based on win32 and in win32 popup are supported. If you accept a few tricks, following code will set you going with a popup. You decide if you want to put it to good use :
Experiment with it a bit, you have to play around with its position and its size. Use it wrong and nothing shows.

Forms in C# are classes that inherit the Form base class.
You can show a popup by creating an instance of the class and calling ShowDialog() .
If you mean to create a new form when a button is clicked, the below code may be of some use to you:
From here, you could also use the ‘Show Dialog’ method

«But the thing is I also want to be able to add textboxes etc in this popup window thru the form designer.»
It’s unclear from your description at what stage in the development process you’re in. If you haven’t already figured it out, to create a new Form you click on Project —> Add Windows Form, then type in a name for the form and hit the «Add» button. Now you can add controls to your form as you’d expect.
When it comes time to display it, follow the advice of the other posts to create an instance and call Show() or ShowDialog() as appropriate.
10 классных сервисов для создания всплывающих окон
Блочный редактор писем, готовые шаблоны email, формы подписки и автоматизация. Запускайте email-рассылки, чтобы быть на связи со своими клиентами.

Всплывающие окна (попапы) помогают удержать пользователя на сайте, предложив ему релевантную информацию. Тип попапа и его полезное действие напрямую зависят от тематики сайта. Обычно во всплывающих окнах предлагают подписаться на рассылку, позвонить в компанию, получить моментальную скидку за быстрый заказ или прочитать новую статью.
Я выбрала и протестировала 10 сервисов для создания попапов. Дальше я расскажу о плюсах и минусах этих платформ. В конце статьи есть сводная таблица, которая поможет выбрать подходящий сервис.
Матчасть
Какие способы создания попапов существуют ↓
Мы обратились к Product Owner Popmechanic Юлии Повх. Она рассказала, какие существуют способы создания попапов и в чем плюсы и минусы каждого из них.
Способ 1: свой разработчик
| Плюсы | Минусы |
| Нет дополнительных платежей |
Теоретически можно создать что угодно Ресурсы разработки
Нужно задействовать несколько специалистов сразу: дизайнера, верстальщика, разработчика
Сложно анализировать форму и проводить A/B-тесты
Сложно вносить изменения
Способ 2: попап как модуль в другом сервисе
Например, модули всплывающих форм в сервисах рассылок: UniSender, SendPulse, GetResponse, Mailganer, MailerLite, Carrotquest, Convead.
| Плюсы | Минусы |
| Бесплатно для пользователей сервиса Не нужно настраивать интеграции | Ограниченный выбор форм Обычно нет A/B-тестов Ограниченность функционала таргетинга, условий показа |
Способ 3: отдельный сервис по формам на сайте
Из русскоязычных: Popmechanic, CartProtector, Witget, JumpOut, MailGet, Keplerleads, LeadPlan, Энвибокс, enPop, Leadgenic.
Зарубежные: Sleeknote, Wisepops, Сonvertful, Privy, Sumo, Optinmonster.
| Плюсы | Минусы |
| Большой выбор форм. Наличие игровых и интерактивных механик. Комбинированные формы (для подписки в мессенджерах и email) Расширенные настройки таргетинга и условий показа форм | Отдельная оплата за сервис Может не быть интеграции с нужным вам сервисом рассылок |
Далее в статье мы будем говорить именно об отдельных сервисах по созданию всплывающих форм.
Как пользоваться сервисами для создания попапов ↓
Все эти сервисы работают по примерно одинаковому принципу:
Регистрация → выбор тарифа → выбор формы и дизайна → кастомизация (не везде) → настройки появления на сайте → таргетинг → интеграция с сервисом рассылки (не везде) → вставка готового кода на сайт.
Чтобы добавить готовый код с попапом на сайт, не обязательно звать на помощь разработчика. Особенно, если сайт сделан на конструкторе вроде Tilda, WordPress или Wix. Подсказки и обучающие видео по настройке, которые есть практически во всех сервисах, помогут разобраться в работе.
Современные всплывающие окна в Windows 10

Windows 10 является более открытой платформой, чем ее конкуренты, и существует множество приложений, которые могут изменить вашу систему. Сегодня мы собираемся более подробно рассмотреть новое приложение под названием «ModernFlyouts», в котором особое внимание уделяется изменению и улучшению всплывающих элементов Windows.
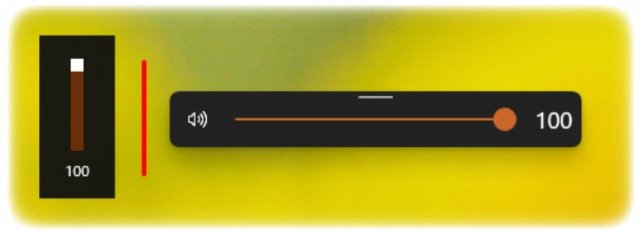
Для тех, кому интересно, всплывающее меню – это тот интерфейс, который отображается в верхнем левом углу рабочего стола / приложения, когда вы настраиваете яркость, громкость или включаете режим полета. Он также показывает элементы управления мультимедиа для Google Chrome, Spotify, Groove Music и других приложений, когда вы воспроизводите мультимедийный контент.
Во встроенном всплывающем меню все еще используется старый дизайн Metro, который отсылает нас к Windows 8, и его также нельзя настроить. Например, Windows 10 даже не позволяет вам изменять время ожидания всплывающего окна или непрозрачность фона.
Microsoft, похоже, не торопится менять внешний вид этих всплывающих окон, но опытные дизайнеры в сообществе Windows точно знают, как все это можно улучшить.
Настроить всплывающее меню Windows 10
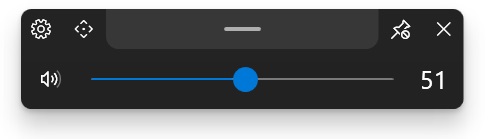
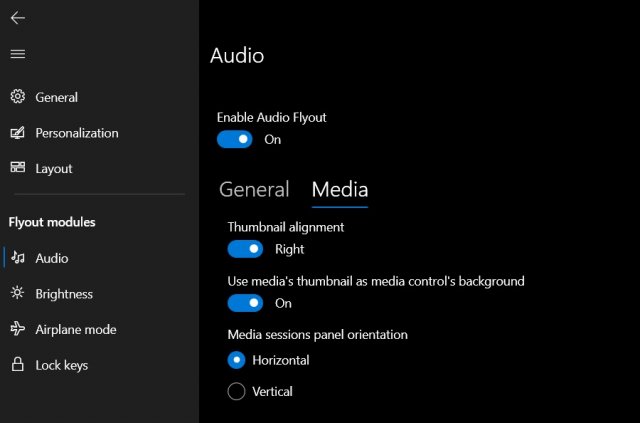
ModernFlyouts – это новое приложение с открытым исходным кодом, которое позволяет значительно улучшить внешний вид всплывающего окна Windows 10, которое включает в себя новую анимацию, переходы и закругленные углы.
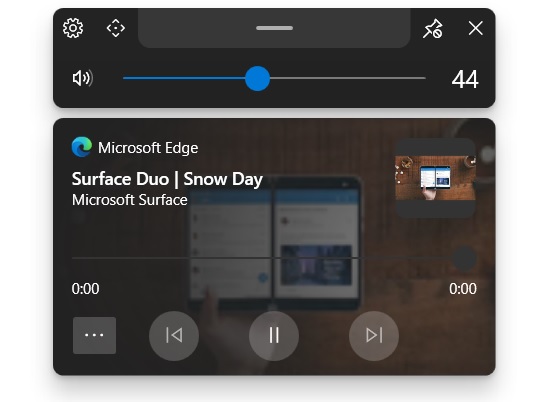
Как вы можете видеть на скриншоте выше, приложение ModernFlyouts вносит столь необходимые изменения в объем и другие всплывающие окна.
Это также делает его частью Windows 10 и Windows 10X благодаря отличной реализации Fluent Design и закругленным углам.
Приложение ModernFlyouts также позволяет изменить время ожидания всплывающих окон, что является отличным способом сделать эти всплывающие окна менее навязчивыми.
Вы даже можете скрыть системные средства управления мультимедиа (GSMTC), также известные как средства управления мультимедиа (эскизы, панель поиска и т.д.) для всех приложений одним нажатием.
Вот список других функций, предлагаемых ModernFlyouts:
- Fluent UI с поддержкой светлых, темных и высококонтрастных тем.
- Добавляет дополнительные средства управления мультимедиа, такие как случайное воспроизведение, повтор и остановка.
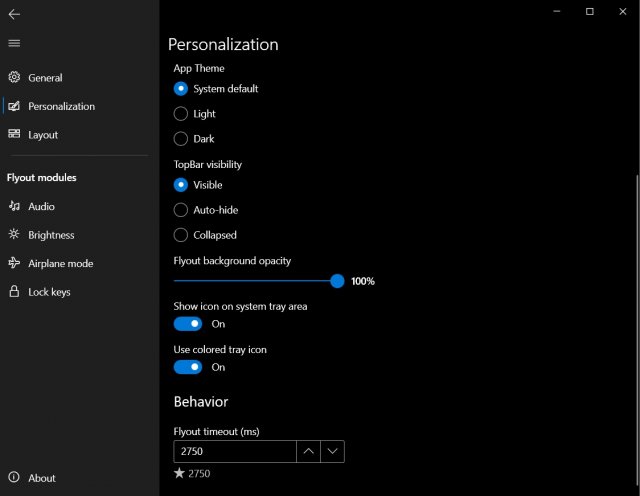
- Полностью настраиваемый: вы можете отключить каждый модуль, изменить положение всплывающего меню и уровень прозрачности.
Все довольно просто, и хотя оно создано не Microsoft, это все же лучшее приложение, которое вы можете получить на данный момент.
Если вам интересно, вы можете скачать ModernFlyouts (Preview) из магазина Microsoft Store. После того, как вы запустили приложение, вы сможете настроить его из панели задач.
Встроенные всплывающие окна временно скрыты, когда это приложение работает в фоновом режиме, что означает, что вы всегда можете завершить процесс приложения и вернуться к пользовательскому интерфейсу по умолчанию.
Вы также можете внести свой вклад в разработку приложения на Github и отправить свои отзывы разработчикам в их группе Telegram.


