- Управление настройками DNS через командную строку
- Дополнительные параметры для настройки DNS
- Windows set dns from command line
- Windows set dns from command line
- System Requirements
- Versions History
- Start Using QuickSetDNS
- How to Change DNS Servers in Windows
- Change DNS servers in any version of Windows
- How to Change Windows DNS Servers
- How to Change DNS Servers With Command Prompt
- DNS Server Settings Are Device-Specific
Управление настройками DNS через командную строку
DNS позволяет определять IP-адрес компьютера по его хост-имени и наоборот. Для компьютеров со статическими IP-адресами нужно указать, к какому DNS-серверу они должны обращаться; вы можете сделать это, используя контекст InterfaceIP в Netsh. Синтаксис для задания конкретного DNS-сервера таков:
- set dns nаmе=ИмяИнтерфейса source=static addr=Адрес
Рассмотрим следующий пример:
- set dns source=static addr=192.168.1.56
Здесь вы указываете, что работаете с интерфейсом Local Area Connection (Подключение по локальной сети) и задаете адрес DNS-сервера — 192.168.1.56.
Если компьютер использует DHCP и вы хотите, чтобы он получал адрес DNS-сервера через DHCP, введите команду вида:
- set dns namе=ИмяИнтерфейса source=dhcp
Вот пример: set dns source=dhcp
Здесь вы указываете, что интерфейс Local Area Connection должен получать адрес DNS-сервера через DHCP.
Если компьютеру уже заданы IP-адреса DNS-серверов, SET DNS заменяет существующие значения. Чтобы добавить IP-адреса DNS-серверов, а не заменить их, пользуйтесь командой ADD DNS. Для проверки параметров DNS введите show dns.
Дополнительные параметры для настройки DNS
Ниже рассматриваются другие, необязательные параметры:
- ddns=enabled|disabled — по умолчанию все IP-адреса для интерфейсов регистрируются в DNS с полным доменным именем компьютера. При такой автоматической регистрации используется протокол динамического обновления DNS. Если вы хотите отключить такую функцию, добавьте параметр ddns=disabled;
- sufflx=interface|primary — по умолчанию полное имя компьютера регистрируется только в его первичном домене. При использовании динамического DNS вы также можете указать, что в DNS должно регистрироваться DNS-имя, специфичное для интерфейса. Введите параметр suffix=interface. Если у компьютера несколько сетевых адаптеров, это позволит подключаться к нескольким доменам.
Windows set dns from command line
- Open up the command prompt (In Windows, you can use WINDOWS KEY+R to open Run dialogue box and type cmd)
(note: Use your up and down arrow keys to access recent commands you have entered in the command line.)
To see your current DNS settings, type ipconfig /displaydns and press Enter.
To delete the entries, type ipconfig /flushdns and press Enter.
To see your DNS settings again, type ipconfig /displaydns and press Enter.
You should see blank records or you might get the message «Could not display the DNS Resolver Cache.»
To perform a DNS lookup, type ping scisweb.ulster.ac.uk and press Enter.
To see your DNS settings again, type ipconfig /displaydns and press Enter.
You should see a DNS record for scisweb.ulster.ac.uk that includes the IP address and other information. Another field in the DNS cache is a TTL value, which is different from the TTL in an IP packet. This DNS TTL value is sent by the DNS server maintaining the scisweb.ulster.ac.uk record. It is measured in seconds and tells your DNS client how long to cache the DNS record as a safeguard against clients holding on to DNS records whose IP addresses might have changed.
To open your computer’s Hosts file, run Notepad as administrator. Easiest way is to press and then type notepad in windows 8 splashscreen, select notepad and right click and then select «Run as administrator» in bottom taskbar area of windows 8. In the Open dialog box, navigate to C:\Windows\System32\Drivers\Etc. In the File type drop-down list, click All Files. Double-click the hosts file to open it.
You should now have a hosts file open with various settings.
After the last line in the file, type 193.61.191.104 university, and then save the file and exit Notepad.
At the command prompt, type ipconfig /displaydns and press Enter to see that the entry is in your DNS cache.
Type ping university and press Enter.
Delete the DNS cache again by typing ipconfig /flushdns and press Enter.
Display your DNS cache by typing ipconfig /displaydns and press Enter.
Notice that the university entry remains in the cache because the Hosts file data always stays in the cache.
Type nslookup scisweb.ulster.ac.uk and press Enter.
Your DNS server’s name and IP address are displayed, along with the name and IP address of www.ulster.ac.uk. You use Nslookup to look up a host’s IP address without actually communicating with it.
Type nslookup and press Enter.
You should now have entered Nslookup’s interactive mode. You should see an arrow prompt.
Type www.google.com and press Enter.
Notice that more than one address is returned along with one or more aliases (other names that www.google.com goes by).
Type www.google.com again (or press the up arrow to repeat the last line you typed) and press Enter.
You should see the IP addresses returned in a different order. (If you don’t, keep trying, and the order will change.)
The www.google.com page can be reached by a number of different IP addresses, and the addresses are returned in a different order so that a different server is used each time, which is called load balancing.
Nslookup is also used to do reverse lookups, in which the IP address is given and the hostname is returned.
If you are ever concerned that your DNS server is not working correctly, you can test it with Nslookup and compare the results of your DNS server with the results from another server, such as Google’s.
Windows set dns from command line
System Requirements
Versions History
- Version 1.31:
- Added ‘Start As Hidden’ option. When this option and ‘Put Icon On Tray’ option are turned on, the main window of QuickSetDNS will be invisible on start.
- Version 1.30:
- Added support for IPv6. In order to set the IPv6 DNS servers, you have to use the ‘Set Active DNS (IPv4+IPv6)’ option. If you want to set only the IPv4 DNS servers, like the previous versions, you should use the ‘Set Active DNS (IPv4)’ option.
- Version 1.22:
- Fixed the ‘Copy SetDNS Command Line’ option — Added quotes to the .exe file.
- Version 1.21:
- You can now specify the connection name in command-line, for example:
QuickSetDNS.exe /SetDNS «8.8.8.8,8.8.4.4» «Local Area Connection»
- You can now specify the connection name in command-line, for example:
- Version 1.20:
- Added new default DNS servers: Cloudflare (1.1.1.1) and Quad9 (9.9.9.9). Be aware that these DNS servers are added only when you run QuickSetDNS in the first time (Without .cfg file)
- Version 1.15:
- Added ‘Open Adapter In RegEdit’ option, which allows you to open the settings of the selected network adapter in the Registry.
- You can now manually set the DNS servers in the Registry, and then use /SetDNS command with ‘reg’ value to update the system with the Registry changes you made, for example:
QuickSetDNS /SetDNS reg ««
- Version 1.10:
- Added option to choose another font (name and size) to display in the main window.
- Version 1.05:
- Added ‘Put Icon On Tray’ option.
- Version 1.03:
- Fixed bug: On some systems, QuickSetDNS failed to display network adapters in the top combo-box.
- Version 1.02:
- Added ‘Always On Top’ option.
- Version 1.01:
- Added ‘Router DNS’ item, which allows you to choose the internal DNS server of your router.
- Version 1.00 — First release.
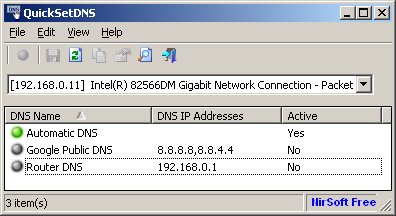
Start Using QuickSetDNS
After running QuickSetDNS, the main window allows you to easily choose the desired DNS servers to use on your Internet connection, by using the ‘Set Active DNS’ option (F2). By default, QuickSetDNS provides only one alternative: the public DNS servers of Google — 8.8.8.8 and 8.8.4.4
You can easily add more DNS servers to the list by using the ‘New DNS Server’ option (Ctrl+N).
If the ‘Automatic DNS’ option is selected, then the DNS server information is received from your router automatically, using DHCP.
If you have multiple network adapters, you may need to choose the correct network adapter from the combo-box located just below the toolbar of QuickSetDNS.
How to Change DNS Servers in Windows
Change DNS servers in any version of Windows
:max_bytes(150000):strip_icc()/tim-fisher-5820c8345f9b581c0b5a63cf.jpg)
:max_bytes(150000):strip_icc()/image-5e6611aebe974bb7886a24b5070c834f.jpg)
Most computers and devices connect to a local network using DHCP and DNS servers are automatically configured in Windows. When you change the DNS servers in Windows, you change which servers Windows uses to translate hostnames (for example, www.lifewire.com) to IP addresses (for example, 208.185.127.40).
DNS servers are sometimes the cause of certain types of internet problems. Changing DNS servers can help troubleshoot the problem. Here’s how to override these automatic DNS servers with others of your choosing.
Instructions in this article apply to Windows 10, Windows 8, and Windows 7.
How to Change Windows DNS Servers
Below are the steps required to change the DNS servers that Windows uses. However, the procedure is different depending on the version of Windows.
For a head start, skip these first four steps and go to Step 5 by entering the control netconnections Control Panel applet command in the Run dialog box. You can access the Run dialog box by pressing the windows key and typing run (search in the charm bar on Windows 8) or by pressing the windows key+R.
On Windows 8.1, select Network Connections from the Power User Menu, then skip to Step 5.
Select Network and Internet.
:max_bytes(150000):strip_icc()/001_how-to-change-dns-servers-in-windows-2626242-5c33e346c9e77c0001e9e573.jpg)
Network and Internet doesn’t appear if the Control Panel displays large or small icons. Instead, choose Network and Sharing Center, then skip to Step 4.
In the Network and Internet window, select Network and Sharing Center to open that applet.
:max_bytes(150000):strip_icc()/002_how-to-change-dns-servers-in-windows-2626242-5c33e3c0c9e77c0001aeedba.jpg)
In the Network and Sharing Center window, select Change adapter settings.
:max_bytes(150000):strip_icc()/003_how-to-change-dns-servers-in-windows-2626242-5c33e3e646e0fb0001aab806.jpg)
The Network Connections window lists connections to the computer. Wired connections are labeled as Ethernet or Local Area Connection, while wireless ones are labeled as Wi-Fi.
:max_bytes(150000):strip_icc()/004_how-to-change-dns-servers-in-windows-2626242-5c33e402c9e77c0001aefbde.jpg)
If you don’t see the right connection, change the view to Details, go to the Connectivity column, and use the connection that lists Internet access.
Open the network connection you want to change the DNS servers for by double-clicking or double-tapping on its icon.
In the Status window, select Properties.
:max_bytes(150000):strip_icc()/005_how-to-change-dns-servers-in-windows-2626242-5c33e49d46e0fb0001c2d1b1.jpg)
In some versions of Windows, provide the administrator password if you’re not logged in to an admin account.
In the Properties window, go to the This connection uses the following items section and select Internet Protocol Version 4 (TCP/IPv4) or Internet Protocol (TCP/IP) to select the IPv4 option, or select Internet Protocol Version 6 (TCP/IPv6) to change the IPv6 DNS server settings.
:max_bytes(150000):strip_icc()/006_how-to-change-dns-servers-in-windows-2626242-5c33e5b2c9e77c0001cb00ff.jpg)
Select Properties.
In the Internet Protocol Properties window, choose Use the following DNS server addresses.
If Windows has custom DNS servers configured, replace the existing DNS server IP addresses with new ones.
Enter the IP address for the Preferred DNS server and for the Alternate DNS server.
:max_bytes(150000):strip_icc()/008_how-to-change-dns-servers-in-windows-2626242-5c33e70dc9e77c000136ee71.jpg)
You can also enter only a preferred DNS server, replace the preferred DNS server from one provider with a secondary DNS server from another, or enter more than two DNS servers using fields in the DNS tab (select Advanced to enter multiple DNS servers).
Select OK to make the DNS server changes.
Close Control Panel.
Verify that the new DNS servers work properly in Windows. Visit several websites in your favorite web browser. If the web pages show up as quickly as before, the new DNS servers are working properly.
How to Change DNS Servers With Command Prompt
The preferred DNS server in Windows can be changed through Command Prompt. Use this method if you’re comfortable entering commands on the command line.
Type netsh and press Enter.
:max_bytes(150000):strip_icc()/Capture-c8b9b976eb5f44a898b7745469358007.JPG)
At the netsh> prompt, type interface ip show config, then press Enter.
:max_bytes(150000):strip_icc()/Capture-d0cbf3148a234688a447f13fb32e4db2.JPG)
Locate the network connection for which you want the DNS server changed.
:max_bytes(150000):strip_icc()/Capture-e1d68f3077a644c0918ca56a1002246e.JPG)
Enter interface ip set dns «Ethernet0» static 8.8.8.8 and press Enter. Replace Ethernet0 with the name of your connection and 8.8.8.8 with the DNS server you want to use.
Use the command line, in Command Prompt or a BAT file, to force the connection to use DHCP. Replace the static section of the command with dhcp.
When the command is completed, the netsh> prompt displays.
Close Command Prompt.
DNS Server Settings Are Device-Specific
Setting up custom DNS servers for your computer only applies to that computer, not to the other devices on the network. For example, you can set up a Windows laptop with one set of DNS servers and use an entirely different set on a desktop, phone, or tablet.
DNS settings apply to the closest device they’re configured on. For example, if you use one set of DNS servers on the router, your laptop and phone will use these DNS servers when they connect to Wi-Fi. However, if the router has its own set of servers and the laptop has its own separate set, the laptop will use a different DNS server than the phone and the other devices that use the router. The same is true if the phone uses a custom set.
DNS settings only trickle down a network if each device is set up to use the router’s DNS settings and not their own. This means that if four devices are on a network, for example, all four could be using separate DNS servers.
Check out our list of free and public DNS servers for the complete list of publicly available DNS servers which may be more complete than the list provided by your ISP.


