- How to Change Drive Letter on Windows 10/8/7 without Effort?
- Why do you want to change drive letter?
- Matters need attention to change drive letter
- How to assign a drive letter on Windows 10/8/7 with Disk Management?
- How to change drive letter on Windows 10/8/7 effortlessly?
- Summary
- Restore the system or boot drive letter in Windows
- Summary
- Change the system or boot drive letter
- How to change Drive letter in windows 10
- Change drive letter in Windows 10
- 1] Using Command Prompt
- 2] Using Disk Management
- 3] Using PowerShell
- 4] Using Registry Editor
- 5] Using Drive Letter Changer software
- C or D Drive letter missing in Windows 10
- Drive letter missing in Windows 10
- 1] Manually Show Missing Drive Letters
- 2] Ensure drive has a drive letter assigned in Disk Management
- 3] Assign the letter via a Registry tweak
- 4] Update Disk Drives Driver
How to Change Drive Letter on Windows 10/8/7 without Effort?
Want to change drive letter on Windows 10/8/7? Here, I will show you two ways and walk you throgh every detailed steps.

By Ivy  / Last Updated September 30, 2020
Why do you want to change drive letter?
The drive letter of system partition is normally assigned by Windows at installation. And the drive letter is C. After installation, Windows still assign a drive letter for any of your partitions on hard drive, flash drive, optical drive, USB drive, card reader.
Sometimes, the drive letter will be unavailable owing to some operations and all partitions are shown as Document, Game, Music. Thus, you need to give the partitions a drive letter. Or you just want to change the original drive letter to another one.
Matters need attention to change drive letter
1. The hard drive contains your operating system and boot files will be set as C: drive and all your software will be saved on it by default. Don’t try to change it, or you cannot boot your computer.
2. Sometimes, you may find that your computer skip one drive letter and assign another available drive letter for your card reader. Maybe, your card reader with one more slots, so it will have different drive letters.
3. A: drive letter or B: have historically been reserved for floppy drives.
4. If you change the drive letter of a partition or disk with software, it may stop working. You cannot find the path of it. Fortunately, this is not a common question with newer programs and apps. But if you have an old program or you still use the old operating system Windows XP or Windows Vista, this may be a potential problem.
5. The different removable drives will have a different hard drive letter.
How to assign a drive letter on Windows 10/8/7 with Disk Management?
When you encounter partition or disk problems, Windows built-in tool, such as disk management, diskpart will your first choice. Below, I will show you how to assign a drive letter on Windows 10/8/7 with Disk Management.
Step 1. Press “Win + R” to open the “Run” window and type diskmgmt.msc in the box
Step 2. Right-click the drive you want to change, and selectChange Drive Letter and Paths in the pop-up window.
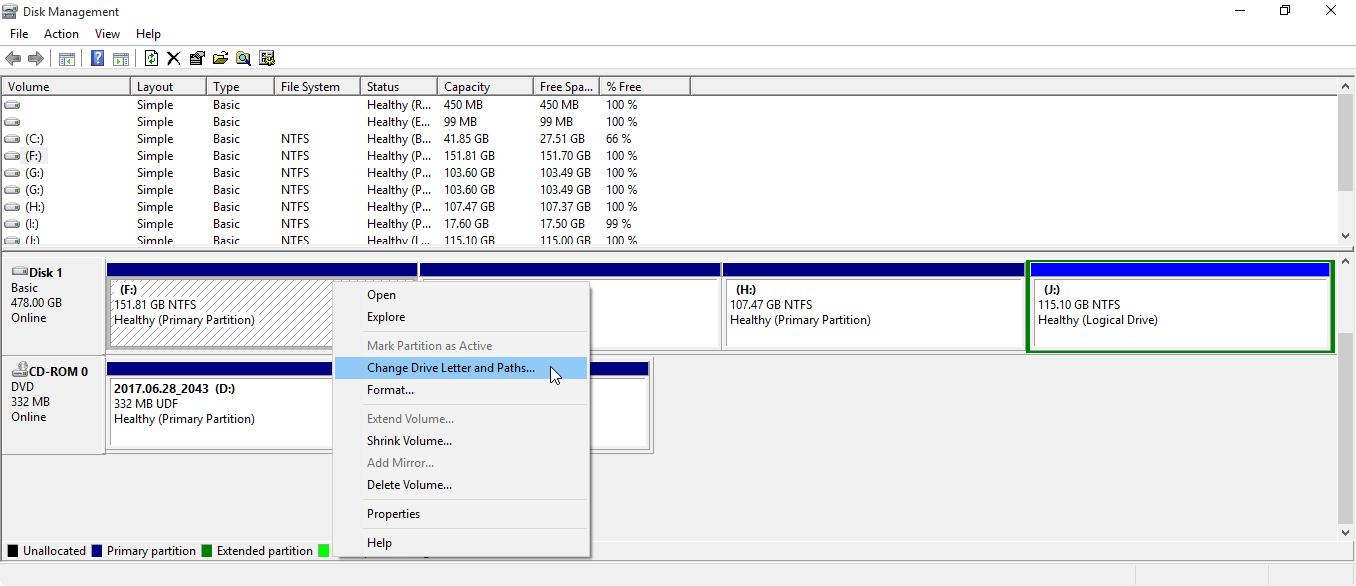
Step 3. Click Change to summon the next window.
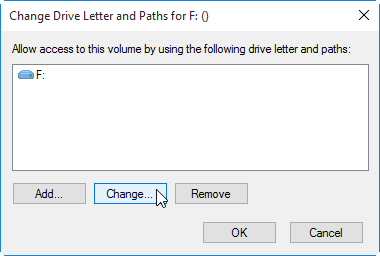
Notice: If you want to remove the drive letter of your partition, you can select «Remove» and follow the instructions step by step.
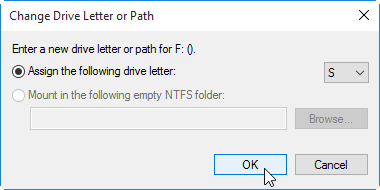
Step 4. Select a drive letter from the drop-down list and clickOK. And you are only allowed to use a drive letter which is still available.
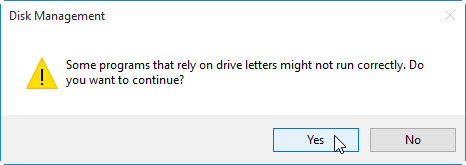
Step 5. Confirm the pending operation and click Yes.
You can change drive letter in disk management. However, it may not work well at any time. For example: when you connect a hard drive to another PC, the disk may not display its drive letter and you cannot add a drive letter to it using Disk Management.
How to change drive letter on Windows 10/8/7 effortlessly?
Windows built-in tool can help you change drive letter in Windows. But, it’s not perfect.
Want to an easier way or more advanced features, you can use free AOMEI Partition Assistant. It contains all the basic features, including Create Partition, Delete Partition, Shrink Partition, etc. Besides, It will offer you more advanced functions like Move Partition, Merge Partition, Convert to Primary Partition, Windows to go creator, etc
Now, coming to our point: how to change drive letter
Step 1. Download AOMEI Partition Assistant, install and launch it.
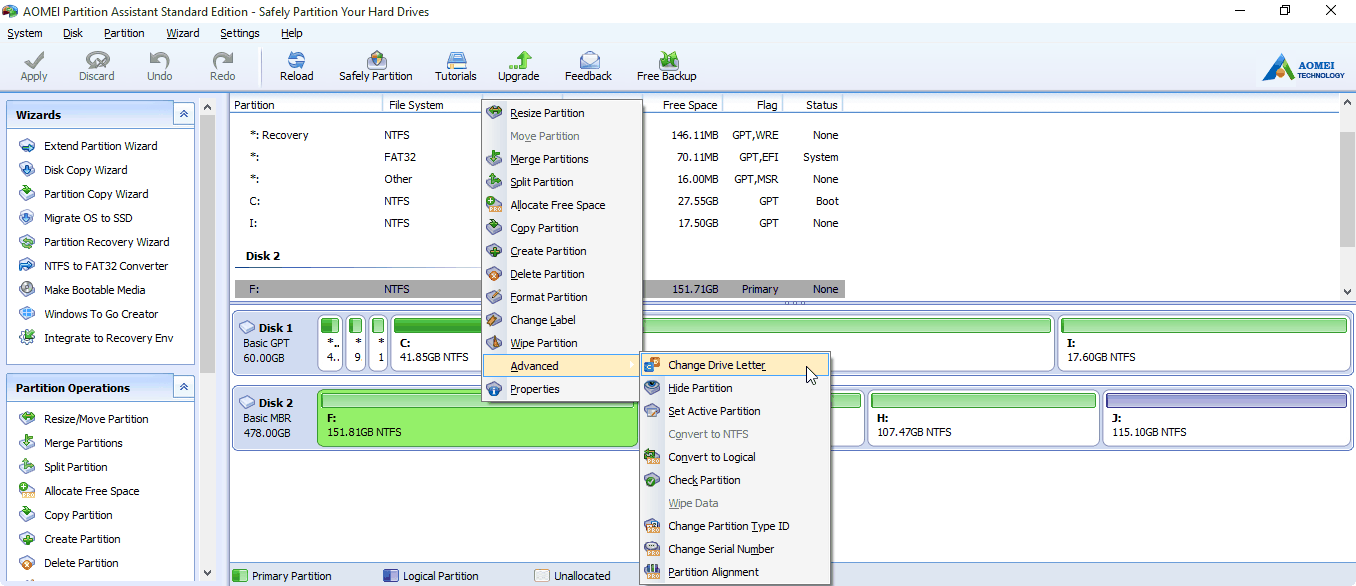
Step 2. Right-click the partition, then select Advancedand Change Drive Letter in the main page.
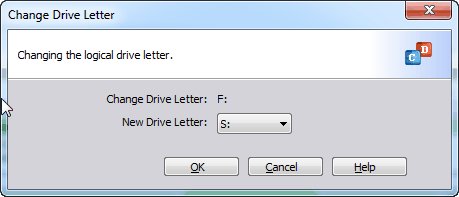
Step 3. Specify a new drive letter and click OK
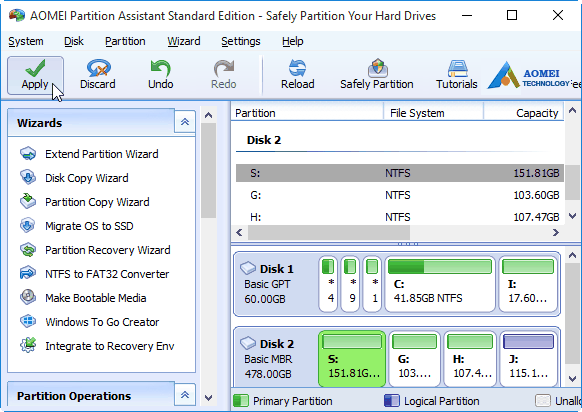
Step 4. Preview the final result and click Apply to execute the further operation
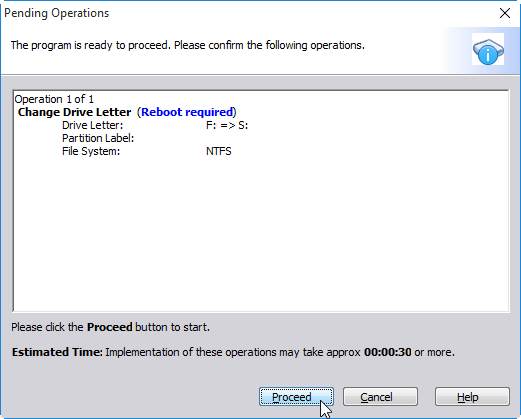
Step 5. Confirm the following operations and click Proceed.
This article is also applied to change drive letter on Windows XP, external hard drive, card reader, etc.
Summary
Windows built-in tool disk management can help you change drive letter in Windows 10/8/7. But it does not work well all the time. A third-party tool like AOMEI Partition Assistant can be a better choice.
With AOMEI Partition Assistant, All the operation becomes very easy, even for a beginner. Besides, it has more advanced features., including Move Partition, Resize Parttion, Convert GPT to MBR, etc. What’s more, it can help you fix problems caused by Disk Management or Diskpart, including The volume size is too big, Mark partition as active greyed out, The extend volume is disabled, etc.
Restore the system or boot drive letter in Windows
This article describes how to change the system or boot drive letter in Windows.
Original product version: В Windows 10 — all editions, Windows Server 2012 R2
Original KB number: В 223188
Summary
Don’t use the procedure that’s described in this article to change a drive on a computer where the drive letter hasn’t changed. If you do so, you may not be able to start your operating system. Follow the procedure that’s described in this article only to recover from a drive letter change, not to change an existing computer drive to something else. Back up your registry keys before you make this change.
This article describes how to change the system or boot drive letter. Usually it isn’t recommended, especially if the drive letter is the same as when Windows was installed. The only time that you may want to do so is when the drive letters get changed without any user intervention. It may happen when you break a mirror volume or there’s a drive configuration change. This situation should be a rare occurrence, and you should change the drive letters back to match the initial installation.
To change or swap drive letters on volumes that can’t otherwise be changed using the Disk Management snap-in, use the following steps.
In these steps, drive D refers to the (wrong) drive letter assigned to a volume, and drive C refers to the (new) drive letter you want to change to, or to assign to the volume.
This procedure swaps drive letters for drives C and D. If you don’t need to swap drive letters, name the \DosDevice\letter: value to any new drive letter not in use.
Change the system or boot drive letter
This section, method, or task contains steps that tell you how to modify the registry. However, serious problems might occur if you modify the registry incorrectly. Therefore, make sure that you follow these steps carefully. For added protection, back up the registry before you modify it. Then, you can restore the registry if a problem occurs. For more information about how to back up and restore the registry, see How to back up and restore the registry in Windows.
Make a full system backup of the computer and system state.
Sign in as an Administrator.
Locate the following registry key:
Select MountedDevices.
On the Security menu, select Permissions.
Verify that Administrators have full control. Change it back when you are finished with these steps.
Quit Regedt32.exe, and then start Regedit.exe.
Locate the following registry key:
Find the drive letter you want to change to (new). Look for \DosDevices\C: .
Right-click \DosDevices\C: , and then select Rename.
You must use Regedit instead of Regedt32 to rename this registry key.
Rename it to an unused drive letter \DosDevices\Z: .
It frees up drive letter C.
Find the drive letter you want changed. Look for \DosDevices\D: .
Right-click \DosDevices\D: , and then select Rename.
Rename it to the appropriate (new) drive letter \DosDevices\C: .
Select the value for \DosDevices\Z: , select Rename, and then name it back to \DosDevices\D: .
Quit Regedit, and then start Regedt32.
Change the permissions back to the previous setting for Administrators. It should probably be Read Only.
How to change Drive letter in windows 10
This post will show you how to change the Drive letter in Windows 10. For each hard drive partition, a letter like C, D, E, etc., is assigned automatically. If you want to change or rename some drive letter, then you can try any of the simple options covered in this post.
Change drive letter in Windows 10
There are 5 different ways covered in this post to change or rename a drive letter in Windows 10. These are:
- Using Command Prompt
- Disk Management
- PowerShell
- Registry Editor
- Drive Letter Changer software.
1] Using Command Prompt
Follow these steps to change a drive letter using CMD or Command Prompt window:
- Run Command Prompt as an administrator
- Type diskpart command and hit the enter key
- Execute list volume command to see the list of all hard drives including their volume numbers and letters
- Run select volume 5 command. Replace 5 with any other volume number for which you want to change the drive letter
- Execute assign letter=L command. Here again, replace L with any other alphabet.
This will change the drive letter immediately.
If the Drive letter is missing or hidden, then you can try some easy options to fix such an issue and then see the newly assigned letter.
2] Using Disk Management
Type diskmgmt in the Search box and use the Enter key.
In the Disk Management window, the list of all volumes or drives, volume type, capacity, free space, etc., are visible. Right-click on a volume and use Change Drive Letters and Paths option.
A small box appears. Here, use the Change button, and another box will open. Now you can select the new letter using the drop-down menu and press the OK button.
Finally, confirm the change using the Yes button.
3] Using PowerShell
This option is also useful to change drive letters, but it doesn’t show volume numbers and letters. So, you first need to check which drive letter you want to change. After that, use these steps:
- Run elevated PowerShell window
- Now execute this command:
Make sure to replace F and L with your actual drive letter and new drive letter.
4] Using Registry Editor
This method requires a PC reboot after applying the changes. The steps are:
Launch Registry Editor by typing regedit in the Search box.
Go to MountedDevices Registry key. Its path is:
On the right section, you will see DWORD values like \DosDevices\D: for all the hard drives along with drive letters. Right-click on a value and use the Rename option.
You need to only rename the drive letter with a new letter and leave everything as it is. For example, change \DosDevices\D: with \DosDevices\L: and save it.
5] Using Drive Letter Changer software
Drive Letter Changer is a free and portable tool. If you want to try some freeware to change drive letters in Windows 10, then this tool is nice. This tool also shows which letters are already assigned to other hard drives and which letters are available or free.
Grab this tool and execute its EXE file to launch its interface. It will show the list of all the drives. Select a drive and it will show the Change drive letter menu. Access that menu and the list of assigned and free drive letters will be visible to you. Select a letter and confirm your action using the Yes button to change the drive letter.
You can also use this tool to directly open the Disk Management window, Restart File Explorer, etc.
Hope these ways will help you easily change drive letters in Windows 10.
C or D Drive letter missing in Windows 10
On rare occasions, you may find that the Drive letter is missing from File Explorer following the installation of an Update. If you have experienced this issue on your Windows 10 PC, here’s a way to get past the problem.
A drive letter represents a single alphabetic character (typically through A-Z) that can be assigned to the following-
- Physical disk partition
- Floppy disk drive
- Removable device/ CD-ROM/ mapping network drive in the computer.
Drive letter missing in Windows 10
Generally, drive letter C: is assigned to the first disk partition where the running Windows is installed. So, if this fixed drive letter is missing from either Windows File Explorer or Disk Management, it can cause inconveniences or even makes the partition inaccessible. If C or D Drive letter is missing, then to fix this issue, you can:
- Manually Show Missing Drive Letters
- Ensure your drive has a drive letter assigned in Disk Management
- Assign the letter via a Registry tweak
- Update Disk Drives Driver
- Run Hardware Troubleshooter.
The above steps can help you to get the missing drive letter back.
1] Manually Show Missing Drive Letters
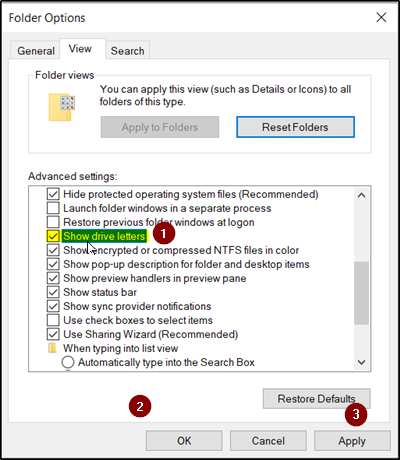
From the Start search, open Folder Options and click the ‘View’ tab.
Scroll down the list of options until the ‘Show drive letters’ option is seen. Simply check the box marked against this option.
Now, go back to the ‘This PC’ window. Your drive letters should be visible.
2] Ensure drive has a drive letter assigned in Disk Management
In Disk Management, every drive is assigned a drive letter, but if it is missing, In Windows Disk Management, you can get it back.
There’s a function ‘Change Drive Letter and Paths’ that appears when you right-click menu of a partition (Volume). It helps you to-
- Add the drive letter
- Change the drive letter
- Remove the drive letter
If the last option, i.e., ‘Remove’ is selected and applied, the letter of the target drive will be removed and disappear in Disk Management. This can be one of the reasons for missing a drive letter.
So, to reverse this change, choose ‘Add’ to assign a letter to the selected drive. It is essential to assign the drive with the original letter – because, if not, then the programs relying on the original letter might not work as desired. If the original letter is taken by a new drive, change the letter of the new drive to another available letter and then allocate the released letter for the target drive.
3] Assign the letter via a Registry tweak
Launch Registry Editor and navigate to-
See if a device is shown as being mounted at the specific drive letter.
Next, right-click the drive letter that you want and choose “Rename” from the right-click menu to change the letter to any other unused letter.
4] Update Disk Drives Driver
From the WinX Menu, open Device Manager, expand Disk drives, right-click on your Hard Disk and select Update, to update the device driver.


