- Changing Default File Associations in Windows 10 via GPO
- How to Set or Change Default Apps on Windows 10?
- Exporting File Associations on Windows 10 to the XML file
- Importing Default App Associations on Windows 10
- Set Default File Associations with Group Policy
- Changing File Association on Windows 10 via Registry
- How to Reset File Associations in Windows 10?
- How to set File associations in Windows 7 (not ‘open’, but others)
- File Types and File Associations
- Additional Resources
- Windows File Association Explained for Desktop Administrators
Changing Default File Associations in Windows 10 via GPO
In this article, we will look on how to manage default file association on Windows 10 and Windows Server 2019/2016/2012R2. As an example, I’ll show you how to set a default browser app to open HTML files, import these settings into an XML file, and deploy file association settings to other computers manually or using Group Policy (GPO).
The main difference between Windows 10 and previous Windows versions is that now you can’t manage file association settings through the Registry or the “Open With” feature of the Group Policy Preferences. But there was a new opportunity to export the current file association settings from the “reference” computer to the XML file and apply this file on other computers. You can also export configured file associations to a Windows image that is deployed to clients on your network (manually, via WDS or SCCM).
How to Set or Change Default Apps on Windows 10?
Suppose you want to use the Firefox browser to open .HTML files on all domain computers (you want to associate this file extension with the app).
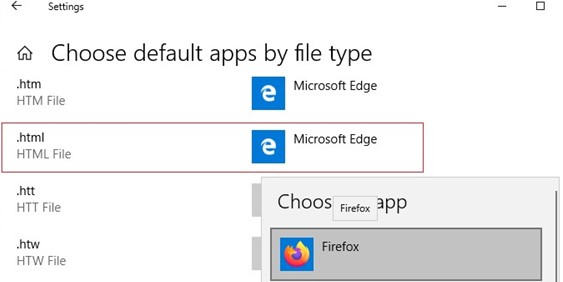
To do this, you need a reference computer with Windows 10 (in this example, the current build 1909 is used) and the installed Firefox browser. To manually create a mapping between a file extension and a program, open the Settings -> Default Apps and click the “Choose default apps by file type” button.
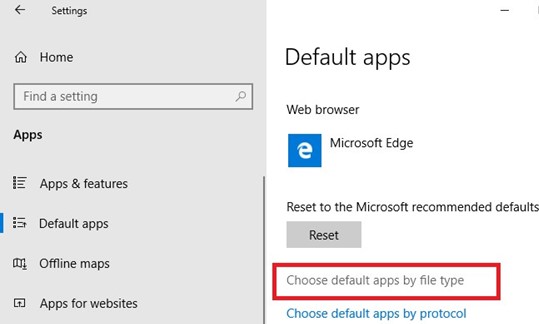
Find the .HTML file in the list of file extensions and use the “Choose a default” button to change the default program to open html files from Microsoft Edge to Firefox.
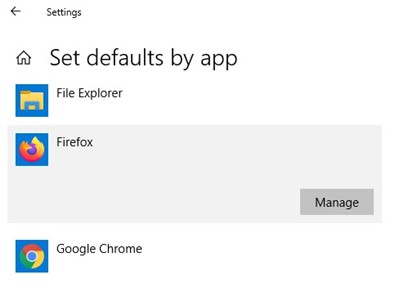
You can automatically assign a specific app with the file extension for which it is registered. To do this, select Set default by apps in the Default Apps section, find your program in the list and click the Manage button.
The next screen contains a list of file types supported by the application. Select the file extensions that you want to open with Firefox.
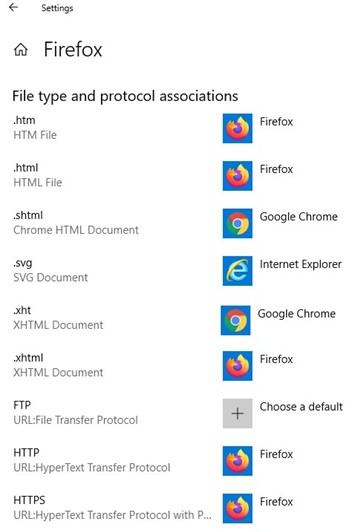
If you need to select specific file extensions, click Choose defaults for this program and check the desired file extensions.

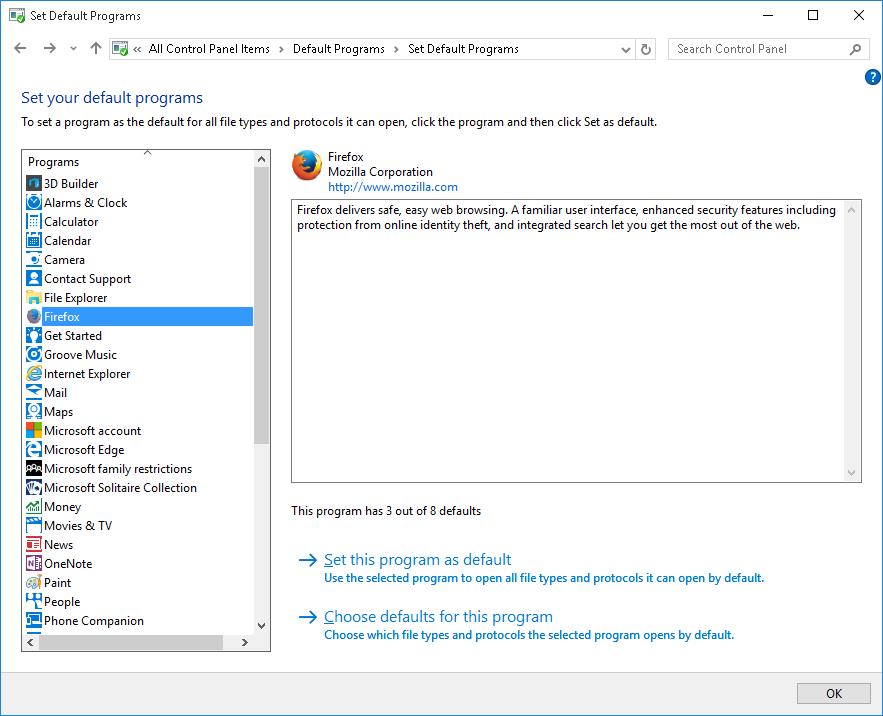
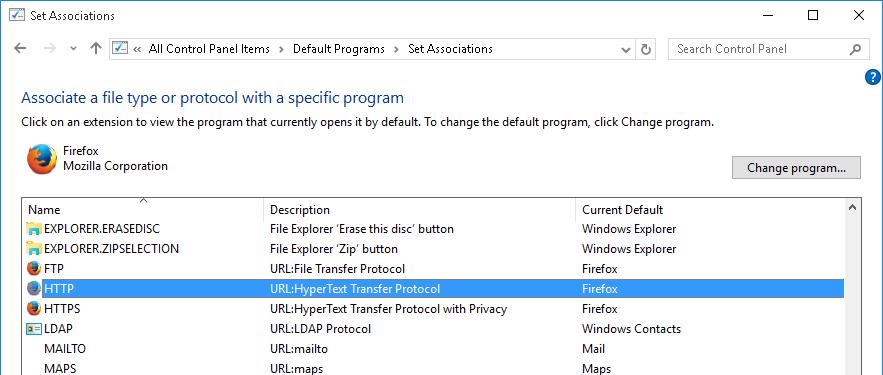
You can check the current associations for the files with the .html extension in the Programs -> Default Programs -> Set Association section of the Control Panel.
Exporting File Associations on Windows 10 to the XML file
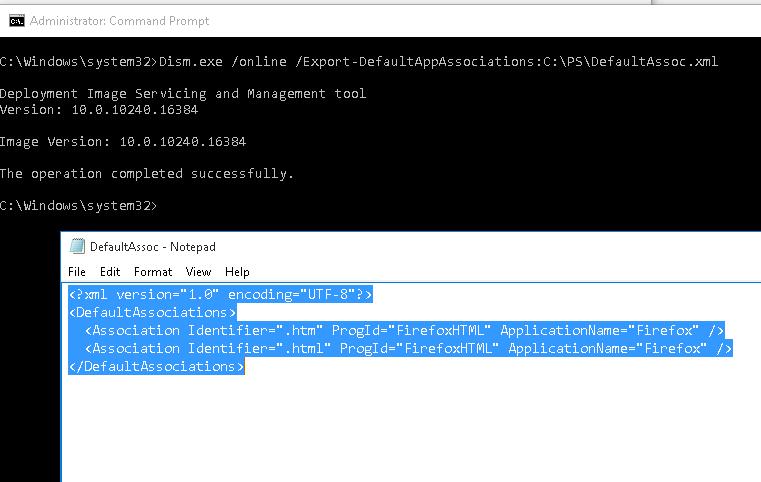
You can export the current configuration of file associations to the XML file using DISM:
Dism.exe /online /Export-DefaultAppAssociations:C:\PS\DefaultAssoc.xml
The command will save all the program associations you have configured on your user profile to the XML file. You can open the DefaultAssoc.xml file in any text editor, and see the full list of file associations exported. If you need to use only a part of associations from this list (in order not to override the existing user settings), you can manually edit the XML file. Leave only the lines with the file extensions you need. For example, we’ll leave the following lines for HTM and HTML extensions:
Importing Default App Associations on Windows 10
The resulting XML file can be imported into a Windows 10 on other computers using DISM tool:
Dism.exe /Online /Import-DefaultAppAssociations:C:\PS\DefaultAssoc.xml
If you manually edited the XML file and imported it through DISM, in some Windows 10 builds you may encounter multiple errors “App default reset notification” at first logon. Microsoft does not recommend to manually edit this XML file.
You can also import these settings to the offline Windows image in the WIM file. First, you have to mount the image:
Dism /Mount-Image /ImageFile:C:\mnt\images\install.wim /MountDir:C:\mnt\offline
And then import the XML file:
Dism.exe /Image:C:\mnt\offline /Import-DefaultAppAssociations:\\Server1\Share\DefaultAssoc.xml
Dism.exe /Image:C:\mnt\offline /Get-DefaultAppAssociations
Set Default File Associations with Group Policy
Windows 10/8.1 introduced a new Group Policy (GPO) option that allows you to apply an xml file with file association settings to all current users on a computer.
This policy named Set a default associations configuration file is located under Computer Configuration -> Administrative Templates -> Windows Components ->File Explorer.
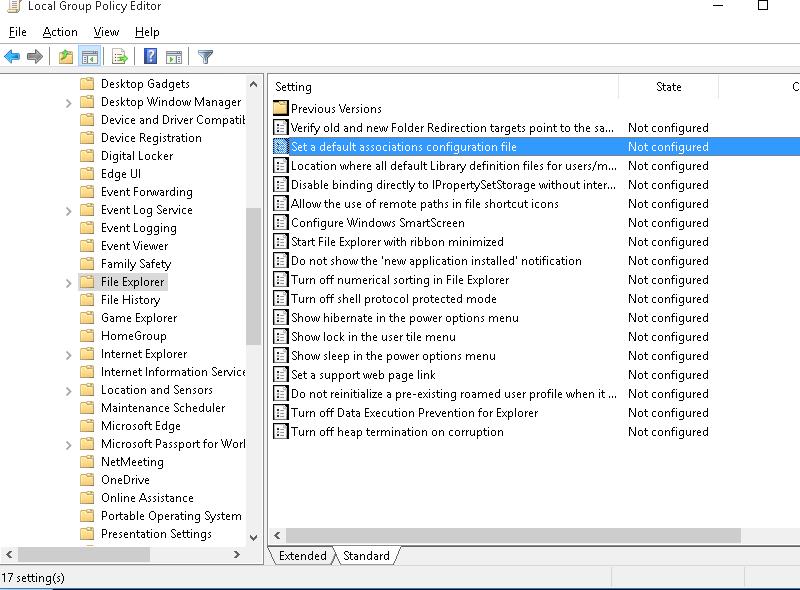
Enable the policy and specify the UNC path to your XML file. It can be located on a shared network folder, SYSVOL directory on the domain controller or pre-copied to the computers using GPP or SCCM.
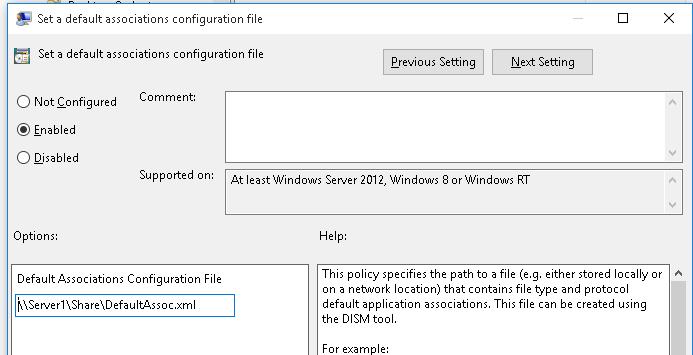
The new file association settings will be applied to all users of the computer after the next login.
Since Windows 10 tracks changes in the file association settings, the first time you try to open an HTML file, a window may appear confirming that Firefox is used as the default program to open this file type (the request appears only once). Such a request will always appear after installing a new application, that is registered to open an existing file type or protocol. You can hide these notifications by enabling the policy “Do not show the ‘new application installed’ notification” in the same GPO section.
Changing File Association on Windows 10 via Registry
As we said above, in Windows 10 the way to set file association options has changed. In the previous section, we showed you how to configure the association for the .html file type with a Firefox browser through an XML file and Group Policy. Now let’s see how it looks in the Windows 10 registry.
Run the Registry Editor (regedit.exe) and go to the registry key HKEY_CURRENT_USER\Software\Microsoft\Windows\CurrentVersion\ Explorer\FileExts\.html\UserChoice. This registry key contains the association settings for the html file extension. Please note the following registry parameters:
- ProgId – this is the identifier of the registered app for opening this file type. This app is specified in the XML file. If a long identifier is specified instead of the application name, then the file association with the modern UWP (Metro-style) application is configured.
- Hash – a hash value that is automatically generated to validate matching the type of files with the program. The presence of this hash ensures that the user or administrator (through the GPO) has configured this file mapping. This security mechanism is needed to protect users from malicious programs that can replace file associations without user’s approval.
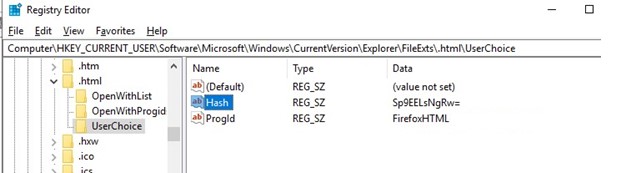
If you try to manually change the ProgId registry value and associate another program, the Hash value will cease to be valid. In this case, Windows 10 will automatically reset the file association settings to the default state. In this case, the user will see a notification:

Accordingly, in Windows 10/Windows Server 2016 you won’t be able to configure file mapping through the registry, as it worked in Windows 7/Windows Server 2008R2.
How to Reset File Associations in Windows 10?
Using the following command, you can reset the settings of file associations imported earlier:
Dism.exe /Online /Remove-DefaultAppAssociations
After running this command, all new users will be logged with the default file association (the reset has no effect on the existing user profiles).
In order to reset the file associations manually configured by the user to the default ones, you need to click on the Reset button in the Settings -> Apps -> Default Applications.

In this case, all file associations will return to the state of clean Windows 10 installation.
How to set File associations in Windows 7 (not ‘open’, but others)
In WinXP, I could go to a the file assocations menu and view or edit the entries for items like: Edit, Print, etc, in addition to ‘Open’, and I could set the default action to something other than open (examples ‘play’, merge, or edit).
Where do I do this in Win7?
I know about the «Control Panel->Default Programs->Set Associations(Associate a file with a program)» page, but that seems to only have the ability to select a program to be called when the user ‘clicks’ on the file, i.e. the default action.
I just recently installed a picture viewer, but it took all the assocs from my picture editing program.
That makes some ‘sense’ (how else to I view pics in the viewer?), so I right clicked to see if there was another option to edit my picture (like edit). There is — except that it doesn’t start my photo editing program, it starts ‘Paint’.
So how do I fix it the ‘Edit’ menu option to call my editor?
More generically, how do I change one of the right-click options to point to my program, or if, say, ‘edit’
wasn’t there, and I wanted ‘Edit’ on «.reg» programs to open the file in a text editor?
These things used to be relatively simple in WinXP, but now I’ve no clue about where to find these basic
OS setting features.
I can’t imagine that MS would expect people to learn and use ‘regedit’ to do these types of changes — but that seems to be the only program included with Win7 to do this, or am I just WAY missing something obvious?
File Types and File Associations
This section on file types and file associations is organized as follows:
Additional Resources
- Set Program Access and Computer Defaults (SPAD) is a Windows Control Panel which allows users with administrative privilege to set a machine default and hide or show an application. Media, Mail, Browser, Messenger and Java applications are examples of applications registered in SPAD. Set Your Default Programs (SYDP) is a Windows Control Panel, that works with limited privileges, and permits users to set a user default. Any application can register in SYDP. For information about SPAD and SYDP application registration, see Guidelines for File Associations and Default Programs, and Set Program Access and Computer Defaults (SPAD).
- For related conceptual background, see Overview of Verbs and File Associations.
- To create a Shell data store, see Implementing the Basic Folder Object Interfaces.
For related reference documentation, see the following topics:
- To execute a verb on a Shell item, see the InvokeVerb method.
- To retrieve a collection of verbs that can be executed on a Shell item, see the Verbs method.
- For performing an operation on a specified file, see either the ShellExecute or ShellExecuteEx functions.
- For a list of default perceived types, see the PERCEIVED enumeration.
- To retrieves a file’s perceived type based on its extension, see the AssocGetPerceivedType function.
Windows File Association Explained for Desktop Administrators
Disclaimer: This article is rather technical and not for the novice user. If you’re looking for simple steps to manually change your file association, check out: https://www.howtogeek.com/223144/how-to-set-your-default-apps-in-windows-10/
Windows file association remains one of the most common and frustrating challenges for any Desktop Administrator. To tackle this challenge, we’re going to take a ground up approach to demystify some of the underlying file association mechanics in a way that will allow you, the administrator, to regain control over your file associations again.
File Association in HKEY_CLASSES_ROOT (The Windows XP Way)
Within HKCR we have the file extension and the handler registry keys (2):
File Extension key for HKCR\.TIF file extension
Handler key for HKCR\.TIF file extension
The file extension key points to the handler key. In this case, the .TIF extension key points to the TIFImage.Document key as specified in the data for the Default value under the .TIF key pictured in the first image above. The TIFImage.Document key specifies the command to run to open the file. In the second image above you can see TIFImage.Document is specifying the command for Windows Photo Viewer.
There is also a second location for handler keys to be aware of located under HKCR\Applications. The HKCR\Applications key is a location where developers can register their application by creating an entry that can later be referenced as a handler for a file extension (see https://msdn.microsoft.com/en-us/library/windows/desktop/ee872121(v=vs.85).aspx for more information on that). Generally, under the Applications key a subkey structure is created for a given application specifying the application’s executable path, such as this:
Handler key located under HKCR\Applications
This relationship serves as the foundation of file association dating back to Windows XP and earlier. All files have an extension key and a corresponding handler key and this is the mechanism that established basic file association. The shortcoming of this mechanism is that it sets the association for all users.
File Association in HKEY_CURRENT_USER (The Windows 7 Way)
With Windows Vista\Windows 7 we saw the introduction of the HKCU hive playing a role in file association for the first time, allowing users to select their own individual file associations. Within the HKCU hive at HKCU\Software\Microsoft\Windows\CurrentVersion\Explorer\FileExts there exists a new set of keys:
Default File Extension key for .TIF file extension under HKCU
Notice how there’s not much to this initially, simply a key specifying the file extension, a subkey called OpenWithProgids, and a value under that key specifying a handler for the file extension in question. This specification of a handler is creating a connection for that specific user between that file extension and the handler key mentioned earlier under HKCR. It should be noted that this reference in HKCU supersedes the handler specified under HKCR for a file extension for the logged-on user.
Now look what happens when an application is specified by the user (via Control Panel or Default Programs):
File Extension key under HKCU after user has specified an application to open a particular file extension
Notice that 2 additional keys are created. The most important of these 3 keys are the OpenWithProgids and UserChoice keys as they specify the file association for the currently logged on user and can be set on a per user basis to achieve user-defined file associations. When these keys are created, the UserChoice key will be created with a value called Progid and that value will contain the handler reference for the application the user specified. That handler reference creates a connection to the handler key mentioned above under HKCR and supersedes the handler reference specified under the OpenWithProgids key mentioned above. It should be noted that a Progid value of Applications\ExecutableName is referring to a handler located under HKCR\Applications.
The addition of the HKCU file association keys compliment the underlying HKCR file association and work with those keys to achieve user-specific file association on Windows 7/8/8.1/10. Many of you are saying, “these mechanisms worked great for us on Windows 7 – what’s the issue with Windows 10?”
File Association in a File (The Windows 10 Way)
Starting with Windows 8, Microsoft introduced “tamper protection” into the aforementioned HKCU registry keys to prevent unauthorized changes to file association (changes not made via the Windows API). Unfortunately, this changed how we as Desktop Environment admins approach file association. Direct registry edits to the HKCU hive are no longer viable as they simply result in an app reset notification and the HKCU keys reverting to their original state:
The new method for setting file associations across the environment is a 2 part process. First a default file association XML file must be created. To create the XML file, on a reference Windows 10 machine (built with the most recent build of Windows 10 in your environment), load the apps you need for the desired associations, create the desired file associations manually, and then export that file via a DISM command:
Dism /Online /Export-DefaultAppAssociations:\\Server\Share\AppAssoc.xml
That will yield an XML file with content that looks like this:
What this file actually does is set the HKCU\. \UserChoice key (mentioned earlier in the article) for a specified file extension to the file handler specified in the XML file:
Second, the exported file is specified in group policy, and all client machines that receive that policy will reference the file for their default file associations (for the group policy settings please see https://blogs.technet.microsoft.com/windowsinternals/2017/10/25/windows-10-how-to-configure-file-associations-for-it-pros/ ) . It should be noted that the associations set in this file are enforced and file association changes made manually by the user will revert to the associations specified in the file. Therefore, this file supersedes any choice the user may have manually set because it is being applied via group policy during each user login. For detailed information on creating this file please see https://docs.microsoft.com/en-us/windows-hardware/manufacture/desktop/export-or-import-default-application-associations
In Closing…
Based on everything we’ve covered, a quick overview of the file association precedence hierarchy looks like this:
In Windows 10, the XML file is necessary for enterprise administration as it’s a mechanism we can expect Microsoft to build upon. Therefore understanding the relationship between the various part of the registry and the XML file, we can understand how file association can break, and where we can manipulate the keys (*cough* in HKCR *cough*) to get the desired results. I hope this helps someone and thanks for reading!


