- Create a local user or administrator account in Windows 10
- Group Policy Central
- How to “Set users home folder” via group policy in Windows 8
- How to set up and manage Windows 10 HomeGroup on a local network
- Before you begin
- How to create a HomeGroup on Windows 10
- How to change which content is shared with your HomeGroup
- How to change your HomeGroup media streaming options
- How to change your HomeGroup password
- How to add computers to a HomeGroup
- How to share additional folders with your HomeGroup on Windows 10
- How to add new folders to shared HomeGroup libraries
- How to add new folder via Windows network share to your HomeGroup
- How to remove a PC from your HomeGroup in Windows 10
- What to do when your HomeGroup isn’t working right
- Other things you need to know about HomeGroups
- Halo: MCC’s live service elements make it better, not worse
- Microsoft’s Surface Duo is not ‘failing up’
- Here’s what you can do if Windows 10 update KB5001330 is causing issues
- These are the best PC sticks when you’re on the move
Create a local user or administrator account in Windows 10
You can create a local user account (an offline account) for anyone who will frequently use your PC. The best option in most cases, though, is for everyone who uses your PC to have a Microsoft account.
If needed, the local user account can have administrator permissions; however, it’s better to just create a local user account whenever possible.
Caution: A user with an administrator account can access anything on the system, and any malware they encounter can use the administrator permissions to potentially infect or damage any files on the system. Only grant that level of access when absolutely necessary and to people you trust.
As you create an account, remember that choosing a password and keeping it safe are essential steps. Because we don’t know your password, if you forget it or lose it, we can’t recover it for you.
If you’re using Windows 10, version 1803 and later, you can add security questions as you’ll see in step 4 under Create a local user account. With answers to your security questions, you can reset your Windows 10 local account password. Not sure which version you have? You can check your version.
Create a local user account
Select Start > Settings > Accounts and then select Family & other users. (In some versions of Windows you’ll see Other users.)
Select Add someone else to this PC.
Select I don’t have this person’s sign-in information, and on the next page, select Add a user without a Microsoft account.
Enter a user name, password, or password hint—or choose security questions—and then select Next.
Change a local user account to an administrator account
Select Start > Settings > Accounts .
Under Family & other users, select the account owner name (you should see «Local Account» below the name), then select Change account type.
Note: If you choose an account that shows an email address or doesn’t say «Local account», then you’re giving administrator permissions to a Microsoft account, not a local account.
Under Account type, select Administrator, and then select OK.
Sign in with the new administrator account.
Group Policy Central
News, Tips and Tutorials for all your Group Policy needss
How to “Set users home folder” via group policy in Windows 8
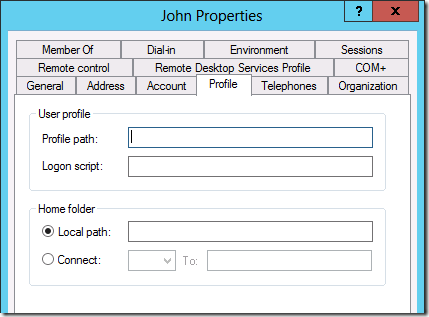
 If your company is like most organisation i have come across you all users to have a home drive (typically H: ) that is give to the users that allows them to store private information that only they have access. Ever since the days of at least NT4 (or possibly earlier) administrators have had the option to configure their users home drives via a setting in their AD account (see image below below).
Even today with Windows Server 2012 this is this is still an option for administrators to configured users home drives via their users accounts (see image below).
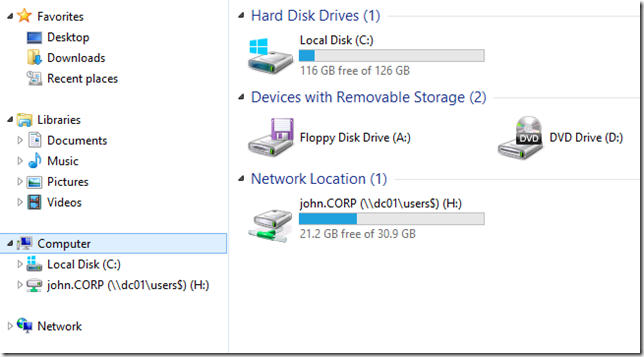
When the home drive is set on a user account via Active Directory Users and Computers the tool actually goes out and creates the home drive in ready for the user to map the next time the log onto a computer.
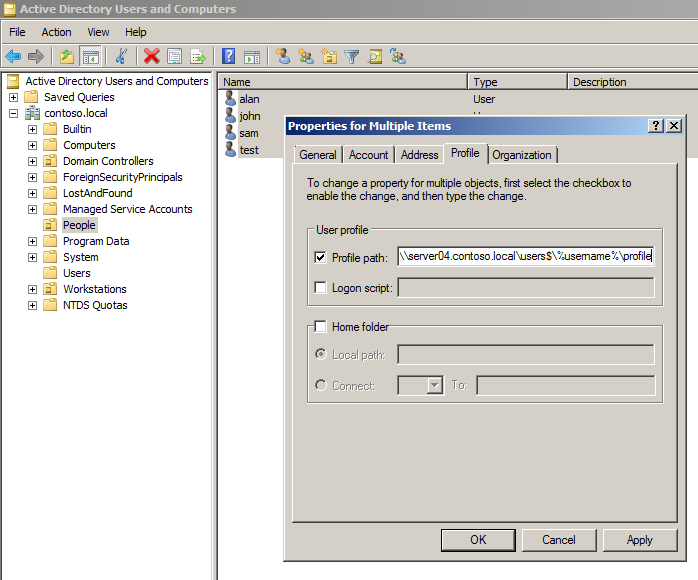
The main problem with configuring users home drive this way is that it is configured on a one by one basis which means that it is difficult to configure these setting and it is another step in the user creation process that can be forgotten to be done. Certainly this is a lot easier with the advent of Windows Server 2003 admin tools that allowed you to select multiple users and configured the home drive on mass.
However the idea of setting the home drive as an individual attribute in todays policy driven, economy of scale management style is just not ideal. Such as a user account is moved from one location to another in AD the users home drive setting is not automatically updated as its a static configuration on the users account.
If you have read my blog post Best Practice: Roaming Profiles and Folder Redirection (a.k.a. User State Virtualization) you might have realised that you can already create the users home drive automatically using folder redirection (specifically Documents) and then you can simply use the Group Policy Preferences Drive Mapping Extension to map the user home drive to the same location as the folder is redirected. This method does allow for the users account to moved around and have policy automatically update their home drive. But in reality it is just a workaround to the lack of any other way of setting the users home drive automatically via policy… until now..
With the introduction of Windows 8 and Windows Server 2012 there is now a new group policy setting called “Set user home folder” and is found under Computer Configuration > Policies > Administrative Templates > System > User Profiles.
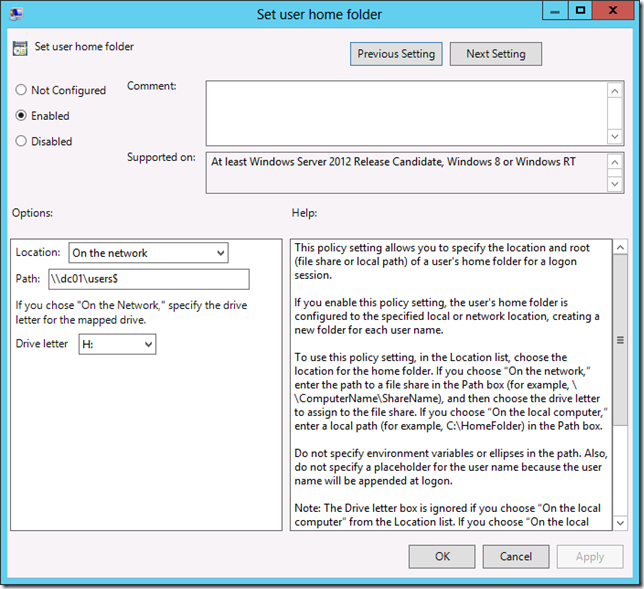
One the policy is applied to a computer anyone logos onto this computer will get a home drive mapped to the path above…
Warning: As this policy can only be applied to the computer object this will apply to everyone who logs on the computer that have this setting applied… including Domain admins and alike so be carefully how you apply it…
TIP: If you have your workstations segmented in your OU structure by site you may want to apply this policy setting at each site to the nearest file server you want to use for storing your home drives. This means that users will not have home drive re-map if they travel for a short time to other locations… Alternately you MIGHT want to apply this setting to your AD site however if you do this make sure you put a WMI filter on the policy so it does not apply to Windows Servers in the same site.. .
How to set up and manage Windows 10 HomeGroup on a local network
HomeGroup is a network sharing feature that has been part of Windows for a long time, and it’s also part of Windows 10. Microsoft included HomeGroup to allow Windows devices to share resources with other PCs on a local network with an easy to set up approach that anyone can use.
HomeGroup is a feature best suited for small home networks to share files and printers with devices running Windows 10, Windows 8.1, and Windows 7. Also, you can also configure media streaming for other devices, such as Xbox One, to play music and video from your computer on the biggest screen in the house.
In this Windows 10 guide, we’ll walk you through the steps to set up and manage a HomeGroup to share resources with other users on your local network.
Before you begin
HomeGroup is very particular on the network configurations you use and if your computer was previously part of another HomeGroup. To make sure you will be able to configure everything correctly, shut down all other the computers on the network, leaving only the computer you’ll use to create the new HomeGroup turned on.
Additionally, you want to make sure all your devices are running Internet Protocol Version 6 (TCP/IPv6). Otherwise, you won’t be able to join any computers to HomeGroup.
- Use the Windows key + X keyboard shortcut to open the Power User menu, and click Network Connections.
- Right-click the network adapter you use to connect to the internet and select Properties.
Make sure to check the Internet Protocol Version 6 (TCP/IPv6) option.

How to create a HomeGroup on Windows 10
HomeGroup hasn’t changed much from previous versions, as such we’ll be using Control Panel to make the configuration.
- Open the Start menu, do a search for HomeGroup and press Enter.
Click Create a homegroup.

Choose what to share on the network. By default Windows sets Pictures, Videos, Music, Printers & Devices as Shared. However, the Documents folder is marked as Not shared.
Note: The sharing options you choose will only apply to devices connecting with different accounts. If you sign-in with the same user account on another computer, you will have access to all files regardless of what you chose to share.
The wizard will complete the setup, and you’ll be presented with a HomeGroup password, which is needed to allow other computers to access files and printers. Write down or click the link to print the password.
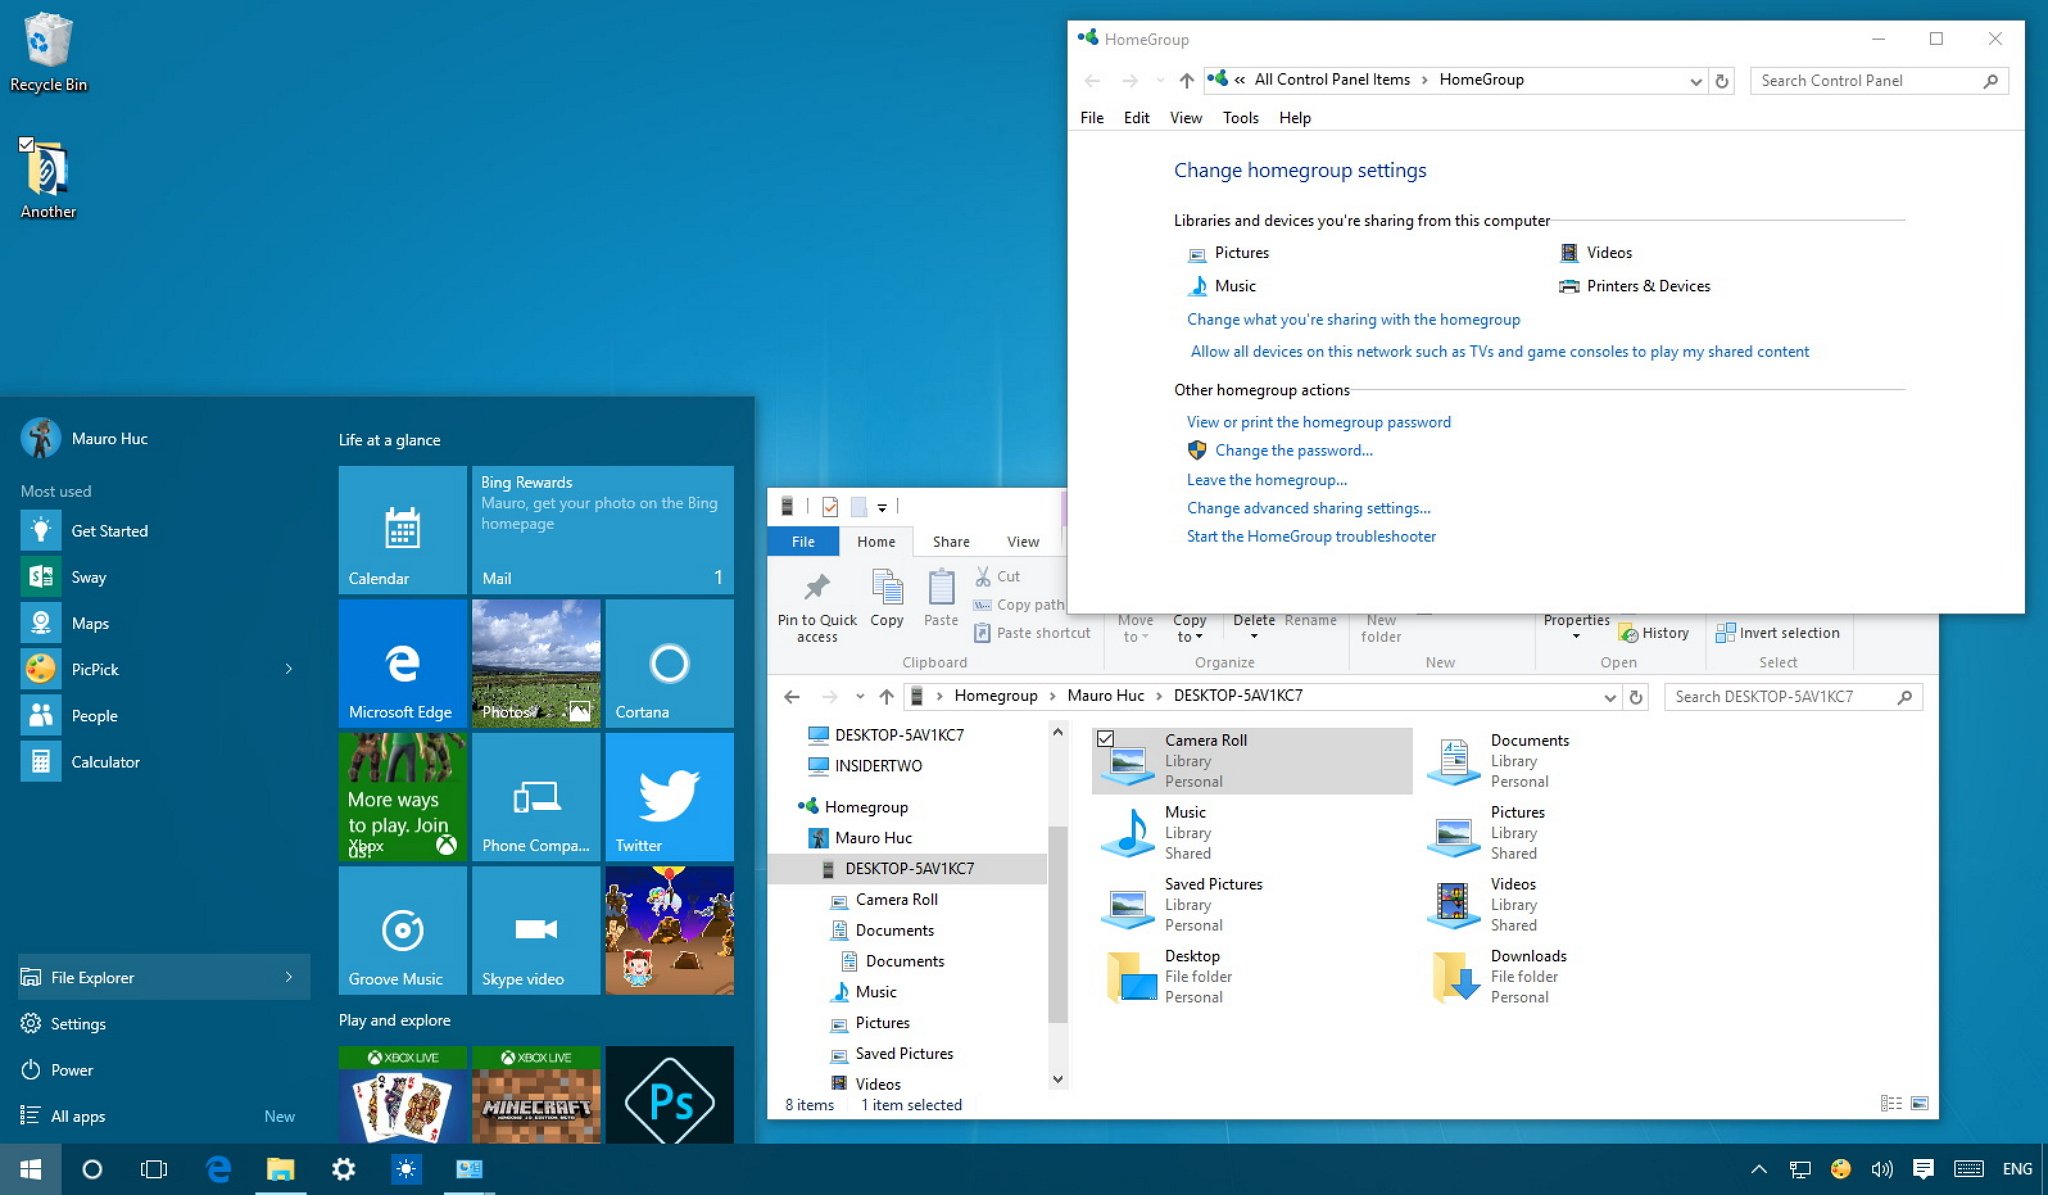
How to change which content is shared with your HomeGroup
If at any time, you want to change the folders you share with other computers do the following:
Click the Change what you’re sharing with the homegroup link.
Click Finish to complete the task.
How to change your HomeGroup media streaming options
HomeGroup also allows you to control which media devices, including TV, Xbox One, Xbox 360, and PlayStation can access and stream the content shared on your computer.
On the HomeGroup settings page in Control Panel, click the Allow all devices on this network such as TVs and game console to play my shared content link.
The first thing you want to do is to pick a name for the media library, as Windows 10 by default uses your account’s email address.
Then you can click the Choose default settings link to change a few streaming settings, including star rating and parental control settings allowed to stream from another media device.

You can also change on which networks you will let devices stream shared content by using the Show devices on drop down menu.
In addition, you can configure which devices are allowed to play remote content. You can block or allow each device individually, or you can click the Allow All or Block All buttons.
Remember that shared content will be available to other devices as long the device sharing the content is turned on and when it’s not in sleep mode. If you need to change the power settings, click the Choose power options link.
How to change your HomeGroup password
If for security reasons you need to change the HomeGroup password, Windows gives you the option to change it at any time.
Click the Change the password link.
Click Change the password.
Click Finish.
Immediately after getting the password go to each computer’s HomeGroup settings in Control Panel, and click the Type new password button.
Type the new password and click Next.
How to add computers to a HomeGroup
Now it’s the time to turn on all the computers around the house and join them to the HomeGroup.
To join devices do the following:
- Open the Start menu, do a search for HomeGroup and press Enter.
Click the Join now button.
Note: If you don’t see the Join now button, there is something wrong, make sure you’re connected to the network and restart your computer.
Select the content you want to share on the network by using the drop down menu for each folder and click Next.
Enter your HomeGroup password and click Next.
Note: If you’re signed into another computer, but you’re using your Microsoft Account, then you won’t be prompted to enter a password.
If you’re prompted to choose network privacy settings, make sure to select the Private option.
In the same way, you’ve done after configuring a new HomeGroup steps, for each machine you join, you’ll need to specify manually the media devices that will be allowed to stream shared content.
How to share additional folders with your HomeGroup on Windows 10
While setting up or joining a new computer to a HomeGroup you’re given the choice to share only your Pictures, Videos, Music, and Documents folders, but you can always share more folders.
You can share more content in two different ways, including adding new locations to the libraries currently being shared, or you can also share a new folder as you would normally do in Windows.
How to add new folders to shared HomeGroup libraries
- Use the Windows key + E keyboard shortcut to open File Explorer.
- On the left pane, expand your computer’s libraries on HomeGroup.
- Right-click Documents.
Click Properties.
Click Add.
Now the folder will be accessible by anyone joined in the HomeGroup when they browse the Documents folder.
How to add new folder via Windows network share to your HomeGroup
- Right-click the folder you want to share.
Select Share with and click the Homegroup (view) option.
Users can access the newly shared folder by:
- Using the Windows key + E keyboard shortcut to open File Explorer.
- Clicking Network on the left pane.
Double-clicking the computer name with shared content, and browsing the folder location.
By default, every HomeGroup folder shared on the network are set with read only permissions. It has to be this way to prevent accidental deletions and modification to your files by other users. However, if you’re using your same Microsoft account to access content from another computer, then you will have read and write permissions.
If you need other users to be able to access, modify, and delete content, the best solution is to share another folder and granting users view and edit permissions.
You can do this with the following instructions:
- Right-click the folder you want to share.
Select Share with and click the Homegroup (view and edit) option.
How to remove a PC from your HomeGroup in Windows 10
When you no longer want a computer to be part of the HomeGroup, Microsoft makes it very easy remove a device without complicated configurations.
- Click the Leave the homegroup link.
Click Leave the homegroup.
At any time, if you want to rejoin a computer, you can easily do this by using the join a computer to a HomeGroup instructions.
What to do when your HomeGroup isn’t working right
While Microsoft tried to design HomeGroup to be a feature that works effortlessly, at times things may not work as expected. Consider the following tips to troubleshoot and fix HomeGroup problems on Windows 10.
The first thing you always want to do is to make sure all the computer are connected to the network. You can verify by going to Settings > Network & internet. Depending on your connection, check Wi-Fi or Ethernet.
Often rebooting and trying to create or join a computer to a HomeGroup again will solve the problem.
Temporarily disable the firewall on your computer. If you’re using the Windows Firewall go to Control Panel\All Control Panel Items\Windows Firewall\Customize Settings, and turn off the firewall. If this is the problem, make sure to configure the firewall correctly, and don’t forget to re-enable the firewall after everything is working properly.
Having the incorrect time can also cause problems trying to set up a HomeGroup. Make sure every computer has the correct time. On Windows 10, go to Settings > Time & language and adjust time as needed.
You can’t have two computers on the network with the same name. Names must be unique on a HomeGroup. You can use our previous Windows 10 guide to rename your PC.
Make sure Network discovery, File and printer sharing, and HomeGroup connections are enabled on your private network. Simply go to Control Panel\All Control Panel Items\Network and Sharing Center\Advanced sharing settings and turn on all these options.
Your computer can only belong to one HomeGroup, if the it’s connected to a different one, make sure to follow the steps to leave the HomeGroup before trying to join.
If you still can’t create or join a new computer to a HomeGroup, Microsoft is also including a diagnostic tool to fix common problems. On Windows 10, go to Control Panel\All Control Panel Items\HomeGroup, and click the Start the HomeGroup troubleshooter link and follow the on-screen directions to fix the problem.
Other things you need to know about HomeGroups
- HomeGroup is only available on Windows 7, Windows 8.x, and Windows 10, which means that you won’t be able to connect any Windows XP and Windows Vista machines.
- There can be only one HomeGroup per network.
- A HomeGroup does not create a hub and spoken network, where a central device has to be up and running for HomeGroup to work. However, the computer with shared content must be running for you to access its files and resources.
- Only computers joined with a HomeGroup password can use the resources on the local network.
- While HomeGroup has to be configured once per computer, each user must specify what content is accessible through the network.
- Once you set up a HomeGroup on a local network, users also have full access to view and edit content in the Public user folders.
Although we focus on configuring and managing HomeGroup on Windows 10, you can also connect Windows 7 and Windows 8.x computers to the network and share content.
How do you share files and other resources on your local network? Do you use HomeGroup? Let us know in the comments below.
![]()
Halo: MCC’s live service elements make it better, not worse
Halo: The Master Chief Collection is more popular than ever, but some fans don’t agree with the live service approach 343 Industries has taken with it. Here’s why those elements are, at the end of the day, great for the game and for Halo overall.
![]()
Microsoft’s Surface Duo is not ‘failing up’
Microsoft announced this week that it was expanding Surface Duo availability to nine new commercial markets. While Surface Duo is undoubtedly a work in progress, this is not a sign of a disaster. It’s also doesn’t mean that Surface Duo is selling a ton either. Instead, the reason for the expansion is a lot more straightforward.
![]()
Here’s what you can do if Windows 10 update KB5001330 is causing issues
In this guide, we’ll show you the steps to get rid of the update KB5001330 to fix profile, gaming, and BSoD problems with the Windows 10 October 2020 Update and May 2020 Update.
![]()
These are the best PC sticks when you’re on the move
Instant computer — just add a screen. That’s the general idea behind the ultra-portable PC, but it can be hard to know which one you want. Relax, we have you covered!


