- Fix: Windows Setup could not configure Windows to run on this computer hardware
- Solution 1: A Command Prompt Tweak
- Solution 2: Change Some BIOS Settings
- Solution 3: Stop Overclocking Your CPU
- Solution 4: Having a Problem with a Certain Device
- FIX: Windows could not run on this computer’s hardware
- How do I fix the hardware upgrade configuration error in Windows 10?
- 1: Run Windows Update Troubleshooter
- 2: Restart Update Services with a batch file
- 3: Run SFC and DISM
- 4: Uninstall Internet Information Services
- 5: Update with Update Assistant or Media Creation Tool
- 6: Install update with the external media
- 7: Remove all peripheral devices and check drivers
- 8: Block the update for the time being
Fix: Windows Setup could not configure Windows to run on this computer hardware
There are quite a few error codes which will definitely annoy every user. However, this one differs from the rest as it won’t allow you to even install Windows on your computer in the first place, as can be understood from the error message.
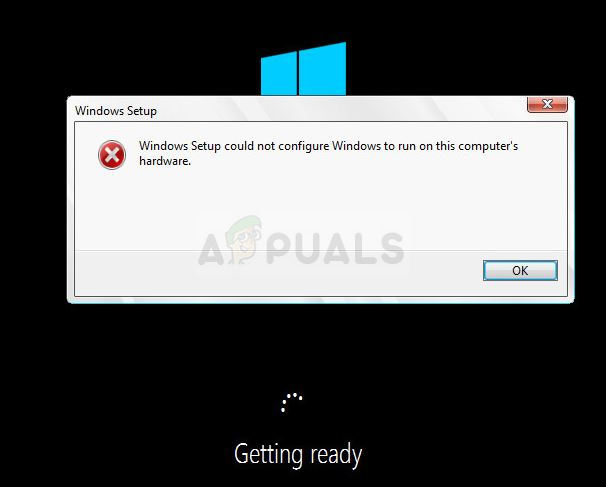
The error usually appears when trying to run Windows Setup and the process simply stops with the message above. This is a clear sign that something is wrong on your computer, especially if you own a PC which can support the version of Windows you are trying to install. Follow the steps below to try and solve the problem easily.
Solution 1: A Command Prompt Tweak
This tweak has proven itself useful to countless users who struggled with this error message for months and it’s amazing how the solution can turn out to be so easy yet so difficult to think off. The solution should be executed the first time you see the error when only starting the installation of Windows and you should be able to go through the installation process successfully.
- Once you receive the error message on your PC while the Windows installation media is still connected to your computer, use the Shift + F10 key combination in order to bring up a Command Prompt window.
- Type in the following commands and make sure you click Enter after each one:
CD C:\windows\system32\oobe
msoobe
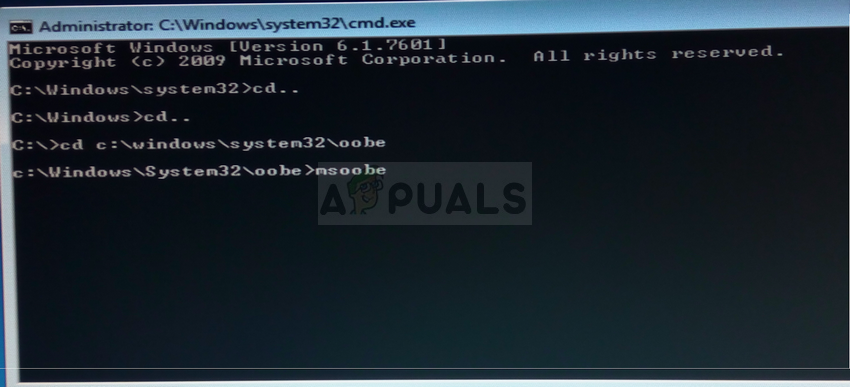
- Check to see if you are able to continue with the process once again.
Solution 2: Change Some BIOS Settings
There are several caused for this problem, but one of them is definitely the fact that there are certain settings in BIOS which works great for older versions of the Windows operating system but they display poor execution on Windows 10 and it can often cause this error to occur. Follow the steps below in order to fix this.
- Turn off your computer by going to the Start Menu >> Power Button >> Shut down.
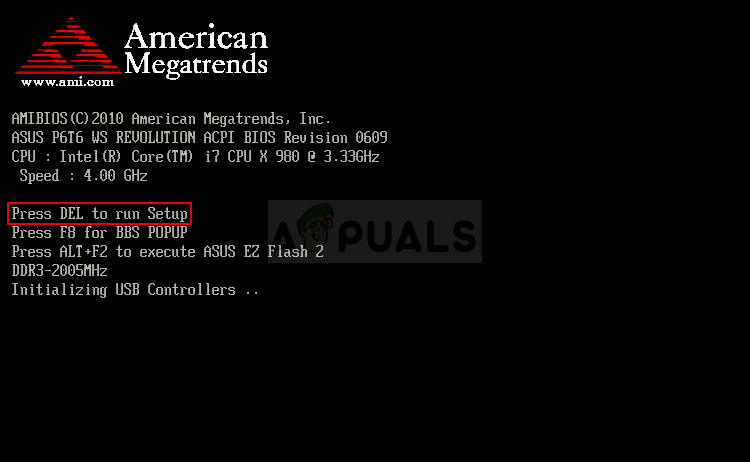
- Turn your PC on again and try to enter BIOS settigns by pressing the BIOS key while the system starts. The BIOS key is typically displayed on the boot screen, saying “Press ___ to enter Setup.” There are other common messages as wel. Common BIOS keys are F1, F2, Del, Esc and F10. Note that you will have to be quick about this as the message disappears pretty fast meaning you will need to restart to try again.
- The SATA option which you will need to change is located under various tabs on BIOS firmware tools made by different manufacturers and these is no general rule to where the setting should be located. It’s usually located under Onboard devices entry, Integrated Peripherals, or even simply under the Advanced tab. No matter what, the name of the option is SATA operation.
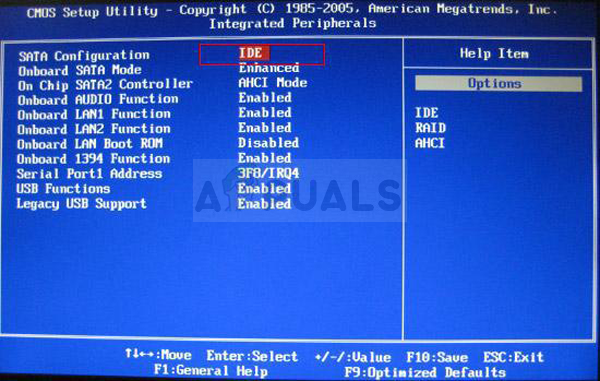
- Once you locate the correct settings, change it from AHCI or RAID, ATA, or IDE. ATA is the most reasonable option for the process of installing new updates or upgrading. Navigate to the Exit section and choose to Exit Saving Changes. This will proceed with the boot. Make sure you try to run the update again.
Note: If the setting was not AHCI to begin with, try changing it to something else no matter what as there are cases where any change produced great results! - Don’t forget to change the settings back to their original state after you have finished with the process and installed Windows 10 successfully on your computer.
Solution 3: Stop Overclocking Your CPU
Overclocking your processor usually causes these errors and it was confirmed by many users that the problem occurred when they started to overclock their PCs.
Overclocking is a process where you change the frequency and speed of your processor to a greater value and above the recommended factory settings. This can give your PC a significant speed advantage but you have to absolutely careful since there were situations where entire PCs went down in fire after users overclocked them too much or because they were careless.
Returning your CPU’s rate and frequency to its original state depends on which software you used to overclock in the first place. Intel and AMD have their own applications available to download which let users overclock their CPUs but there are dozens of programs available to choose from so use them to stop overclocking.
Stop overclocking your PC and check to see if the error appears again.
Solution 4: Having a Problem with a Certain Device
In order to be ready to apply this solution, first you will need to be sure that this is indeed causing the problem. You can check this by disconnecting or disabling various devices on your computer via Device Manager >> Right-click on device >> Disable Device. This way you can restart the process and check to see when the error does not appear -> that device is causing problems.
You should see the following message when you choose the install option if you are really having problems with your drivers in the first place:
“To continue installation, use the Load Driver option to install 32-bit and signed 64-bit drivers. Installing an unsigned 64-bit device driver is not supported and might result in an unusable windows installation”
This usually means that the driver for that specific device is not installing properly and you may need to load it manually. Follow the steps below in order to try and do it yourself.
- Download the driver for the device which is causing issues and extract it. You will need to end up with a .sys and a .inf file in order for the process to succeed.
- Copy these files to an external media device such as a USB driver, DVD, or CD, connect the device to your computer, and start the Windows setup by loading the Windows installation media and restarting your computer. This time, it’s important that you don’t choose install. Choose the Repair option and choose the Load driver option.
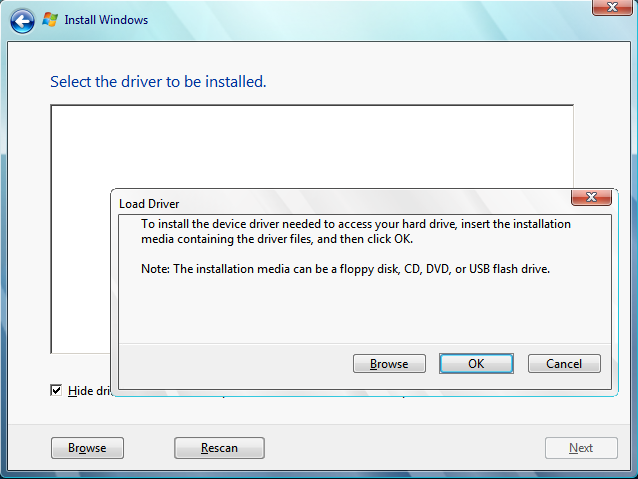
- Navigate to your unsigned driver which should be located at the root folder of the device you used to save the driver to. Wait for the scanner to locate the driver and click the x button in order to close the Repair window.
- Now you can choose the install option and proceed with the normal installation of Windows.
FIX: Windows could not run on this computer’s hardware

- During the update installation process, you might encounter the Windows setup could not configure to run on this computer’s hardware error. To solve this problem, we prepared a list of applicable solutions so make sure to check it out in the article below.
- If you need to create a bootable drive check our complete guide on how to create a Windows 10 bootable USB drive.
- Windows Update is one of the most common sources of error so you might want to bookmark our Windows Update errors hub for further reference.
- If you experienced any other Windows 10 errors please know that we wrote a plethora of articles about this subject. Check out our Windows 10 errors hub.

Windows Update on Windows 10 is the number one instigator of system malfunction.
Recently, users with Creators Update have had a hard time upgrading due to an error.
During the update installation process, they were prompted with the Windows setup could not configure to run on this computer’s hardware error.
In order to address this, we prepared a list of applicable solutions so make sure to check it out.
If you’re constantly stalled by the error after numerous tries, the below-presented steps should help you out.
How do I fix the hardware upgrade configuration error in Windows 10?
1: Run Windows Update Troubleshooter
Windows always had a plethora of troubleshooting tools at users’ disposal. With Windows 10, Microsoft finally decided to make the dedicated menu for troubleshooters.
Windows Update Troubleshooter is one of the most used ones, which is rather obvious if we take into consideration the notoriety of Windows 10 Updates.
In this case, we recommend running it once the major update installation fails. It should restart the update services and check for additional errors.
Follow these instructions to run it in Windows 10:
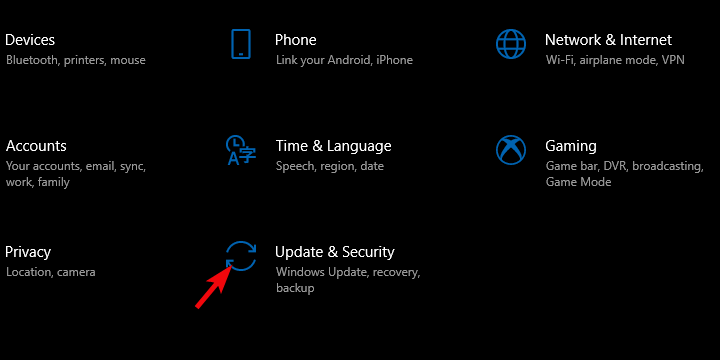
- Right-click Start and open Settings.
- Open Update & Security.

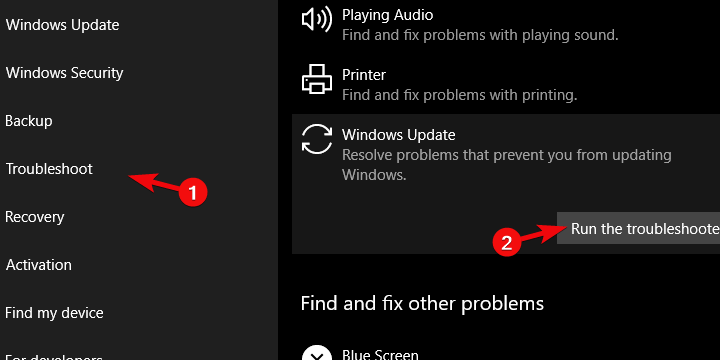
- Choose Troubleshoot from the left pane.
- Expand Windows Update and click Run the troubleshooter.
2: Restart Update Services with a batch file
If the built-in troubleshooter fails, you can always take the matters into your own hands. There are various services related to Windows Update and restarting them could be helpful.
In addition, the downloaded update files ready for installation can often get corrupted for various reasons.
So, what you’ll need to do is to both restart the dedicated services and delete the Software Distribution folder.
After that, the update sequence should recommence.
There are various ways to do this, but the manual approach can take too much of your time. The best way to do it is by running the batch script, and we explained how to do it, here.
3: Run SFC and DISM
SFC and DISM are two essential built-in utilities for troubleshooting major system errors. They should scan the system files and replace them.
The System File Checker tool is the first tool you should run, just to confirm that the error is not within the system.
If it doesn’t help, you might have better luck with Deployment Image Servicing and Management.
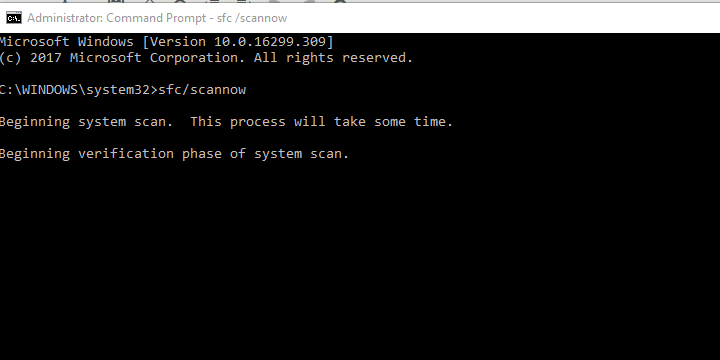
Follow these instructions to run SFC on Windows 10:
- In the Windows Search bar, type cmd.
- Right-click on Command Prompt and run it as an administrator.
- In the command-line, type sfc/scannow and press Enter.
- Wait for the procedure to end and restart your PC.
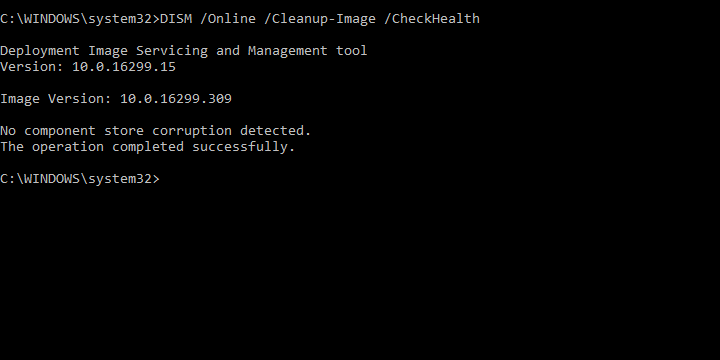
And this is how to run DISM:
- Open Command Prompt with administrative permissions.
- In the command line, type the following commands and press Enter after each:
- DISM /online /Cleanup-Image /ScanHealth
- DISM /Online /Cleanup-Image /RestoreHealth
- DISM /online /Cleanup-Image /ScanHealth
- Wait for the procedure to end and restart your PC.
4: Uninstall Internet Information Services
There are some system features which, when enabled, can cause various update issues.
In this case, numerous users found that IISA (Internet Information Services Admin) services were causing the upgrade error.
There are multiple ways to address this and we can’t guarantee which will work.
The first way relies on disabling this Windows Feature, while the second requires the uninstalling via the Command Prompt command-line. Here’s how to perform both and, hopefully, resolve the issue at hand.
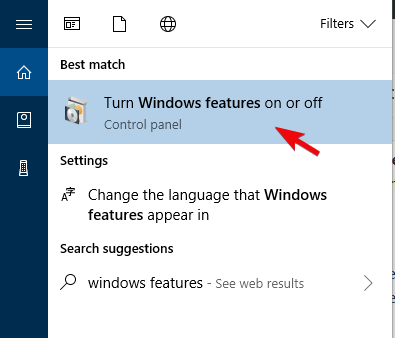
Disable in Windows Features:
- In the Windows Search bar, type Windows Features and open “Turn Windows Features on or off“.
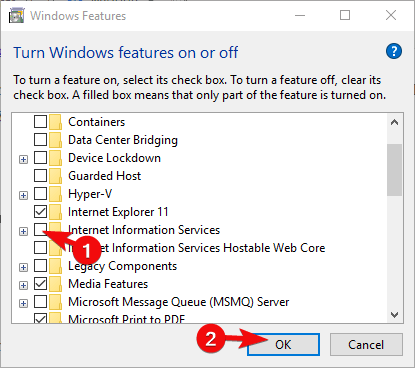
- Scroll below until you reach Internet Information Services and uncheck its box.
- Confirm changes and restart the PC.
Uninstall with Command Prompt:
-
- Open Command Prompt as an administrator.
- In the command-line, type the following commands and press Enter:
- NET STOP IISADMIN
- SC DELETE “IISADMIN”
- NET START IISADMIN
- Close the command prompt.
5: Update with Update Assistant or Media Creation Tool
When it comes to major Windows 10 updates, we always recommend upgrading manually with one of the available tools.
The over-the-air distribution is known for various issues and you can avoid them with Update Assistant or Media Creation tool.
They’ll download the update automatically and install it, without worrying problems Windows Update feature is plagued with.
Here’s how to update Windows 10 with Update Assistant:
- Download Update Assistant, here.
- Run the tool and wait until it prepares your PC for updating.
- Back up your data from the system partition.
- Follow the instructions until the installation is completed.
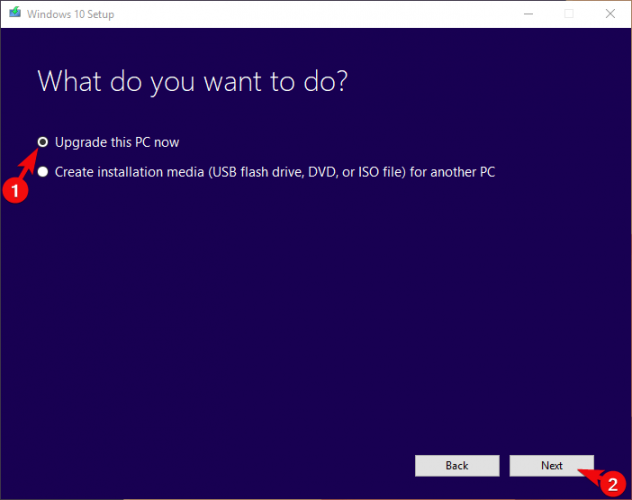
And this is how to utilize Media Creation Tool for the same purpose:
- Download Media Creation Tool, here.
- Accept the Agreement terms and click Upgrade this PC now.
- Wait until the tool downloads update files and continue with the installation procedure.
6: Install update with the external media
If the system update won’t install through the Windows shell, you can always boot from the installation media drive and install updates that way.
In order to do so, you’ll need the Media Creation Tool and USB drive with 6 or more gigabytes of storage space.
After you’ve created the bootable drive, just change the boot sequence, boot from a drive and upgrade the system without issues.
7: Remove all peripheral devices and check drivers
Since the error prompt obviously points in the direction of hardware failure, you should remove all peripheral devices from USB ports and restart the installation.
A lot of issues in Windows 10 are to be blamed for faulty drivers for legacy devices and lack of proper support.
So, before you start with the updating, make sure to remove all peripheral devices and stick only with the essential ones – mouse and keyboard.
In addition, we recommend navigating to Device Manager and double-checking the state of system drivers.
If there’s an exclamation point informing you about the device failure, make sure to get the proper driver prior to a system upgrade.
Just right-click Start and choose Device Manager.
8: Block the update for the time being
Finally, as the case has shown on many occasions, major Windows updates are quite often unpolished after the release. The latest Windows 10 April Update caused a lot of problems for a variety of both home and enterprise users.
In other words, waiting for some time until Microsoft provides hotfixes is a good idea.
Also, since updates are mandatory, you’ll need to postpone them for some time. Here’s how to do it in a few simple steps:
- Press Windows key + I to open the Settings app.
- Choose Update & Security.
- Select Windows Update from the left sidebar.
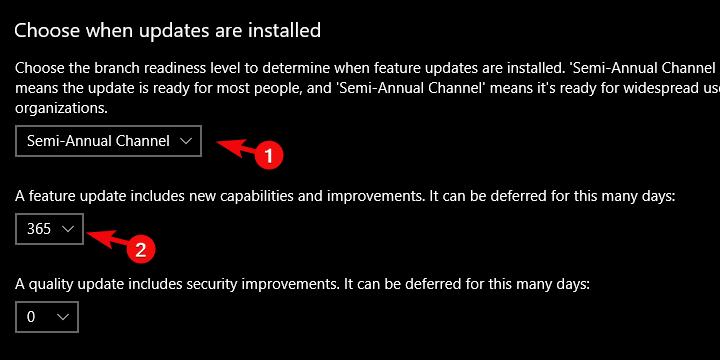
- Click on Advanced Options.
- Choose Semi-annual Channel.
- Enter for how long you want to postpone updates (up to 365 days) from the drop-down menu.

With that, we can conclude this article. We hope you addressed the issue at hand. In case you’re aware of other applicable solution or have some questions, make sure to share them with us. You can do so in the comments section below.


