- Fix- Windows Setup could not configure Windows to run on this computer’s hardware problem in Windows 10
- Fix-1 Run msoobe.exe manually-
- Fix-2 Change SATA settings-
- Fix-3 Manually install the problematic driver-
- Fix-1 Run Windows Update Troubleshooter-
- Fix-2 Download the Feature Update with MCT-
- Windows Setup could not configure windows to run on this computer’s hardware — Win 10 Pro 1709
- Windows setup could not configure Windows to run on this computer’s hardware
- Windows Setup could not configure Windows to run on this computer’s hardware
- 1] Manually run msoobe.exe to finish the install
- 2] Change some BIOS settings
- 3] Stop overclocking your CPU
- 4] Check for and manually install problematic drivers
- 1] Restart your PC and re-run the Windows Update
- 2] Run Windows Update Troubleshooter
- 3] Run the SFC/DISM scan
- 4] Install the Windows Update via Windows 10 Update Assistant or Media Creation Tool
Fix- Windows Setup could not configure Windows to run on this computer’s hardware problem in Windows 10
August 31, 2020 By Sambit Koley
While installing a feature update from a stand-alone installer or re-installation of Windows 10, you may see this error message “Windows Setup could not configure Windows to run on this computer’s hardware“. This message usually pops up after the installation stage ends. So, if you are facing this issue on your computer, there is no need to worry. Follow these easy fixes to solve the problem very easily.
Fix-1 Run msoobe.exe manually-
Microsoft Out of Box Experience (Msoobe.exe) is the application that ensures the activation of Windows.
1. Press Shift+F10 to open the Command Prompt window, while you are in the error screen.
2. In the Command Prompt window, copy-paste these commands sequentially and hit Enter at the end.
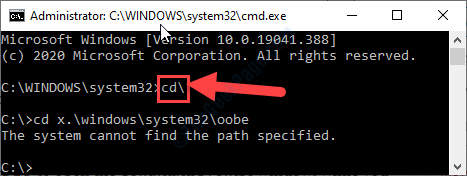
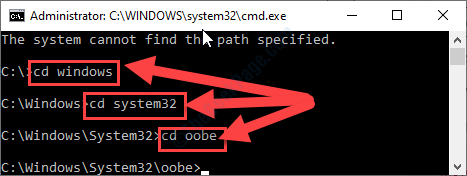
In case, if you see “The system cannot find the path specified.” error message, follow this step-
a. Execute these three codes in the CMD terminal.
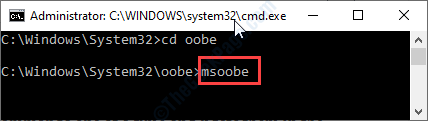
3. Now, you have to execute msoobe.exe on your computer.
To do it, copy-paste this command and then hit Enter.
Now, wait a while. Windows will complete the installation process normally.
Fix-2 Change SATA settings-
Modify SATA settings on your computer to IDE, RAID, ATA or AHCI.
1. Shut down your computer.
2. Start the computer.
3. Press the “F12” key to open boot settings on your computer.

4. When the BIOS setting opens on your computer, you need to go to the “Advanced“.
5. Now, press down arrow keys to highlight the “SATA Operation” setting, and hit Enter.

6. Now, change the settings to “IDE” or “RAID” and then hit Enter.
7. Now, press ‘Esc‘ key from your keyboard.
8. Finally, when the ‘Save configuration and reset‘ message pops up, select “Yes” and hit Enter.

Now, save and exit the BIOS settings on your computer.
Fix-3 Manually install the problematic driver-
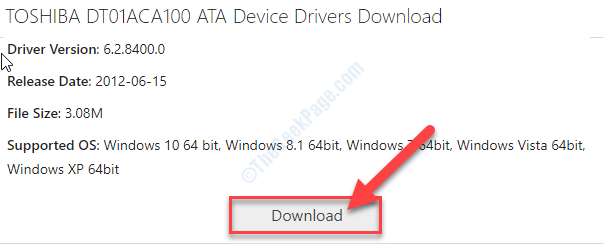
Sometimes problematic drivers on your computer may cause this type of issue. Manually installing the latest driver may fix the issue on your computer.
NOTE– For this fix, you will need a separate laptop/ PC to download the latest driver for the problematic driver.
For most of the cases, the hard disk drive has been found to be the actual culprit.
Steps to do on the other computer–
1. Download the latest hard disk drive from the manufacturer’s website.
2. Store the driver package on a USB flash drive or an external drive.

Steps to do on your computer-
1. Plugin the USB device on your computer.
2. Initialize the system installation.
3. Now, you will notice the “Load driver” option. Click on the “Load driver“.
5. Now, choose the latest harddisk driver from the external drive. Wait for the installation to complete.
6. Now, advance with the installation of Windows.
This should solve your problem.
If you are facing the problem while installing a Windows Feature Update, try these fixes-
Fix-1 Run Windows Update Troubleshooter-
Windows Update Troubleshooter can determine the problem you are facing and solve the issue easily.
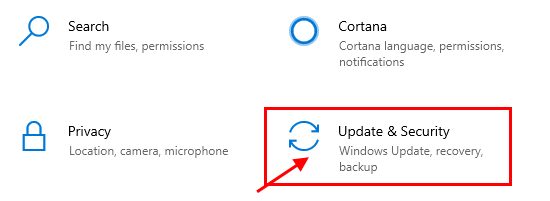
1. Open the Settings window.
2. Then click on “Update & Security“.
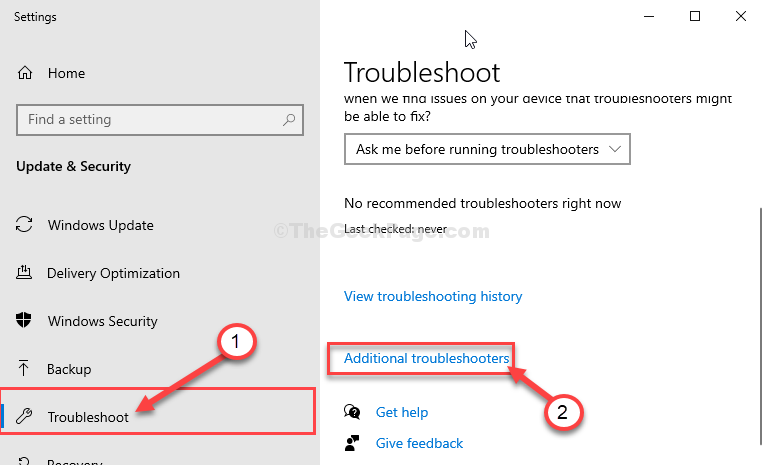
3. After that, you need to click on “Troubleshoot“.
4. Then, click on “Additional troubleshooters“.
5. Simply click on the “Windows Update” in the list of troubleshooters.
6. To start the troubleshooting process “Run the Troubleshooter“.
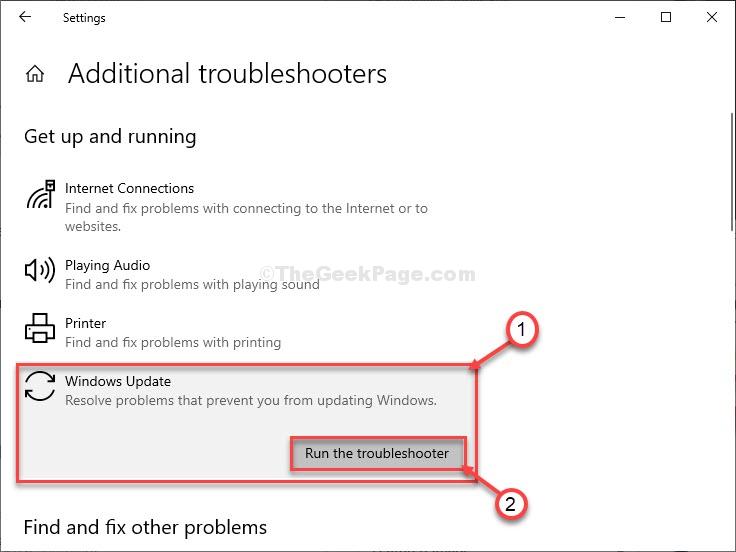
The troubleshooter will identify any hardware problem causing this issue.
Now try to install the update on your computer again.
Fix-2 Download the Feature Update with MCT-
1. At first, you need to visit the Microsoft Software Download website.
2. To download the installation media, click on the “Download tool now“.
3. Click on “Save“.
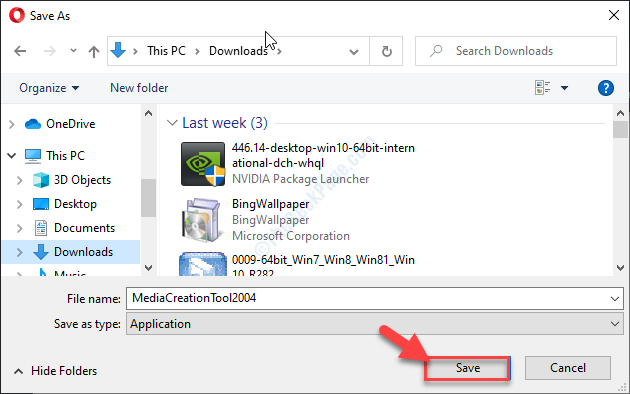
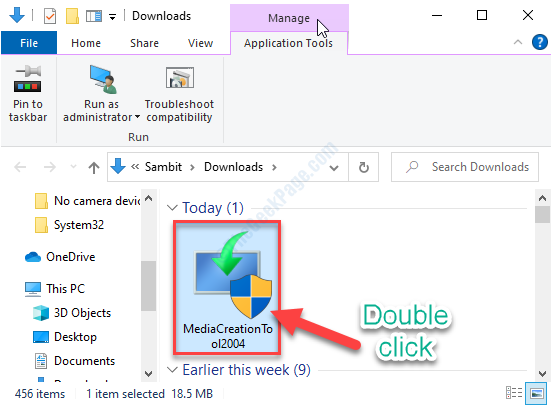
4. Go to the hard drive location where you have downloaded the installer.
5. Then, double click on “MediaCreationTool2004” to access it.
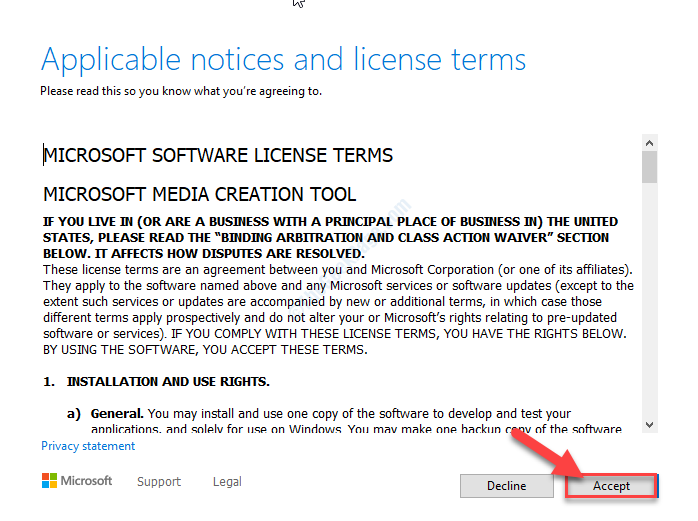
6. To accept the terms and conditions, click on “Accept“.
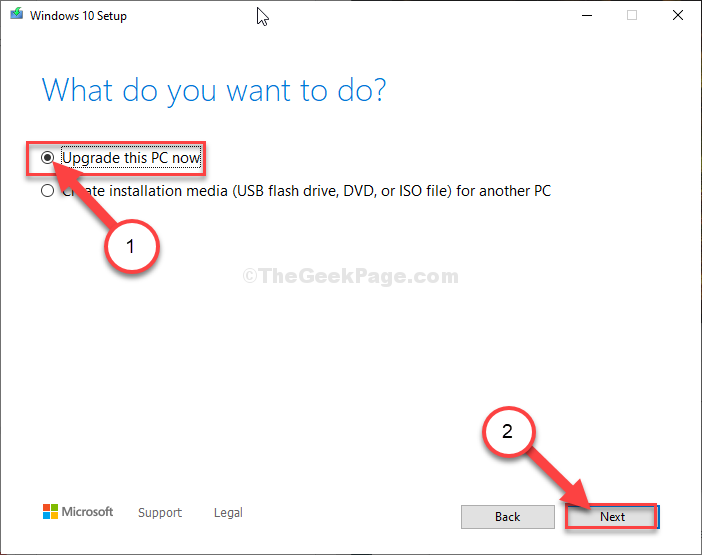
7. What you need to do is to choose the “Upgrade this PC now” option.
7. After that, click on “Next“.
Media Creation Tool will download and install it on your device.
Reboot your computer.
Additional Tip–
If you are trying to overclock the CPU on your system, that may cause this problem.

Sambit is a Mechanical Engineer By qualification who loves to write about Windows 10 and solutions to weirdest possible problems.
Windows Setup could not configure windows to run on this computer’s hardware — Win 10 Pro 1709
So I am attempting to build an image for the company I work for. I have built the system as a VHD in VirtualBox. I mount and capture the VHD in powershell to a wim file allowing me to deploy via a USB flash drive. This works normally but when i attempt to sysprep (which i complete an OOBE /generalize and shut down) then capture and reapply i get the message above. both the sysprep and non-sysprep use the same diskpart script.
select disk 0
clean
convert gpt
rem == 1. System partition (260 for 4kn drives)=====
create partition primary size=260
format quick fs=fat32 label=»System»
assign letter=»S»
gpt attributes=0x8000000000000000
rem == 2. Microsoft Reserved (MSR) partition =======
create partition msr size=16
rem == 3. Windows partition ========================
create partition primary
shrink minimum=4096
format quick fs=ntfs label=»Windows»
assign letter=»W»
rem === 4. Recovery tools partition ================
create partition primary
format quick fs=NTFS label=»Recovery»
assign letter=»R»
set
gpt attributes=0x8000000000000001
select disk 1
list partition
select partition 2
assign letter=»H»
exit
my apply for sysprep and non-sysprep are only different in the file they are calling. One is in a folder called sysprep, the other in a folder called nosys.
diskpart /s diskparti.txt
ECHO Imaging System, please stand by.
Dism /Apply-Image /ImageFile:H:\Images\SysPrep\RDNTLT.wim /Index:1 /ApplyDir:W:\
bcdboot W:\Windows /s s: /f all
md R:\Recovery\WindowsRE
xcopy /h/i/s W:\Windows\System32\Recovery\Winre.wim R:\Recovery\WindowsRE\
W:\Windows\System32\Reagentc /Setreimage /Path R:\Recovery\WindowsRE /Target W:\Windows
W:\Windows\System32\Reagentc /Info /Target W:\Windows
i’m using a PC that is on windows 10 1709 with the 1709 ADK, which is what i built the winpe from. I see this question come up for windows 7 but i believe the issue is different. The purpose of this image is to quickly deploy laptops, we do not use MDT at our company and i’m not the person who would make that kind of move, i’m just trying to make this automated so i don’t have to continually manually build every station.
Windows setup could not configure Windows to run on this computer’s hardware
Some users when installing a Feature Update or full install/re-install of Windows 10 may receive the error Windows setup could not configure Windows to run on this computer’s hardware right after or during the “Completing installation” stage of the process. The installation process will not continue past the error. If you restart the computer, the install process will arrive back at the same error with no further progress. In this post, we will provide the solution for both cases of when performing a feature update or installing Windows 10 and you encounter this error.
This error is triggered due to a number of reasons such as corrupted update’s installation files (especially during a major update such as the Windows 10 Feature Updates), an unseen problem with the Windows Update services, Windows activation error (if you’re installing Windows 10), OS system file error, or even conflicts between existing software.
Windows Setup could not configure Windows to run on this computer’s hardware
If you were installing Windows 10 and the error occurred, you can try the following steps to resolve this issue.
1] Manually run msoobe.exe to finish the install
A possible resolution to this issue is to manually run the msoobe.exe program (which ensures the Microsoft Windows version is activated and registered properly) to allow the install to complete.
Here’s how to manually run the msoobe.exe program:
- While on the screen where the error appears, press Shift+F10 to bring up the command prompt.
- Type or copy and paste the command below (replace the x place-holder with the actual drive letter where Windows is installed and hit Enter.
- Next, type the command below in succession and hit Enter.
You may then be prompted to create an account name and password, and set the time and date.
- Click Finish when done
If this is a retail version of Windows 10, you may also be prompted to enter a product key for Windows 10. Enter the product key and click Finish.
The installation process should then complete and allow the computer to boot into Windows.
2] Change some BIOS settings
There are certain settings in BIOS which work great for older versions of the Windows operating system but they display poor execution on Windows 10 and it can often cause this error to occur. In this case, do the following:
- Restart your computer and press a specific key to boot into BIOS.
- Locate the SATA option in BIOS. This item can be located under different tabs depending on different manufacturers, and usually they can be the Advanced tab, Integrated Peripherals, etc.
- When you locate it, change it to IDE, RAID, ATA or AHCI and save the change. Note that even if it’s not SATA that is originally there, you can still change it to something else.
Pro tip: ATA is the most reasonable option for the process of installing new updates or upgrading.
Remember to change the settings back to their original state after you have finished with the process and installed Windows 10 successfully on your computer.
3] Stop overclocking your CPU
Overclocking is a process where you change the frequency and speed of your processor to a greater value and above the recommended factory settings. This can give your PC a significant speed advantage.
In this case, returning your CPU’s rate and frequency to its original state depends on which software you used to overclock in the first place.
4] Check for and manually install problematic drivers
You can check this by disconnecting or disabling various devices on your computer via Device Manager. After which you can restart the installation process and check to see when the error does not appear. If so, that device is causing problems.
Pro tip: It has been known that the hard disk drivers is usually the culprit here. So check that first.
You should see the following message when you choose the install option if you are really having problems with your drivers in the first place:
To continue installation, use the Load Driver option to install 32-bit and signed 64-bit drivers. Installing an unsigned 64-bit device driver is not supported and might result in an unusable windows installation.
This usually means that the driver for that specific device is not installing properly and you may need to load it manually. Here’s how:
- Download the driver for the problematic device from the manufacturer’s website.
- Save the driver to a USB flash drive or external hard drive.
- Connect the device to the computer which you are installing Windows on.
- Start the system installation, watch for Load Driver and click this option.
- Once the driver is loaded, proceed with the installation of Windows.
The process should be completed successfully.
Now the solutions outlined above is for when you encounter ‘Windows Setup could not configure Windows to run on this computer’s hardware’ error during installation of Windows 10. If however, you encounter this error during a feature update, you can try the following solution.
1] Restart your PC and re-run the Windows Update
It could be some of the installation files that downloaded earlier were corrupted or missing. Before you re-run Windows Update, go to this folder C:\Windows\SoftwareDistribution and move all the files to another folder or you can simply delete the Software Distribution folder.
Generally, after removing the files in C:\Windows\SoftwareDistribution, Windows will re-download whatever it must when you run Windows Update again. So, try this and if the issue isn’t resolved you can try the next solution.
2] Run Windows Update Troubleshooter
For whatever Windows 10 related problem you encounter, the very first thing you should do is to run the in-built Windows 10 Troubleshooter for that particular area the problem occurred. In this case, you should try to run the Windows Update troubleshooter and see if the issue is resolved.
3] Run the SFC/DISM scan
The SFC & DISM are tools to automatically scan and repair missing files or corrupted system files in the Windows 10 OS – and in some cases rebuild the system image. The procedure does not affect your personal files.
For the purposes of ease and convenience, you can run the scan using the procedure below.
Open Notepad – copy and paste the command below into the text editor.
Save the file with a name and append the .bat file extension – eg; SFC-DISM-scan.bat.
Repeatedly run the batch file with admin privilege (right-click the saved file and select Run as Administrator from the context menu) until it reports no errors – at which point you can now restart your PC and see if the ‘Windows Setup could not configure Windows to run on this computer’s hardware’ issue has been resolved when you try updating Windows 10.
4] Install the Windows Update via Windows 10 Update Assistant or Media Creation Tool
Windows Update can be installed via several other methods such as using the Update Assistant or Media Creation Tool. For major updates like the Windows 10 Feature Update, you can manually update to it using the two mentioned tools.
Depending on how you encountered the ‘Windows Setup could not configure Windows to run on this computer’s hardware’ error, any of the above solution(s) should fix the issue.


