При переключении SATA Mode в режим RAID — предустановленная Windows 7 перестаёт загружаться.
Материнская плата: Gigabyte GA-Z97X-Gaming 5
Жёсткие диски: 1) SSD M.2 планка на 128 Гб (Windows 7) 2) WD RED 2 Tb #1 (RAID Mirror) 3) WD RED 2 Tb #2 (RAID Mirror)
История: Установил 2 серверных диска и решил объединить их в зеркальный RAID. В BIOS — Sata mode установил в режим RAID Создал зеркальный RAID из двух HDD
Однако после этих манипуляций Windows 7 с SSD стартовать отказывается. Уходит в ребут в момент загрузки При возвращении SATA Mode в режим ACHI — всё загружается.
Суть проблемы, как я понял в том, что Винде нужны другие драйвера которые позволят работать и RAID и ACHI. И таковые существуют! На сайте производителя Gigabyte можно скачать для материнки:
Intel SATA Preinstall driver (For AHCI / RAID Mode) Note: Windows setup to read from USB thumb drive.
У данных драйверов нет привычного .exe инсталятора. Я так понимаю из-за особенностей ядра Windows их невозможно установить непосредственно из ОС. Они как-то должны интегрироваться в сборку установщика и как мы видим в Note указано: «Windows setup to read from USB thumb drive», что значит — «Установка Windows, чтение с USB флэшки». т. е. я так понимаю при установке Винды эти дрова нужно как-то подсунуть на флешке?
Интересует вот этот момент: Как это сделать? Нужна загрузочная флешка с этими драйверами? Или как? И вообще возможно ли сейчас как-то интегрировать эти драйвера уже в установленную ОС?
* Я пробовал обновить драйвер из винды, но естественно это в режиме ACHI и он логично и ставит заново ACHI так что никак.
Помогите пожалуйста решить данную проблему.
Установщик не видит SSD
При установки Win7 доходит до место выбора диска и сообщает о том что якобы нету оптического привода, собственно и дальше не ставится. Не понятно зачем нужен оптический привод когда я ставлю из флэшки . Подозреваю что просто оборудование новое и нету драйверов, подсунуть что либо тоже никак не получается так как он тупо не видит другую флэшку, кроме того не понятно какой именно драйвер туда надо ставить. Но самое интересное при установке кнопка обзор показывает диск C: .
Материнка GIGABYTE GA-H110N, диск SSD 64Gb Smartbuy Leap Marvell 88NV1120.
Установщик Windows 7 не видит разделы 🙁 Проблема заезженная, но решить сам не смог, по сему прошу помощи 😥 Перейдем к сути дела.
Установщик Windows не видит жесткий диск В наличии ноутбук Asus n53s, c которого после переустановки Windows и скачки новых драйверов новая.
Установщик не видит разделы на жестком диске При установке виндовс, установщик не видит разделы, куда можно установить ОС. Материнская плата.
Флэшка стоит в USB2, а так на материнке есть USB3. Но куда бы я не ставил загрузочную флэшку или флэшку с драйверами результат один и тот же . Проблема в чем не понятно, то ли в чипсете материки, толи в USB3.0(хотя на других компах семерка ставится на метеринке с USB3.0) толи в SSD.
Короче как решить проблемку?))
Добавлено через 4 минуты ПО вашему проблема именно в дровах USB3.0 ?
1. Не понятно что значит установить. Точнее куда установить. В установщик. Если да то как. 2. Так как флэшки не видит, а значит драйвера никак не поставить, я решил сначала поставить WIn10, потом на диск С записать все драйвера материки и подавать по одному. В результате уставилось.
Я так понял что у него проблема была именно в USB — потому что я дал установщику драйвера из папки диска драйверов материки CD:E\Boot\Intel-USB-3.0-Drivers\Win7\x64. Самое главное что нужно два раза дать ему установить из этой папки. Сначала он установить драйвер USB-3.0 потом при повторном поиске в этой папке он обнаружил еще одно устройство (Концентратор — Расширетель Хост) что то такое и только потом она продолжила и дошла до выбора диска. Причем еще не все . При установки первого драйвера если у вас клавиатура USB то она перестает работать и мышка тоже, и дальше уже продолжить никак нельзя. Я подключил клавиатуру PS2 и она заработала. Короче вот такой вот шаманский метод .
Но вопрос остается открытым. 1. Как дать ему драйвера через флэшку — потому что ставить десятку, копировать на диск С и далее ставить семерку как то вульгарно . 2. Можно ли как то эти дровишки в дистрибутив на флэшке в какую нить папку кинуть чтобы она сама подхватила. При установку появляется какой то диск Х и с папками Program Files, Sources И еще 2 папки не помню. Это я так понял какието вируальные файлы которые установщик создает, так вот может сюда можно как то кинуть дрова??
Как поставить в BIOS загрузку с диска или USB флешки?
Чаще всего мы вспоминаем про BIOS (Базовую Систему Ввода/Вывода) лишь тогда, когда нам нужно переустановить операционную систему и нужно в нём как то выставить загрузку с диска или флешки. Я часто писал об этом в таких статьях как: Установка windows 7 на новый ПК, Установка Windows XP с USB-флешки, 4 способа установить Windows 7 с флешки. Создание загрузочной флешки, Установка Windows 8 на компьютер, ноутбук или планшет и другие. Теперь же я хочу собрать воедино и ссылаться лишь на эту статью при необходимости. Эта статья полезна будет для всех версий БИОСа и для разных фирм. Этакий единый справочник
Первое, что Вам нужно знать — BIOS разделяется по производителям и версиям.
Чтобы изменить способ загрузки в BIOS — нужно вначале в него войти. Можно, конечно, узнать какая версия и производитель Вашего биоса, из руководства идущего с компьютером. Так же это можно узнать посмотрев на строку вверху на черном экране при загрузке (там будет указан производитель). Ну а затем уже войти в биос, зная какой он у Вас.
Вот небольшой список производителей и сочетаний клавиш для входа в БИОС:
Так же внизу черного экрана пишутся клавиши для входа в биос и для вывода списка, в котором содержатся доступные устройства для загрузки и чтобы можно было с него загрузиться. Но о нём в конце статьи.
Как видите — чаще всего нужно нажимать клавишу F2 или Del.
Теперь нужно поставить в загрузку флешку или диск. Рассмотрим на нескольких примерах, отличающихся от производителя BIOS.
Настройка Award Bios для загрузки с флешки или диска: Главное окно представляет собой вот такой вид, в которым нам нужен второй пункт:
На заметку:
First Boot Device – устройство, с которого комп будет загружаться в первую очередь
Second Boot Device – второе устройство, с которого комп будет загружаться, если «First Boot Device» окажется не загрузочным или неработоспособным.
Third Boot Device – третье устройство, с которого комп загрузится, если «Second Boot Device» не окажется загрузочным
Если Вы выберете флешку, то помимо прочего нужно ещё зайти в пункт «Hard Disk Boot Priority» и передвигаем нашу флешку на самый верх с помощью кнопок «+» и «-» или «PageUp» и «PageDown»:
Что переводится как «Нажмите любую кнопку чтобы загрузиться с CD или DVD». Это значит, что если в этот момент не нажать любую кнопку на клавиатуре, то компьютер продолжит загружаться со следующего по списку устройства.
Ещё разновидность этого биоса:
Как выбрать с чего грузиться в AMI BIOS Если, войдя в Биос, Вы видите такой экран, значит у Вас AMI BIOS:
Чтобы загрузиться с CD/DVD диска нужно в этом меню выбрать «ATAPI CD-ROM» (или просто «CDROM»), при этом нет надобности заходить в предыдущее меню «Hard Disk Drives». Теперь сохраняем результаты кнопкой «F10» или переходим в раздел БИОСа «Exit» и выбираем «Exit Saving Changes».
Еще один AMI BIOS, но тут всё понятно:
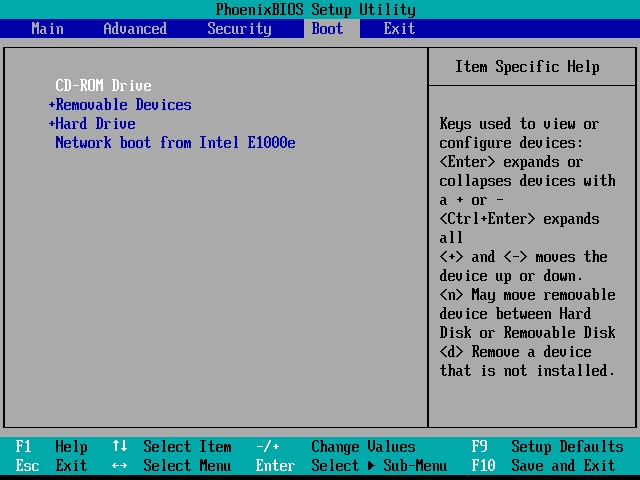
Настройка Phoenix-Award Bios для загрузки с флешки Если, войдя в Биос, вы видите такой экран, значит у вас Phoenix-Award BIOS:
Настройка EFI (UEFI) Bios с графическим интерфейсом для загрузки с флешки Сейчас уже этим никого не удивишь. Практически все новые компьютеры снабжаются подобной оболочкой. Подробнее о ней Вы можете прочитать в статье Чем UEFI лучше обычного BIOS и каковы отличия. При загрузке, в нижней части экрана есть раздел «Boot Priority», где можно с помощью мышки (перетаскиванием) картинок выставить нужный порядок загрузки. Также можно нажать в правом верхнем углу кнопку «Exit/Advanced mode» и выбрать в появившемся окне Advanced mode (расширенный режим).
Как загрузиться с флешки или с диска без входа в БИОС Это то, о чем я писал почти в самом начале статьи. Это когда нужно один раз нажать клавишу и появится окно с выбором загрузки. Этот способ не меняет настройки биоса. Обычно Award BIOS предлагает нажать «F9» для вызова загрузочного меню, а AMI просит нажать «F8» . На нотбуках это может быть клавиша «F12». В общем — смотрите нижнюю строчку и ищите пункты наподобие «Press F8 for BBS POPUP» или «Press F9 to Select Booting Device after POST».
Почему не получается загрузиться с флешки в BIOS?
Возможные причины:
Отключён контроллер USB в BIOS. Чтобы это проверить в биосе Award, нужно зайти в раздел «Advanced Chipset Features» или «Integrated Peripherals». Ищем опцию «USB Controller», должно быть «Enabled»
Проблемы с передними гнездами USB входов, попробуйте другие или задние.
Проблемы в самой флешке или в образе который записан (обычно если возникает ошибка «NTLDR is missing» или мигает курсор слева вверху экрана). Проверить нужно на рабочем компьютере.
Не забудьте после того, как Вы сделали то, что хотели (а именно — зачем меняли загрузку в биосе) — верните настройки загрузки обратно, чтобы компьютер загружался с жесткого диска.
Windows setup to read from usb thumb drive перевод
Профиль | Отправить PM | Цитировать
Сообщения: 26992 Благодарности: 7877
Стоит попробовать именно Teac.
Однако, в моей практике было так: внешний USB floppy Teac, его строка «USB\VID_0644&PID_0000» полностью совпадала со строкой в «Txtsetup.sif» (каковой и указан в статье A connected USB floppy disk drive does not work when you press F6 to install mass storage drivers during the Windows XP installation process), инсталляции корпоративной версии Windows XP SP3 и Windows Server 2003 R2, загруженные с сайта Microsoft и записанные на болванки. Ни в одном, ни в другом случае (на разных машинах) мне не удалось корректно воспользоваться методом подгрузки драйверов с USB floppy Teac по F6 и пришлось пользовать nLite для интеграции драйверов в образ.
Возможно, мне попались (бралось сразу несколько штук, и именно для озвученной цели) не совсем правильные пчёлы приводы Teac, а может быть даже и совсем не Teac — разве что по названию.
BIOS/UEFI Setup Guide: Boot from a CD, DVD, USB Drive or SD Card
Windows runs on thousands of computer configurations, but installing a new operating system like Windows 10 on the variety of configurations that exist is another thing. The steps may be different depending on whether your computer has an existing Windows 10 installation on it, an earlier version of Windows on it or a completely different operating system on it, like macOS or Linux. In each case, installing Windows 10 relies on booting from a device other than your main hard disk drive (HDD) or solid state drive (SSD). To do that, you need to access the BIOS or UEFI setup page. Sometimes, this is easier said than done.
In this guide, we’ll walk through the basic steps that apply to most scenarios. Then, we’ll discuss some troubleshooting and alternate methods, in case the simple approach doesn’t work for you.
How-to Summary: Boot Your Computer from a CD/DVD/USB/SD Drive
BIOS vs. UEFI: What’s the Difference?Optional. In case you want some background info on what the heck UEFI is and why it makes things difficult.
How to Access BIOS / UEFI Setup Screen. Includes the keyboard commands you need to access the BIOS or UEFI setup screen.
Navigate BIOS / UEFI Setup Screen. Finding your way around without a typical keyboard/mouse interface.
How to Change Boot Order in BIOS / UEFI. These are the settings you need to change in BIOS / UEFI to allow your PC to boot from a USB or CD.
Booting from a USB/CD/DVD Drive or SD Card. Once you’ve configured your BIOS / UEFI correctly, here’s what to do.
Best case scenario, those steps will get you up and running. If not, see our Troubleshooting section. This includes details for changing the boot order on a Microsoft Surface device and booting from another device on a Mac.
Note:Once you master the steps to boot your computer from a USB or CD/DVD, you can use this to boot other operating systems or bootable live environments on your machine.
BIOS vs. UEFI: What’s the Difference?
Each computer, whether it’s a DELL, HP, Acer or even a custom built system, is an island unto itself before Windows 10 (or some other operating system) starts. Since the 1980s, hardware vendors have worked together to standardize around common access routines and commands for managing your BIOS Boot Options. The BIOS, which stands for Basic In Output System, is a critical bit of low-level code stored in nonvolatile memory that your computer uses to manage your hardware and load Windows 10 or another operating system.
A new standard called UEFI or Universal Extensible Firmware Interface came online a decade ago and became the standard for new PCs and devices preinstalled with Windows 8 or later. UEFI offers more advanced options than BIOS, with support for features such as a graphical user interface and mouse support, making it easier to configure boot and hardware settings. UEFI also supports recent security standards required by Windows 10 and previous releases such as Secure Boot, which maintains the integrity of a computer’s state and prevents malicious code from compromising your system at boot time. After decades of systems using BIOS, malware has become more sophisticated, where it is even possible for malicious code to easily infect key operating system code such as the Master Boot Record.
How to Access Your BIOS or UEFI Setup Screen
Because of the variety of brands and configurations, and the ongoing revisions to these systems, this article is not exhaustive. That said, the following provides a comprehensive list of common methods for booting into the BIOS or UEFI firmware interfaces.
To enter the BIOS, you need to press a certain key or combination of keys while your computer is booting up. Usually, your window to do this is very brief—you have to press the button when the splash screen with the manufacturer’s logo is displayed. If it seems like your computer boots too fast for you to get a chance to hit the button, you may need to disable fast startup.
Here is a list of the common functions or commands for loading the BIOS. Please note, your BIOS screen might display a hint to indicate the appropriate function key for loading the firmware. Start your computer then proceed to strike the appropriate key or command to load the BIOS. After loading the BIOS or UEFI, connect your USB media or connect the DVD install media.
Each BIOS or UEFI looks different and works differently, but most share basic principles for navigation. For menu driven BIOS or UEFI interfaces, your keyboard’s arrow keys are used to access and enter menus. The settings for configuring boot options are sometimes hidden under submenus, which you will have to navigate using these keys.
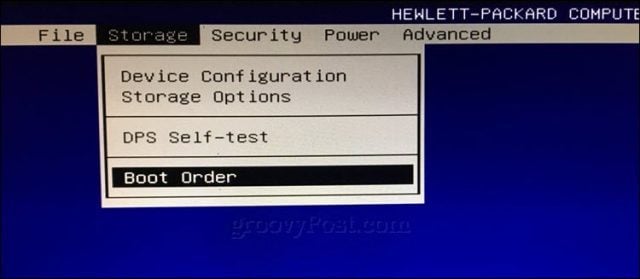
On my HP desktop, the option for changing the system’s boot order is located under Storage > Boot Order. On my other computer, an HP Elitebook, the boot order is called Boot Options located under the System Configuration tab, which uses a graphical interface. So, the experience will vary depending on the system you are using; even if they are the same brands. Navigate through these interfaces by browsing and looking for logical labels that might suggest what you are looking for – storage, boot, disks, etc.
How to Change the BIOS / UEFI Boot Order to Boot from a USB / CD Drive
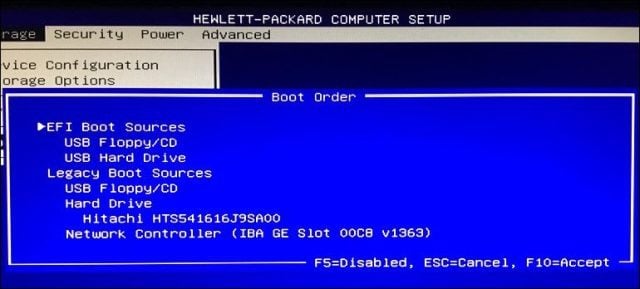
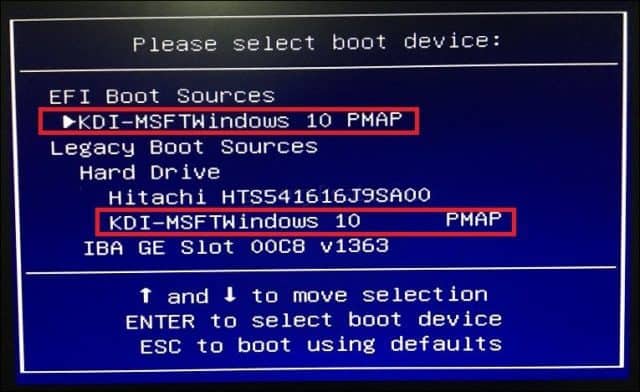
Once you’ve found the Boot Order menu, the interface will present menus displaying the structure of your boot order. Boot order determines which devices your computer will try to boot from first, second, etc. when you turn it on. Most often, your first boot device is your hard disk or SSD containing Windows 10. You can also have your DVD, CD or USB thumb drive, set as the first boot device without it affecting Windows 10 loading into main memory. If you have a removable storage device set as your first boot device the BIOS will check if there is any attached removable storage as part of POST (Power On Self Test). If a USB thumb drive or DVD is detected, the system will prompt you to boot from it before loading any existing operating systems on the local disk.
Moving through the options will require using the arrow keys. If you don’t see your connected USB device listed, choose the USB storage listed under EFI or Legacy sources. Use the down arrow key to navigate to the selection; some older BIOS interfaces will require using function keys such as F5 and F6 to navigate up and down the boot order. After selecting the appropriate option, you will need to confirm these changes; pressing F10 will usually save them. If not, read the on-screen instructions, which will identify the appropriate function key for saving or accepting changes.
Booting from a USB drive or CD/DVD
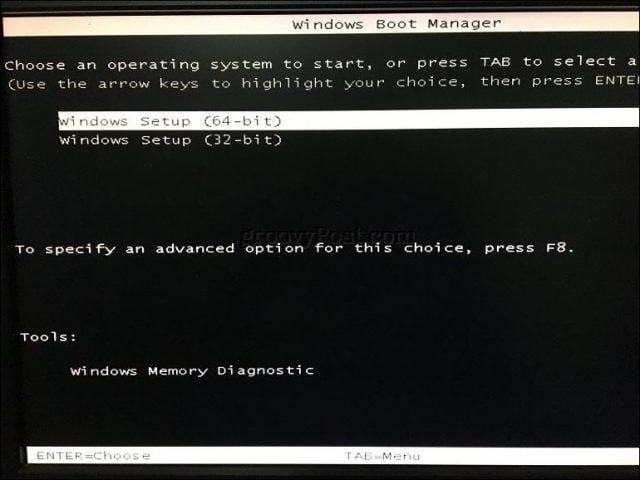
Once the desired option has been selected and confirmed, depending on the type of installation media you are using, you might see different options. USB media will immediately boot into a Windows Boot Manager, prompting selection of the architecture of Windows 10 – 32 or 64 bit – you would like to install.
If you are installing from DVD media, Windows 10 setup will prompt you to hit any key on your keyboard to load setup.
From there, you should be home free. As long as you created your bootable installation media correctly, the on-screen instructions should guide you through the rest of the process.
Troubleshooting Boot Options
Some systems might encounter problems when attempting to boot from removable media. If you are following the steps above to a T and you’re still having issues, look into some of the items below.
Accessing the UEFI setup page on a Microsoft Surface device. The steps for accessing the BIOS / UEFI page on Surface devices are a bit different. See the steps below for Setting Up UEFI on a Microsoft Surface.
Changing UEFI settings on an out-of-the-box Windows 8 or Windows 10 device. For computers that you buy with Windows 8 or Windows 10 pre-installed, it may be tricky to access the UEFI / BIOS. See the steps below for Configuring UEFI on Windows 8 or Windows 10 Computers.
What about Mac? Apple computers support installing Windows, but they don’t have a BIOS / UEFI setup page like your typical PC. See our section on installing Windows on a Mac below.
Make sure the bootable media was created properly. Boot issues can sometimes be attributed to how the install media was configured or prepared. For instance, on UEFI-based systems – systems designed for Windows 8 or later – preparing the install media, if downloaded from the Microsoft software page, will require using the Microsoft Media Creation Tool or a third-party utility such as Rufus.
Enable Legacy Boot Sources. If you are installing on an older computer using BIOS, selecting the option under Legacy Boot Sources or Legacy USB will let you start Windows setup from a USB or CD drive.
Disable Secure Boot. Security technologies included in UEFI such as Secure Boot can be a blocker and prevent the system from booting external storage sources. Disabling Secure Boot, temporarily—normally accessible under the security menu or tab—will often resolve this.
Disable Fast Startup. If you are unable to access the BIOS, you may need to disable Fast Startup, if it is enabled.
Resetting BIOS settings. Some BIOS / UEFI setup screens have a factory reset option. This can sometimes be a quick fix but proceed with caution. If you have your drive BitLocker encrypted with TPM enabled, this may make your existing system drive unusable. OF course, this is a non-issue if your goal is to reinstall your operating system from scratch.
Disabling Fast Startup
If you are attempting to load the firmware on a computer already running Windows, this might prove difficult because of the Fast Startup setting that might be enabled. Fast Startup was first introduced in Windows 8 as a way to make Windows start quicker after shutdown by caching key pieces of operating system code.
If you are experiencing problems loading your BIOS or UEFI or changing your boot order, start Windows then turn off Fast Startup.
Press Windows key + X
Click Power Options
Click Choose what the power buttons do
Click the link Change settings that are currently unavailable
Under Shutdown settings, uncheck Turn on fast startup (recommended)
Boot Device Menu / Boot Override
Some computers will let you press a function key that takes you to a direct menu where you can immediately choose, which volume: USB thumb drive, SD Card, external hard disk, local disk or optical media you would like to boot from. Dell and HP systems, for instance, will present an option to boot from USB or DVD after striking the F12 or F9 keys respectively. This boot device menu is accessed once you’ve already entered into the BIOS or UEFI setup screen.
Here is a list of commands for accessing the direct boot menu on popular brands:
 Установщик Windows 7 не видит разделы 🙁


 Профиль | Отправить PM | Цитировать