- File sharing over a network in Windows 10
- Общий доступ к файлам Windows Windows file sharing
- Доступ к файлам с помощью общего доступа к файлам Windows Accessing your files using Windows file sharing
- Запуск и остановка сервера общего доступа к файлам Starting and stopping the file sharing server
- Отключение и включение сервера общего доступа к файлам при запуске Disabling and enabling the file sharing server on startup
- Share OneDrive files and folders
- Productivity apps, 1 TB of OneDrive, and advanced security.
- How do you want to share?
- Sharing folders
File sharing over a network in Windows 10
In Windows 10, some features of file and folder sharing over a network have changed, including the removal of HomeGroup. Read on for answers to common questions about other changes to file and folder sharing in Windows 10.
To share a file or folder in File Explorer, do one of the following:
Right-click or press a file, select Give access to > Specific people.

Select a file, select the Share tab at the top of File Explorer, and then in the Share with section select Specific people.

If you select multiple files at once, you can share them all in the same way. It works for folders, too—share a folder, and all files in it will be shared.
To stop sharing in File Explorer, do one of the following:
Right-click or press a file or folder, then select Give access to > Remove access.

Select a file or folder, select the Share tab at the top of File Explorer, and then in the Share with section select Remove access.

File Explorer shows the «Remove access» option («Stop sharing» in older versions of Windows 10) for all files, even those that aren’t being shared over a network.
Open File Explorer, then type \\localhost into the address bar.
Note: When you’ve shared a file from a folder in your user profile and you go to \\localhost, you’ll see your user profile and all its files there. This doesn’t mean that all of your files are shared—just that you have access to all your own files.
If you open File Explorer, go to Network, and see an error message («Network discovery is turned off….»), you’ll need to turn on Network discovery to see devices on the network that are sharing files. To turn it on, select the Network discovery is turned off banner, then select Turn on network discovery and file sharing.

To troubleshoot problems with sharing files or folders, follow the steps below on all computers from which you’re trying to share.
Make sure the computers are on the same network. For example, if your computers connect to the internet through a wireless router, make sure they all connect through the same wireless router.
If you’re on a Wi-Fi network, set it to Private. To find out how, read Make a Wi-Fi network public or private in Windows 10.
Turn on network discovery and file and printer sharing, and turn off password protected sharing.
Select the Start button, then select Settings > Network & Internet , and on the right side, select Sharing options.
Under Private, select Turn on Network discovery and Turn on file and printer sharing.
Under All Networks, select Turn off password protected sharing.
Make sharing services start automatically.
Press the Windows logo key + R.
In the Run dialog box, type services.msc, and then select OK.
Right-click each of the following services, select Properties, if they’re not running, select Start, and next to Startup type, select Automatic:
Общий доступ к файлам Windows Windows file sharing
Для перемещения файлов на устройство и с него можно использовать общий доступ к файлам Windows. You can use Windows file sharing to transfer files to and from your device.
Доступ к файлам с помощью общего доступа к файлам Windows Accessing your files using Windows file sharing
Сервер общего доступа к файлам на устройстве Windows IoT базовая запускается автоматически при загрузке. The file sharing server on your Windows IoT Core device starts automatically on boot. Для подключения к нему требуется IP-адрес устройства. In order to connect to it, you need the IP address of your device. IP-адрес можно найти в приложении по умолчанию, которое загружается при запуске устройства. You can find the IP address on the default app that boots when your device starts.

Получив IP-адрес, откройте проводник на компьютере и введите \\ \c$ , где — это имя или IP-адрес устройства Windows IOT базовая, а затем нажмите клавишу ВВОД. Once you have the IP, open up File Explorer on your computer and type \\ \c$ , where is either the name or the IP Address of your Windows IoT Core device, then hit Enter.
При появлении запроса введите имя пользователя и пароль администратора. Enter your administrator username and password if prompted. Имя пользователя должно иметь префикс с IP-адресом устройства Windows IoT базовая. The username should be prefixed with the IP Address of your Windows IoT Core device. Пример: username: 192.168.1.118\Administrator пароль:

- Теперь вы можете получить доступ к файлам на устройстве, используя общий доступ к файлам Windows. Now you can access the files on your device using Windows file sharing.
Запуск и остановка сервера общего доступа к файлам Starting and stopping the file sharing server
Подключитесь к устройству с помощью PowerShell или SSH. Connect to your device through PowerShell or SSH.
По умолчанию сервер совместного использования файлов запускается при загрузке устройства. By default the file sharing server is started when the device is booted.
Чтобы отключить сервер общего доступа к файлам, введите net stop Server /y To stop the file sharing server, type net stop Server /y
Чтобы запустить сервер общего доступа к файлам, введите net start Server To start the file sharing server, type net start Server

Отключение и включение сервера общего доступа к файлам при запуске Disabling and enabling the file sharing server on startup
Подключитесь к устройству с помощью PowerShell или SSH. Connect to your device through PowerShell or SSH.
По умолчанию сервер совместного использования файлов запускается при загрузке устройства. By default the file sharing server is started when the device is booted.
Чтобы отключить сервер совместного использования файлов, чтобы он не запускался при запуске устройства, введите reg add HKEY_LOCAL_MACHINE\SYSTEM\CurrentControlSet\services\lanmanserver /v Start /t REG_DWORD /d 0x3 /f To disable the file sharing server so that it does not start when the device starts, type reg add HKEY_LOCAL_MACHINE\SYSTEM\CurrentControlSet\services\lanmanserver /v Start /t REG_DWORD /d 0x3 /f
Чтобы включить сервер общего доступа к файлам, который запускается при запуске устройства, введите reg add HKEY_LOCAL_MACHINE\SYSTEM\CurrentControlSet\services\lanmanserver /v Start /t REG_DWORD /d 0x2 /f To enable the file sharing server, so that starts when the device starts, type reg add HKEY_LOCAL_MACHINE\SYSTEM\CurrentControlSet\services\lanmanserver /v Start /t REG_DWORD /d 0x2 /f
Share OneDrive files and folders
Productivity apps, 1 TB of OneDrive, and advanced security.
Use Microsoft OneDrive as a cloud backup, and share files, photos, and entire folders with others.
Your cloud storage in OneDrive is private until you decide to share with others. You can also see who a OneDrive file is shared with or stop sharing at any time.
Note: The options you see may vary slightly between OneDrive and OneDrive for work or school, especially if your organization has restricted certain settings.
How do you want to share?
- How do you want to share?
- Copy a link to paste in a text message or on a website
- Send a link in email
Choose this option to share items with lots of people you might not even know personally. For example, you can use these links to post to Facebook, Twitter, or LinkedIn, or share in email or IM. Anyone who gets the link can view or edit the item, depending on the permission you set. Users with the link cannot upload new items. Keep in mind that the link can also be forwarded and sign-in is not required.
Go to the OneDrive website and sign in with your Microsoft account or your work or school account.
Note: For OneDrive for work or school users not using Microsoft 365, try Share documents or folders in SharePoint Server.
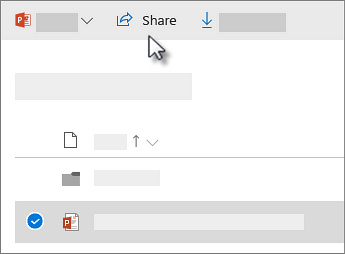
Pick the file or folder you want to share by selecting the circle in the upper corner of the item. You can also pick multiple items to share them together (sharing multiple items at the same time is not available for OneDrive for work or school accounts).
Select Share at the top of the page.
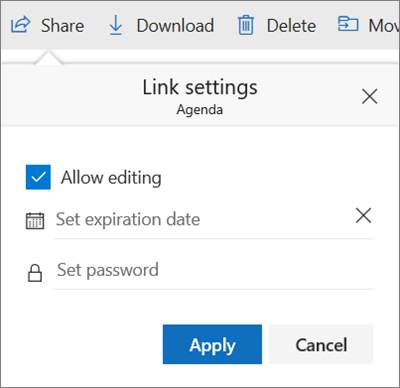
Select Anyone with the link can edit to customize the link options.
Set the options you want on your link, then select Apply when you’re done.
Allow editing — When you share items with this type of link, people can edit files, and can add files in a shared folder if they’re signed in with a Microsoft account. Recipients can forward the link, change the list of people sharing the files or folder, and change permissions for recipients. If you’re sharing a folder, people with Edit permissions can copy, move, edit, rename, share, and delete anything in the folder.
Unchecking this box means that people can view, copy or download your items without signing in. They can also forward the link to other people. However, they cannot make change to the version on your OneDrive.
Set expiration date — The link will only work until the date you set. After that, the link will be invalid, and you will need to create a new link for users requiring access to your file or folder.
Set password — When a user clicks the link, they will be prompted to enter a password before they can access the file. You’ll need to provide this password separately to users.
OneDrive for work or school additional options
OneDrive for work or school users also have the option to restrict the level of access (anyone with the link, only people within your organization, only people with existing access to the file, or only individuals you specify). Also, if you opt to disable editing, you can also opt to prevent viewers from downloading the file.
Anyone gives access to anyone who receives this link, whether they receive it directly from you or forwarded from someone else. This may include people outside of your organization.
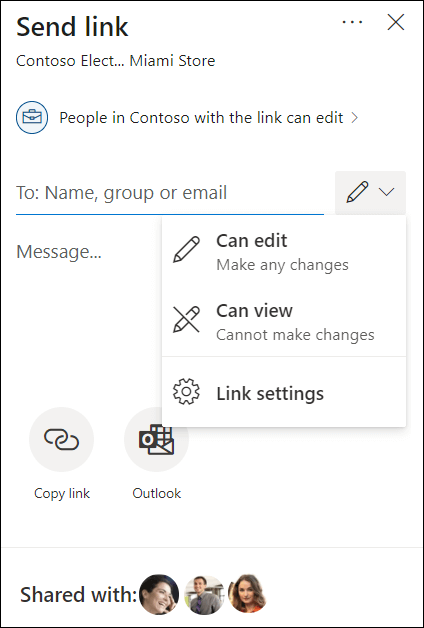
People in gives anyone in your organization who has the link access to the file, whether they receive it directly from you or forwarded from someone else.
People with existing access can be used by people who already have access to the document or folder. It does not change the permissions on the item. Use this if you just want to send a link to somebody who already has access.
Specific people gives access only to the people you specify, although other people may already have access. If people forward the sharing invitation, only people who already have access to the item will be able to use the link.
Allow editing — When you share items with this type of link, people can edit files, can add files in a shared folder, and can delete files in a shared folder if they’re signed in. Recipients can forward the link, change the list of people sharing the files or folder, and change permissions for recipients. If you’re sharing a folder, people with Edit permissions can copy, move, edit, rename, share, and delete anything in the folder.
By default, Allow editing is turned on. If you want people to only view your files, uncheck the check box. With OneDrive for work or school accounts, you can also quickly select editing permissions without having to open the sharing link settings. Simply select the pencil icon next to the Name, group or email box, then give the recipients edit or read-only permission.
Note: If a sharing option has been greyed out, your organization’s admins may have restricted them. For example, they may choose to disable the Anyone option to prevent usable links being forwarded to others.
Permissions can be further restricted by selecting the option to Block download, which means they cannot save a local copy. For Word files, you can also select Open in review mode only to limit people to leaving comments and making suggestions in the file. Note that if someone already has editing permissions for the item, selecting Open in review mode only will not prevent them from making edits. For them, document will open in edit mode.
Note: When you enable Open in review mode only for a shared document, recipients who open the document in the Word desktop app will be redirected to Word on the web to make tracked edits or leave comments.
Once you’re back at the main Share box, select Copy Link to copy the link to your clipboard.
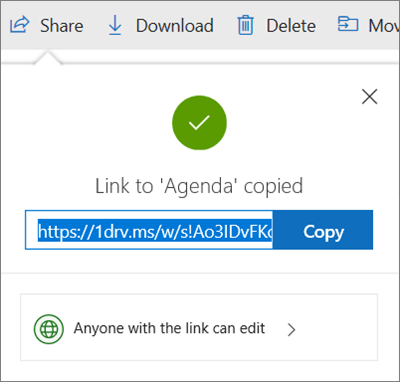
Note: «https://1drv.ms” is the shortened URL for OneDrive. Shortened URLs are useful for sharing via Twitter.
Paste the link in an email message or wherever else you’re sharing the link.
Tip: You can also generate sharing links through the OneDrive desktop app for Windows 7, Windows 10, and Mac. All you need to do is right-click the file or folder in your OneDrive folder on your computer, and select Share a OneDrive link. This will copy a link to your clipboard that you can paste into an email, website, blog post, and so forth.
However, these links are set by default to Edit permission. If you only want someone to have View permission, you’ll need to use the OneDrive website to generate the link (or modify the one you just created).
Choose this option if you want to send an email invitation to people or groups and keep track of who you invited. This lets you also remove permission for specific individuals or groups later if you need to.
In the Enter a name or email address field, start typing the email addresses or contact names of people you want to share with. When you begin to enter info in the box, you can also choose a contact from the list that appears.
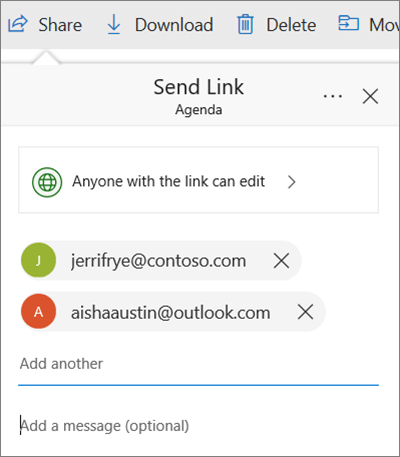
Add a note to recipients if you want.
To change the permission level, select Anyone with the link can edit.
Set the options you want on your link, then select Apply when you’re done.
Allow editing — When you share items with this type of link, people can edit files, and can add files in a shared folder if they’re signed in with a Microsoft account. Recipients can forward the link, change the list of people sharing the files or folder, and change permissions for recipients. If you’re sharing a folder, people with Edit permissions can copy, move, edit, rename, share, and delete anything in the folder.
Unchecking this box means that people can view, copy or download your items without signing in. They can also forward the link to other people. However, they cannot make change to the version on your OneDrive.
Set expiration date — The link will only work until the date you set. After that, the link will be invalid, and you will need to create a new link for users requiring access to your file or folder.
Set password — When a user clicks the link, they will be prompted to enter a password before they can access the file. You’ll need to provide this password separately to users.
OneDrive for work or school additional options
OneDrive for work or school users also have the option to restrict the level of access (anyone with the link, only people within your organization, only people with existing access to the file, or only individuals you specify). Also, if you opt to disable editing, you can also opt to prevent viewers from downloading the file.
Anyone gives access to anyone who receives this link, whether they receive it directly from you or forwarded from someone else. This may include people outside of your organization.
People in gives anyone in your organization who has the link access to the file, whether they receive it directly from you or forwarded from someone else.
People with existing access can be used by people who already have access to the document or folder. It does not change the permissions on the item. Use this if you just want to send a link to somebody who already has access.
Specific people gives access only to the people you specify, although other people may already have access. If people forward the sharing invitation, only people who already have access to the item will be able to use the link.
Allow editing — When you share items with this type of link, people can edit files, can add files in a shared folder, and can delete files in a shared folder if they’re signed in. Recipients can forward the link, change the list of people sharing the files or folder, and change permissions for recipients. If you’re sharing a folder, people with Edit permissions can copy, move, edit, rename, share, and delete anything in the folder.
By default, Allow editing is turned on. If you want people to only view your files, uncheck the check box. With OneDrive for work or school accounts, you can also quickly select editing permissions without having to open the sharing link settings. Simply select the pencil icon next to the Name, group or email box, then give the recipients edit or read-only permission.
Note: If a sharing option has been greyed out, your organization’s admins may have restricted them. For example, they may choose to disable the Anyone option to prevent usable links being forwarded to others.
Permissions can be further restricted by selecting the option to Block download, which means they cannot save a local copy. For Word files, you can also select Open in review mode only to limit people to leaving comments and making suggestions in the file. Note that if someone already has editing permissions for the item, selecting Open in review mode only will not prevent them from making edits. For them, document will open in edit mode.
If you want to send your sharing invite directly from Outlook, select the Outlook icon to automatically open an email. Then enter the recipients and a message, and select Send.
Select Apply to save the permission settings, and then select Send.
If you have trouble sharing from Outlook.com, see Can’t share OneDrive files from Outlook.com.
If your Microsoft account is set with Family Safety, and your parent has turned off contact management, you can only share items with people who are already on your contact list.
Please respect copyright and be careful what you share online. Copying or sharing unauthorized materials violates the Microsoft Services Agreement.
Sharing folders
When you share folders with Edit permissions, people you share with can add the shared folders to their own OneDrive. This lets them keep the folder alongside their own folders and items, easily move items between folders, and more easily work on it offline. Any updates they make sync with the shared folder, so everyone with access to the folder is up to date.
Tip: The recipient can add shared folders to their OneDrive, not individual files. If you want the recipient to add files to their OneDrive, put the files in a folder first, and then share the folder.


