- File sharing over a network in Windows 10
- How to Map a Shared Folder to Network Drive Using Group Policy
- Map a Shared Folder to Network Drive
- how to map ubuntu shared folder in windows 7?
- 3 Answers 3
- Mapping drive letters to local folders
- 6 Answers 6
- subst
- net use
- Map Network Drives or Shared Folders Using Group Policy in 8 Easy Steps
- Conclusion
File sharing over a network in Windows 10
In Windows 10, some features of file and folder sharing over a network have changed, including the removal of HomeGroup. Read on for answers to common questions about other changes to file and folder sharing in Windows 10.
To share a file or folder in File Explorer, do one of the following:
Right-click or press a file, select Give access to > Specific people.

Select a file, select the Share tab at the top of File Explorer, and then in the Share with section select Specific people.

If you select multiple files at once, you can share them all in the same way. It works for folders, too—share a folder, and all files in it will be shared.
To stop sharing in File Explorer, do one of the following:
Right-click or press a file or folder, then select Give access to > Remove access.

Select a file or folder, select the Share tab at the top of File Explorer, and then in the Share with section select Remove access.

File Explorer shows the «Remove access» option («Stop sharing» in older versions of Windows 10) for all files, even those that aren’t being shared over a network.
Open File Explorer, then type \\localhost into the address bar.
Note: When you’ve shared a file from a folder in your user profile and you go to \\localhost, you’ll see your user profile and all its files there. This doesn’t mean that all of your files are shared—just that you have access to all your own files.
If you open File Explorer, go to Network, and see an error message («Network discovery is turned off….»), you’ll need to turn on Network discovery to see devices on the network that are sharing files. To turn it on, select the Network discovery is turned off banner, then select Turn on network discovery and file sharing.

To troubleshoot problems with sharing files or folders, follow the steps below on all computers from which you’re trying to share.
Make sure the computers are on the same network. For example, if your computers connect to the internet through a wireless router, make sure they all connect through the same wireless router.
If you’re on a Wi-Fi network, set it to Private. To find out how, read Make a Wi-Fi network public or private in Windows 10.
Turn on network discovery and file and printer sharing, and turn off password protected sharing.
Select the Start button, then select Settings > Network & Internet , and on the right side, select Sharing options.
Under Private, select Turn on Network discovery and Turn on file and printer sharing.
Under All Networks, select Turn off password protected sharing.
Make sharing services start automatically.
Press the Windows logo key + R.
In the Run dialog box, type services.msc, and then select OK.
Right-click each of the following services, select Properties, if they’re not running, select Start, and next to Startup type, select Automatic:
How to Map a Shared Folder to Network Drive Using Group Policy
There are two methods for mapping a shared folder to a network drive (using GUI and group policy). I am focusing on the latter method of using a group policy.
I assume you have already shared a folder with the right permissions. You can check my recent article on setting correct permissions for a shared folder.
Map a Shared Folder to Network Drive
Step 1: Open the group policy management console.
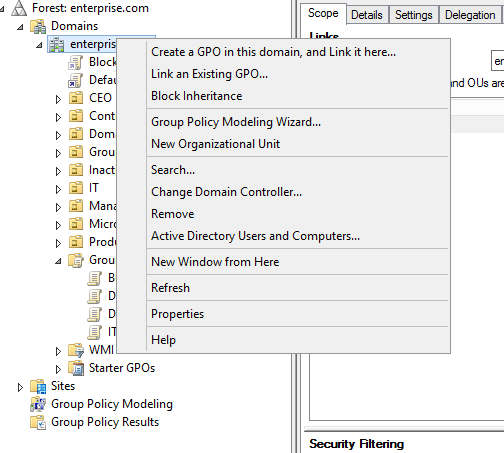
Step 2: Right-click on your domain or any specific user’s OU for which you want to map the network drive.
Step 3: Click «Create a GPO in this domain, and Link it here«.
Step 4: Give a meaningful name to the GPO.
Step 5: Right-click on the newly created GPO and choose Edit.
Step 6: Now, go to the following location:
User Configuration -> Preferences -> Windows Settings -> Drive Maps
Step 7: Right-click on Drive Maps and then click New -> Mapped Drive.
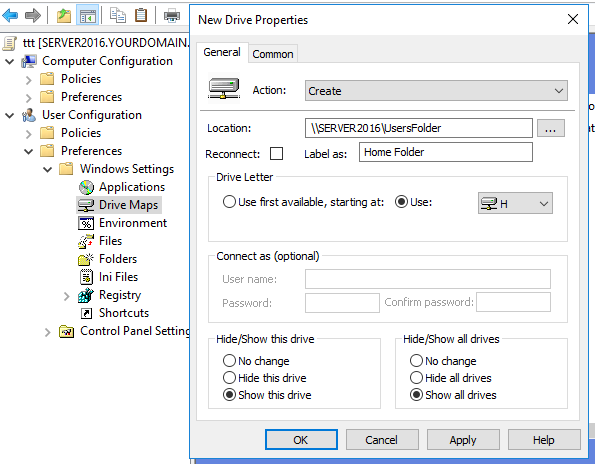
Step 8: On the General tab, choose ‘Create’ from the action drop down.
Step 9: Provide the shared folder location, check the Reconnect checkbox, and give a meaningful label as well as a drive letter.
Step 10: Go to the common tab, and choose Run in logged-on user’s security context option.
Step 11: Open the command prompt and execute the gpupdate command to update the group policies.
 Map drive with group policy
how to map ubuntu shared folder in windows 7?
My host OS is Windows 7 and I have an Ubuntu 14.04 install as guest OS. I would like to know how can I share particular folders from Ubuntu and map them as a drive in Windows 7.

3 Answers 3
To share host file with guest vm in vmware workstation you can use VM->settings->options->shared folders. It’s quite easy to use.
If you want to create a share directory on guest Ubuntu system and map it as a network driver on windows system. You may need to create a samba share and then map it in windows. on Utunbu:
- $sudo apt-get install samba
- $smbpasswd -a geek
- $mkdir
/Desktop/Share
$sudo vi /etc/samba/smb.conf
$sudo service smbd restart On windows map the \UtuntuIP-ADDRESS\SHARE-NAME to a network driver.
This is easy and basically you need to configure two parts: 1. setup a shared folder on Ubuntu; 2. setup the network disk mapping on windows to the shared folder.
On ubuntu, let us use samba to build a shared folder:
you need to install samba from terminal:
sudo apt-get install samba
add your current ubuntu account to samba (suppose your ubuntu account is sharetest):
sudo smbpasswd -a sharetest
Then it reqires you to setup the password of your account in samba: 
create your folder to be shared, for example, the folder you share has name shared_folder,
configure samba to recognize your shared_folder and grant corresponding read, write and browsing configurations, by editing file smb.conf using vi editor
sudo vi /etc/samba/smb.conf
Go to the end of smb.conf and add the following content (Find out how to use vi editor by yourself if you are not familiar with it.):

The above figure shows the configuration of this specific example, you need to customize your configurations (settings enclosed by <> below) accordingly.
restart the samba service
sudo service smbd restart
On Windows:
Go to your windows file explore and right click on This PC and you can see the dropdown menu. Left click on Map network drive . .
Choose your Drive symbol (say we use Y:). And configure the Folder path of your shared folder in this format:
Mapping drive letters to local folders
Is there a windows equivalent to the old dos SUBST command?
I want to be able to assign a local drive letter to a folder on a local drive.
I realize that a mapped drive will work (and so far that’s the technique I’ve ended up using), but it doesn’t seem to cut-in until rather late in the boot process. I’ve also in the past tried putting SUBST commands in batch files in the boot process, but that doesn’t seem to work either.
6 Answers 6
Good news! The subst command still works in Windows 7!
To create a new mapping:
subst x: C:\Folder\Example
To remove a mapping:

Alternative:
The difference between net use & subst below break
subst
When a share becomes unavailable subst will try over and over again to re-connect severely impacting performance of your PC as it tries to re-connect. This is less common when mapping local files as it will only occur if you say re-name the folders in the path. The resolution if this does occur is subst x: /d
net use
net use was introduced in win2k/xp to provide an alternative to this. When net use is used to connect to a location and that location becomes unreachable windows will report drive as disconnected and not try to re-connect until user tries to re-connect to resources on the mapped drive. This resolves the performance issues noted in subst
For more information on both commands you can query via the command line with /?
Map Network Drives or Shared Folders Using Group Policy in 8 Easy Steps

Mapping network drives is a common task for system administrators. One option is to create a batch script that runs every time the workstation starts. But there is a simpler and more convenient method: using Group Policy. Mapping network drives via Group Policy is faster and easier, so it is a much more scalable approach.
Here is a step-by-step guide for Group Policy drive mapping:
Step #1. On a Microsoft Windows Server with the Active Directory role installed, open the Group Policy Management
Step #2. Create a new GPO and give it a name. Then link it to an OU that contains user accounts because Group Policy drive mapping is a user configuration preference. You can also select an option – create a GPO in this domain and link it here, after that use item-level targeting option which will be described below.
Step #3. Right-click the new Group Policy object and go to User Configuration -> Preferences -> Windows Settings -> Drive Maps.
Step #4. Right-click Drive Maps, select New and then click the Mapped Drive

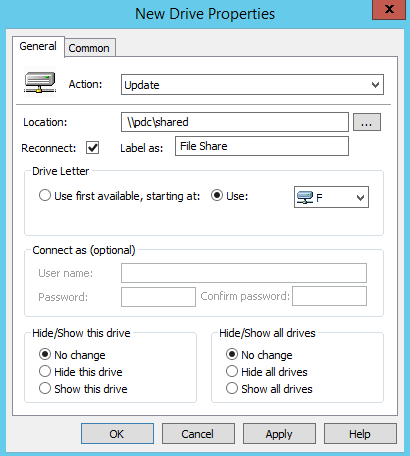
Step #5. Then you need to configure the settings for the new mapped drive. Here are the options on the General tab:
-
- Action — Select an action that will be performed on the shared drives:
- Create — creates a new mapped drive for users.
- Delete — deletes a mapped drive for users.
- Replace — deletes and then creates mapped drives for users.
- Update — modifies settings of an existing mapped drive for users. This action differs from Replace in that it only updates settings and don’t delete
- Location — Specify the path to the shared folder or drive that you want to map.
- Reconnect — Check this option if you want to save the mapped drive in the user’s settings and reconnect it each time they log on.
- Label as — Specify a custom name for the shared drive. (You can leave this field blank.)
- Drive Letter — Specify the letter you want the drive to be mapped to. Be careful, because if the workstation is already using the letter you choose here, the Group Policy drive mapping will fail.
- Connect as — If this setting is blank, the drive will be mapped using the current user account credentials. You can choose to specify a different account here that will be used instead.
- Hide/Show options — You can also choose to connect the new drive (or all drives) in a hidden state.
- Action — Select an action that will be performed on the shared drives:
Step #6. Click the Common tab to configure these additional settings for all items:
-
- Stop processing items in this extension if an error occurs
- Run in the security context of the user who is currently logged on
- Remove this item when it is no longer applied
- Apply once and do not reapply
- Item-level targeting (see step 7)

Step #7. Item-level targeting allows you to apply drive mappings in a very flexible way. For example you could apply a drive mapping only to a certain OU and the users and computers in it, or only to a certain IP address range. If you enable item-level targeting, click the Targeting button to open the Targeting Editor. Click New Item and select the type of item that you want to apply the new shared drive mapping policy to. The screenshot below shows how to select Organizational Unit and then choose the specific users or computers in that OU. Click OK to close the Targeting Editor.

Step #8. To apply the policy, either reboot the target computers or run gpupdate /force on them. Alternatively, you can go to Group Policy Management, right-click the target OU, and then click Group Policy Update.
Now, whenever a user logs on to any of the targeted computers, the new network drive will be shown in their file explorer.
Conclusion
As you can see, mapping a network drive via Group Policy is a very easy process and doesn’t require any PowerShell scripting experience. It is the best way to assign network drives to your users in a centralized manner, and makes troubleshooting easier — for example, you can simply use gpresult rather than writing logon scripts.


