- Shell, ShellListener
- Конструкторы Shell
- Стили Shell
- Основные методы Shell
- Слушатель окна ShellListener, ShellAdapter
- Пример слушателя закрытия окна Shell
- Пример контроля свойства modify окна Shell
- Листинг примера ShellModifiedTest
- Листинг процедуры создания меню
- Скачать примеры Shell
- 1 Introduction to JShell
- Why Use JShell?
- Starting and Stopping JShell
- Как с помощью Java выполнить Shell-команду
- Обзор
- Зависимость операционной системы
- Ввод и вывод
- Runtime.exec()
- ProcessBuilder
- Заключение
- How to Run a Shell Command in Java
- Get started with Spring 5 and Spring Boot 2, through the Learn Spring course:
- 1. Overview
- 2. Operating System Dependency
- 3. Input and Output
- 4. Runtime.exec()
- 5. ProcessBuilder
- 6. Conclusion
- windows shell for java kiosk application
- 2 Answers 2
Shell, ShellListener
Экземпляры класса Shell с точки зрения интерфейса представляют собой «окна» рабочего стола. Если Shell создается без родителя, т.е. конструктор в качестве параметра принимает только значение Display, то данный экземпляр будет родительским для всех остальных окон приложения. Окна Shell, которым при создании в конструктор в качестве аргумента передается родитель, будут дочерними или диалоговыми.
Конструкторы Shell
Стили Shell
Shell может использовать стили BORDER, CLOSE, MIN, MAX, NO_TRIM, RESIZE, TITLE, ON_TOP, TOOL, SHEET MODELESS, APPLICATION_MODAL, PRIMARY_MODAL, SYSTEM_MODAL. Стили окон могут комбинироваться.
Если стиль окна установлено «модальным», то window manager блокирует работу с другими окнами экрана :
- PRIMARY_MODAL закрывает доступ к окну своего родителя;
- APPLICATION_MODAL блокирует доступ ко всем окнам экрана приложения;
- SYSTEM_MODAL закрывает доступ ко всем окнам разных приложений.
Примечание: при определении в стиле модальности окна можно использовать один из трех доступных стилей.
Класс SWT включает два «комбинированных» стиля :
- SHELL_TRIM — комбинирование стилей TITLE | CLOSE | MIN | MAX | RESIZE, используется при создании типичного окна;
- DIALOG_TRIM — комбинирование стилей TITLE | CLOSE | BORDER, используется при создании диалогового окна.
| Стиль | Описание | Интерфейс |
|---|---|---|
| SWT.SHELL_TRIM | Окно можно развернуть, свернуть и изменить размер |  |
| SWT.MAX | SWT.RESIZE | Окно можно развернуть и изменить размер |  |
| SWT.MIN | SWT.RESIZE | Окно можно свернуть и изменить размер |  |
| SWT.DIALOG_TRIM | Окно имеет фиксированный размер |  |
Окна Shell в интерфейсе могут быть представлены в «развернутом» (maximized), в «свернутом» (minimized) или в «нормальном» (normal) состоянии.
Если реализации Shell будет определено состояние «maximized», то window manager развернет окно так, чтобы оно заняло всю видимую область экрана (display). В развернутом состоянии размер Shell не может быть изменен, даже если оно имеет стиль RESIZE. Если Shell находится в нормальном состоянии, то внешний вид окна контролируется стилями, которые были определены на этапе создания. Размер окна может быть изменен, если окно имеет соответствующий стиль. Если стиль окна «minimized», то интерфейс окна (клиентская область) не виден. В зависимости от window manager окно может быть «свернуто» в иконку или скрыто.
Основные методы Shell
| Метод | Описание |
|---|---|
| void addShellListener(ShellListener listener) | Добавление слушателя в коллекцию слушателей окна, которые вызываются при возникновении соответствующих событий. |
| void close() | Закрытие окна |
| void dispose() | Освобождение сввязанных с окном ресурсов. |
| void open() | Открытие окна и размещение его сверху над остальными на экране, передача фокуса в окно. |
| Rectangle getBounds() | Получение размеров окна в виде параметров четырехугольника. |
| Point getLocation() | Получение точки размещения окна на экране относительно родительского окна или относительно экрана, если родительское окно не определено. |
| boolean getMaximized() | Функция возвращает true, если окно развернуто во весь экран, в противном случае false. |
| Point getMinimumSize() | Функция возвращает минимальный размер окна в виде Point. |
| boolean getModified() | Функция возвращает true, если окно модифицированно, в противном случае false. |
| Point getSize() | Получение размера окна в виде Point. |
| ToolBar getToolBar() | Получение панели инструментов окна. |
| void setMinimumSize(int width, int height) | Процедура определения минимального размера окна согласно значением параметров. |
| void setMinimumSize(Point size) | Процедура определения минимального размера окна согласно значению параметра. |
| void setModified(boolean modified) | Процедура определения измененного состояния окна. |
| void setVisible(boolean visible) | Процедура представления окна видимым, если аргумент true, и невидиммым в проивном случае. |
Слушатель окна ShellListener, ShellAdapter
Слушатель окна ShellListener позволяет перехватить сообщения об активации/деактивации окна, сворачивании/разворачивании окна, закрытии окна. В следующем коде к окну shell поключается слушатель ShellAdapter, включающий соответствующие методы.
Использование ShellListener — это не единственный способ перехватывания соответствующего события. Можно использовать и обычного слушателя Listener. В следующем коде к shell подключается Listener, который перехватывает событие закрытия окна.
Пример слушателя закрытия окна Shell
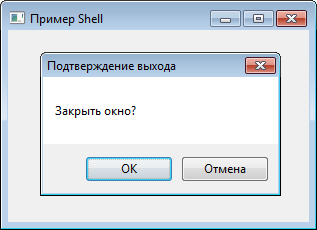
В следующем примере в зависимости от значения adapter к Shell подключается один из слушателей, который перехватывает событие «закрытия окна» и вызывают перезагруженную функцию confirmExit для подтверждения завершения работы. Функция confirmExit открывает модальное диалоговое окно MessageBox в приложении (стиль SWT.APPLICATION_MODAL) с размещением в интерфейсе двух кнопок OK и Cancel.
Интерфейс окна примера слушателя закрытия Shell представлен на следующем скриншоте.
Пример контроля свойства modify окна Shell
В следующем примере выполняется контроль свойства modify окна при его закрытии. Для этого к Shell подключается слушатель, который перехватывает событие закрытия окна и вызывает метод getModified(). Окно изменено, если метод возвращает true.
В интерфейсе окна размещается текстовое поле text, к которому подключается слушатель события изменения SWT.Modify. При внесении изменения в текстовое поле слушатель устанавливает свойству окна modify значение true, которое можно сбросить (false), используя соответствующий пункт меню.
Листинг примера ShellModifiedTest
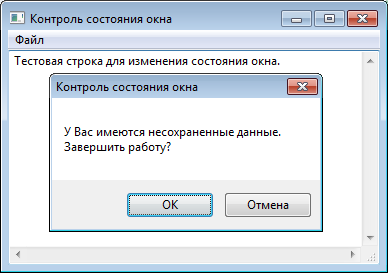
Интерфейс примера контроля состояния окна Shell представлен на следующем скриншоте.
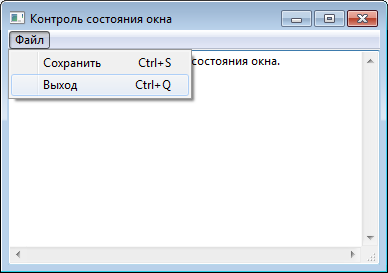
В методе createMenu() создается основное меню «Файл», включающее подпункт «Сохранить», по нажатию на который свойство окна modify сбрасывается. Подробное описание работы с меню библиотеки SWT представлено на странице Menu Popup MenuItem.
Листинг процедуры создания меню
Интерфейс примера контроля состояния окна с раскрытым пунктом меню на следующем скриншоте.
Скачать примеры Shell
Рассмотренные примеры Shell в виде проекта Eclipse, включающего библиотеки SWT для 32- и 64- разрядных Windows, можно скачать здесь (5.76 Мб).
1 Introduction to JShell
The Java Shell tool (JShell) is an interactive tool for learning the Java programming language and prototyping Java code. JShell is a Read-Evaluate-Print Loop (REPL), which evaluates declarations, statements, and expressions as they are entered and immediately shows the results. The tool is run from the command line.
For reference information for this tool, see jshell in Java Platform, Standard Edition Tools Reference .
Why Use JShell?
Using JShell, you can enter program elements one at a time, immediately see the result, and make adjustments as needed.
Java program development typically involves the following process:
Write a complete program.
Compile it and fix any errors.
Run the program.
Figure out what is wrong with it.
Repeat the process.
JShell helps you try out code and easily explore options as you develop your program. You can test individual statements, try out different variations of a method, and experiment with unfamiliar APIs within the JShell session. JShell doesn’t replace an IDE. As you develop your program, paste code into JShell to try it out, and then paste working code from JShell into your program editor or IDE.
Starting and Stopping JShell
JShell is included in JDK 9. To start JShell, enter the jshell command on the command line.
JDK 9 must be installed on your system. If your path doesn’t include java-home /jdk-9/bin , start the tool from within that directory.
The following example shows the command and the response from JShell. Text that you enter is shown in bold:
The examples in this tutorial use the verbose mode. Verbose mode is recommended as you work through this tutorial so that what you see matches the examples. When you are more familiar with the tool, you might prefer to run in normal or a more concise mode.
To start JShell in verbose mode, use the -v option:
Как с помощью Java выполнить Shell-команду
Обзор
В этом руководстве мы рассмотрим два способа выполнения shell -команд из программы на Java . Первый способ – использовать класс Runtime и вызвать его метод exec . Второй (более гибкий способ) – создать экземпляр класса ProcessBuilder .
Зависимость операционной системы
Сначала нужно определить операционную систему, на которой работает наша JVM . В Windows необходимо запустить команду в качестве аргумента оболочки cmd.exe, а в остальных ОС мы будем использовать стандартную оболочку sh:
Ввод и вывод
Также нужно подключиться к входным и выходным потокам нашего процесса. По крайней мере, нужно получить выходные данные, иначе процесс зависнет.
Реализуем класс StreamGobbler, который использует InputStream :
Примечание. Этот класс реализует интерфейс Runnable , а это означает, что он может быть выполнен любым исполнителем.
Runtime.exec()
Метод Runtime.exec() — это простой, но недостаточно гибкий способ создания нового подпроцесса .
В следующем примере мы запросим список пользователей из локальной директории и выведем его в консоли:
ProcessBuilder
Класс ProcessBuilder является более гибким в использовании, чем Runtime. Он позволяет настраивать целый ряд параметров.
- изменить рабочий каталог, в котором работает shell-команда,
- перенаправить потоки ввода и вывода;
- наследовать их в потоках текущего процесса JVM, используя builder.inheritIO().
Заключение
Shell команды в Java можно выполнять двумя различными способами. Но если нужно настроить выполнение созданного процесса, то используйте класс ProcessBuilder .
Программные исходники примеров, приведенных в этой статье, доступны на GitHub .
How to Run a Shell Command in Java
Last modified: January 13, 2020
Get started with Spring 5 and Spring Boot 2, through the Learn Spring course:
If you have a few years of experience in the Java ecosystem, and you’re interested in sharing that experience with the community (and getting paid for your work of course), have a look at the «Write for Us» page. Cheers, Eugen
1. Overview
With this tutorial we’ll illustrate the two ways of executing a shell command from within Java code.
The first is to use the Runtime class and call its exec method.
The second and more customizable way, will be to create and use a ProcessBuilder instance.
2. Operating System Dependency
Before we’re going to create a new Process executing our shell command, we need to first determine the operating system on which our JVM is running.
That’s because, on Windows, we need to run our command as argument to the cmd.exe shell and on all other operating systems we can issue a standard shell, called sh:
3. Input and Output
Furthermore we need a way to hook into the input and output streams of our process.
At least the output must be consumed – otherwise our process doesn’t return successfully, instead it will hang.
Let’s implement a commonly used class called StreamGobbler which consumes an InputStream:
NOTE: This class is implementing the Runnable interface, which means that it could be executed by any Executor.
4. Runtime.exec()
A method-call to Runtime.exec() is a simple, not yet customizable, way to spawn a new sub-process.
In the following example we will request a directory-listing of a users home-directory and printing it to the console:
5. ProcessBuilder
For the second implementation of our computing problem, we’ll be using a ProcessBuilder. This is preferred over the Runtime approach because we’re able to customize some details.
For example we’re able to:
- change the working directory our shell command is running in using builder.directory()
- set-up a custom key-value map as environment using builder.environment()
- redirect input and output streams to custom replacements
- inherit both of them to the streams of the current JVM process using builder.inheritIO()
6. Conclusion
As we’ve seen in this quick tutorial, we can execute a shell command in Java in two distinct ways.
Generally, if you’re planning to customize the execution of the spawned process, for example, to change its working directory, you should consider using a ProcessBuilder.
As always, you’ll find the sources on GitHub.
windows shell for java kiosk application
i have developed a java application in SWT that should be run on a Windows system operating as kiosk. The application should be the only application running in the system and should open just after the system starts. Every thing like task manager, windows start menu, hotkeys etc should be disabled (see for example http://www.codeproject.com/Articles/7392/Lock-Windows-Desktop). The application has also a build in administrator user which can activate all the things again having the possibility to make changes in the system. These things are already implemented. The problem is that when windows starts it lasts some seconds till the application opens and during this short time the user sees everything (nothing is disabled till the application starts). I have searched the internet and the only solution seems to be a replacement of the standard windows shell in registry. Now here comes the question:
Does anyone know how to write a shell for windows that
- enables me to deactivate everything on startup
- lets me put a shortcut to my application in the desktop so the user can open the application
- lets me activate the deactivated functionality for administrator user in my application
Or do you have any other ideas how to accomplish this?
2 Answers 2
Since what i tried to accomplish turned out to be complex and no one has answered till now, i will answer the question myself based on the things i implemented.
For having the possibility to start my application from the desktop(which does not exist since i had to remove it) i tried to implement a sort of taskbar. I implemented a SWT Dialog with jast a menu bar and a shell height of zero
As you see when this applicatioin opens it tries to disable every windows functionality and than starts. In the menu bar of the dialog i put 1 menu with 2 menu items. One for starting my application and one for the administrator. Generated a jar, made an exe out of the jar and based on the link http://technet.microsoft.com/en-us/library/cc939862.aspx i put it in the userinit key.
I used the java generated code from the dll in http://www.codeproject.com/Articles/7392/Lock-Windows-Desktop to disable windows functionality like taskbar, clock, task manager etc and the links http://umang-world.blogspot.de/2012/02/is-it-is-possible-to-disable-windows.html for installing a key hook and http://www.kbdedit.com/manual/low_level_vk_list.html and http://msdn.microsoft.com/en-us/library/windows/desktop/dd375731%28v=vs.85%29.aspx for the virtual key maps. When the user logs in using the administrator item in the menu bar i enable everything again through the same dll and deactivate the hook. Logging out the administrator activates averything again.
- enables me to deactivate everything on startup
- override userinit key in windows registry to deactivate the desktop and make my application start just after windows start without delay
- when taskbar starts (the swt dialog i implemented)
- kill explorer.exe
- use dll to disable windows applications
- install keyhook to disable keyboard keys
- lets me put a shortcut to my application in the desktop so the user can open the application
- menu item in the taskbar
- lets me activate the deactivated functionality for administrator user in my application
- if admin logs in through menu item
- start explorer.exe
- use dll to enable windows applications
- stop keyhook to enable keyboard keys
- if admin logs in through menu item
I hope this can be usefull to others searching for same things. What i explained above is tested on windows xp sp3 and works fine.


