- TCPView v4.0
- Introduction
- Using TCPView
- Using Tcpvcon
- Microsoft TCPView KB Article
- 7 netstat Command Usage on Windows with Example
- Show all connections
- Show only established connection
- Show PID used by port number
- Show statistics of all protocols
- Show routing information
- Show Interface Statistics
- Show Fully Qualified Domain Name of foreign address (remote host)
- Viewing and killing TCP IP connections Windows
- How To View Who Is Connected To Your Shared Folders On Windows
TCPView v4.0
By Mark Russinovich
Published: March 23, 2021
 В Download TCPView (1.4 MB)
Run now from Sysinternals Live.
Introduction
TCPView is a Windows program that will show you detailed listings of all TCP and UDP endpoints on your system, including the local and remote addresses and state of TCP connections. On Windows Server 2008, Vista, and XP, TCPView also reports the name of the process that owns the endpoint. TCPView provides a more informative and conveniently presented subset of the Netstat program that ships with Windows. The TCPView download includes Tcpvcon, a command-line version with the same functionality.
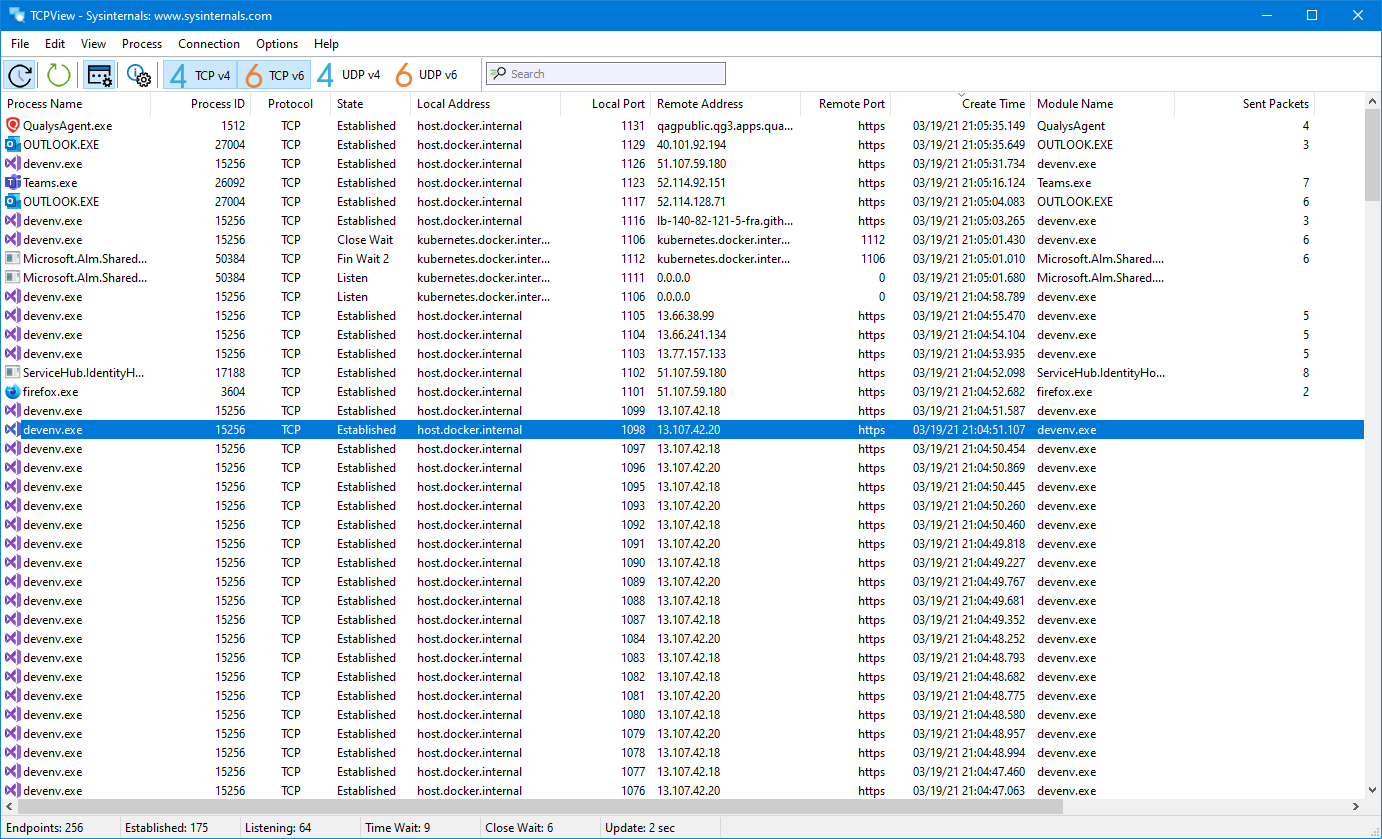
Using TCPView
When you start TCPView it will enumerate all active TCP and UDP endpoints, resolving all IP addresses to their domain name versions. You can use a toolbar button or menu item to toggle the display of resolved names. On Windows XP systems, TCPView shows the name of the process that owns each endpoint.
By default, TCPView updates every second, but you can use the Options|Refresh Rate menu item to change the rate. Endpoints that change state from one update to the next are highlighted in yellow; those that are deleted are shown in red, and new endpoints are shown in green.
You can close established TCP/IP connections (those labeled with a state of ESTABLISHED) by selecting File|Close Connections, or by right-clicking on a connection and choosing Close Connections from the resulting context menu.
You can save TCPView’s output window to a file using the Save menu item.
Using Tcpvcon
Tcpvcon usage is similar to that of the built-in Windows netstat utility:
Usage:
| Parameter | Description |
|---|---|
| -a | Show all endpoints (default is to show established TCP connections). |
| -c | Print output as CSV. |
| -n | Don’t resolve addresses. |
Microsoft TCPView KB Article
This Microsoft KB article references TCPView:
В Download TCPView (1.4 MB)
Run now from Sysinternals Live.
Runs on:
- Client: Windows 8.1 and higher.
- Server: Windows Server 2012 and higher.
—>
7 netstat Command Usage on Windows with Example
![]()
netstat is a command-line network tool that is a handy troubleshooting command. Its cross-platform utility means you can use it on Linux, macOS, or Windows.
netstat can be very handy in the following.
- Display incoming and outgoing network connections
- Display routing tables
- Display number of network interfaces
- Display network protocol statistics
Let’s get it started…
Show all connections
To start with netstat, let’s see the command that displays all connections.
Type the above command and hit enter. You will see all the active connections from different states as shown below.
You will see a header with Proto, Local Address, Foreign Address, and State. Let’s see brief info about them.
- Proto – defined the protocol type (TCP, UDP, etc. ) of the socket.
- Local Address – displays your computer IP address and port, local end of the socket.
- Foreign Address – displays remote computer that your computer is connected to, the remote end of the socket.
- State – defines the state of the socket (LISTENING, ESTABLISHED, CLOSE_WAIT, TIME_WAIT).
We can filter the connections in different ways. Let’s see them.
Show only established connection
We have seen the state in the connection information. You can use below syntax to view all established connections from/to your Windows server.
Note: to view LISTEN, CLOSE_WAIT, TIME_WAIT you can just use as follows.
To see the connections that are in LISTENING state change ESTABLISHED keyword in the previous command to LISTENING. You will get the information about connections that are in the listening state as follows.
Similarly, run the following command to see all the connections that are in CLOSE_WAIT state.
Finally, use the TIME_WAIT flag to get information about all the connections that are in TIME_WAIT state.
Show PID used by port number
Every connection is a process internally. And every process has an ID, and its called PID. We can see the PID of every socket connection using the following command.
The above command displays all the connections with PID. Let’s run the command and see how we get the result.
We got an extra column called PID. And its the process identifier.
A very handy when you have to find out which PID is using the particular port number.
You can see the following info if you use the above command.
Show statistics of all protocols
Useful when you have to find out for any received header error, received address error, discarded packet, etc. It will list out statistics from IPv4, IPv6, ICMPv4, ICMPv6, TCP, UDP, etc.
You will see the statistics of all protocols as shown below.
To find out any errors quickly you can use syntax.
The above command filters all the errors from statistics of all protocols.
Show routing information
To display Route Table, you can use the below syntax. The following syntax will also list all interfaces.
If you use the above command, then you see the info about routing as shown below.
Show Interface Statistics
To view the status of all interface, you can use the following syntax. This will display Received & Sent details.
Show Fully Qualified Domain Name of foreign address (remote host)
If you are tracking some issues and would like to know FQDN of the remote host, then you can use the following syntax.
If you run the above command, then you will see a similar result as follows.
Note: you can combine findstr syntax to show precise results like below.
The above command will filter the connections and displays only established connections. Let’s see an example.
We can filter the connections using the domain with the following command.
Specify the domain in the command and you will see the filtered connections as follows.
I hope this helps you get familiar with netstat command usage on Windows. If you are interested in learning Windows administration then I would suggest checking out this course.
Viewing and killing TCP IP connections Windows
Many time in troubleshooting or needing to view network traffic information or connection information, seeing your TCP/IP connections in Windows can provide valuable insight into problems or issues that may be going on in Windows with connectivity. Also, viewing connection information is a great way to narrow down on possible backdoor traffic to a workstation if malware is suspected. In this guide, we want to look at several tools and utilities to both view connection information as well as kill TCP connections in Windows that may be problematic or malicious.
Windows itself has many really nice tools built-in that will enable you to see TCP and UDP connections right out of the box via the commandline. Especially the later versions of Windows which include Powershell expand these capabilities as well.
Commandline Tools
Powershell
With powershell we have a whole new array of commandlets to peer inside of and control what is going on with Network connections in Windows. There are two commands in general among others that provide really powerful monitoring inside of Powershell and that is the get-nettcpconnection and get-udpendpoint. Take a look at the whole list of new powershell commands for monitoring and controlling TCP activity here: https://technet.microsoft.com/en-us/library/hh826123.aspx
Get-NetTcpConnection – cmdlet gets current TCP connections. Use this cmdlet to view TCP connection properties such as local or remote IP address, local or remote port, and connection state.

Get-NetUDPEndpoint – gets current statistics for a UDP endpoint. The cmdlet returns UDP end point properties, such as local and remote UDP ports. If you do not specify any parameters, the cmdlet gets statistics for all UDP end points.
Netstat
Displays active TCP connections, ports on which the computer is listening, Ethernet statistics, the IP routing table, IPv4 statistics (for the IP, ICMP, TCP, and UDP protocols), and IPv6 statistics (for the IPv6, ICMPv6, TCP over IPv6, and UDP over IPv6 protocols). Used without parameters, netstat displays active TCP connections.
Below the command was issued netstat -ano

With the PID information you see above in the netstat output, you can use this number to correlate with PID information in Task Manager to identify the exact process and kill if need be.
Wkillcx is a small command-line utility to close any TCP connection under Windows XP/Vista/Seven as well as Windows Server 2003/2008. This is a great little commandline program that allows you to kill the remote IP:port connection information without knowing the PID. You simply issue the command, feed the appropriate connection information, it searches for that connection and kills it. Download wkillcx here: https://wkillcx.sourceforge.net/
GUI Tools
Along with the commandline tools included in Windows there are also a couple of really nice GUI tools that allow ones to see TCP activity as well as kill those TCP connections via killing the process that is spawning the TCP connections.
TCPView
TCPView is a Windows SysInternals Tool that is designed to basically show detailed listings of all TCP and UDP endpoints on your system, including the local and remote addresses and state of TCP connections. The download of the utility also includes a commandline version of the tool in tcpvcon. Download TCPView here: https://technet.microsoft.com/en-us/sysinternals/bb897437.aspx

Another really nice feature of TCPView is that you can right-click on any connection entry and then Kill the process that is using it:

Microsoft Message Analyzer 1.0
Microsoft Message Analyzer is a new tool for capturing, displaying, and analyzing protocol messaging traffic and other system messages. This is a relatively new tool that also can import data from the legacy Microsoft Network Protocol Analyzer 3.4.
This is a more full blown protocol analyzer, but can do many of the basic things we are referring too in the above guide. Download the Microsoft Message Analyzer here: https://www.microsoft.com/en-us/download/details.aspx?id=40308
Final Thoughts
Using the tools listed above, one can view network connection information via either the commandline or using GUI tools. This is extremely helpful when you are tracking down a rogue connection or a problematic process that has network hooks.
How To View Who Is Connected To Your Shared Folders On Windows
Have you ever wondered who may be connected to your Windows computer shared folders…right now?
If you have created shares to allow access to folders and files, you can easily view who is connected to each share and what files they have opened.
Knowing who is connected to your computer shared folders can be useful if you are on a public wireless network (hopefully your firewall is blocking access) or even when you are on your home wireless network.
While utilities may exist for viewing folder shares and connections, Windows already has a built-in tool that is simple to use: the Computer Management console.
Since Computer Management console is included in XP and Windows 7 (as well as Vista), and accessing it is the same in either version, the screen shots below are from Windows 7 (unless noted otherwise).
Opening Computer Management Console
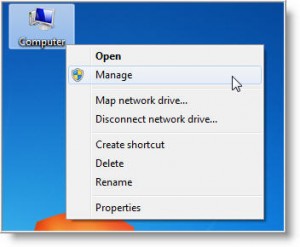
In either Windows XP or Windows 7, if you have the Computer icon on your desktop, just right click on it and select Manage.
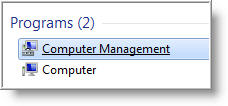
Or in Windows 7 and Vista, you can click on Start and type computer in the search box, and click on the Computer Management link.
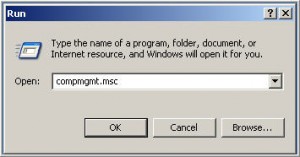
Or in Windows XP, click on Start \ Run and type compmgmt.msc in the run box and click OK.
Once Computer Management opens, expand System Tools \ Shared Folders (click on the small arrows as shown circled in the image below) then click Shares.
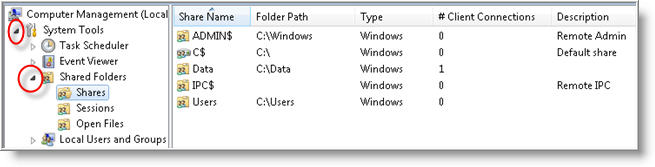
Here you will see all the shares on your Computer and the number of connected users listed in the Client Connections column. As you can see on my computer, one user is connected to the Data share.
Who’s On My Computer?
To view «who» is connected to a share or shares, click on Sessions (from left navigation pane).
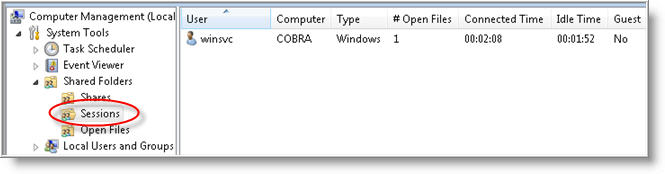
You will then see all the connected users.
In the example shown in the above screen shot, one user is connected, named «winsvc«, his computer name is also displayed (Cobra), along with: the number of files that is open by the user (Open Files column) and how long the user has been connected to the share (Connected Time column).
NOTE: if you want to disconnect the user, just right click on the user name and select Close Session.
To view which files the user is accessing, click on Open Files (from left navigation pane).
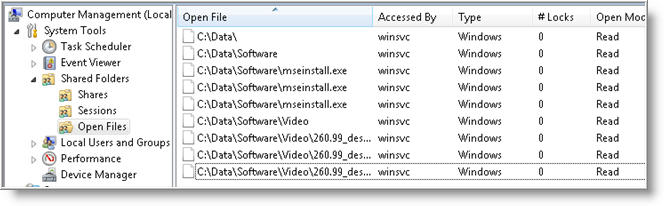
Here you will see a list of files that have been accessed by the user (or users). If the full path to a file is not fully displayed, just mouse over a file to see the path.
NOTE: if you want to close the connection to an open file, just right click on the file and select Close Open File.
Monitoring Connections
As you can see, using the Computer Management console provides a great way to keep tabs with viewing who is access what folders and files on your computer.
It’s also another method that can be used to keep tabs on who is connected to your wireless network or wired network.
To stay up to date with Windows and how to set up shares securely, see these resources at this link.


