- How to Show Hidden Files in Windows 10
- Option 1 – From File Explorer
- Option 2 – From Control Panel
- Option 3 – Via Registry
- You Might Also Like
- Reader Interactions
- Comments
- Did this help? Let us know! Cancel reply
- Primary Sidebar
- Recent Posts
- Who’s Behind Technipages?
- Windows show all hidden devices
- Что такое скрытые сетевые адаптеры?
- Как показать скрытые устройства в Windows
- Как удалить скрытое устройство через реестр Windows
- Hiding Devices from Device Manager
- Hiding Devices from Within a Driver
- Hiding Devices By Using the ACPI BIOS
- Windows show all hidden devices
- Windows 95
- Windows 98
- Windows ME
- Windows NT
- Windows 2000
- Windows XP and Windows 2003
- Windows Vista
- Windows 7
- Windows 8
- Windows 10
- Conclusion
- Users who read this also read:
How to Show Hidden Files in Windows 10
By Mitch Bartlett 10 Comments
By default, Microsoft Windows 10 hides certain files from view when you explore them on your hard drive. This protects important files from being deleted so that the system isn’t damaged. If you’re the geeky type, you’ll want to be able to view all files all the time. Follow these steps to show hidden files.
Option 1 – From File Explorer
- Select the “Start” button, then choose “File Explorer“.

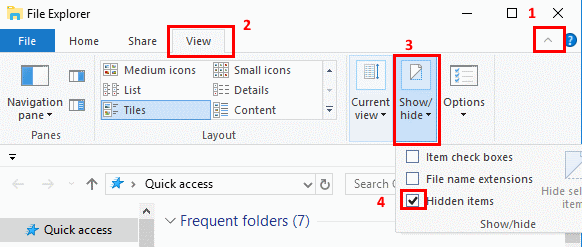
- Make sure the menu bar is expanded. You can toggle the menu bar by selecting the ^ at the upper right portion of the window.
- Select the “View” tab.
- Check the “Hidden items” check box to view hidden items.
- If you need more file viewing options, select “Options” > “View“.

Option 2 – From Control Panel
- Right-click the “Start” button, then select “Control Panel“.
- Go to “Appearance and Personalization“, then select “File Explorer Options“.
- Click the “View” tab.
- Scroll down a bit and change the “Hidden files and folders” setting to “Show hidden files, folders, and drives“. Optionally, you may wish to uncheck the “Hide protected operating system files” box as well.
Option 3 – Via Registry
- Hold the Windows Key and press “R” to bring up the Run dialog box.
- Type “regedit“, then press “Enter“.
- Navigate to the following location:
- HKEY_CURRENT_USER
- Software
- Microsoft
- Windows
- CurrentVersion
- Explorer
- Advanced
- Set the value for “Hidden” to “1” to show hidden files, folders, and drives. Set the value to “2” to not show hidden files, folders, and drives.
- Set the value for “ShowSuperHidden” to “1” to show protected operating system files. Set the value to “2” to not show protected operating system files.
You Might Also Like
Filed Under: Windows Tagged With: Windows 10
Reader Interactions
Comments
Kartik singh says
I have nokia lumia 520.
I want to convert it into android.I want to know that after installing the android. Will my sim card work and data connection.
Jan de Vos says
I have reinstalled the USB driver successfully. Though, Samsung dex did not recognize my device.
Neha Singh says
This one worked. Thanks for the guidance. It really helped me alot.
Ok, I just checked this out… here’s an example where the attrib method (below) will show files when the author’s method will not. To illustrate, configure Explorer to show all files as outlined in this article. Then,
1) Open a 2nd Windows Explore and navigate to C:\Users\\AppData\Roaming\Microsoft\Windows\Recent Items
2) Shift select and delete these files (or move them to a temp location; I think advanced “Disk Cleanup” tool will delete as well).
Also, note that all the advanced “show file” setting made earlier are still intact.
Next open a command prompt in the …\Recent Items folder. To do this:
1) Open a 3rd explorer window and navigate *in the left panel* to C:\Users\\AppData\Roaming\Microsoft\Windows
2) With your mouse over the “Windows” folder *still in the left panel*, hold down Left-Shift + Right Mouse Click to get the advanced context menu, click on “Open command window here”
3) In the …\Roaming\Microsoft\Windows> command prompt, key in: “cd recent”
4) Key in …\recent\> attrib *.*
You should see a bunch of files not shown in explorer.
Charles Davis says
The current version of Win 10 looks and works differently, so this just confused me.
I don`t have CurrentVersion in Windows from HKEY_CURRENT_USER, please help me!
No. Unable to change entry. Received notice “Cannot edit Hidden. Error writing the value’s new contents”.
This saved me so much time! Thank you!
This saved me so much time! Thank you!
Did this help? Let us know! Cancel reply
This site uses Akismet to reduce spam. Learn how your comment data is processed.
Primary Sidebar
Recent Posts
Who’s Behind Technipages?
 My name is Mitch Bartlett. I’ve been working in technology for over 20 years in a wide range of tech jobs from Tech Support to Software Testing. I started this site as a technical guide for myself and it has grown into what I hope is a useful reference for all.
Follow me on Twitter, or visit my personal blog.
Windows show all hidden devices
 Добрый день! Уважаемые читатели и гости одного из популярнейших блогов по системному администрированию Pyatilistnik.org. В прошлый раз мы с вами устранили ошибку на устройстве «Диск защищен от записи» и успешно его отформатировали. Идем далее, иногда, после конвертации P2V, или после пересоздания виртуальных машин, случается ситуация, что драйвера от старых физических NIC все еще присутствуют в виртуальной системе, и физические сетевые карты (NIC) все еще считаются Windows существующими устройствами на машине.
Что такое скрытые сетевые адаптеры?
Проблема заключается в том, что исходные NIC являются скрытыми (hidden), и по умолчанию не видны в оборудовании системы, и вы не можете назначить старый IP адрес новой сетевой карточке, т.к. данный адрес еще используется старой NIC. В таком случае Windows начинает раздражать такими сообщениями об ошибке:
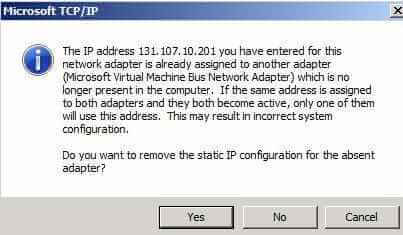
Как в ESXI VMWare удалить невидимые сетевые карты в Windows server 2008 R2 после миграции P2V-01
Или в русском варианте:
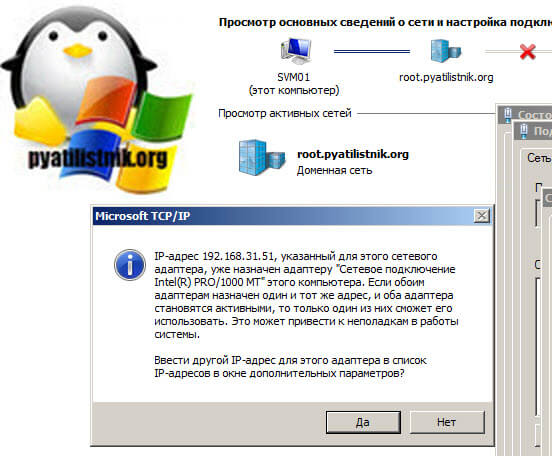
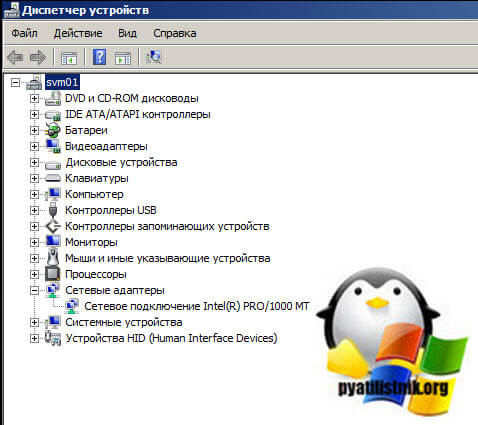
Если зайти в диспетчер устройств (DeviceManager), вы увидите, что ваша новая сетевая карта названа как то так: “Microsoft Virtual Machine Bus Network Adapter #2”, а более никаких NIC в системе не видно. Так где же NIC # 1? На самом деле, она тоже там есть, но она скрыта, и до тех пор, как Windows помнит о старой сетевой карте, вы не сможете назначить новым картам старый IP адрес.
Как показать скрытые устройства в Windows
Чтобы избавиться от старых невидимых NIC, воспользуйтесь следующей процедурой:
- Откройте командную строку.
- Наберите следующую команду и нажмите клавишу ВВОД: set devmgr_show_nonpresent_devices=1
- Наберите еще одну команду: start devmgmt.msc
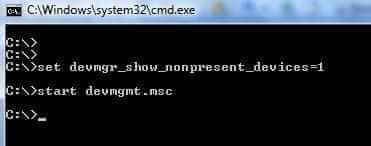
Как в ESXI VMWare удалить невидимые сетевые карты в Windows server 2008 R2 после миграции P2V-02
Убедитесь, что вы набрали devmgmt.msc в том же самом окне командной строки, в котором вы выполнили «set devmgr_show_nonpresent_devices=1″. Причина в том, что команда «Set» работает только для того же самом окружения, в котором выполнялась, и если вы закроете окно эта переменная сбросится. Далее;
-
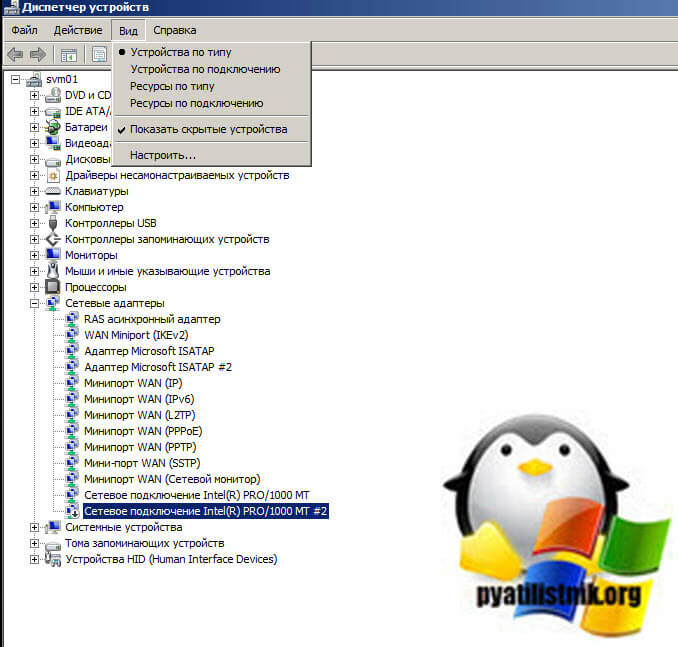
- В диспетчере устройств выберите View > Show hidden devices (Показать скрытые устройства).
- Разверните дерево сетевых адаптеров. Старые физические сетевых карты теперь видны и окрашены в серый цвет.
- Щелкните правой кнопкой по такой сетевой карточке и нажмите Uninstall(Удалить).
Обратите внимание, что если у вас обновленная система или Windows 8.1 и выше, то у вас будет сразу данная кнопка в диспетчере устройств, найти ее можно в меню «Вид — Показать скрытые устройства». Так после ее активации у вас будут отображены и технические интерфейсы, например мини-порты.
Как удалить скрытое устройство через реестр Windows
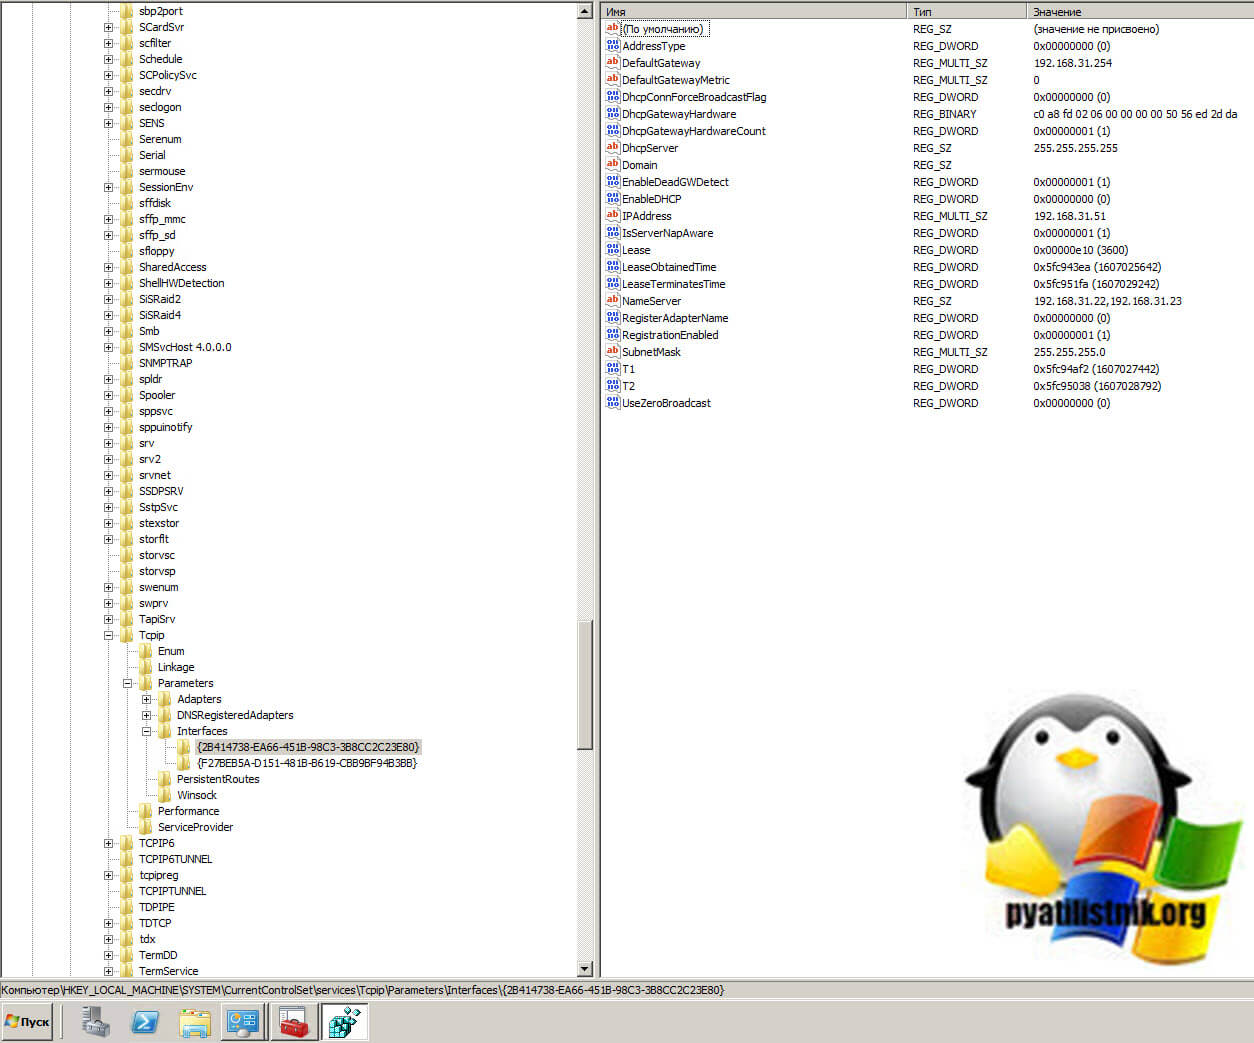
И так, в реестре Windows есть вот такая ветка:
Данная ветка содержит список сетевых интерфейсов с их IP-адресами, мы с вами уже тут бывали, когда решали проблему, из-за которой на виртуальной машине ESXI 6.5 у меня прилетали неправильные сетевые настройки. Тут названия интерфейсов будут в виде GUID, так что для идентификации вы можете соотнести GUID с сетевым интерфейсом, или просто посмотреть на ключи реестра IPAddress, где прописан старый адрес. После чего просто удалите всю ветку с GUID.
После этого вы можете назначить требуемый IP адрес новой виртуальной NIC. Примечание: администраторам Windows Active Directory для простоты управления я рекомендую установить эту переменную глобально с помощью групповых политик, и распространить эту политику на все компьютеры. Для этого создайте новый GPO, которые определяет следующую ветку реестра:
Имя параметра: DEVMGR_SHOW_NONPRESENT_DEVICES
Тип данных: REG_SZ (String Value)
Value Data: (1 = show all hidden devices/ показать все скрытые устройства)
Для применения данной политики понадобится перезагрузка. Мне кажется, что отображение скрытых устройств Windows с помощью групповой политики – это хорошая идея, т.к. проблема с невидимыми устройствами нередка в Windows системах. Скачать готовый фикс можно тут
Hiding Devices from Device Manager
By default, Device Manager shows the state of every device on a computer. In some situations, you might want to prevent certain devices from appearing in Device Manager. For example, a motherboard might have a CardBus controller with a slot that is not user-accessible. Because the user cannot use the slot, you do not want Device Manager to display any information about the device.
To hide a device in Device Manager, you can mark the device as a hidden device. Typically, Device Manager does not display hidden devices. (Note, however, that users can override this setting and display all devices within Device Manager, even hidden ones. For more information about how to override this setting, see Viewing Hidden Devices.)
There are two ways to mark your device as hidden: within the device’s driver or by using the ACPI BIOS.
Hiding Devices from Within a Driver
Drivers have two ways to mark a driver as hidden:
A function driver or function filter driver can ask the operating system to hide a successfully started device by responding to the IRP_MN_QUERY_PNP_DEVICE_STATE IRP. When the IRP arrives, the driver must set the PNP_DEVICE_DONT_DISPLAY_UI bit in IoStatus.Information to TRUE in the driver’s dispatch routine.
On Windows XP and later versions of the Windows operating systems, a bus driver or bus filter driver can hide any device, started or otherwise, by responding to the IRP_MN_QUERY_CAPABILITIES IRP. When the IRP arrives, the driver must set the Parameters.DeviceCapabilities.NoDisplayInUI member to TRUE in the driver’s dispatch routine. In some cases, a bus filter driver might have to set this bit in a completion routine. This extra step is required when the underlying bus driver’s dispatch routine incorrectly clears all capability fields that other drivers set.
Hiding Devices By Using the ACPI BIOS
You can mark a device as hidden in the ACPI BIOS. The BIOS can expose a _STA method for the device. The _STA method returns a bitmask. Bit 2 (mask 0x4) specifies whether Device Manager should make the device visible by default. This bit should be 1 if the device should be made visible and 0 otherwise.
For example, the following code example shows how a USB controller on the root bus would be hidden.
In Microsoft Windows 2000, you can hide only started, working devices. In Windows XP and later versions of Windows, you can also hide broken devices. Bit 3 (mask 0x8) that is returned by the _STA method indicates whether a device is working properly. This bit is 1 if the device is working properly and is 0 otherwise. For example, the following code example shows how a BIOS would indicate a USB controller is broken and should be hidden:
NoteВ В The «decoding» bit (0x2) does not have any relevance for devices that are described through _ADR methods. The previous code examples also work without the decoding bit set. BIOS writers must track the decoding state only for devices that are described through _HID methods.
Windows show all hidden devices
By default Windows hides certain files from being seen with Windows Explorer or My Computer. This is done to protect these files, which are usually system files, from accidentally being modified or deleted by the user. Unfortunately viruses, spyware, and hijackers often hide there files in this way making it hard to find them and then delete them.
By following the steps below for each version of Windows you will be able to change the operating systems behavior so that you can see hidden and protected files. In this way you will be able to delete or replaces files for troubleshooting purposes.
Windows 95
To enable the viewing of Hidden files follow these steps:
- Close all programs so that you are at your desktop.
- Double-click on the My Computer icon.
- Select the View menu and then click Options.
- After the new window appears select the View tab.
- Scroll down until you see the Show all files radio button and select it.
- Press the OK button and close the My Computer window.
- Now your computer is configured to show all hidden files.
Windows 98
To enable the viewing of Hidden files follow these steps:
- Close all programs so that you are at your desktop.
- Double-click on the My Computer icon.
- Select the View menu and then click Folder Options.
- After the new window appears select the View tab.
- Scroll down until you see the Show all files radio button and select it.
- Press the Apply button and then the OK button and close the My Computer window.
- Now your computer is configured to show all hidden files.
Windows ME
To enable the viewing of Hidden files follow these steps:
- Close all programs so that you are at your desktop.
- Double-click on the My Computer icon.
- Select the Tools menu and click Folder Options.
- After the new window appears select the View tab.
- Under the Hidden files and folders section select the radio button labeled Show hidden files and folders.
- Remove the checkmark from the checkbox labeled Hide file extensions for known file types.
- Remove the checkmark from the checkbox labeled Hide protected operating system files.
- Press the Apply button and then the OK button and shutdown My Computer.
- Now your computer is configured to show all hidden files.
Windows NT
To enable the viewing of Hidden files follow these steps:
- Close all programs so that you are at your desktop.
- Double-click on the My Computer icon.
- Select the View menu and then click Options.
- After the new window appears select the View tab.
- Scroll down until you see the Show all files radio button and select it.
- Press the OK button and shutdown My Computer.
- Now your computer is configured to show all hidden files.
Windows 2000
To enable the viewing of Hidden files follow these steps:
- Close all programs so that you are at your desktop.
- Double-click on the My Computer icon.
- Select the Tools menu and click Folder Options.
- After the new window appears select the View tab.
- Under the Hidden files and folders section select the radio button labeled Show hidden files and folders.
- Remove the checkmark from the checkbox labeled Hide file extensions for known file types.
- Remove the checkmark from the checkbox labeled Hide protected operating system files.
- Press the Apply button and then the OK button and shutdown My Computer.
- Now your computer is configured to show all hidden files.
Windows XP and Windows 2003
To enable the viewing of Hidden files follow these steps:
- Close all programs so that you are at your desktop.
- Double-click on the My Computer icon.
- Select the Tools menu and click Folder Options.
- After the new window appears select the View tab.
- Put a checkmark in the checkbox labeled Display the contents of system folders.
- Under the Hidden files and folders section select the radio button labeled Show hidden files and folders.
- Remove the checkmark from the checkbox labeled Hide file extensions for known file types.
- Remove the checkmark from the checkbox labeled Hide protected operating system files.
- Press the Apply button and then the OK button and shutdown My Computer.
- Now your computer is configured to show all hidden files.
Windows Vista
To enable the viewing of Hidden files follow these steps:
- Close all programs so that you are at your desktop.
- Click on the Start button. This is the small round button with the Windows flag in the lower left corner.
- Click on the Control Panel menu option.
- When the control panel opens you can either be in Classic View or Control Panel Home view:
If you are in the Classic View do the following:
- Double-click on the Folder Options icon.
- Click on the View tab.
- Go to step 5.
If you are in the Control Panel Home view do the following:
- Click on the Appearance and Personalization link .
- Click on Show Hidden Files or Folders.
- Go to step 5.
Windows 7
To enable the viewing of Hidden files follow these steps. Please note a guide with images that shows the same steps can be found here: How to show hidden files in Windows 7
- Close all programs so that you are at your desktop.
- Click on the Start button. This is the small round button with the Windows flag in the lower left corner.
- Click on the Control Panel menu option.
- When the control panel opens click on the Appearance and Personalization link.
- Under the Folder Options category, click on Show Hidden Files or Folders.
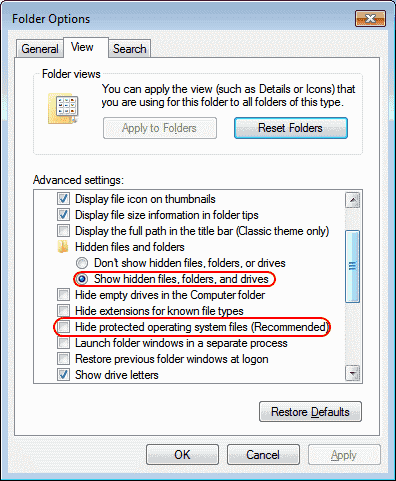
- Under the Hidden files and folders section select the radio button labeled Show hidden files, folders, or drives.
- Remove the checkmark from the checkbox labeled Hide extensions for known file types.
- Remove the checkmark from the checkbox labeled Hide protected operating system files (Recommended).
- Press the Apply button and then the OK button..
- Now Windows 7 is configured to show all hidden files.
Windows 8
To enable the viewing of Hidden files follow these steps. Please note a guide with images that shows the same steps can be found here: How to see hidden files in Windows 8
- From the Windows 8 Start Screen, click on the Control Panel app.
- When the Control Panel opens scroll down to the bottom and click on the More Settings option.
- The traditional Windows 8 Control Panel will now open. When it is open, click on the Appearance and Personalization link.
- Under the Folder Options category, click on Show Hidden Files or Folders.
- Under the Hidden files and folders section select the radio button labeled Show hidden files, folders, or drives.
- Remove the checkmark from the checkbox labeled Hide extensions for known file types.
- Remove the checkmark from the checkbox labeled Hide protected operating system files (Recommended).
- Press the Apply button and then the OK button..
- Now Windows 8 is configured to show all hidden files.
Windows 10
To enable the viewing of Hidden files in Windows 10, please follow these steps:
- From the Windows 10 Start Screen, click on the File Explorer buttonon the task bar.
- When File Explorer opens, click on the View tab and then select Options.
- When the Folder Options screen opens, click on the View tab.
- You will now see various settings you can select.
- Folder Options category, click on Show Hidden Files or Folders.
- Under the Hidden files and folders section select the radio button labeled Show hidden files, folders, or drives.
- Remove the checkmark from the checkbox labeled Hide extensions for known file types.
- Remove the checkmark from the checkbox labeled Hide protected operating system files (Recommended).
- Press the Apply button and then the OK button..
- Now Windows 10 is now configured to show all hidden files.
 on the task bar.
Conclusion
Now that you know how to see all hidden files on your computer, malicious programs such as viruses, spyware, and hijackers will no longer be able to hide their presence from you or people helping you.
Please note that you will now see icons that were not previously visible. One of the most common concerns is that you will see a file called desktop.ini throughout your computer. These are legitimate hidden files and can be ignored.
If you have any questions please feel free to post them in our computer help forums.
Users who read this also read:
How to show hidden files in Windows 7
Windows 7 hides certain files so that they are not able to be seen when you exploring the files on your computer. The files it hides are typically Windows 7 System files that if tampered with could cause problems with the proper operation of the computer. It is possible, though, for a user or piece of software to set make a file hidden by enabling the hidden attribute in a particular file or .
How to remove a Trojan, Virus, Worm, or other Malware
If you use a computer, read the newspaper, or watch the news, you will know about computer viruses or other malware. These are those malicious programs that once they infect your machine will start causing havoc on your computer. What many people do not know is that there are many different types of infections that are categorized in the general category of Malware.

How to start Windows in Safe Mode
Windows Safe Mode is a way of booting up your Windows operating system in order to run administrative and diagnostic tasks on your installation. When you boot into Safe Mode the operating system only loads the bare minimum of software that is required for the operating system to work. This mode of operating is designed to let you troubleshoot and run diagnostics on your computer. Windows Safe Mode .
How to Setup Login Verification in Twitter
To increase security, Twitter offers a feature called Login verification, which is their version of two-step verification. With Login verification enabled on an account, a user will not only need their password to login, but will also require a code sent to your mobile number at the time of the login.
How to see hidden files in Windows 8
Windows 8 hides certain files so that you are not able to view them while exploring the files and folders on your computer. Windows has two types of files that Windows will classify as hidden and hide from the user. The first type are actually hidden files, which are ones that are given the +H attribute or specified as Hidden in a file or folder’s properties. The second type of file are System .


