- How to Change File Type in Windows 10
- Showing file extensions and changing the file format
- Configure Windows 7 to Display File Extensions [How-To]
- How To Display File Extensions In Windows 7
- Show and change file extensions in Windows 10
- How to show file extensions and change file extensions in Windows 10?
- Batch change file extensions in Windows 10
- Формат Format
- Синтаксис Syntax
- Параметры Parameters
- Remarks Remarks
- Примеры Examples
How to Change File Type in Windows 10
With our increasing use of computers in our daily life, it may get necessary even for a simple user to change the file type of a file from one format to another. Each file format has their own properties. For example a ‘.txt’ file will probably get opened by the text editor while an ‘html’ file will get launched in your default browser.
 File format analogy
Even though the contents inside the files might be the same, the file type matters a lot. The process of changing file type is quite simple and straightforward. However, there are some cases whereby changing the file type, the file becomes unusable. Hence it is recommended that you know exactly what you’re doing and also make an additional copy of the file.
Showing file extensions and changing the file format
By default, Windows doesn’t have the file format displayed alongside every file. For example, if a file is a text file, its name wouldn’t display ‘ap puals.txt’. Instead, it will only display ‘appuals’. First, we will enable the file extensions and then through basic rename, we will change the file extension. You can also choose to rename files in bulk if there are a lot of files that you need to change the type for.
- Press Windows + E, click View from the top-most ribbon. Now click Options and select the option Change folder and search options.
 Change folder and search options – Windows Explorer
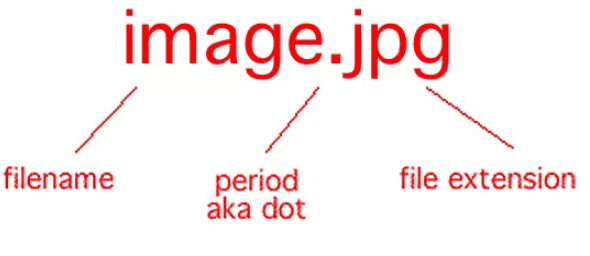
- Now uncheck the option Hide extensions for known file types. Now all the files will have their file extensions displayed alongside their names.
 Enabling File Extensions – Windows Explorer
- Now navigate to the file for which you want to change the file format. Right-click on it and select Rename.
- Now change the file’s extension to the extension of the type which you want to change into. In this example, we change a ‘text’ file to a ‘python’ file. The extensions for a text file are ‘txt’ and for python ‘py’.
 Process of changing a file type
Here is a list of common file extensions used in the world of computing. We have listed them according to their type.
Configure Windows 7 to Display File Extensions [How-To]

 In all versions of Windows including the latest Windows 7, the file extensions are hidden by default. Perhaps it’s because Microsoft did some case study in the past and found that people don’t like being able to see file extensions. Who knows. All I know is, with hidden file extensions, it’s not easy to (A – Find a file at times and (B – Rename files (specifically their extension.) This is why the below Step-by-Step to configure Windows to display file extensions is one of the first things I do on new systems.
How To Display File Extensions In Windows 7
1. Right-Click the Start Orb, and then Click Open Windows Explorer.

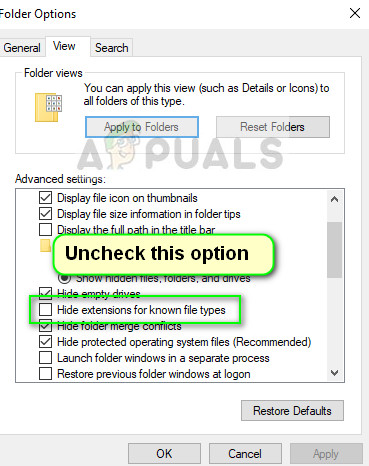
2. In Explorer, Click Organize. Then Click Folder and search options.
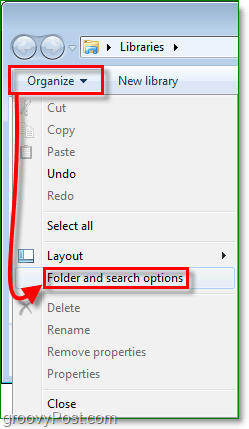
3. In the Folder Options window, Click the View tab. Next Click and Uncheck the Hide extensions for known file types check box. Click OK to finish.
All done!
Instantly your files will show their extensions at the end of their file name. Now you can even use the Right-Click > Rename feature to change file extensions manually as well (just make sure you know what you’re doing first.)
Show and change file extensions in Windows 10
Do you have trouble change file extensions on Windows computer? In an earlier post, we discussed how to convert Samsung voice recording files from 3GA to MP3 format, a couple of readers wrote to us saying “how can you rename a file (the extension) because I can’t see file extensions, I can only rename the ‘normal’ name.” It is true with most Android phones, you can only rename file on mobile but can’t edit file extensions unless you have installed the file explorer, see how to change file extensions on Samsung and Android phones. Today, we will be using Windows 10 in the demo to show you how to display file extensions and change file extension in Windows 10. File extensions of known file types are hidden on Windows 10 PC by default. Only those file types that are not associated with some software installed in your computer display file extensions after file names. This seems to be easier to use for average users. However this could be confusing as well. Many Windows 10 users are confused as file extensions can be found in some files not another. In this guide, we will show you quick ways to turn off “Hide extensions for known file types” feature of File Explorer in Windows 10 so you will not see some files have extensions, other files do not and this allows you to change file extensions in Windows 10.
How to show file extensions and change file extensions in Windows 10?
In order to edit file extensions in Windows 10, you need to change the File Explorer settings to display file extensions first. Open File Explorer in Windows 10 or any folder on your computer hard drive, then switch to the View tab in upper menu to view ribbon menu. Click to check the box before File name extensions option to enable file extension display in Windows 10. Now you can see those hidden file extensions in Windows explorer, including those common file types and file extensions like .exe, .doc, .docx, .xlsx, .jpg, .png, .mp3, mp4, .wmv, etc. 
To show file extensions in Windows 10, you can also click the Options button as shown in the upper right corner, then disable the “Hide extensions for known file types” in windows 10 from File Explorer Options as shown below.

Now you can go to change a file name extension within Windows File Explorer. Simply double click a file name then edit file extensions as you like on Windows 10 PC. Alternatively you can right click on the file you like to edit, then choose Rename from the context menu on right click to start changing file extension for the selected file in Windows 10.
Batch change file extensions in Windows 10
Have you ever wanted to change a group of files file extensions in Windows 10? For example, you want to change 100 audio files with .amr extension to .mp3. You do not have to change file extensions one by one. You can make use of the Windows Command Prompt to batch change file extensions on Windows 10 PC.
Firstly create a new folder on your computer. For example, we can create a folder named ‘test’ on hard drive D. Put all those .amr files to this new folder. Then open the Command Prompt in Windows 10. You can right click on the Windows logo at the bottom-left corner of the screen, then choose Command Prompt to open Command Prompt in Windows 10 or simply type CMD in the search box at the bottom-left corner to find and open Command Prompt in Windows 10.

Secondly we need to change path to the created folder in Command Prompt. By default it opens the user folder. Type “d:” without the quotes and press Enter to change to another disk. Type “cd test” and hit Enter to change the current working directory to the “test” folder where all the files you want to change file extensions are saved.
Finally type “ren *.* *.xxx” and hit Enter to change all files’ extension to .xxx. For example, if you want to change them to mp3 files, use the command “ren *.* *.mp3”.
Windows 10 has been released for some time. We have found many new features in this latest Windows OS such as the Edge browser, new Start menu, etc. We also noticed some features have been removed, such as the DVD playback support, now you need to manually download a free DVD Player for Windows 10.
Update May 2018: this article was originally published in Sep 2015 and has since been updated. in this update, we added the new method to batch change file extensions for multiple files in Windows 10.
Формат Format
Область применения: Windows 10, Windows Server 2016 Applies to: Windows 10, Windows Server 2016
Форматирует диск для приема файлов Windows. Formats a disk to accept Windows files. Для форматирования жесткого диска необходимо быть членом группы администраторов. You must be a member of the Administrators group to format a hard drive.
В консоли восстановления можно также использовать команду Format с различными параметрами. You can also use the format command, with different parameters, from the Recovery Console. Дополнительные сведения о консоли восстановления см. в разделе Среда восстановления Windows (Windows RE). For more information about the recovery console, see Windows Recovery Environment (Windows RE).
Синтаксис Syntax
Параметры Parameters
| Параметр Parameter | Описание Description |
|---|---|
| Указывает точку подключения, имя тома или букву диска (с последующим двоеточием) диска, который требуется отформатировать. Specifies the mount point, volume name, or drive letter (followed by a colon) of the drive that you want to format. Если не указать ни один из следующих параметров командной строки, команда Format использует тип тома для определения формата диска по умолчанию. If you do not specify any of the following command-line options, format uses the volume type to determine the default format for the disk. | |
/FS: | Указывает тип файловой системы (FAT, FAT32, NTFS). Specifies the type of file system (FAT, FAT32, NTFS). | |
| /v: /v: | Задает метку тома. Specifies the volume label. Если опустить параметр командной строки /v или использовать его без указания метки тома, будет предложено ввести метку тома после завершения форматирования. If you omit the /v command-line option or use it without specifying a volume label, format prompts you for the volume label after the formatting is complete. Введите параметр с синтаксисом /v:, чтобы запрос на ввод метки тома не появлялся. Use the syntax /v: to prevent the prompt for a volume label. Если вы форматируете несколько дисков одной командой format, всем дискам будет присвоена одинаковая метка тома. If you use a single format command to format more than one disk, all of the disks will be given the same volume label. |
| / /a: | Указывает размер единицы размещения для томов FAT, FAT32 или NTFS. Specifies the allocation unit size to use on FAT, FAT32, or NTFS volumes. Если не указать унитсизе, он будет выбран в зависимости от размера тома. If you don’t specify unitsize, it’s chosen based on volume size. Для общего использования настоятельно рекомендуется применять параметры по умолчанию. Default settings are strongly recommended for general use. В следующем списке представлены допустимые значения для NTFS, FAT и FAT32 унитсизе: The following list presents valid values for NTFS, FAT, and FAT32 unitsize:
Файловые системы FAT и FAT32 также поддерживают значения 128 KБ и 256 KБ для секторов размером больше 512 байт. FAT and FAT32 also support 128K and 256K for a sector size greater than 512 bytes. |
| /q /q | Выполняет быстрое форматирование. Performs a quick format. Удаляет файловую таблицу и корневой каталог ранее отформатированного тома, но не выполняет посекторную проверку на наличие плохих областей. Deletes the file table and the root directory of a previously formatted volume, but does not perform a sector-by-sector scan for bad areas. Параметр командной строки /q следует использовать для форматирования только ранее отформатированных томов, о которых известно, что они имеют хорошее состояние. You should use the /q command-line option to format only previously formatted volumes that you know are in good condition. Обратите внимание, что /q переопределяет /p. Note that /q overrides /p. |
| ключа /f: | Задает размер форматируемого гибкого диска. Specifies the size of the floppy disk to format. По возможности используйте этот параметр командной строки вместо параметров командной строки /t и /n . When possible, use this command-line option instead of the /t and /n command-line options. В Windows допустимыми являются следующие значения размера: Windows accepts the following values for size:
|
/t:| Задает количество дорожек на диске. Specifies the number of tracks on the disk. По возможности используйте параметр командной строки /f . When possible, use the /f command-line option instead. Параметр /t должен использоваться только вместе с параметром /n. If you use the /t option, you must also use the /n option. Эти параметры применяются совместно в качестве альтернативного способа указания размера форматируемого диска. These options together provide an alternative method of specifying the size of the disk that is being formatted. Этот параметр не работает с параметром /f. This option is not valid with the /f option. | |
| параметра /n: | Указывает количество секторов на дорожке. По возможности используйте параметр командной строки /f вместо /n. Specifies the number of sectors per track. When possible, use the /f command-line option instead of /n. Параметр /n должен использоваться только вместе с параметром /t. If you use /n, you must also use /t. Эти параметры применяются совместно в качестве альтернативного способа указания размера форматируемого диска. These two options together provide an alternative method of specifying the size of the disk that is being formatted. Этот параметр не работает с параметром /f. This option is not valid with the /f option. |
| /p |
Remarks Remarks
Команда Format создает новый корневой каталог и файловую систему для диска. The format command creates a new root directory and file system for the disk. Кроме того, он может проверить наличие поврежденных областей на диске и удалить все данные на диске. It can also check for bad areas on the disk, and it can delete all data on the disk. Чтобы иметь возможность использовать новый диск, необходимо сначала использовать эту команду для форматирования диска. To be able to use a new disk, you must first use this command to format the disk.
После форматирования дискеты в формате отображается следующее сообщение: After formatting a floppy disk, format displays the following message:
Volume label (11 characters, ENTER for none)?
Чтобы добавить метку тома, введите до 11 символов (включая пробелы). To add a volume label, type up to 11 characters (including spaces). Если вы не хотите добавлять метку тома на диск, нажмите клавишу ВВОД. If you do not want to add a volume label to the disk, press ENTER.
При использовании команды Format для форматирования жесткого диска выводится предупреждение следующего вида: When you use the format command to format a hard disk, a warning message similar to the following displays:
Чтобы отформатировать жесткий диск, нажмите клавишу Y; Если вы не хотите форматировать диск, нажмите клавишу N. To format the hard disk, press Y; if you do not want to format the disk, press N.
Файловые системы FAT ограничивают количество кластеров не более 65526. FAT file systems restrict the number of clusters to no more than 65526. Файловые системы FAT32 ограничивают количество кластеров между 65527 и 4177917. FAT32 file systems restrict the number of clusters to between 65527 and 4177917.
Сжатие томов NTFS не поддерживается для кластеров размером более 4 МБ. NTFS compression is not supported for allocation unit sizes above 4096.
Параметр Format немедленно останавливает обработку, если он определяет, что предыдущие требования не могут быть выполнены с использованием указанного размера кластера. Format will immediately stop processing if it determines that the previous requirements can’t be met using the specified cluster size.
После завершения форматирования в поле Формат отображаются сообщения, отображающие общее место на диске, пробелы, отмеченные как неисправные, и место, доступное для файлов. When formatting is complete, format displays messages that show the total disk space, the spaces marked as defective, and the space available for your files.
Ускорить процесс форматирования можно с помощью параметра командной строки /q . You can speed up the formatting process by using the /q command-line option. Используйте этот параметр, только если на жестком диске нет поврежденных секторов. Use this option only if there are no bad sectors on your hard disk.
Не следует использовать команду Format на диске, подготовленном с помощью команды subst . You shouldn’t use the format command on a drive that was prepared by using the subst command. Вы не можете отформатировать диски по сети. You can’t format disks over a network.
В следующей таблице перечислены коды завершения и краткое описание каждого из них. The following table lists each exit code and a brief description of its meaning.
| Код выхода Exit code | Описание Description |
|---|---|
| 0 0 | Форматирование выполнено успешно. The format operation was successful. |
| 1 1 | Заданы недопустимые параметры. Incorrect parameters were supplied. |
| 4 4 | Произошла неустранимая ошибка (любая ошибка, отличная от 0, 1 или 5). A fatal error occurred (which is any error other than 0, 1, or 5). |
| 5 5 | Пользователь нажал N в ответ на запрос «продолжить форматирование (Y/N)?» The user pressed N in response to the prompt «Proceed with Format (Y/N)?» чтобы завершить процесс. to stop the process. |
Коды завершения можно проверить с помощью переменной среды errorlevel в пакетной команде if. You can check these exit codes by using the ERRORLEVEL environment variable with the if batch command.
Примеры Examples
Чтобы отформатировать новый гибкий диск в дисководе A с использованием размера по умолчанию, введите следующую команду. To format a new floppy disk in drive A using the default size, type:
Для быстрого форматирования ранее отформатированного гибкого диска в дисководе A введите следующую команду. To perform a quick format operation on a previously formatted floppy disk in drive A, type:
Чтобы отформатировать гибкий диск в дисководе а и назначить ему данные метки тома, введите: To format a floppy disk in drive A and assign it the volume label DATA, type:


