- How to Show Hidden Files in Windows 10
- Option 1 – From File Explorer
- Option 2 – From Control Panel
- Option 3 – Via Registry
- You Might Also Like
- Reader Interactions
- Comments
- Did this help? Let us know! Cancel reply
- Primary Sidebar
- Recent Posts
- Who’s Behind Technipages?
- How to show Hidden Files and Folders in Windows 10
- Show Hidden Files & Folders
- Unhide Protected operating system files
- How to Show Hidden Files and Folders in Windows 10
- 2 ways to show hidden files and folders in Windows 10:
- Windows show hidden files and folder
- How to show hidden files in Windows 7
- Users who read this also read:
How to Show Hidden Files in Windows 10
By Mitch Bartlett 10 Comments
By default, Microsoft Windows 10 hides certain files from view when you explore them on your hard drive. This protects important files from being deleted so that the system isn’t damaged. If you’re the geeky type, you’ll want to be able to view all files all the time. Follow these steps to show hidden files.
Option 1 – From File Explorer
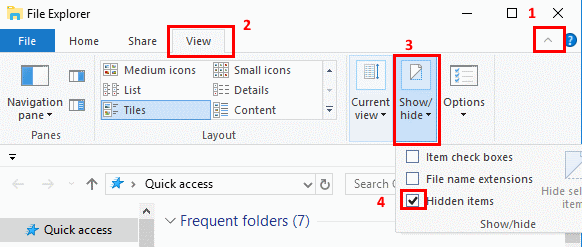
- Select the “Start” button, then choose “File Explorer“.

- Make sure the menu bar is expanded. You can toggle the menu bar by selecting the ^ at the upper right portion of the window.
- Select the “View” tab.
- Check the “Hidden items” check box to view hidden items.
- If you need more file viewing options, select “Options” > “View“.

Option 2 – From Control Panel
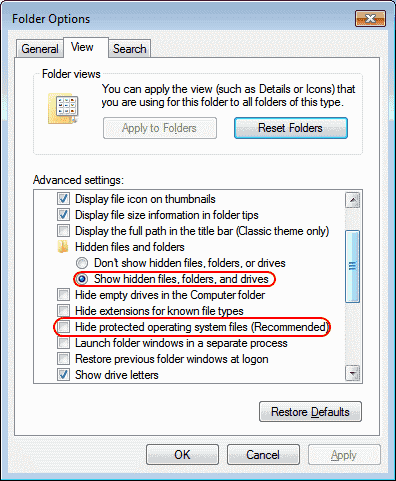
- Right-click the “Start” button, then select “Control Panel“.
- Go to “Appearance and Personalization“, then select “File Explorer Options“.
- Click the “View” tab.
- Scroll down a bit and change the “Hidden files and folders” setting to “Show hidden files, folders, and drives“. Optionally, you may wish to uncheck the “Hide protected operating system files” box as well.
Option 3 – Via Registry
- Hold the Windows Key and press “R” to bring up the Run dialog box.
- Type “regedit“, then press “Enter“.
- Navigate to the following location:
- HKEY_CURRENT_USER
- Software
- Microsoft
- Windows
- CurrentVersion
- Explorer
- Advanced
- Set the value for “Hidden” to “1” to show hidden files, folders, and drives. Set the value to “2” to not show hidden files, folders, and drives.
- Set the value for “ShowSuperHidden” to “1” to show protected operating system files. Set the value to “2” to not show protected operating system files.
You Might Also Like
Filed Under: Windows Tagged With: Windows 10
Reader Interactions
Comments
Kartik singh says
I have nokia lumia 520.
I want to convert it into android.I want to know that after installing the android. Will my sim card work and data connection.
Jan de Vos says
I have reinstalled the USB driver successfully. Though, Samsung dex did not recognize my device.
Neha Singh says
This one worked. Thanks for the guidance. It really helped me alot.
Ok, I just checked this out… here’s an example where the attrib method (below) will show files when the author’s method will not. To illustrate, configure Explorer to show all files as outlined in this article. Then,
1) Open a 2nd Windows Explore and navigate to C:\Users\\AppData\Roaming\Microsoft\Windows\Recent Items
2) Shift select and delete these files (or move them to a temp location; I think advanced “Disk Cleanup” tool will delete as well).
Also, note that all the advanced “show file” setting made earlier are still intact.
Next open a command prompt in the …\Recent Items folder. To do this:
1) Open a 3rd explorer window and navigate *in the left panel* to C:\Users\\AppData\Roaming\Microsoft\Windows
2) With your mouse over the “Windows” folder *still in the left panel*, hold down Left-Shift + Right Mouse Click to get the advanced context menu, click on “Open command window here”
3) In the …\Roaming\Microsoft\Windows> command prompt, key in: “cd recent”
4) Key in …\recent\> attrib *.*
You should see a bunch of files not shown in explorer.
Charles Davis says
The current version of Win 10 looks and works differently, so this just confused me.
I don`t have CurrentVersion in Windows from HKEY_CURRENT_USER, please help me!
No. Unable to change entry. Received notice “Cannot edit Hidden. Error writing the value’s new contents”.
This saved me so much time! Thank you!
This saved me so much time! Thank you!
Did this help? Let us know! Cancel reply
This site uses Akismet to reduce spam. Learn how your comment data is processed.
Primary Sidebar
Recent Posts
Who’s Behind Technipages?
 My name is Mitch Bartlett. I’ve been working in technology for over 20 years in a wide range of tech jobs from Tech Support to Software Testing. I started this site as a technical guide for myself and it has grown into what I hope is a useful reference for all.
Follow me on Twitter, or visit my personal blog.
How to show Hidden Files and Folders in Windows 10
In this post, we will see how to show Hidden Files, Folders & Drives along with Protected operating system files in Windows 10/8/7, via File Explorer Options in the Control Panel.
Show Hidden Files & Folders
To do this, you will have to open the Control Panel and then select the File Explorer Options. File Explorer Options is referred to as Folder Options in Windows 8.1/7.
To show Hidden Files, Folders & Drives on your Windows 10 computer:
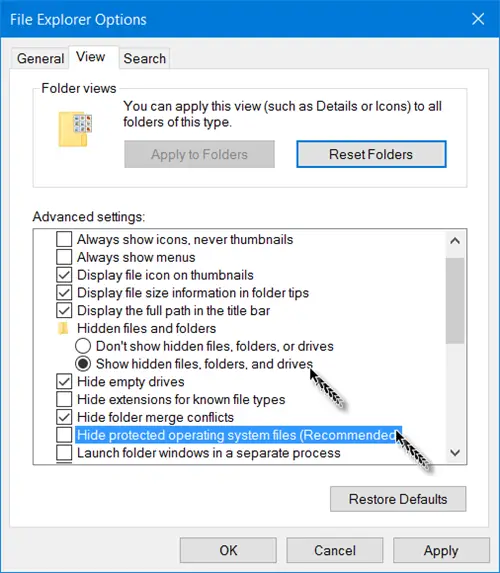
- Open File Explorer Options
- Click on the View tab
- Under Hidden Files & Folders, select the Show Hidden Files, Folders and Drives option
- Click on Apply and Exit.
Unhide Protected operating system files
If you wish to unhide and show the Protected operating system files, you need to uncheck the Hide protected operating system files (Recommended) setting, and click Apply.
Alternatively, you can also open Explorer, select the View tab and toggle the Hidden items checkbox to short or hide files and folders.
For your information, you can also access the Change folder and search options box from here.
There is another way! You can use attrib.exe to change File Attributes, and/or show the hidden files.
This post will show you how to make a File or Folder Hidden or Read Only. If you wish to, you can also list all the hidden files & folders on your Windows computer.
BONUS TIP: If you find that the Show Hidden Files, Folders and Drives option is missing, then this registry tweak is sure to help you. Alternatively, you could use our freeware FixWin to fix this problem. You will find the fix under its Explorer section.
How to Show Hidden Files and Folders in Windows 10
To show the files and folders automatically hidden in your Windows 10 computer, you can use one of the two methods introduced in this text.
Video guide on how to show hidden files and folders in Windows 10:
2 ways to show hidden files and folders in Windows 10:
Way 1: Show hidden files and folders in the View menu.
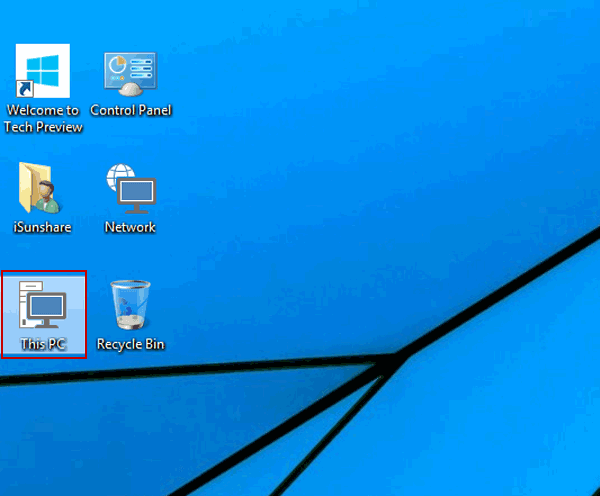
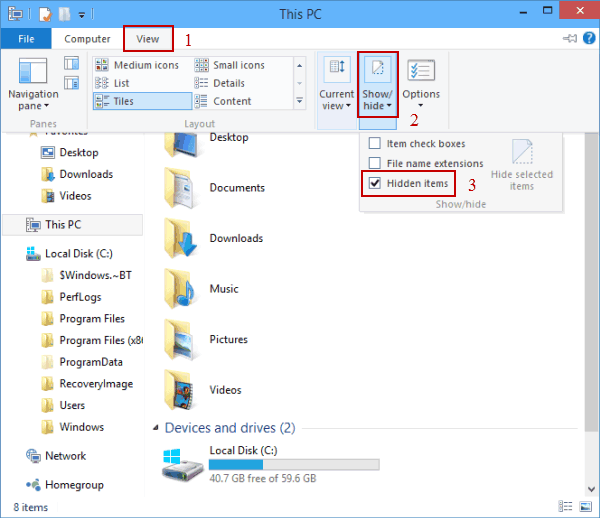
Step 1: Open This PC.
Double-click This PC on the desktop to open it.
Tips:
1. If you have no idea how to add This PC to the desktop, please refer to How to Add Desktop Icons on Windows 10.
2. You can also open another folder such as Network, File Explorer, Recycle Bin, etc.
Step 2: Show the hidden files and folders in the View menu.
Click View, tap Show/hide in the menu, and check the small box before Hidden items in the sub-list.
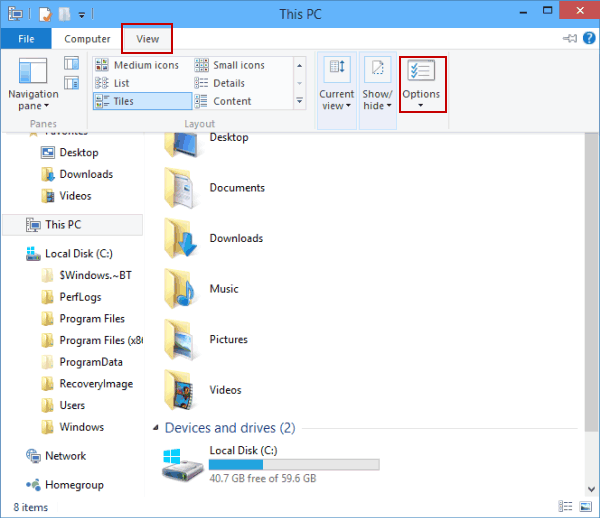
Way 2: Show hidden files and folders in the Folder Options.
Open This PC, click View and select Options.
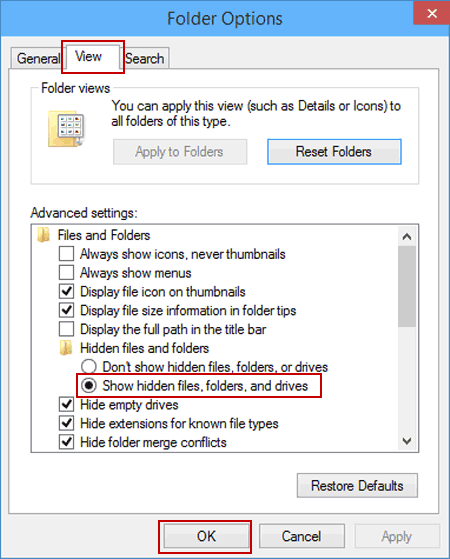
Step 2: Show the hidden files and folders in the View settings.
In the Folder Options window, choose View, select Show hidden files, folders, and drives, and then click OK.
Now, go ahead to put them into practice, and you can show the hidden files and folders on your PC.
Windows show hidden files and folder
- Home
- Tutorials & Tech Support Guides
- Windows 7 Tutorials
- How to show hidden files in Windows 7
How to show hidden files in Windows 7
Lawrence Abrams
- February 1, 2009
- Read 3,680,266 times
Windows 7 hides certain files so that they are not able to be seen when you exploring the files on your computer. The files it hides are typically Windows 7 System files that if tampered with could cause problems with the proper operation of the computer. It is possible, though, for a user or piece of software to set make a file hidden by enabling the hidden attribute in a particular file or folder’s properties. Due to this it can be beneficial at times to be able to see any hidden files that may be on your computer. This tutorial will explain how to show all hidden files in Windows 7.
To enable the viewing of hidden and protected system files in Windows 7 please follow these steps:
- Close all programs so that you are at your desktop.
- Click on the Start button. This is the small round button ( ) in the lower left corner of your screen that has a Windows flag on it.
- Click on the Control Panel menu option.
- When the control panel opens you will see a screen similar to Figure 1 below.
Now click on the Show hidden files and folders option as shown by the red arrow in Figure 2 above.
Once this is done, your Folder Options screen should look similar to the following image.
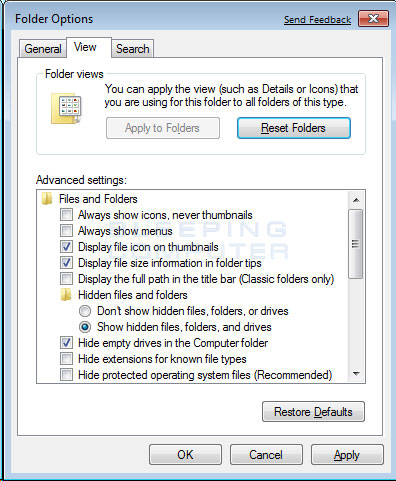
Figure 3. Folder Options screen
You will now be at your desktop and Windows 7 will be configured to show all hidden files.
If you have any questions about this tutorial please feel free to post them in our Windows 7 forums.
Users who read this also read:
How to see hidden files in Windows
By default Windows hides certain files from being seen with Windows Explorer or My Computer. This is done to protect these files, which are usually system files, from accidentally being modified or deleted by the user. Unfortunately viruses, spyware, and hijackers often hide there files in this way making it hard to find them and then delete them.
How to remove a Trojan, Virus, Worm, or other Malware
If you use a computer, read the newspaper, or watch the news, you will know about computer viruses or other malware. These are those malicious programs that once they infect your machine will start causing havoc on your computer. What many people do not know is that there are many different types of infections that are categorized in the general category of Malware.
How to see hidden files in Windows 8
Windows 8 hides certain files so that you are not able to view them while exploring the files and folders on your computer. Windows has two types of files that Windows will classify as hidden and hide from the user. The first type are actually hidden files, which are ones that are given the +H attribute or specified as Hidden in a file or folder’s properties. The second type of file are System .

How to create a new user account in Windows 7 and Windows Vista
Windows 7 allows you to have multiple users sharing the same computer under their own individual accounts. This allows each individual user to have their own location on the computer where they can store their personal documents, pictures, videos, saved games, and other personal data. This also allows the owner of the computer to assign certain accounts the ability to perform administrative tasks .

How to start Windows in Safe Mode
Windows Safe Mode is a way of booting up your Windows operating system in order to run administrative and diagnostic tasks on your installation. When you boot into Safe Mode the operating system only loads the bare minimum of software that is required for the operating system to work. This mode of operating is designed to let you troubleshoot and run diagnostics on your computer. Windows Safe Mode .


