- Screen sizes and breakpoints
- Breakpoints
- Why are TVs considered «small»?
- Effective pixels and scale factor
- Change the size of a picture, shape, text box, or WordArt
- See Also
- Resize manually
- Resize to an exact height and width
- Resize to an exact proportion
- See Also
- Quickly resize a picture, shape, WordArt, or other object
Screen sizes and breakpoints
Windows apps can run on any device running Windows, which includes phones, tablets, desktops, TVs, and more. With a huge number of device targets and screen sizes across the WindowsВ 10 ecosystem, rather than optimizing your UI for each device, we recommended designing for a few key width categories (also called «breakpoints»):
- Small (smaller than 640px)
- Medium (641px to 1007px)
- Large (1008px and larger)
When designing for specific breakpoints, design for the amount of screen space available to your app (the app’s window), not the screen size. When the app is running full-screen, the app window is the same size as the screen, but when the app is not full-screen, the window is smaller than the screen.
Breakpoints
This table describes the different size classes and breakpoints.

| Size class | Breakpoints | Typical screen size (diagonal) | Devices | Window sizes |
|---|---|---|---|---|
| Small | 640px or less | 4″ to 6″; 20″ to 65″ | Phones, TVs | 320×569, 360×640, 480×854 |
| Medium | 641px to 1007px | 7″ to 12″ | Phablets, tablets | 960×540 |
| Large | 1008px or greater | 13″ and larger | PCs, laptops, Surface Hubs | 1024×640, 1366×768, 1920×1080 |
Why are TVs considered «small»?
While most TVs are physically quite large (40 to 65 inches is common) and have high resolutions (HD or 4k), designing for a 1080P TV that you view from 10 feet away is different from designing for a 1080p monitor sitting a foot away on your desk. When you account for distance, the TV’s 1080 pixels are more like a 540-pixel monitor that’s much closer.
UWP’s effective pixel system automatically takes viewing distance in account for you. When you specify a size for a control or a breakpoint range, you’re actually using «effective» pixels. For example, if you create responsive code for 1080 pixels and higher, a 1080 monitor will use that code, but a 1080p TV will not—because although a 1080p TV has 1080 physical pixels, it only has 540 effective pixels. Which makes designing for a TV similar to designing for a phone.
Effective pixels and scale factor
UWP apps automatically scale your UI to guarantee that your app will be legible on all Windows 10 devices. Windows automatically scales for each display based on its DPI (dots-per-inch) and the viewing distance of the device. Users can override the default value and by going to Settings > Display > Scale and layout settings page.
Change the size of a picture, shape, text box, or WordArt
You can easily resize pictures, text boxes, shapes, and WordArt in your Office file. You can also remove unwanted portions of a picture by cropping it.
If you want to stretch, shrink, or just change the size of a picture (or shape), use the sizing handles or for more precise control, the Size options on the Picture Tools Format tab or the Drawing Tools Format tab.
Microsoft 365 subscribers who have a touch screen may use a finger or a digital stylus to grab a sizing handle.
Click the dropdown control below for more details.
Click the picture, shape, WordArt, or other object (such as a chart) that you want to resize.
To increase or decrease the size in one or more directions, drag a sizing handle away from or toward the center, while doing one of the following:
To keep the center in the same place, press and hold Ctrl while you drag the sizing handle.
To maintain the proportions, press and hold Shift while you drag the sizing handle.
To both maintain the proportions and keep the center in the same place, press and hold both Ctrl and Shift while you drag the sizing handle.
Note: Resizing a WordArt object in this way only resizes the box the WordArt is in. The actual WordArt text behaves just like any other text. If you want to resize it simply select the text you want to resize and change the font size on the Home tab of the ribbon.
Click to select the picture, shape, WordArt, or other object that you want to precisely resize.
To resize multiple objects at the same time, press and hold Ctrl while selecting each object.
Depending on the type of object you’ve selected, do one of the following:
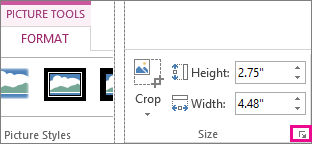
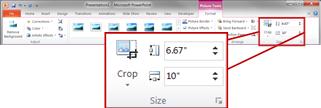
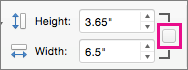
To resize a picture, on the Picture Tools Format tab, in the Size group, enter the new measurements into the Height and Width boxes.
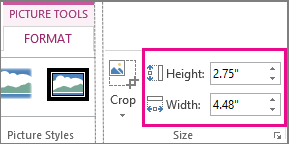
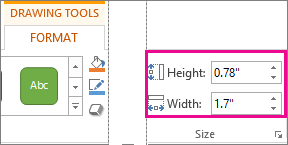
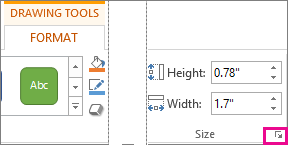
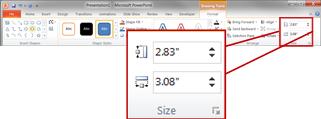
To resize a shape or other object, on the Drawing Tools Format tab, in the Size group, enter the measurements you want into the Height and Width boxes.
Note: If your screen size is smaller, you might need to click the down arrow in the Size group to see the Height and Width boxes.
If you’re not able to change the height and width independently, you’ll need to unlock the aspect ratio:
Click the dialog box launcher  in the bottom right corner of the Size group.
In the format pane or dialog box that appears, clear the Lock aspect ratio check box.
Click the picture, shape, WordArt, or other object that you want to resize.
To resize multiple objects at the same time, press and hold Ctrl while selecting each object.
Do one of the following:
To resize a picture, on the Picture Tools Format tab, in the Size group, click the dialog box launcher .
To resize a shape or other object, on the Drawing Tools Format tab, in the Size group, click the dialog box launcher .
If your screen size is smaller, you might need to click the down arrow in the Size group to see the dialog box launcher.
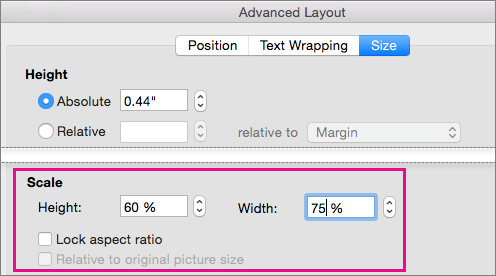
In the format pane or dialog box that appears, do one of the following:
To maintain the original proportion, select the Lock aspect ration check box and enter a Scale percentage for Height or Width.
To resize to a different proportion, clear the Lock aspect ratio check box and enter Scale percentages for Height and Width.
See Also
Resizing stretches or shrinks the dimensions of an object.
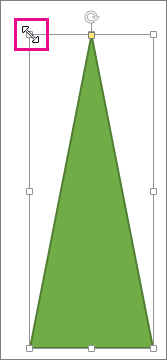
Resize manually
Click the picture, shape, text box, or WordArt that you want to resize.
To increase or decrease the size in one or more directions, drag a sizing handle away from or toward the center, while doing one of the following:
To keep the center of an object in the same place, press and hold CTRL while you drag the sizing handle.
To maintain the object’s proportions, press and hold SHIFT while you drag the sizing handle.
To both maintain the object’s proportions and keep its center in the same place, press and hold both CTRL and SHIFT while you drag the sizing handle.
Resize to an exact height and width
Click the picture, shape, text box, or WordArt that you want to resize.
Do one of the following:
To resize a picture, under Picture Tools, on the Format tab, in the Size group, enter the measurements that you want into the Height and Width boxes.
Note: If you do not see the Picture Tools and Format tabs, make sure that you selected a picture. You might have to double-click the picture to open the Format tab.
To resize a shape, text box, or WordArt, under Drawing Tools, on the Format tab, in the Size group, enter the measurements that you want into the Height and Width boxes.
Note: If you do not see the Drawing Tools and Format tabs, make sure that you selected a picture, shape, text box, or WordArt. You might have to double-click the picture to open the Format tab.
In the Size group, click the Size and Position dialog box launcher .
On the Size tab, under Size and rotate, clear the Lock aspect ratio check box.
Resize to an exact proportion
Click the picture, shape, text box, or WordArt that you want to resize.
Do one of the following:
To resize a picture, under Picture Tools, on the Format tab, in the Size group, click the Size and Position dialog box launcher .
Note: If you do not see the Picture Tools and Format tabs, make sure that you selected a picture. You might have to double-click the picture to open the Format tab.
To resize a shape, text box, or WordArt, under Drawing Tools, on the Format tab, in the Size group, click the Size and Position dialog box launcher .
Note: If you do not see the Drawing Tools and Format tabs, make sure that you selected a picture, shape, text box, or WordArt.
On the Size tab, under Scale, enter the percentages of the current height and width that you want to resize to, in the Height and Width boxes.
Clear the Lock aspect ratio check box.
Tip: To apply the same height and width to different objects, select all objects that you want to have the same dimensions, and then in Size group, enter the dimensions that you want in the Height and Width boxes. To select multiple objects, click the first object, and the press and hold CTRL while you click the other objects.
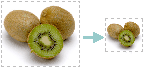
Warning: You cannot return a picture to its original size if you previously cropped and saved it, or if you selected the following options from the Compression Settings dialog box (to open the Compression Settings dialog box, under Picture Tools, on the Format tab, in the Adjust group, click Compress Pictures, and then click Options): the Delete cropped areas of pictures check box, and either Print (220 ppi): excellent quality on most printers and screens or Screen (150 ppi): good for Web pages and projectors.
Select the picture that you want to return to its original size.
Under Picture Tools, on the Format tab, in the Size group, click the Size and Position dialog box launcher .
Note: If you do not see the Picture Tools and Format tabs, make sure that you selected a picture. You might have to double-click the picture to open the Format tab.
In the Format Picture dialog box, click the Size tab, under Original size, clear the Lock aspect ratio check box, and then click Reset.
When you modify an image with the Graphics Interchange Format (.gif), Joint Photographic Experts Group File Interchange Format (.jpg), or Portable Network Graphics (PNG) file format, you can save the original version of the edited picture.
Right-click the edited picture, and then click Save as Picture on the shortcut menu.
In the Save As Picture dialog box, click the arrow next to Save, and then click Save Original Picture.
See Also
If you want to stretch, shrink, or just change the size of a picture (or shape), use the sizing handles. For more precise control, you can use the Size options on the Format tab.
Quickly resize a picture, shape, WordArt, or other object
Click the picture, shape, or WordArt you want to resize.
To increase or decrease the size in one or more directions, drag a sizing handle away from or toward the center, while doing one of the following:
To keep the object’s center in the same place, press and hold the OPTION key while you drag the sizing handle.
To maintain an object’s proportions while resizing it, press and hold the SHIFT key while you drag a corner sizing handle.
Click the picture, shape, or WordArt you want to precisely resize.
Click the Picture Format or Shape Format tab, and then make sure the Lock aspect ratio check box is cleared.
Do one of the following:
To resize a picture, on the Picture Format tab, enter the measurements you want in the Height and Width boxes.

To resize a shape or WordArt, on the Shape Format tab, enter the measurements you want in the Height and Width boxes.

Click the picture, shape, or WordArt you want to resize.
Do one of the following:
To resize a picture, click the Picture Format tab, click Position > More Layout Options.

To resize a shape or WordArt, on the Shape Format tab, click Position > More Layout Options.
Click the Size tab, and under Scale, make sure the Lock aspect ratio check box is clear.
Enter percentages you want for Height and Width.
Click OK when finished.
Tip: To apply the same height and width to different objects, select all objects you want to have the same dimensions, and then enter the dimensions in the Height and Width boxes. To select multiple objects, click the first object, and then press and hold SHIFT while you click the other objects.
If you want to stretch, shrink, or just change the size of a picture (or shape), use the sizing handles. On a touch screen, you may use a finger or a digital stylus to grab a handle.
For more precise control, if you have a desktop version of Excel or PowerPoint, you can use the Size options on the Picture Tools Format tab or the Drawing Tools Format tab.
Click the dropdown control below for more details.
Click the picture, shape, WordArt, or other object (such as a chart) that you want to resize.
To increase or decrease the size in one or more directions, drag a sizing handle away from or toward the center, while doing one of the following:
To keep the center in the same place, press and hold Ctrl while you drag the sizing handle.
To maintain the proportions, press and hold Shift while you drag the sizing handle.
To both maintain the proportions and keep the center in the same place, press and hold both Ctrl and Shift while you drag the sizing handle.
Note: Resizing a WordArt object in this way only resizes the box the WordArt is in. The actual WordArt text behaves just like any other text. If you want to resize it simply select the text you want to resize and change the font size on the Home tab of the ribbon.
For this procedure, you must have a desktop version of Excel or PowerPoint.
Click the picture, shape, WordArt, or other object that you want to precisely resize.
To resize multiple objects at the same time, press and hold Ctrl while selecting each object.
Depending on the type of object you’ve selected, do one of the following:
To resize a picture, on the Picture Tools Format tab, in the Size group, enter the new measurements into the Height and Width boxes.
To resize a shape or other object, on the Drawing Tools Format tab, in the Size group, enter the measurements you want into the Height and Width boxes.
Note: If your screen size is smaller, you might need to click the down arrow in the Size group to see the Height and Width boxes.
If you’re not able to change the height and width independently, you’ll need to unlock the aspect ratio:
Click the dialog box launcher in the bottom right corner of the Size group.
In the format pane or dialog box that appears, clear the Lock aspect ratio check box.
For this procedure, you must have a desktop version of Excel or PowerPoint.
Click the picture, shape, WordArt, or other object that you want to precisely resize.
To resize multiple objects at the same time, press and hold Ctrl while selecting each object.
Do one of the following:
To resize a picture, on the Picture Tools Format tab, in the Size group, click the dialog box launcher .
To resize a shape or other object, on the Drawing Tools Format tab, in the Size group, click the dialog box launcher .
If your screen size is smaller, you might need to click the down arrow in the Size group to see the dialog box launcher.
In the format pane or dialog box that appears, do one of the following:
To maintain the original proportion, select the Lock aspect ration check box and enter a Scale percentage for Height or Width.
To resize to a different proportion, clear the Lock aspect ratio check box and enter Scale percentages for Height and Width.


