- IT Blogtorials
- Pages
- Sunday, February 17, 2013
- Understanding TCP Window Size / Window Scaling
- Low resolution problems in Windows 10 [BEST METHODS]
- How can I solve low resolution problems in Windows 10?
- 1. Update your display driver
- 2. Change the registry values
- 3. Roll back your driver
- 4. Set DPI size
- 5. Update monitor drivers
IT Blogtorials
Where blogs and tutorials intersect >>>
Pages
Sunday, February 17, 2013
Understanding TCP Window Size / Window Scaling
The easiest way to understand TCP Window size is to observe two people having a conversation. Every so often, the talker will wait for the listener to acknowledge that they have heard everything up to that point. Once the listener acknowledges then the talker begins to talk again. The amount of words spoken before waiting for an acknowledgement from the listener is much like the TCP window size. The official definition of the window size is «the amount of octets that can be transmitted without receiving an acknowledgement from the other side».
Let’s assume that the receiver window size is 16,384 bytes which means that the sender can send up to 16,384 bytes before stopping to wait for an acknowledgement. Let’s also assume that the maximum segment size is 1024. This means that the sender can send 1024 bytes 16 times before it will stop sending and wait for an acknowledgement. For the sake of simplicity, I will not discuss TCP slow start (Rapid Increase/Multiplicative Decrease), congestion avoidance, congestion window and congestion control etc. As a side note keep in mind that the sender rate is controlled by the min(congestion window, receive window).

So what is the optimum window size that two hosts should agree on? Well there are different school of thoughts, but let’s look at one example where the window size is 2 x BDP. What the heck is BDP you ask? BDP is short for bandwidth-delay product. Here is how to calculate BDP. Bandwidth times one-way latency.
For example take two hosts connected with 20 Mbps of bandwidth and using PING/ICMP we conclude that the one-way latency is 20 ms. First let’s convert 20 Mbps into bytes which turns out to be 2,621,440 bytes. Take 2,621,440 x .02 equals to approximately 52,428. So 2 x 52,428 = 104,856 bytes, therefore the optimum window size for 2 hosts with 20 Mbps of bandwidth with a 20 ms one-way latency is 104,856 bytes. That is the sender can send 104,856 bytes of data before the sender must wait for an acknowledgement from the receiver. The reason we are doing 2 x the BDP is because the sender does not have to wait the time it takes for the ACK from the receiver (that he got the first 52428 bytes of data) to come back to the sender. Instead of the sender sitting IDLE for the ACK to come back, the sender can use the ACK travel time (20 ms) to actually send another 52,428 bytes of data.
One problem, the TCP RFC states that the window size is a 16 bit field which means that the largest window size that can be advertised is 65,536 or 2 ^ 16 or 1111 1111 1111 1111 (16 bits). And as we saw earlier, it is optimum to use 104,856 for the window size. So how do we accomplish this? This is where window scaling comes into play. It is a TCP option that is sent with the initial TCP 3 way handshake and both sides MUST agree to use this option or else window scaling will not be used. Window scaling basically bitwise shifts the window size. So let’s take a look at a wireshark packet capture to further explain this. Note that window scale option/shift count will be only be sent/negotiated in the initial 3 way handshake (SYN, SYN-ACK,ACK).

Flags 0x002 (SYN) — Initial SYN Packet sent by the sender.
Window size value: 8192 or 0010 0000 0000 0000 (16 bits).
Window scale Shift count: 8 — bit-wise shift window size by 8 to the left.
Window multiplier: 256 or 2 ^ shift count which is 2 ^ 8 in this case.
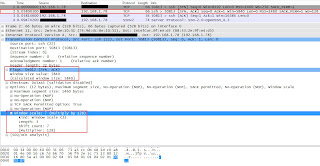
Flags 0x012 (SYN,ACK) — SYN, ACK packet sent by the receiver acknowledging the initial SYN packet.
Window size value: 5840 or 0001 0110 1101 0000 (16 bits).
Window scale Shift count: 7 — bit-wise shift window size by 7 to the left.
Window multiplier: 128 or 2 ^ shift count which is 2 ^ 7 in this case.
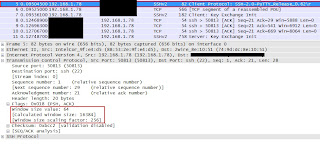
Now we are inspecting a packet farther down the conversation. This is a packet sent by 192.168.1.78 who notified the other end to use a shift count of 8.
Window size value: 64 or 0000 0000 0100 0000 (16 bits)
Window size scaling factor: 256 or 2 ^ 8 (as advertised by the 1st packet)
Although the window size states 64, the actual window size is 16,384 (64 * 256) meaning that the other side can send 16,384 bytes of data before stopping to wait for an acknowledgement.
As the conversation between the two hosts continue, the window size can be narrowed or widen using the widow size by specifying the window size value in the 16 bit field however the window size scaling factor must/will remains the same. For example if the sender wants to make the window size 104,856 the window size would be set as 410 in the 16 bit option field.
410 or 0000 0001 1001 1010 (16 bits) and since it will be shifted 8 to the left, the actual window size will be 104,960 or 0000 0000 0000 0001 1001 1010 0000 0000 (32 bits).
The maximum number of the shift count is 14 per RFC 1323 which means that the maximum window size can be 1 gigabyte. That is ONE BIG window size!!
Many more articles to come so stay tuned.
Please subscribe/comment/+1 if you like my posts as it keeps me motivated to write more and spread the knowledge.
Low resolution problems in Windows 10 [BEST METHODS]

Windows 10 is now the most popular version of Windows with millions of users worldwide, and since Windows 10 is free upgrade from Windows 7 or Windows 8, it’s no wonder that so many people are using it.
However, problems can occur with with your Windows 10, and today we’re going to tell you how to fix low resolution problems in Windows 10.
- Windows 10 low resolution programs – It’s possible that you screen resolution gets low only when using certain programs.
- Windows 10 low resolution games – If your screen resolution gets low during playing games, check out our article dedicated to this issue.
- Windows 10 update changed my display – Some updates can actually disrupt your system, instead of improving it. Changing your resolution is just one of the possible problems.
- Stuck at Windows resolution – Another common problem is when you can’t change the resolution in the Settings app.
How can I solve low resolution problems in Windows 10?
Users have reported that they are limited to low resolutions in Windows 10 and this is an issue because Universal apps won’t run on low resolutions, but there are few workarounds that can help you deal with this issue.
1. Update your display driver
Common cause for low resolution is the lack of proper display driver, and in order to fix this you need to update your graphic driver. To do so, you need to visit your graphic card manufacturer’s website and download the latest drivers for your graphic card.
Just make sure that you find the latest drivers optimised for Windows 10. If no Windows 10 drivers are available you can download Windows 8 or even Windows 7 drivers.
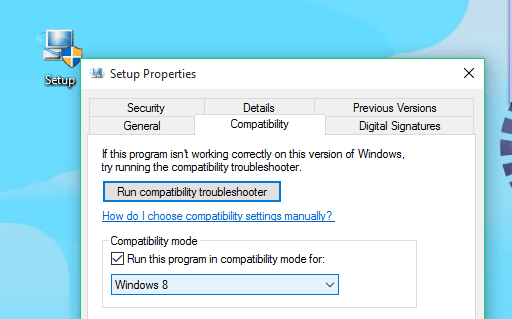
If you download drivers for older version of Windows, try installing them in Compatibility mode by following these steps:
- Right click the setup file and select Properties.
- Go to the Compatibility tab.
- Check the Run this program in compatibility mode for and select Windows 8 or Windows 7 from the list.

- Click Apply then OK.
- Run the installation.
All your drivers need to be updated, but doing it manually is very annoying, so we recommend you to download this driver updater tool (100% safe and tested by us) to do it automatically.
Update drivers automtically
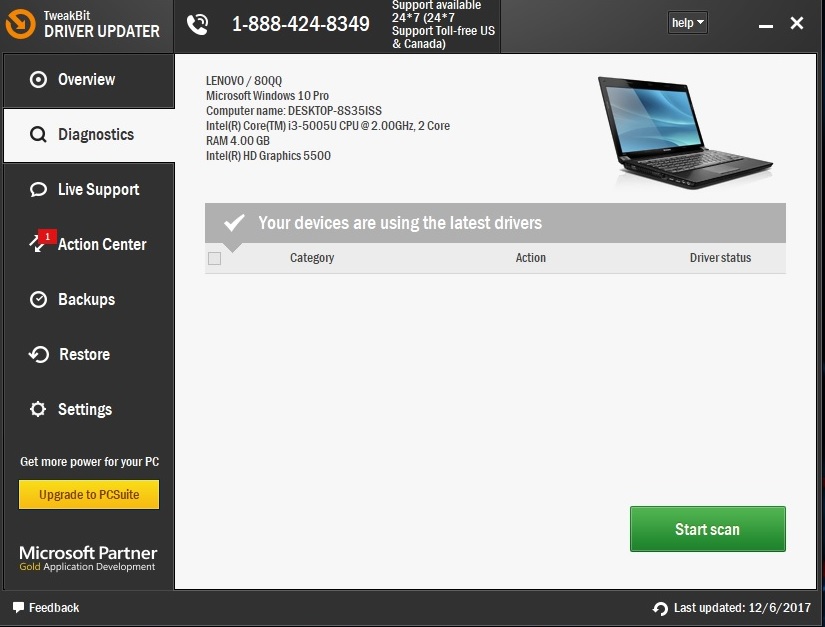
If you don’t want the hassle of updating drivers manually, we strongly suggest to do it automatically by using Tweakbit’s Driver Updater tool. This tool is approved by Microsoft and Norton Antivirus.
After several tests, our team concluded that this is the best automatized solution. Below you can find a quick guide how to do it:
- Download and install TweakBit Driver Updater.
- Once installed, the program will start scanning your PC for outdated drivers automatically. Driver Updater will check your installed driver versions against its cloud database of the latest versions and recommend proper updates. All you need to do is wait for the scan to complete.
- Upon scan completion, you get a report on all problem drivers found on your PC. Review the list and see if you want to update each driver individually or all at once. To update one driver at a time, click the ‘Update driver’ link next to the driver name. Or simply click the ‘Update all’ button at the bottom to automatically install all recommended updates.

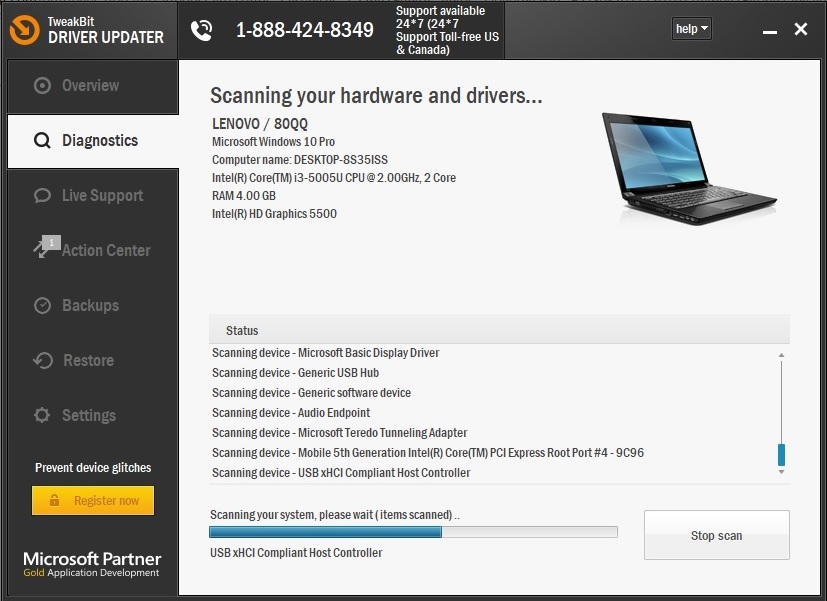
Note: Some drivers need to be installed in multiple steps so you will have to hit the ‘Update’ button several times until all of its components are installed.
2. Change the registry values
Installing latest display drivers will most likely solve the problem with low resolution in not just Windows 10, but every version of Windows.
But, if you still can’t set the higher resolution, you can try with performing one registry tweak. Here’s exactly what you need to do:
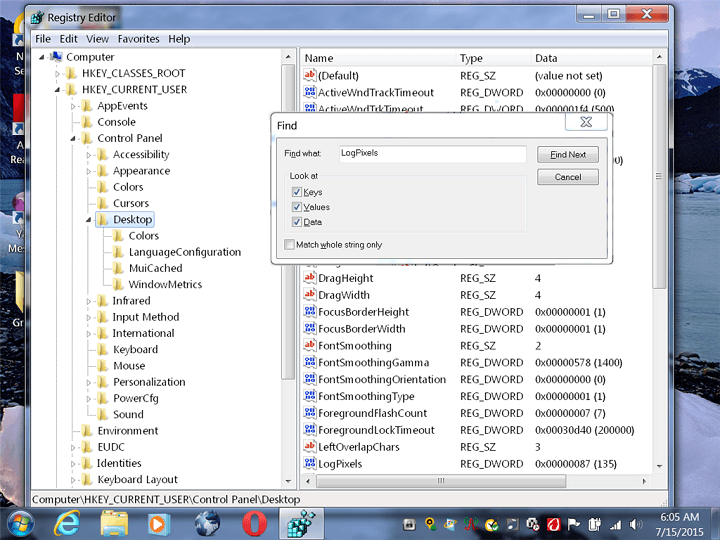
- Run Registry Editor by typing regedit in the Search box and selecting Registry Editor from the list of results.
- When Registry Editor opens you’ll need to search for a specific value, and you can do so by pressing Ctrl +F.
In the Find window enter display1_downscaling_supported. - Double click Display1_DownScalingSupported key and change its Value Data to 1 and click OK to save the changes.
Next you need to press F3 to search again. Now repeat the step 4 and 5 for all Display1_DownScalingSupported keys that you find. - After you’ve changed all Display1_DownScalingSupported you can restart your computer.
If you can’t find Display1_DownScalingSupported in Registry Editor try this:
- Open Registry Editor and search for LogPixels key. You can search it by Pressing Ctrl+F, or you can navigate to:
- HKEY_CURRENT_USER\Control Panel\Desktop
- HKEY_CURRENT_USER\Control Panel\Desktop
- Find LogPixels and double click it.
- Set its value to 87. Depending on your screen size, you might need a lower value.
If you can’t edit your Windows 10’s registry, read this handy guide and find the quickest solutions to the issue.
3. Roll back your driver
Paradoxically to the first solution, it may actually be your new graphics driver that causes the problem. So, if you recently installed a new update, there’s a good chance that very update causes the low resolution problem.
So, we’re going to roll back the freshly updated driver to its previous version:
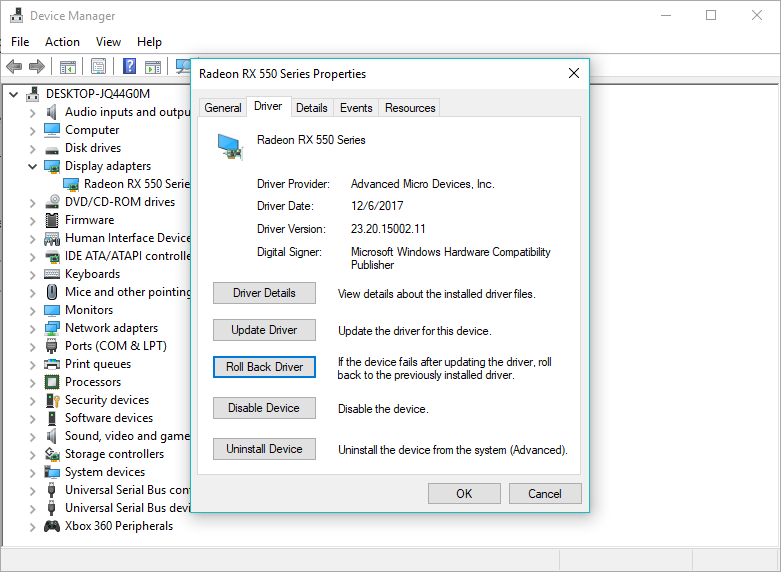
- Go to Search, type devicemngr, and open Device Manager.
- Find your graphics card under Display Adapters, right-click it and go to Properties.
- Head over to the Driver tab.
- Click Roll back driver.
- Follow further on-screen instructions.
- Restart your computer.
If the rollback is successful and the problem disappears, you’ll have to prevent Windows to automatically update this driver in the future. To do so, follow the simple steps from this dedicated article.
4. Set DPI size
There’s a chance your screen resolution isn’t at all low. You just got the wrong DPI size settings. DPI size determines the size of icons on your desktop and other elements. If it’s wrong, your resolution may feel low.
Here’s how to set DPI size in Windows 10:
- Go to Settings > System > Display
- Now, go to custom scaling, and you’ll see a screen like this:
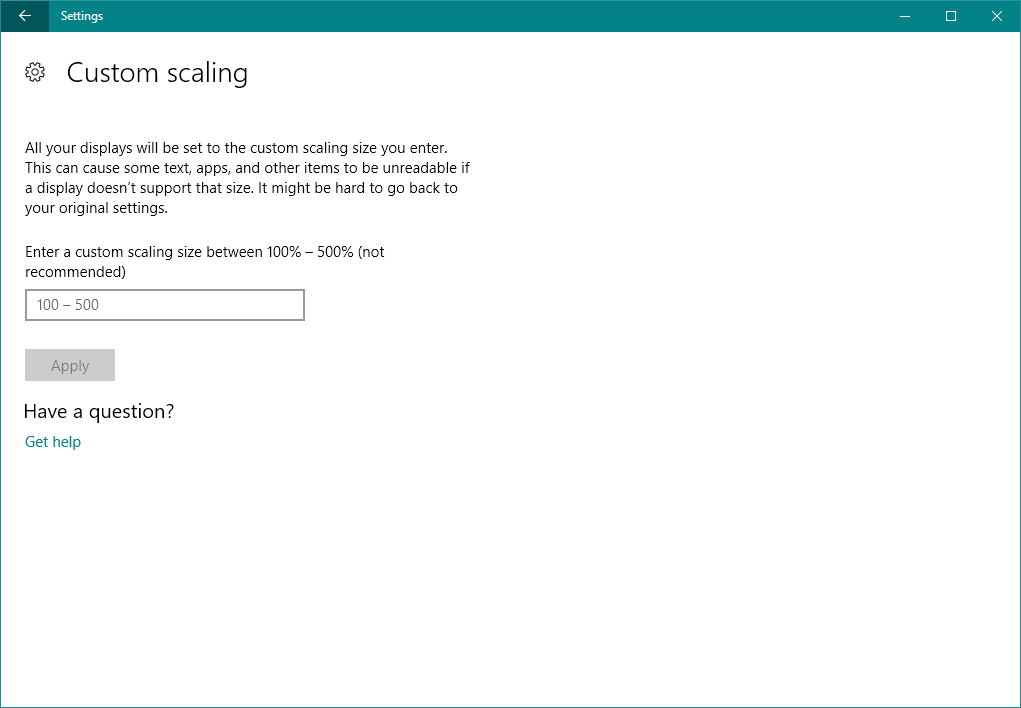
Now, choose one of these three options and save the changes:
- Smaller – 100% = 96 DPI (Pixels/Dots Per Inch)
- Medium – 125% = 120 DPI (Pixels/Dots Per Inch)
- Larger – 150% = 144 DPI (Pixels/Dots Per Inch)
Once you’ve chosen the right DPI size, just restart your computer, and you should be good.
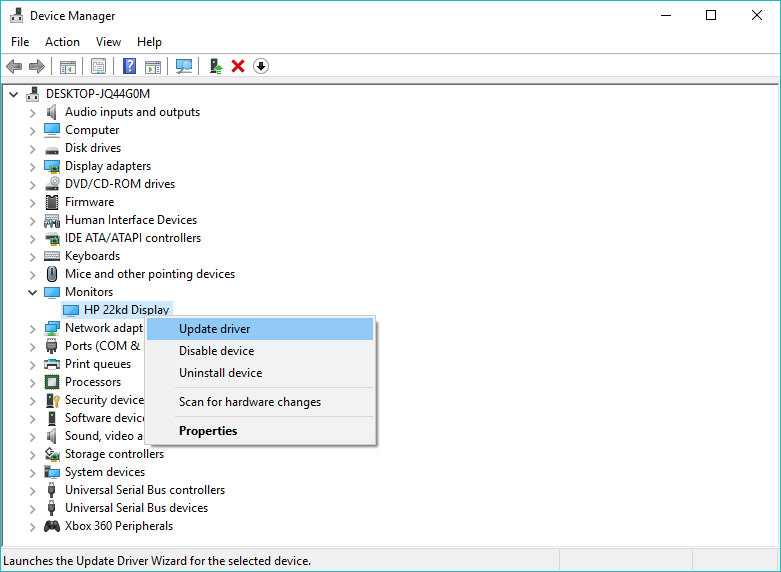
5. Update monitor drivers
Maybe there’s nothing wrong with your grahpics card. And it’s your monitor that actually causes the problem. To check if this is the case, we’re going to update the monitor drivers:
- Go to Search, type devicemngr, and open Device Manager.
- Expand Monitors.
- Right-click your monitor, and go to Update driver.
- Let your computer find new drivers for your monitor.
- If there are any new drivers available, let the wizard install them.
- Restart your computer.
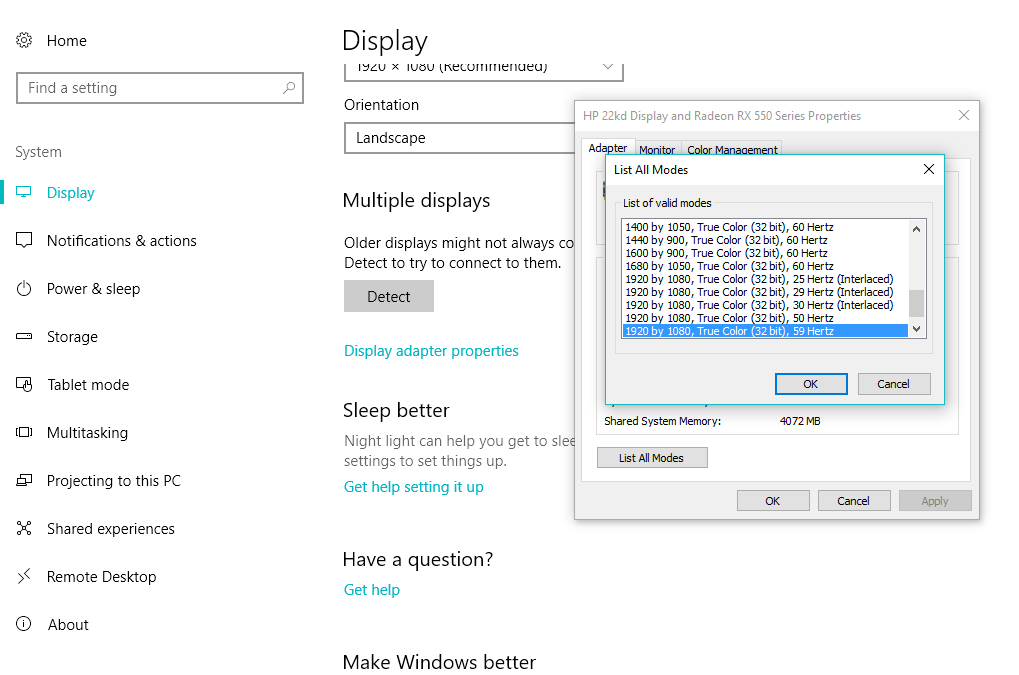
Bonus: Stuck at a certain resolution
If your screen is actually set to low resolution, and you cannot change it from the settings page, there’s one ‘trick’ that may actually be helpful. Here’s what you need to do:
- Go to Settings >System >Display.
- Go to Display adapter properties.
- On the Adapter tab, click List all modes.
- Choose a desired resolution.
- Save the changes and restart your computer.
If you want to create custom resolutions, take a look at this dedicated article that will help you do just that.
That’s all, this is a common and easy-to-solve issue, so one of these solutions will definitely help. If you have some other screen problems after Windows 10 update, you can check out our article about solving problems with screen in Windows 10.
If you have any questions or comments, just reach for our comments section, below.
RELATED STORIES YOU NEED TO CHECK OUT:


